
.....rigging the boat
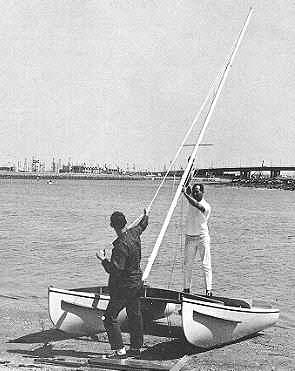 FIG. 9-1 - Putting the mast in
position is called "stepping the mast". With the pivoting mast step
shown in this boat, the mast is placed in the step with one person pulling
forward with the forestay or jib halyard, and a second person pushing forward
and steadying the mast. FIG. 9-1 - Putting the mast in
position is called "stepping the mast". With the pivoting mast step
shown in this boat, the mast is placed in the step with one person pulling
forward with the forestay or jib halyard, and a second person pushing forward
and steadying the mast. |
STEPPING THE MAST
Stepping the mast means putting the mast on the boat so it can receive the sails. Fig. 9-1 shows a mast being stepped on a small catamaran. Since the first time you will step the mast will probably be on land, the first thing to do is make sure there are no overhead obstructions in the way, ESPECIALLY ELECTRICAL WIRES! Also, the mast stepping arrangement must be in place. On boats with wood spars, there must be a way for any water that may settle in the mast step (either from rain coming down the inside of the spar or from water on deck) to drain out, or rot will be promoted. With aluminum spars, the same applies, but not for the same reason. While stainless steel and aluminum are fairly compatible, there is still some corrosive action between the two in saltwater conditions, and because the fastenings at the mast base area will probably be stainless steel, corrosion could occur if salt water were allowed to remain between the two metals.
If the mast is of the aluminum pivoting type, a stiffener is often used in the base to provide extra bearing for the pivot bolt. With pivoting masts, it may be necessary to radius the bottom corners of the spar to allow it to pivot into position. When wood masts are used in conjunction with a pivoting mast step, the mast should not bear directly on the deck or cabin top, but should be supported by the large bolt in the mast step fitting, thereby preventing rot by water staying in the step. To raise a mast with a pivoting mast step, insert the bolt through the mast in the step, connect the shrouds to the chainplates initially if possible, have one person aft and under the mast pushing up forward, and have another person pulling directly ahead with the forestay or jib halyard.
Most masts are stepped with some degree of "rake", or angle from vertical when viewed in profile. This rake may be built into the boat, but usually the builder must align the mast to the proper rake. With masts that step onto the keel or through the deck, wedges of wood can be used at the hole through the deck to maintain the angle along with the tension of the stays. On masts stepped on deck or on the cabin top, the rake of the mast must be maintained by stay adjustment. Mast rake is usually noted in inches per length of mast, and should be maintained per the designer's specifications for proper performance, at least initially. One method of determining the rake is to affix a line to the top of the mast with a plumb bob attached to the lower end. The boat must be leveled first. The line should be the length of the mast from the masthead to the base point from which the rake is measured. The rake is then measured from one side of the mast to the plumb bob line. When the correct distance is obtained, the stays can be set up. To keep the plumb bob steady, it can be dropped in a container of water. Another method for determining mast rake is to make up a shim or template equal to the amount of rake. Then use a builder's level held vertically and tilt the mast so that one side aligns with the shim held between the level and the mast. Again, the boat must first be leveled.
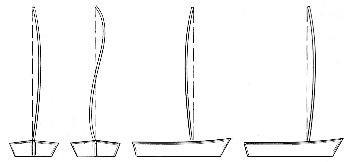 FIG. 9-2-How NOT to adjust tension on stays. Tension should be set up so that the spar is free of curves or bends when sighting up along the length. |
SETTING UP THE STANDING RIGGING
When the rake has been determined, the standing rigging can be set up. If your boat has diamond stays or jumper stays, these should be installed and set up taut before the mast is stepped. It is difficult if not impossible to state what the tension on stays should be. The best guide is common sense, at least in the beginning. Don't set the stays up so taut that the mast resembles any of the examples shown in Fig. 9-2. Stays should not be set so tight that they "sing" when plucked by hand, or cause the mast to bend. Diamond and jumper stays should be set up very tight, while the lower shrouds are usually set up "hand tight" only. Use the forestay to maintain the mast rake, and the backstay or shrouds (if no backstay is used) to put tension on the forestay. The forestay should also be very tight, especially if a jib is used. Where upper and lower shrouds are used, the upper shrouds usually are set up slightly tighter than the lower shrouds. On simple three stay rigs using stay adjusters on the shroud, use the forestay turnbuckle to put tension on the rig. When setting up your rigging, make sure the boat is level and that there is little wind so the mast will not exert tension of its own. Also, shroud tension should be equal on each side, even though the shrouds to windward when sailing on a tack will be taut, while those to leeward will be slack.
Once the tension is set, the turnbuckles should be locked in position. If stay adjusters are used on the shrouds, these can be set and kept in this position at all times. The turnbuckle on the forestay is then used to put tension in both the forestay and shrouds.
SETTING UP THE RUNNING RIGGING
Having mocked up the deck fittings and hardware once and fastened them in position, there is little more required to set up the running rigging. The lines used for the various sheets should be cut to the correct lengths and the ends "whipped." The lengths of the sheets should be determined when the boom or the jib is at the maximum point of travel. For the boom, it should be swung outboard so it is almost at 90 degrees to the hull centerline. The jib sheets should be long enough so it can be "tacked" or pulled across the boat from side to side without the slack side of the jib sheet being pulled free from the jib sheet creating device or fitting. WHIPPING the ends of lines means fixing them so they will not fray or unwind along the braids. The traditional method of whipping is shown in numerous books on "marlinspike seamanship," but on small boats using synthetic lines, an easier way is to use a liquid compound made especially to "seal" the end of the line. Another "makeshift" way to do the job quickly is to merely light a match and let the flame "melt" the strands together if the material is synthetic. As noted previously, it is a good idea to make a good-sized knot in the running end of sheets to prevent them from running out the blocks if they should get away from the crew. In reeving the lines through the various blocks, start with the "dead" end of the line first and reeve to the working or running end. The dead end of a line is best fitted with a spliced eye or tied in a good knot at the fitting being attached. Wire rope halyards should be fitted with an eye to a rope at the running end, or spliced directly to the rope line. Use shackles or Brummel hooks to attach the halyards to the sails. Check all running rigging to see that all lines operate smoothly, that the sails will raise and lower without incident, and that there is a place for all lines to lead without confusion. If the sail tends to bind in the mast groove, a little paraffin will usually smooth things out. Check at all possible points for chafe of both the sails and all lines, and if there are any points which could cause undue wear, they should be rectified. Particular points to check are spreader tips, turnbuckles in way of jib sheets, and fittings along the spar in way of halyards. Go through the rigging process several times until you have it down to a "system". By this time you will know all the parts by name and what they do.
HELM BALANCE AS IT RELATES TO RIGGING
Sailboat balance simply means whether a boat has a "weather" or a "lee" helm. A boat with a "weather" helm tends to head into the wind if the tiller is released, eventually coming to a complete halt when the bow faces directly into the wind (discounting drift). A boat with a "lee" helm tends to bear away from the wind if the tiller is released, and ultimately causing the boat to go in the direction the wind is blowing. When sailing on courses more or less into the direction of the wind, balance is important. A boat with too much lee helm could be dangerous if the tiller was released, as a capsize might occur. A boat with too much weather helm, however, would only tend to head into the wind too quickly. The problem with too much weather helm is that it requires too much effort to steer the boat thereby wearing out the helmsman, plus it cuts down on the speed of the boat. So the ideal balance is when very little effort is required on the tiller to keep the boat on course AND when the tiller is released, the boat will head gently into the wind. A theoretical discussion of balance would include the relation between the Center of Effort (CE) of the sails, and the Center of Lateral Resistance (CLR) of the hull, which is not within the scope of this book. All the average sailor wants to know is how to correct his boat so it has the proper balance, and that's what will be discussed here.
The listing below gives many options that can be tried in order to arrive at a balanced helm. Not all items listed are practical for all boats. Obviously it is best to start with the easy things first in the hopes that these will do the trick. Also, it is desirable to use a combination of these changes in minute degrees until the proper balance is achieved. Note that balance wilI change with many factors. For example, a boat with good balance in light winds might develop a strong weather helm in heavy winds. This would cause the boat to turn quickly into the wind if the tiller is released, which is not a bad quality if not pronounced. The point is that balance is a dynamic problem that can be constantly changing depending on crew loading, wind conditions, and with the sails used. So if you think you need to change the balance, first consider your sailing conditions before making drastic modifications. Remember, it is always desirable to have at least a little weather helm under all conditions. Here are the changes that can be made:
| TO DECREASE WEATHER HELM: 1. Step mast farther forward 2. Decrease rake of mast 3. Mount centerboard farther aft 4. Lift centerboard up slightly when sailing to windward 5. Move crew weight farther aft 6. Sail boat more upright 7. Increase size of jib 8. Decrease size of mainsail 9. Locate jib farther forward 10. Use mainsail with less fullness of shape |
TO INCREASE WEATHER HELM: 1. Step mast farther aft 2. Increase rake of mast 3. Mount centerboard farther forward 4. Drop centerboard to full down position when sailing to windward 5. Move crew weight farther forward 6. Sail boat at greater angle of heel 7. Decrease size of jib 8. Increase size of mainsail 9. Locate jib farther aft 10. Use fuller shaped mainsail shape |