Building the Glen-L Yukon
by Wayne Milner
Page 2
Working alone made it difficult to erect the first frame. Some rope and a few conveniently located trees helped. Once the first frame was up, a block and tackle attached to the peak and moved along from peak to peak made erection of the next and subsequent frames easy. The frames were set at 2-foot intervals and braced with 1x3 strapping as they were erected. The roof was strapped at 2-foot intervals with 1x3 strapping running at right angles to the rafters.
The sides of the structure are covered with 6-mil plastic sheeting attached to the vertical wall studs with wood laths and galvanized nails. The plastic on the sidewalls was left about 2 feet long at the bottom, spread out on the ground and covered with earth and rocks to help hold the structure down in wind storms. I got a silage tarp, treated to resist ultraviolet radiation, from a farm-supply store. I used this to cover the roof, and fastened it with laths and nails along the roof edges and up the peaks at the ends. The earth floor was covered with 6-mil plastic to keep out moisture from the ground, and to ease cleanup. Working about a day and a half on weekends, and the odd day I could take off work, it took me three months to build my shelter. Materials cost about $2,300 Canadian, or about $1,700 U.S. Seven or eight years ago I built a similar shelter 30 feet by 14 feet with 8-foot side walls for about $300 Canadian.
These structures are stronger than one would think. My present structure has withstood winds of 60 or 70 mph at times, as well as a load of about 6 inches of wet snow. Snow won't slide off the roof tarp unless I go inside and poke the underside with a padded stick. During a big snow storm, I go out a couple of times to knock the snow off so that it doesn't build up too thick.
The Tools
I bought a 14-inch band saw when I started this project, which I probably didn't need. A circular saw and a saber saw are essential. A circular saw will cut a significant curve. A power hand plane with a couple of spare drive belts and lots of spare blades (blades shatter when you run over a screw or nail) is an essential tool, and saves a lot of hand labor. Also essential are a 1/2-inch industrial-grade drill, a high-quality, 3/8-inch variable-speed reversible drill, drill bits, and screwdriver bits. I fabricated a bit to drill the hole for the shaft. A sander is necessary. I like the angle-grinder type.
I used half a dozen pipe clamps and a few C-clamps. You don't need as many clamps as you would think. A lot of times, a Spanish windlass or a special clamp made out of a couple of pieces of wood and a threaded rod can be used.
A 10-inch table saw with lots of power would be an asset, as would a thickness planer. I have an 8-inch table saw with not much power, and I don't have a thickness planer. I do have a homemade (not by me) 8-inch jointer set up on an antique washing-machine frame.
With regard to safety, I tried to be careful not to breathe in too much dust or chemical fumes. I used a 3M respirator with appropriate filters, safety glasses, and a lot of medium-weight latex gloves. (I found medium-weight gloves better than the very thin ones.) When I got epoxy on my clothes and it soaked through the cloth, I washed the skin with soap and water within a few minutes.
The Building Form
The set of plans I bought included a sketch showing the building form on which the hull was to be built. The lumber used to build the form was going to be inside in a dry environment for the length of time it would take me to complete the hull. I reasoned that, by that time, the lumber would be pretty dry, without my having to pay the price for kiln-dried lumber. I could then rip it up and use it for such things as deck supports, and cabinet and bunk framing. I bought a piece of 6x6 lumber, 16 feet long, on which to sit each of the five sets of legs of the building form. The 6x6s have another use later on. I laid the 6x6s transversely on the ground, leveled them, and proceeded to build the form. I braced the form well in every direction, and made sure that it was straight and level.
During the course of the project, I frequently checked to see that the building form stayed straight and level. I did this by running a string down the centerline, and making sure it stayed over the marked centerline of each set of legs, and by checking with the level.
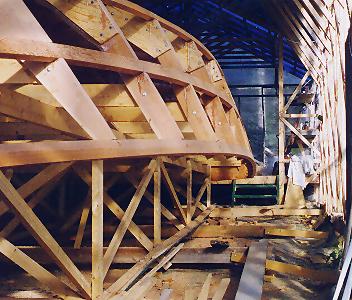 The hull framing was nearly complete at this point. Note the building form under hull. |