Building the Squirt with jet power
by Paul Day
Sept 2003:
Purchased Douglas-fir and plywood for frames and
gussets. For the next boat I would definitely cut the port and starboard sides
of the frames simultaneously using a band or scroll saw as it is difficult to
get square and matched pieces cutting one at a time with a jig saw. Also saw a
lot of splitting of the frames when securing the gussets with the 1"
Silicon bronze ring shank nails w/o pilot hole. All of the frames are lightened
by drilling at several points at neutral axis using 1" diameter Forstner
bit and are then epoxy encapsulated.
Oct 2003:
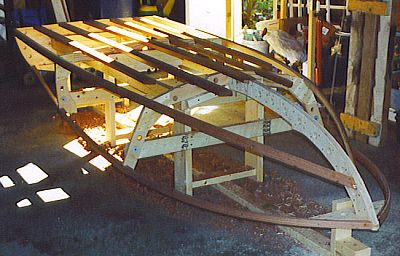
Purchased 1990 SeaDoo SP as donor and began disassembly; the jet ski looked clean and well maintained and the engine started right up. Hope the 580 cc twin will deliver enough to push the Squirt to 40 mph. Kept engine, drive train, the aft hull near the jet pump and most of the internals including oil and gas tanks and electrical components. The distance between transom and the first frame on the Squirt was stretched by 8" to accommodate jet ski engine and drive; also stretched distance between 1st and 2nd frames to maintain proportions. Built jig from 2 by and aligned and mounted frames to the jig. Stem and transom mounted on jig. The keel, battens, sheer and chine made from Mahogany, with the sheer and chine made of three laminations to ease the transition from side to bow.
Nov 2003:
Fairing completed using #5 plane and 80 grit paper
glued to a 3x21" piece of 1/4 plywood. Final cuts made on what remained on
jet ski hull and began fit up.
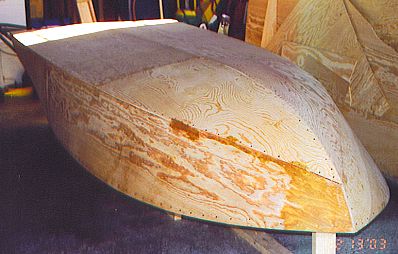
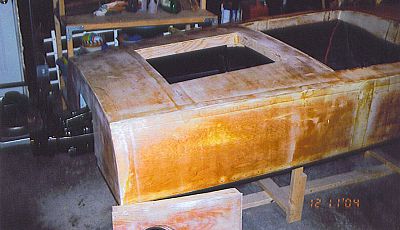
Dec 2003:
Eight hull panels of 1/4" thick Marine Grade
Plywood applied to boat using 1" silicon bronze annular ring shank nails.
Joints between panels made using a 5 1/2" wide lap joint with plenty of
Gorilla glue. Next time I would go through the effort of scarfing the panels to
avoid the additional fairing and the inevitable bulge that appears when faired
and painted. Also need to be careful when nailing w/o pilot holes as mahogany
longitudinals were split in many locations. Initial fairing completed using
3x21" sanding board with 80 grit and entire bottom is epoxy encapsulated.
Transition pieces for jet ski-to-Squirt hull required as Squirt is quite a bit
flatter; the transitions were fashioned from laminations of 3/4" thick
plywood and epoxied. Jet ski hull attached with 14 countersunk machine screws
thru hull on bottom 12 Si-bronze wood screws to transom. The boat now weighs in
at 140 lbs.
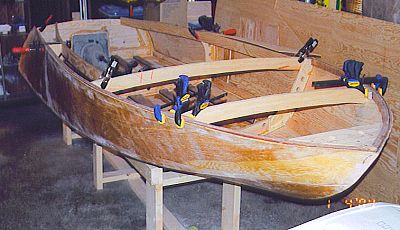
Jan 2004:
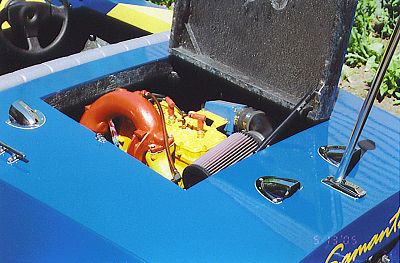
Boat flipped and deck beams cut from Douglas-fir and
secured. The jet ski hull is the gray part in the back, and the engine can be
seen hanging just above. Battens under engine mounts reinforced by adding an
additional 1x2" mahogany length between transom and frame #1. Engine
dropped in and it appears the spark plugs and the exhaust manifold are well
above deck level . . . will have to think about how to raise the deck in those
regions. All of the internal joints filleted with epoxy and #2 silica
powder.
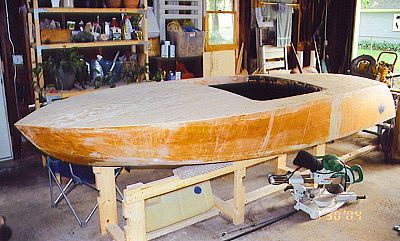
July 2004:
Glad to be boat building again after a long kitchen
remodel project. Deck battens and hatch structure are now fitted and faired.
This boat will have a 24x20" hatch that will open to starboard. Internals
are epoxied, but my wood working skills are not so great, so I decide to go
with black Herculiner on all internal surfaces below the deck. This will also
aid in waterproofing and should deaden some of the noise. The 1/4" thick
plywood deck panels go in well, but still had problems splitting and hitting
the centers of the deck battens with the 1" annular ring shank nails. The
boat now weighs 171 lbs.
August/Sept 2004:
A garage roof project slows things down, but I get the
gas tank cradle, throttle bracket and seat frame made from 3/4" plywood
and epoxy encapsulated. Fiberglass applied to deck and first application of
microballons is done. The gas tank cradle (the 8 gallon jet ski tank will go in
front and is mounted crossways to keep it low), seat frame and throttle bracket
painted and installed.
A hatch bulge for the exhaust manifold made by making a Styrofoam master and then laminating 1x5" strips of fiberglass that have been soaked in epoxy with #2 silica powder. Overall the bulge is 5x12" and is about 3" high. The hull is now glassed and the first application of silica/microballons is complete. I'm using the Teleflex NFB steering selected for project as it appeared relatively compact in the photos. The rear portion of the cable had to be modified extensively to mate with the jet pump, but it looks as though it will do the job. Note that this system has a very high activation torque, and I may change it out in the future. Designed wiring harness to utilize all old parts in their new positions, but added wiring for bilge pump and lights.
December 2004:
Wiring harness is complete from 14-gauge multi strand
wire and is a dozen wires thick at some points. Installation of the harness is
complete but is difficult with the deck panels in place. I would definitely
install the harness and the steering before doing the deck panels. After making
a few careful measurements I took a deep breath and applied a small handsaw to
the deck to free the hatch lid. With the exception of a slight misorientation
on one side, the operation went well. The handsaw was easily controlled and
left a very thin kerf. The fuel pump, fuel filter, fuel selector switch, and
all electrical components mounted under deck on custom hangers bent from SS
sheet stock.
January 2005:
Holes cut for gas tank fill and exhaust port. A custom
exhaust tube needs to be made to fit between muffler outlet and exhaust port.
I'd like to have it in stainless but can't imagine what it would cost.
Instead, a master is made from Styrofoam disks that are glued together and
filed to shape. The master is then built up using fiberglass strips that have
been soaked in epoxy/#2 silica powder. After doing 3 or 4 laminations the
Styrofoam is dissolved by pouring acetone into the tube. A similar tube is made
to connect flame arrestor and air cleaner.
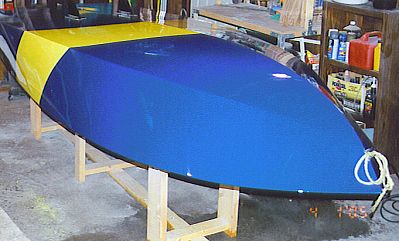
February/March/April 2005:
Applied paint to hull and deck. Used three coats of
sapphire blue Polyurethane from Interlux with wet sanding between coats; top
and bottom got a yellow stripe for accent. I'm happy with the finish, but
it takes some skill to apply: too wet and the paint forms bubbles on the
roller, too dry and poor coverage results. Best to apply wet with very
short-napped roller and to spread a lot. Final rolling should be with no
pressure other than that due to weight of roller itself. Also, installed
cooling air scoops, vinyl seat, lights, cleats, transom tie downs and hatch
hardware. Dropped engine and made final gas, cooling water, oil, and electrical
connects. Engine started and running in driveway on garden hose cooling.
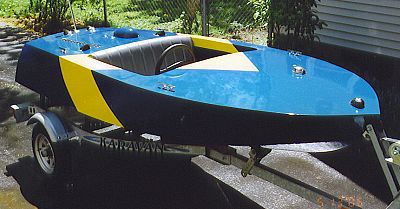
May 2005:
Dropped the back end in the Mohawk River just enough
to lift off the bunks of the trailer…lots of water inside,
unfortunately. Perhaps I positioned the bilge outlet too low and will have to
launch with the bilge on. It appears as though most of the annular ring shank
nails on the deck have managed to back out just the slightest amount so that
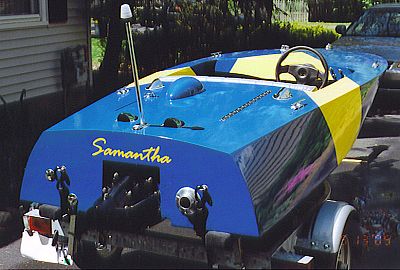
the deck now has a riveted appearance. On the 20th, Samantha is underway for
the first time on the Mohawk River. No leaks and runs well at idle, albeit with
some vibration. Upon opening the throttle the stern squats down
considerably…don't see how she'll come up on plane like this.
Unfortunately about five minutes out we run into a boulder sitting a few inches
below the surface. Luckily the hull was not breached, but later inspection will
reveal a large chuck taken out of one of the aluminum skegs. Tough boat.
We're off that rock now and feeling good to have that behind us and giving
her some more throttle. At about one-third to half throttle there's a
remarkable transition and the boat climbs up on top of the water and stays put.
It's a very dry and stable ride and with little or no porposing; it felt
like over 40 at a touch under full throttle. Didn't make too many turns
other than a few broad, sweeping ones at mid-throttle that she took very well.
Overall very impressed with the performance and design of this boat and would
recommend it to anyone interested in building a small powerboat. Thanks for
your support.