Bull's Eye by Mark Chadwick
I’ll bet you thought I had given up on my boat since it has been soooo long since I sent in a progress report. NO WAY!! The winter here in Toronto does not help move work along as I don’t have access to a heated space. I still have one more week of vacation at the cottage to move it along plus some weekends before I have to decide where to store her for the winter so I want to get as far along as I can.
July 30 - August 12 - roughly 60 hours
Finally back to the boat - started a bathroom reno over the
winter and it had to be completed before I could go back to
the boat.
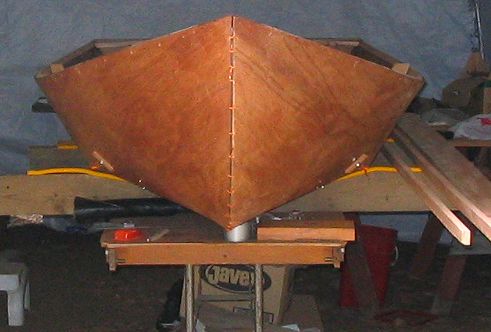
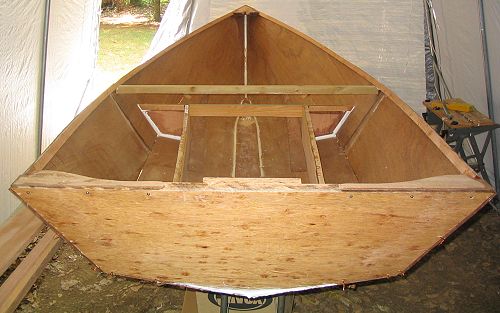
Moved her down from the ceiling of the garage and up to the canvas building I use to store my ski boat in at our cottage - nice shady and dry place to work plus both ends can be opened as required for ventilation. First steps was getting her set up in the canvas building/shed and my working area laid out.
The keel laminations had been cut, shaped and fit last year but not installed, so this is where I started. I installed the first and then the second keel laminations - bedded in resin putty and held down with bricks.
Installed battens held down with self tapping sheet metal
screws - they work great as long as you don't spin them
out with the drill - need to make sure you include the layout
lines for the them! I had to go back and add them.
Cleats were attached to the seat ends and when I went to
position them in the hull I found I had been sloppy in an
early step - much earlier - the but block on the port side
was not positioned exactly as it should have been and was aft
by about an inch or more so the question was where should the
seat end be? The starboard side lined up with the edge of the
butt block and when the seat side was used to approximate
where it should be in the hull all was well. I attached the
spreader to the one seat end and used the end of the spreader
and the seat side (running along the batten)for the port side
to position the seat end in the hull. I held it in place with
a few small finishing nails through the side of the hull and
filleted it in place along with the starboard side.
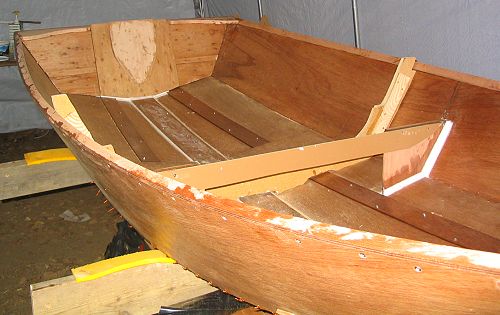
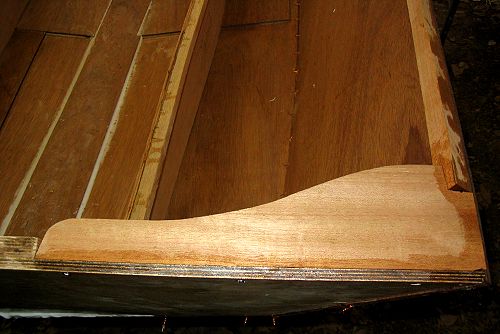
I can cause myself more problems…when I was cutting out the breast hook I cut the final shape so did not leave myself the clamping pad to clamp the shear. Yes I do know that instruction is printed on the template sheet – just a little aggressive when I was cutting it out. I glued the plywood layer onto the back of the breasthook and glued the piece I had cut out of the breasthook back in. I don't throw much out on a project until I'm done so I still had the piece! Once dry I cut the clamp pads to shape. When all is done I'll follow the glue line and take them back out. I cut the angles on the breasthook, adjusted the fit with a belt sander and installed it into the hull with stainless steel screws and epoxy. I'm using stainless for all the screws I had Noah's here in Toronto rip the inner and out sheers for me. The inner shear was fitted into the slot in the breasthook after being coated in epoxy and clamped in place. I enlisted my wife to assist with holding and clamping as the shear was bent down, clamped and screwed to the planking. I was worried about it breaking but the mahogany bent to the curve quite nicely and there did not seem to be any danger of it breaking. The second side was installed just as easily. I was worried about this task but it went very smoothly.
The next task was to fabricate the corner knees for the transom. The first one too me about three hours to make after transferring all the angles from the boat itself with an adjustable T-square. I manage to ruin it with about 30 seconds too much belt sanding on one edge. The second one only took about an hour to make. Yes I know I'm slow. I had to keep second guessing my self on the one for the port side as the angles are opposite. In the end I'm quite pleased with the way both of them fit. Not perfect but acceptable. Installed with stainless screws and epoxy.
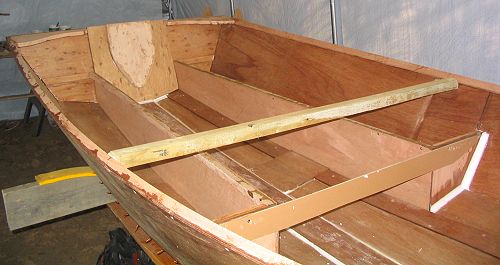
Once the corner knees were cured it was time to install a
spreader under the shear and finally remove the building
form! This seemed to be a milestone moment. I could now place
the seat sides into the hull in their final position to see
how my seat end planning had worked out. I was happy to find
it actually was correct! With some adjusting and trimming to
length the seat sides fit correctly. The seat sides had their
top edge cleats installed with epoxy and screws, fit to the
hull planking and filleted into place. I used small finishing
nails to hold them while the epoxy cured. The nails were only
driven in enough to do the job, and once the epoxy putty was
cured I pulled them back out.
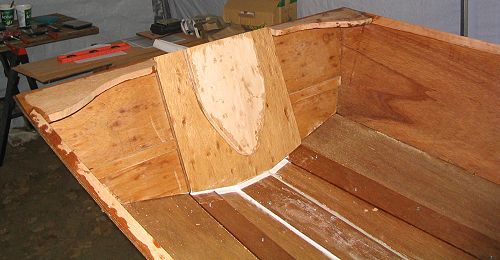
The next step to tackle was the forward bulkhead. I had
managed to get the layout line on the bottom planking way
back in the beginning so I had a reference line to work with.
Still the bulkhead did not fit the hull well and took many
scribes of the bulkhead to get the shape to allow it to sit
properly. I was afraid of taking too much off so it was
removed very slowly. This fitting took a great deal of time,
but I believe it was worth it. The bulkhead was stitched to
the hull and then filleted on the forward side to hold it in
place. This took me to the end of my two weeks
vacation.