
In response to email requests from builders, we have added this page for builders to register their Glen-L boatbuilding project. The purpose is to give builders a way to communicate with each other. Note: If you are repairing or restoring an older Glen-L design see the Old Boat Club directory. THE Rule: You must have actually started construction of a Glen-L boat. The next step is to :
You may update this as often as you like. We will post your information in alphabetical order by Glen-L design name. If you have already finished a Glen-L design, and would like to communicate with other builders or would-be builders, we would be happy to post your information also. Remember this is to facilitate communication, so you must send your email address. |
|
A B-Bi Bo-Bz C-Cl Co-Cz D-Dr Du-Dz E F G H I J K-Kid Kin-Kz L M N O P Q R S-Sp Sq-Sta Ste-Sw Ta Te-Ti TNT-To Tu-Tz U V-VD Ve-Vz W X Y Z |
|---|
AIRBOAT / Kyle & Joe Wahl / / 1-19-00: Made frames last weekend... working on bulkheads and long chines... lots of fun. 3-12-00: Hull is built and getting ready to cover with fiberglass cloth. Also received a 2275cc 100 hp Volkswagon. 5-13-00: Hull turned over and trying to finish topside. 6-5-00: Hull is finished, starting on rudders, engine mounting, and Bt. trailer. 7-18-00: Project update on Airboat by Kyle & Joe Wahl, Yuma, AZ. Airboat trailer is completed starting engine mount and cage. Was 123 degrees today so work is a little slow, A lot of night hours when it is a little cooler. 8-30-00: Working on final details putting cage, rudders, & prop all together... Then the we go in the water. 10-15-00: We are done! All went well, launched the Airboat and was really pleased... I kept the speed down to learn to handle the boat. Just a little tricky on the yaw. Planes out really quick and handles nicely. Sits level in the water; was a little worried that it might sit stern heavy, but worked out ok... I just love it. Thank you Glen-L. (See Customer Photos)
AIRBOAT / Bruce and Jack Kibbey / / 01/24/01: Started project. 02/02/01: All bulk heads made, waiting another supply of wood to pick through at the local lumber yard for the chines. 4/11/01: Completed the framing steps, getting ready for bottom sheeting. Starting to look alot like a boat! 3-21-03: Haven't done to much on our boat, its very much winter here yet.
AIRBOAT / Terry Chapman / Nova Scotia, Canada / / 5-20-02: Began cutting the mahogany for the frames and braces. 5-31-02: Finally got the frames put together. 6-1-02: Built the supports to hold the boat during construction. 6-5-02: Ripped the chines from 4 inch stock. Will let you know when I have more done. Can hardly wait, there are a ton of shallow grassy lakes full of bass waiting for me. 3-22-03: I have not been working on the boat all winter. I have all of the frames, battens, keel, sawed chines and bow pieces ready to fasten plywood to. I have made a change in the plans; I have added one extra frame and the result is that the boat is three feet longer, but with the same original shape just narrower at the bow. I use my boats in big water (ocean goose hunting) and this will help with the lee side of a wave ... I think. Anyway, I have not abbandoned it, just got slowed down. I will send photo's as soon as I get the whole project back into production.
AIRBOAT / Ildeu Oliveira / Gouveia, MG, Brazil / / 2-25-03: I bought your Airboat plan before the year 2000 and only now started building. The hull is almost ready and I'm sending you some photos of it. At the end of the construction I'll send you the final photos. 3-23-03: This weekend we ran the engine. The exaust pipes perform well, as well as the propeller guard. We are building it almost exactly as the patterns. The rudders are being done and at the end of the next week we hope to install them. We did a test putting rollers under the hull and the airboat moved satisfatory over the rollers with the thrust of the engine. We guess it will function properly in the water. I'm sending more photos of the first run. There's a lot of things to be done yet and I promise to send you photos of all stages. (see Customer Photos)
AIRBOAT / Wayne A. Petty / West Jordan, Utah / / 8-15-03: Plans were purchased in June of '98, and just found time to start. First time boat builder. I already had a VW aero-engine which I was going to put in a homebuilt airplane, but sold the airframe and kept the engine. I am keeping a digital photo record of construction. Number 1 and number 3 frames are cut out, long bulkhead is cut out. Rather than build the boat up from the sheer, I have built a jig and will attempt to put it together that way.
AIRBOAT / Brad Nilsson / St Louis MO / / 1-19-04: I have started my Airboat. I have made the motor mounting steel frame. I am going to use it for and engine stand to get my VW motor running. I have all the parts in my garage I hope to be done in time for the spring flooding around here.
AIRBOAT / Peter Wilhelmus / Wairau Valley, Marlbrough, New Zealand / / 11-10-04: At present I have built all the frames, including sawn chine and long bow. Also completed tail rudders and they are ready for fibre glassing. I've used macrocapa instead of mahog because of the cost. It is used alot here in boat building; very strong and light. Since your e-mail i have talked to some fly boys involed in home builds and hovercraft, they recommended EA 81 Subaru 1800 push rod motor with a 2-1 reduction gearbox straight to the crank for max revs at max torque to acheive airoplane prop speed. Engine dry weight 90 kg.
AIRBOAT / Thomas Hawkins / Bethel, Alaska / or / 3-1-05: I've started on my Airboat as of two days ago. All my straight pieces have been ripped and I've cut and fitted the transom. As soon as the fitting package comes I'll get the transom glued and set up.
AIRBOAT / Terry Chapman / / 4-2-06: I have begun another of your Airboats. The new project is going well – I think. I have been working on it for three weeks and have a lot completed. The Transom and frame one and two were built in the winter when it was too cold to think about anything else. I built one last year (it actually took two years due to moving etc), but I made the bow square. The new one will be rounded off as per the plans, and I think instead of the raised sheer, I will use a bush-guard as the cat-tails here are quite tall and hard. (see Customer Photos)
AIRBOAT / Bobby J. Rowe, Jr. / Pell City, AL /
/ 1-13-08: I have ordered the lumber and am in the process
of construction.
3-8-08: I am in the construction stage at this time. All the
frames have been built, the long bulk heads and the frame
jig.
4-7-08: I am in the process of putting it on the jig and
putting the keel, sheers and battens on the frames. I will
send photos just as soon as I get time to post them.
2-14-09: Here it is February 2009. I have had more time to
work on the boat here lately. I have got the frame together
and ready to put the sides and the bottom on the boat. I am
working on the cage for the motor and starting the rudders;
also I am also going to put a 1/4 inch sheet of gator-back
polymer on the bottom due to water level on the lake that I
live on. I hope to have the boat finished by the end of
April. I have pictures and will post them this week. (See
Customer Photos)
ALLEGRO / Tony Long / Leeds, ENGLAND / / 10-5-02: I have started construction of my Allegro 333 in a barn in Leeds England. I currently have the Transom, Stem and 4 frames complete only 5 more to go. The intersting part is still to come when I try to line them all up and add the battens etc. I will submit some pics at that point. 3-28-03: The project is going as well as can be expected, having had to stop due to the winter. I just started again this week. All the frames are now installed and I am now installing the battens. 7-18-04: All is going well. I have now got to the point were all the boards are on the hull and the first layer of fiber glass and epoxy are on the boat. I am now wondering what is going to be the best way of turning the boat in a about a month when it is finished. 11-27-05: Well it has been a while since the last update and due to work commitments I have only now finished the Hull. I am still going to add a epoxy and copper layer to the Hull below the waterline before I turn it but as it is winter. I have to wait for a reasonable day, when the temp will remain warm enough for the epoxy to cure. Then I will be turning the boat. (see Customer Photos)
ALPHA 2 / Walt Conrad / Email address not valid: 03-24-03 / 7-30-99: Have cut cross legs and braces, starting CB trunk. If anyone has building tips, let 'em rip. Thanks. 4-14-00: Centerboard trunk glassed & assembled. Assembling breasthook, stem, transom, centerboard, form. Rudder and yoke finished. 5-21-00: I'm setting up the jig. 6-16-00: Jig is up, starting on chines. 7-18-00: I soaked my chines in a 10' black plastic, ABS, pipe. After soaking one half of the chines for 2 days, I flipped them over and soaked the other end. I wrapped the exposed portion in plastic bags so they wouldn't dry out. The chines bent effortlessly. 11-9-00: I soaked the bent sheers in a swimming pool for 3 days to make twisting them easier. Chines and sheers attatched, fairing underway.
ALPHA 2 / Tom Strong / Michigan / / 11-15-99: Cut and faired centerboard. I live in Michigan so I plan to do all I can in basement during winter, and start framing in the spring. 1-12-00: Finished centeboard, stem, breasthook, and have cut CB trunk sides. 2-4-00: CB trunk complete, started on transom. 2-27-00: The Jig is UP! Built a platform and erected the building form. 5-1-00: Finished attaching chines and inner shears to transom. Faired chines & shears. 5-18-00: Planking nearly completed. 7-16-00: Finished and sailing! For latest pictures see: http://www.kerchevalave.com/alpha2/index.html
ALPHA 2 / Peggy Babcock / Upstate NY / / 4-12-00: All the small stuff is done. Centerboard Trunk is built, glassed and looking good and the CB is installed inside the trunk. I've got the setup forms/members all ready to go and I've just recently ripped my chines/sheers. I have also purchased the Alpha 2 sails as a kit from sail-rite. I'll start the sewing this weekend. 3-24-03: It took 6 months to complete and now my Alpha 2 has had 2 seasons in the water and I love it! It is a beautiful boat with classic lines and I always receive great comments when I take it out. One of my favorites was, "That's a beautiful old boat--how old is it?" To which I replied, "Oh about 4 months!" I also enjoy rowing it-- remove mast, rigging and ballast and it becomes a very comfortable and quick boat to row. I made my sails from a kit from sailrite--using a cream-coloured sailcloth. They look great with the varnished wood of the boat and were another enjoyable part of the project. I also have a good report on my bottom paint-- I used 100% latex exterior house paint. 3 coats of primer and 2 coats of a nice dark green paint. I bought a top-quality paint and it has held up great. It still looks freshly painted and the surface scratches in the hull at the end of the season are easily repainted. Why would you use anything else? This was my first boatbuilding project--as you can see I'm very satisfied with my Alpha 2 and your plans made it a joy to build. If anyone has questions they can contact me about any aspect of the project. Project pictures of my boat have been kindly posted by Tom Strong at http://kerchevalave.com/alpha2/babcock1.html.
A-LURE / Denzil Duncan / Orange CA /
/ 5-19-06: I begun this project in Feb. 2006. I have
completed cutout of all side and bottom frame members,
transom frames and sheer harpin. I have just begun to make
the stem. I have already constructed the building form.
1-29-07: I am ready to start fairing the hull frames.
9-13-08: The build is progressing smoothly; not as fast as
hoped but fast enough. The hull is now complete. It is
glassed with 10 oz. S2 cloth, filled-faired-sanded, then
sanded some more and even more. Bottom boot stripe and sides
painted. I have added lift strakes and all hull appendages
including spray rails. I am now building a trailer so I can
right the hull and finish the build. I have seen many
examples of righting the hull, nevertheless I am having
anxiety attacks thinking about it. I built a Ford 302 cu. in.
motor with beefy Windsor heads with bigger Chevy valves.
Pictures will be submitted if I have to hand deliver them to
Glen -L's office. I am still just finding my way around
computers.
3-16-09: This project has taught me that it is ok to strive
for perfection but symmetry is more important. Epoxy has
gap-filling properties that I can use to my advantage when
the "friendly side of the line" isn't and the
table saw won't split the line even though I have used
the widest lumber pencil. Eye balling is accurate when all
reference points are curving sloping and generally looks
different every time it's measured. For the most part I
strive to follow the plans and have found that as the build
progresses the plan reveals itself with info glossed over in
the early stages, info that I did not yet know how to
interpret. I am now beginning to see more than just the
constituent parts of the project and more so the total. We
all, especially boat builders, like pictures. The images have
helped me a lot; hopefully those I've submitted may be
able to help someone. (See Customer Photos)
AMIGO / Capt. Heiko Hempen / Schleswig, Germany / / 6-21-01: Started: May 98. Finished hull: June 99. Changed our house and private shipyard from Osnabrück to Schleswig (near the Balitc Sea) June 99 to Okt 2000. Still working inside the boat (building the cabinposts right now - June 2001). 3-27-03: My Amigo is nearly finished, I hope to put it in water in about 14 days, will send you some pics at this time.
AMIGO (Masthead rig) / Mark Matthews / Glenhuntly, Melbourne, Australia / / 10-9-03: Hull complete, working on cabin interior. (See Customer Photos)
AMIGO / Allen Messick / Linn, MO / / 2-22-05: I received plans in November... started in December. Have completed all stations, stem and am ready to start planking as soon as I get all the cedar cut and bead and cove completed. PLANNING to build a cutter version with a masthead rig and a bowsprit.
AMIGO-FG / Capt. Leo Lobo / Goa, India / / 7-13-07: Completed the plug from frame drawings and completed a female mould from fiberglass. We are now in the process of making the hull.
AMIGO / James Brennan / Fort McMurray, Alberta, Canada / / 4-29-08: This lovely "Amigo" was built in 2006 by Francis Kerrivan in Dunville, Newfoundland, Canada. She was built from local spruce for the strip planking and juniper for the frames and rub rails and then glassed over. She is a sweet sailer and stole my heart, though I already owned a bigger boat. She is bare bones hull and rigging with sails and a little paint and paneling inside; I think I still have a few years to complete the bells and whistles but she is sailable now. Am presently installing a 7hp diesel and will inform you how this pans out. The boat will be sailed in Placentia Bay and the south coast of Newfoundland. If anyone has sailed these little cruisers offshore I would be glad to hear from you. (See Customer Photos)
AMIGO / Dr. Juan Carlos Concha / Santiago, Chile / / 4-19-09: Working on the frames.
AMP EATER / Charles Ervin / Covington, La. / / 8-9-02: I ordered the plans for the Amp Eater about 2 1/2 yrs ago and finally got started on it March, 2002. I find myself working one or two weekends and taking off three or four. Still, at this very relaxed pace, I am to the point of laying out the meranti plywood deck on her. All bulkheads and thwarts are glassed in and the inner sheer is in and planed. The hull has been faired and I'm quite pleased with her lines. This is my first attempt at boat building and I have been very happy with the fit of the patterned parts. I am accumulating the running gear and will be installing the same in the next 4-6 weeks. 3-21-03: Project moved along nicely until the first mate decided that we needed ceramic tile floors, two bathroom renovations, a set of built-ins in the kids room and, since we had all that extra tile left over...How about some new kitchen countertops... I've had the Amp-Eater on the back burner for about 9 months... but I see light at the end of the tunnel. The hull is complete, bulkheads are in, deckbeams are in, hull is sheathed in epoxy and glass, I still need to attach the skeg but am trying to decide on inboard 36 volt DC motor / belt driven or 76# thrust 24 volt trolling motor. The cost will be about the same to do either but the simplicity of the trolling motor is attractive. Of course, the durability of the inboard electric is equally attractive. This is my first boat building project and I have been extremely pleased with the patterns and instructions.
ANDANTE / Mark Ewert / Phoenix, AZ / / 4-9-07: At this stage the Hull Has been primed and 35% of the interior is in. I have a lot of progress pictures. I am the cabinet maker/boat builder that has been contracted with to provide the owner with a top quality Mahogany interior.
ANDANTE / Rodolfo Gutierrez / Costa Rica / / 7-19-09: A long time ago, specificaly on the 28 of Jan. 1987 I received two envelopes with the plans of Andante, that I had order a few days earlier. The idea was to start building it right away on weekends. However I was very busy on those days and the two envelopes have been resting in a drawer ever since. I retired and got my pension from working for the Government three years ago. My last asignment was as Ambassador to the United Kingdom which lasted for 6 years. Before that I was Ambassador in Portugal and before that in Iceland. Now the time to start building the boat has arrived!!! A bit late, considering that I am 76 and my health is not what it used to be. But what the ...... If I die before I finish it, at least I am going to have fun my last days. I forgot to tell you that I am a citizen of Costa Rica and I am going to build it in this country. I have already bought about $4000 in different sizes of steel and have made the frames. Nothing can stop me now. I thought you might like to know about this project.
AQUA CAT / Ken Dollard / / 2-18-00: Started Dec 99, now putting on plywood skin. Would like to hear from other builders.AQUA CAT / Kirk Copeland / / 6-21-00: Just getting ready for plywood. Have a few more stringers to out on. Started in May of 2000
AQUA CAT / Daniel Bucklin / Sydney, Australia /
/ 9-7-04: Currently building the frames and encapsulating
everything in west system epoxy.
8-3-09: It's coming along nicely and I am very much
looking forward to completing it. I am trying to be faithful
to the plans and I'm sure it will be a great boat. (See
Customer Photos)
AQUA CAT / Richard Kalvelage / / 8-22-05: Started Aqua-Cat Oct 18 2005. Am making frame patterns out of 3/16 presswood to start. I want to be able to make my mistakes and correct them before assembly. Presently woorking on frame #3.
AQUARIAN / Frank Vannoy / / 5-13-01: Built Aquarian 10 years ago and had no problems doing so. I have been sailing it on Lake Erie since then, it handles well and is a very tough boat. I got hit by a large charter boat while tied up at my dock and the wood top was mashed, I replaced it with 11 ga. steel and could not tell any difference in handling or stability. Very good boat but a little slow. I primed and painted it with Pettit epoxy paints and have never repainted, touched up a few spots, there is no rust or fatigue at all, it pays to spend time on priming and painting. 3-21-03: Still here, I had finished boat about 12 years ago and sailed the great lakes for about 11 years. Never had problem with boat and only repainted it once. I have since sold boat and bought a smaller one as the dock rent got too high (about $2500 a year plus winter storage). I miss the boat but could not afford it. It was a very good boat and the new owner took it to the Gulf of Mexico and is still going. It was a great project and I really enjoyed it.
ARGOSY / Wayne & Pam Potts / Email address not valid: 03-24-03 / 1-25-01: We are pleased to announce that we have started to build our boat. The ribs are in place and we will be planking in two weeks. We are very excited about our new project.
AUDEEN / Frank Tamanko / / 4-5-99: Started project about 18 months back. 11-19-98: Family was over for a birthday party, and with heir help, flipped the fiberblassed and painted hull. 4-5-99: putting final coats of varnish on top decking.
AUDEEN / Neil Olson / / 4-5-99: I have the hull good side up and am installing the engine. I have used your advice over and over again with things like prop sizes, stuffing boxes, rudders, etc. Thanks again for the help. If I'm not working on my boat I'm looking at the catalog trying to determine which project is next.
AUDEEN / Todd Isaacs / / 4-1-00: Received plans a couple of weeks ago and today finished the layout table. Will start construction of the frames next week.
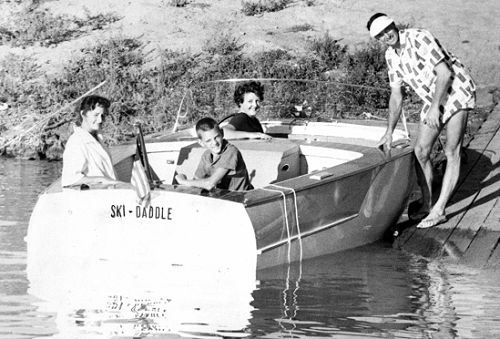
AUDEEN / David Springer / Winters, CA / / 1-6-05: In 1959 my father completed work on the pictured Audeen (that's me in the back shortly after her maiden launch). He did a meticulous job that I still marvel at. The deck is mahogany plywood that is routed and filled with putty to obtain a plank-like appearance. The engine is a '54 Ford V8 238 (the first OHV) with a Capital in/out/reverse and Barr Marine manifolds. Dad welded a wedge into the pan to extend the oil capacity and to keep the oil from migrating away from the pump intake while the boat is approaching plane. Engine cooling water recirculates to a small tank. Water from the intake is cycled through the tank and ejected through the manifolds and exhaust pipes. Dad built mufflers from large diameter copper tube that he squished into an oval shape. Slotted 1-1/2" copper pipe inserted into end plates provide the inlet and outlet. The 'Ski-Daddle' proved her reliability on a trip we took from Lake Roosevelt (Grand Coulee Dam) over 100 miles up the Columbia to Upper Arrow Lake in Canada in 1963. I renovated her in 1989 and we still enjoy her every summer.
AUDEEN / David Marusa / Denver, CO / / 1-17-06: Just finished cleaning out the garage and began building the frames. This past weekend, I also purchased a donor boat for most of the mechanical. It is a 1976 20' Penn Yan Explorer and has a freshly rebuilt Chrysler 318 RHR. My wife is a little less thrilled about all of this than I am, but we have come to an agreement. I had to finish ALL projects around the house before I could begin.
AUDEEN / Mark Radanovich / / 10-10-06: I picked up the Audeen frame kit and plans in July 2005 and was able to meet Allyn before he retiered. I have finally finished a smaller boat and made some space to start the motor stringers on 9-5-06. 3-14-07: It has been slow going and slow gluing this winter, but I have managed to get a few hours in at a time. I had to scarf some boards together to complete the keel and chine logs. The sheer members are almost complete. I am laminating one side at a time having run out of clamps. 1-17-08: The battens are now all in and the first layer of planking is started in the forward sections. (see Customer Photos)
AUDEEN / Al Neill / Ottawa, Ontario, Canada /
/ 7-21-07: Having purchased the plans 10 years ago, studied
them to death and dreamed of building this beautiful boat,
today, 21 July 2007, I actually built frame #5 hurrah! I am
using white oak for the frames and at this point all I have
to say is: a. What excitement; and b. That white oak is hard
stuff! I look forward to corresponding with Glen-L staff and
others who are building Audeen.
1-11-08: My Audeen is beginning to sneak up the basement
stairs. I hope that spring arrives early here in Ottawa. My
wife, meanwhile is operating the jackhammer at the south wall
of the basement (not really). I have simply left my glue
bottle on the shelf and all of this will be disassembled and
moved to the garage in April. Who says you can't build a
boat in the basement?
5-22-09: My Audeen is well under way after a bit of a delay.
I had engine rebuilder problems which are now rectified.
Engine has been rebuilt, tested and now stored. The engine
hoist is in the middle of the ceiling of my garage and
therefore I could not assemble my boat frames until the
engine was returned. UGH! So you think that you may have
enough clamps ? Buy more! I laminated the sheer's from
white oak but the chines are made from a nice 17' piece
of ash. Steamed once, twice, three times and then yes, four
times. I will start the "fairing" process next
week. Yahoo! I am still spending many hours on your wonderful
web site. Keep up the good work. (See Customer Photos)
AUDEEN / Bob Johnson / Cayuta, Finger Lakes, New York / / 7-21-09: I am at the fairing stage. Would appreciate any advice from this point on.
AUDEEN / David Kennedy / Portsmouth, England / / 11-24-09: I have built half of the frames with the rest likely to be done by Christmas.
BANDIDO Wood / Nick Moschis / Maylands, Adelaide,
Australia /
/ 5-18-04: I have a strong interest in wood working, but no
previous experience in boatbuilding. Project started Oct.
2003, slowly with the building of a large new shed at the
rear of my home. Have almost completed the building form with
all stations including the Transom, Rope locker, cabin
Bulkhead & engine bulkhead. Total hours logged so far -
120hrs. Have decided to use twin outboard motors ( 2 x 130
hp) which will give a lot more boat space. As I read a few of
the other boatbuilders stories I see that 'time' is
the common enemy, so that means less TV and better time
management (also less hours sleep!).
3-23-08: A few more months pass and I am well into the below
deck interior. I have decided to complete this before the
deck goes on to avoid working in a confined space. Am
finishing with Teak cabinetry and flooring, highlighted with
white timber beams and "soft" fabric wall
lining.
10-8-08: Currently working on the deck and finishing off the
interior. Also starting the installation of a half size cabin
(my own design, not on the original drawings). I hope that it
will give it a retro look!
8-17-09: Nearly another year has gone (5 years so far!). I
have passed my original completion date and have decided not
to have a deadline as I don't want to rush any of the
finishing detail. The interior is fun and interesting
compared with the hull, however there is a lot to do,
especially sub floor which has two fuel tanks, a fish tank
and a fresh water tank - all built out of plywood and epoxy
(am worried I might forget something). Each time I plan to do
something I realise I need to do 3 other jobs first. I have
allowed for lots of storage space, compartments, an external
sink, a fold up gas hotplate, rear seats, etc. etc. One small
rule I have to keep things moving: I always do some work on
the boat each day, even if it's only 15 minutes! There
are lots of small jobs to do, and if you do one each day
it's amazing how much gets done. (See Customer Photos)
BANDIDO Wood / Scott Ure / Paisley, Scotland / / 9-8-05: I purchased the plans for a Bandido boat from you during September 03 and have been building the hull since then. I have just completed and turned over the hull 3rd Sept 05. The hull has been stretched 10% to give additional cabin & deck space. Space is limited on my 'building berth' and the car port had to be stripped and rebuilt completely to turn the hull, but where there is a will there is usually a way! Will forward a few more pictures when the fore/aft decks & cockpit area are completed. 7-2-07: Things have taken a bit longer than I expected due to some changes to gain more deck height in the forward cabin spaces. Currently in the process of fitting the foredeck panels, hope to have pictures for you of the finished hull ready for outfitting sometime in October this year. (see Customer Photos)
BANDIDO Wood / Denis Smith / / 10-5-06: I just finished the hull on my Bandido and was able to rig scaffolding and a cradle to facilitate righting it last Thursday. It is now upright and on a couple of boat dollies ready for engines, jet pumps, interior (etc) and finishing. I may get it done yet.
BARRELBACK / James Hurley / Oss, The Netherlands / / 8-6-07: Upon receipt of the plans in 2005, I immediately transferred the lines drawing to Auto Cad so that I had 1 to 1 drawings of the frames. After making a set of templates I started production of the frames using Cambara hardwood. I used fir for the longitudinals and Miranti plywood for the planking. Instead of using wood for the engine stringers I used 100 x 50 mm aluminium tubing and added transverse sections at the transom and bow frame. The engine is out of a Citroen XM and has 170 horse power. This is an all aluminium V6 with electronic fuel injection. Fuel consumption is very low and the engine only weighs 200 kilograms. I used a heat exchanger so that coolant can be used in order to protect the engine from corrosion. The water pump is driven from the crank shaft and after going through the cooler it exits through the stainless steel exhaust. There are no marine parts available for the engine and therefore I was required to make everything myself. The transmission is a Velvet Drive 1:1 and the adapter was also made by myself. This project took me 1660 hours over a period of two years and two months. All of the parts were weighed before installation and the total came to 1118 kilograms. We have just competed a three week summer vacation where the boat was in daily use. The handling was better than expected and steering is good even without a fin. The hull offered a better ride than expected being that the stern is flat. The bow has a sharp entry and this offers good wave penetration if you reduce your speed to 15 knots. For anyone having questions feel free to contact me.
BARRELBACK / Ron Hoag / / 12-12-07: I have the frames, stem and keel attached to the building form. The name of the boat is "wooden legacy".
BARRELBACK 19' Runabout / Bob McLean / Wayne, NE / / 3-13-08: Hello to all: I was not sure what you meant by started contruction. Have not put saw blade to wood yet. However I have been gathering research/resource information and surfing the internet. I have purchased plans and have looked at them until I have little blue lines in my eyes. I have purchased power tools that Tim the Tool man would envy(not really). I have been laboring over decisions and wondering what is right and what is wrong. I believe I have more than started. I did the same thing when I built my kit airplane. Much thought and contemplation must precede the actual work. If you think otherwise I will let you know when the keel has been lade, laid, well you know what I mean. I am from Wayne, Nebraska. My name is Robert (Bob) McLean) and I am at the very serious part of this project. Getting started. This is actually the most crucial part. Mistakes made here will be with me until we hit bottom. I have read three of your books regarding the contruction of plywood boats and find them very helpful and interesting. Anxious to get started.
BARRELBACK / Kurt Helfrich / San Diego, CA / / 4-4-08: I am at the very beginning of building a 20' Barrelback.
BARRELBACK 19' Double Cockpit / Dr. John Kilejian / St. Augustine, FL / / 4-16-08: Started in Mid March . I am ready for the Chine and the Sheers. See my blog for pictures and construction updates.
BARRELBACK 19' / Francesco Moro / Venice, Italy / / 7-12-07: Build started.
BARRELBACK 19' / Ron Cheatwood / Mesa, AZ / / 8-4-08: I am currently in the planing and layout stage of this project.
BARRELBACK 19' / Mike Clem & George Portfleet / Grand Rapids, Michigan / / 1-5-10: George and I began building the Barrelback back in December of 2007. We discussed starting with a smaller plywood construction boat to gain some building experience first, but decided to jump right in and build the boat we both wanted. Building goes in spurts as we generally only work on it weekends during the winter months after the hunting season ends in November. After the holidays, most every Saturday and Sunday we work on it together while the wives are busy playing Scrabble and drinking wine in front of the fire. So far we are about 80% finished fairing and hope to start the Cold-Mold planking in about two weeks. Our goal for this winter is to complete the outside of the hull so we can flip it by time the boating season begins here in May. We are planning on using a 4.3 Liter V6 for power. George and I are both very interested in speaking with others who are either building or have built the Barrelback as we have many questions. We also have learned many things that might be helpful to others.
BARRELBACK 19' / Dan & Mike Martin / Katy, Texas / / 1-1-10: Finished plywood layers on hull. Laying out installation locations for strut, rudder and shaft hole and starting mahogany finish layer.
BARRELBACK 19' / Daniel Holmes / Fairport, New York / / 5-27-11: I'm just finishing the 7th frame, and getting ready to build the Stem and Breast Hook. (See Customer Photos)
BARRELBACK 20' / Mert Tuncel / Istanbul, Turkey / / 9-8-08: We are building the frame. Approx. 75 hours spent so far!
BARRELBACK 20' / Mark Moyer / Shooting Creek, NC / / 10-7-08: I just wanted to let you know that, though I haven't "laid the keel" yet, I have built my building form and aside from research, research and more research I have laid up my frames and started making the frame parts. I think this constitutes a "start" in construction. I am building the Barrelback 19'1" extended to 20'1" to support the small block Chevy 350 we plan on stickin' in her. The boat is being built in Shooting Creek, NC, deep in the heart of the Appalachian Mountain Range on Lake Chatuge. Lake Chatuge is ½ in Georgia and ½ in North Carolina. The state line runs east to west straight through the middle of it. Nothing like a little geographic trivia, huh? Anyway, wish me luck! I need to hit ALL 6 numbers sometime soon so I can go all out with this thing. I'm really looking forward to this and have enjoyed everything I've learned, all the books I've read and all the people I've met and that includes YOU! Thanks a bunch!
BASS BOAT / Neil Gaughan / Email address not valid: 03-24-03 / 8-7-00: Fairing the chine, keel, sheer, bending battens. 8-28-00: Port and Starboard side planking faired to Chine. Scallops in battens completed. Bottom planking butt blocks installed. 1st aft bottom panel installed. 9-5-00. All bottom planking installed. Filling screw holes and fairing. Bending of the bow planks did not require any hot water, and went fairly easily, much to my surprise. 9-17-00: Bottom and side panels: fairing, filling and seal coat using epoxy resin completed. 10-13-00: Fiberglassing of bottom and sides completed. I again have to leave the project for about 3 weeks. 11-2-00: Finish coats of epoxy resin completed. 11-20-00: Skeg installed, bottom painting completed and boat turned over, and leveled and blocked in place. Encapsulated entire inside of boat with resin. Deck arc and blocking for bow-piece cut and are ready to be beveled. I followed your advice and used an oil based primer and a good latex exterior paint for the bottom. It was good to finally finish the bottom. 11-27-00: Installed and beveled deck arc and blocking for bow-piece. Installed second shears and inboard and outboard cleats. Installed motor well and forward deck beams, motor well 2x4 member, and decking framework. 1-4-01: Installed floorboards, aft cockpit panel, cupholders, lure trays, backing for forward mooring line cleats, butt-blocking for port and starboard side panels. I have added two battens for additional support for both the forward and aft floorboards. I also added a center support between the stem and center deck support up forward. I have four compartments under the forward floorboard, one a live well. There are two storage compartments along the sides of the floor, and one directly in front of the fishing chair position. There are 7 compartments in the aft floor, three along the center line in front of the aft fishing chair, and 4 across the back just in front of the aft cockpit panel. The bilge pump is under one of these, the rest are storage/inspection ports. I have added support for three chairs, in addition to the helm chair. All of these three seats will be on pedestals, and the fore and aft fishing chairs are anchored to the keel. the third seat is a "passenger seat" and I added support under this chair running from chine to chine. this support also runs under the helm seat. I will have one battery, mounted in the aft section, just above the knee. I have a door in the aft bulkhead for access. I also laid in flooring from the aft bulkhead panel to the transom to support two 6-gallon gas tanks. This flooring can be "picked up" and will not be screwed down. 4-24-01: Well, I am just about done. This last weekend I finished fiberglassing and most of the sanding on the topsides. Only the lure trays and cup holder holes remain to be sanded. I have built the console and base for the drivers seat. I will build a passenger seat this week. Both of these seats will slide forward to give the aft fishing chair more room. I have obtained a steering system and need to install it yet, as well as wire everything up. I ran wires before I installed the topside panels. Tasks left include painting, making step pads, installing the fore and aft lights, wiring the console, running gas lines, wiring for the engine (it is electric start), installing the fish finder transducer (where to put it?), tie downs for the batteries, etc. All time consuming small stuff. I have bought a used 40HP Johnson outboard and will install it after everything else is done. 8-20-01: The boat is finished and has been launched. I am attaching several .jpg images showing the finished boat. The engine was mounted last week and the boat tested at Lake Patagonia, AZ on Saturday August 18. It performed great under power, top speed was 25 mph as measured by a following boat trying to match speed. The engine is a 1989 Johnson 40HP, just rebuilt and running like new. I did finally find insurance, from Haggerty. It was very reasonable and I got converage for both boat and engine. Thanks for your great support throughout the project. When we launched it last weekend, there were a bunch of people drooling over the boat and couldn't believe I made it myself. Now that felt good! (See Customer Photos-Archives)
BASS BOAT / Brian Eager / / 01-24-2001: Project complete, probably. This boat was built by my father Dale Eager, brother Steve and I, starting in late 1975 or 1976. We were inspired to build when Dad and I got our backsides wet in a two seater kayak-style Folbot design that we had built 3 or 4 years earlier. Started from the frame kit and worked on the project in the evenings and on rainy days when the farming work was not pressing. Frame layout, longitudinals and planking were done in the driveway of a corn crib, then we moved the hull into our wood shop (Refitted chicken coop) for the fiberglass application. No big door, we put it in and took it out on edge through the walk-in door. We are powered with a 1958 Johnson V-4 50HP short shaft, it will make about 32 mph at full throttle and consume 6 gal/hr. Reducing power by 1/3 will still translate into around 27 mph and the fuel flow drops to 3 gph. The boat was a great pleasure to build and is still giving us good service 30 years later.
BASS BOAT / James Wald / Mustang, OK / / 5-30-02: Done with bottom and inside trying to decide if I want cut outs and where and almost ready to fiberglass.
BASS BOAT / Mike Lechowski / Tobyhanna, PA / / 11-10-03: So far I've gotten all the 1" frame members, transom pieces, knee, bow pieces etc. cut. Hopefully today after work I will be able to cut bulkheads and gussets. Fastening kit is supposed to be delivered today. I'm hoping to have all of this assembled and epoxied in next two weeks. If weather holds up I'm going to precut and epoxy chines sheers etc. before Thanksgiving. 2-12-04: It has taken a lot longer that I thought, but I'm moving forward. I've completed all frames, transom and bow pieces. Eagerly awaiting for the snow to melt so that I can start assembling the boat. 8-25-04: I am now fairing. 10-12-04: I have completed planking, puttying and yes sanding and currently working on encapsulating – got the transom and both sides done. Although the cold weather is slowing me down. 10-23-04: Last Monday I have completed covering the hull with fabric. Maybe you should mention someplace on your website that doing this is a lot easier than some people (me ) might think. Anyway if the weather holds up I will be building up the edges this weekend. However, with the temperatures staying in fifties during a day and falling to thirties at night I'm afraid I will not be able to apply the next two coats of epoxy this year. That's actually quite Ok since I need to look into few things in the house, maybe put together the trailer for the boat during winter months. After all steel does not care about Fahrenheits. 8-5-05: I was finally able to get back to boat building. So far I have installed the skeg and yesterday applied last coat of epoxy. Hope to do the sanding this weekend and start painting the bottom next week. If everything goes well I should be flipping the boat over towards the end of the month.
BASS BOAT / George Robertson / Tyler, TX / / Started construction May 14, 2006. 6-27-06: All structural pieces cut and frames, stem, transom and bow piece assembled. First sheer clamp installed. Currently fairing battens and chine log for fit and assembly. I currently have 137.5 hours in on this project. (see Customer Photos)
BEAR-CAT CUDDY / Harry Smith / / 3-8-08: Started form - just finished building "boatyard."
BELLE ISLE 23' / Jeremy Goldstein / Sandusky, OH / / 9-30-08: I am a professional boat builder and restorer. I own Custom Marine Inc. in Sandusky, Ohio. I am building a Belle Isle 23’. Currently we are installing the battens on the frames. I got this boat from a friend in Cleveland who started the project several years ago. He was overwhelmed with this build and sold it to me to complete. I have saved his original frames, but everything from there forward is brand new. I would like to be able to share pictures and information with other people building this model. I can be reached at (419) 621-1188.
BELLE ISLE 23' / Vladimir Janous / Vlasim, Czech Republic / / 1-13-10: See build photos at www.plachetnice.estranky.cz
BELLE ISLE 23' / Bob Brown / Corallis, Oregon / / 2-21-11: Growing up within a quarter mile of the Rogue River in Southern Oregon, it was a great experience to build a sled boat with my dad back in the early 70's. Ever since, I've wanted to build another. With a friend and my son, I visited the Sierra Boat Company at Lake Tahoe in 2009, on our way to a hike. We all loved the Chris Craft and Gar Wood mahogany runabouts there. From that, research led me to Glen-L and, for my birthday in May 2010, my family gave me plans for the 23' Belle Isle. The build started on Saturday October 16, 2010. The frames are now completed and mounted to the motor stringers. Today (February 21, 2011), the preliminary setup of the keel and stem were completed. One unusual aspect of my build is that the frames are Port Orford Cedar from trees which were in our backyard. They died a few hears ago, so we had them cut into lumber, hoping to build a boat in the future. See my "photo journal" of the build on Facebook at Building a Boat: the Belle Isle. The design and plans are great! The books and forum you provide are very helpful. Other builders provide inspiration, especially Bill Checkerberry, Bob Perkins, and Mark Broncalla, and their photos are also a great help! Thanks! (See Customer Photos)
BIG HUNK / Howard L Ruiz / Kennewick, WA / / 4-12-02: Started the frame work. I've got two bad legs, but they are there, can't get around like I did 20 years ago, but I can get around. I bought the plans 10 years ago, I liked them then and love them now that I am retired. This is my first boat, but worked construction 30 years and have the knowledge to build. We are having a ball. With the plans & patterns, it is so easy... with a little help from you all. The Norma-K is my dream 3-21-03: Barry don't delete me, we are starting to do all the cut out work from our plans & Patterns now.
BINGO / Matt Duller / / 10-24-01: Building as a High School project.
BINGO / Rob Russell / Arkona, ON, Can / / 3-8-04: Started March 2/04, bottom complete. 11-30-05: Started the project again on Nov.1/05. It was sitting in the attic getting dusty. Just had the hull inside done. Started the deck and finished it on Nov.25, flipped the hull over on Nov, 28 and laid up the glass the same day. Started sanding it Nov.29/05. 2-14-07: Project finished. Just playing around with the performance of it now. Pic in Customers Photos. Also built a lift for it. Plans available for those who would like to make a lift the will lift 1000 lbs. Only cost about $300 to build the lift with electric controls on it.
BINGO / Brad Lynskey / Arkadelphia, Arkansas /
/ 2-16-09: Cutting all parts and encapsulating. I'll
send pictures when the boat is complete; hoping to finish it
before June 20th, 2009…we shall see. Thanks again for
the plans and kits!
7-10-09: Construction began 2/15/09, ~400 hours to date.
This has been a fantastic project and I'm
sad/relieved/excited it is almost complete. I modified the
deck shape to provide a larger dash and added a hatch behind
the passenger compartment for storage. I rebuilt a 1964
Mercury 500 (50hp) and I am in the process of painting and
restoring this great little motor. Should be a fun and
exciting boat, can't wait to put her on the lake! I have
over 500 pictures documenting the progress of this boat;
email me if there is any way I can help. Thanks to Gayle and
everyone at Glen-L for the help and encouragement!
12-14-09: My original completion date of June 20th is long
past, but the fiberglass is finished and I am now painting
the bottom. Really glad to finish the fiberglass/epoxy and
SANDING  Just placed an order for some
additional foam rollers (seem to work good with the Interlux
VCPerformance bottom paint and hopefully the Perfection
topside paint as well). (See Customer Potos)
Just placed an order for some
additional foam rollers (seem to work good with the Interlux
VCPerformance bottom paint and hopefully the Perfection
topside paint as well). (See Customer Potos)