Plywood Boatbuilding for Virgin Builders
by Dick Koepp
ContinuedSetting up:
This is the process of putting together the
building form, or what ever your plans call for as a building platform.
Remember that a large number of boats are built upside down. In most
cases, a building form is a frame that anchors to a flat surface (level
both ways), and served to hold the frames, stem, and transom in position
so that the longitudinals can be accurately installed. What ever you do,
DO NOT deviate from the designers suggested building form. The form
should be built according to their instructions, using the same
thickness' and lengths of wood called for. I can't stress this
enough. In all of my boats, I literally anchored the building form with
expansion bolts into the concrete floor, or with screws into a wooden
floor. You do not want the form to move once you begin building. This is
critical. You will find that at several points during the fastening of
the hull planking that you will have to lean on, crawl on or otherwise
put weight on the structure. If it is not secured, it will bend, move or
shift. Once you finish the hull, and are ready to turn it over, you will
crawl under and release the bolts. Now having said this, you need to be
aware that not all boats require a building form, in which 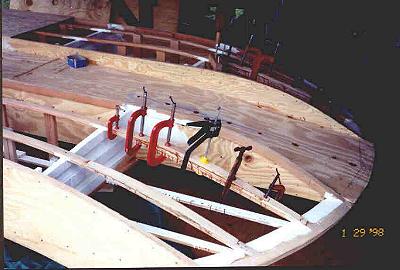 case you
might use saw horses, or some other method to set up the members. My
advise is the same. Follow the designer's suggestions. If you get a
boat design from the library or a neighbor, you must determine how to
accurately line up the frames and keep everything "fair" (if
you have not heard of fair before, get used to it. Fair is what builders
of boats use to determine and define whether the lines run true to plan,
i.e. is it straight?) I have a policy, after I do anything, like set a
frame up and get it all lined up, I step back and eyeball the whole set
up from a ways back. This is vital all through the project. It tells you,
using the most sophisticated devise known to man (your eyes) whether your
creation looks right. Lines of a boat must NEVER have dips, sags, bows,
ups downs etc. More on this later under "Fairing". Once you
have set the building form up, then you will be ready to start placing
frames and transoms and stems onto the building form as directed in your
plans. Tips: before you secure your form to the ground, check the plans
and be sure you can access the bolts or screws (i.e. place them near the
ends of the boat if you can't scoot under it). Tips: I prefer to work
on a wood floor, if possible. The main reasons are the warmth of wood,
softness on the feet, and cleanup when stuff drips on it. Additionally,
wood readily allows you to temporarily shore up frames, stems, etc during
the building process.
case you
might use saw horses, or some other method to set up the members. My
advise is the same. Follow the designer's suggestions. If you get a
boat design from the library or a neighbor, you must determine how to
accurately line up the frames and keep everything "fair" (if
you have not heard of fair before, get used to it. Fair is what builders
of boats use to determine and define whether the lines run true to plan,
i.e. is it straight?) I have a policy, after I do anything, like set a
frame up and get it all lined up, I step back and eyeball the whole set
up from a ways back. This is vital all through the project. It tells you,
using the most sophisticated devise known to man (your eyes) whether your
creation looks right. Lines of a boat must NEVER have dips, sags, bows,
ups downs etc. More on this later under "Fairing". Once you
have set the building form up, then you will be ready to start placing
frames and transoms and stems onto the building form as directed in your
plans. Tips: before you secure your form to the ground, check the plans
and be sure you can access the bolts or screws (i.e. place them near the
ends of the boat if you can't scoot under it). Tips: I prefer to work
on a wood floor, if possible. The main reasons are the warmth of wood,
softness on the feet, and cleanup when stuff drips on it. Additionally,
wood readily allows you to temporarily shore up frames, stems, etc during
the building process.
Building the frames and other pieces:
The backbone of any boat is the framing
including the keel, transom, and stem, as well as the frames themselves.
These form the outside shape of what the boat will look like in its final
form. Do NOT rush through this process. Each frame must be built as close
to perfect as you can make it. This is one reason that many builders,
including Glen L, sell "Frame Kits" with their designs. These
frame kits are precut to correct dimensions and "guarantee" a
perfect start to your project. IF you chose to not use frame kits, and
have decent woodworking skills, the use of them is not necessary. I
personally have never used them, but I have made a few mistakes on frames
before also. The most important thing here is to trace those frame
members from the blueprints, and/or the Kraft paper templates as
accurately as possible. The stem is the portion of the boat up front
where the hull will angle up to meet the deck. This will allow a flat
surface for the plywood planking to rest on and this is a critical
junction of the hull. The stem normally attaches to the keel log (if you
use one) and is supported temporarily below. Along the keel you normally
space out each of the numbered frame members. Then you fasten the transom
member to the keel and support it below. Once you have the stem and
transom glued and fastened, you re-check the distances of each frame
(THIS IS CRITICAL!), check them several times heck, call your wife out
and have her check them. Once the chine and sheer logs are added (see
longitudinals below) you will be committed as we say! Now, once you are
glued and screwed down on all frame members, step back and look at the
front, the back, the bottom, crawl, on you knees and spot down the frames
to insure that everything looks right and fair. If not, STOP, and recheck
the design plans to find out what is going on.
 Tips: Common mistakes I have made on frames, include not
carrying correct measurements over to all members, not identifying the
number of the frame, and consequently making two of the same frame and
thereby missing a frame, hey don't laugh, it happens! But the most
common mistake made in building the frames is to not notch the frames for
the correct width of your battens, or logs (chines and sheers, discussed
below). What this means is that you need to have these dimensions perfect
before you cut the notches. Its not too difficult to re-notch most frame
members, but almost impossible to re-notch transom notches, which for the
most part are "blind notches" (meaning the notch is covered at
the rear by the plywood transom hull piece.
Tips: Common mistakes I have made on frames, include not
carrying correct measurements over to all members, not identifying the
number of the frame, and consequently making two of the same frame and
thereby missing a frame, hey don't laugh, it happens! But the most
common mistake made in building the frames is to not notch the frames for
the correct width of your battens, or logs (chines and sheers, discussed
below). What this means is that you need to have these dimensions perfect
before you cut the notches. Its not too difficult to re-notch most frame
members, but almost impossible to re-notch transom notches, which for the
most part are "blind notches" (meaning the notch is covered at
the rear by the plywood transom hull piece.
Glues, clamps and fasteners
A quick word on glues, clamps and fasteners.
Like anything in this world, there are many ways to accomplish the same
task. When it comes to glues and fasteners, this is very true. I will not
go into a long discussion of these, rather I will tell you what I do. I
am cheap, well, I am resourceful. But the one thing you do not want to
scrimp on in building your boat is glue and fasteners. It ain't worth
it, trust me! IF the plans call for 1 1/2 screws, use them. The cost
factor here comes from the grade of screws. I now use stainless steel
(SS) wood screws. I also have used hot dipped (HD) galvanized wood
screws. The reason I went to SS is they are never going to rust; easy to
drive, and most lock down real nice and tight. IF money is your concern,
go with the HD Galvanized, but under no circumstances should you
substitute cheap zinc or 'heaven forbid', drywall screws. These
are brittle and offer no resistance to rust or corrosion.
Tips: Always request and use "Phillips cross
slotted" head screws. You should be driving all your screws with a
screw gun (many drills can be converted to drive screws, but for
"shooting" a large number of screws, a quality made screw gun
is best. It is impossible to drive straight slot screws with a gun. Trust
me on this! Remember, when you start fastening the hull, you will be
placing a large glued up wet panel on to your frames, time is of the
essence here, you need to drive screws as fast as you can to get the
panel down. I happen to prefer using Elmer's Plastic Resin Glue
(which I buy in bulk from GlenL, hey they are the cheapest!). But some
words of wisdom on glues. The most important thing about glues being used
in boats is that they be waterproof without exception. My experience with
cheap glues on other projects (even those that tout themselves as water
proof/resistant, has been poor. Again, price here should not stop you.
The plastic resin is an economical alternative to epoxies, and other
glues, and it mixes with tap water. I have never had a failure with this
resin, BUT you must be careful to mix the batches correctly following
instructions on the container. Also, you will need to build your
experience level in order to mix up enough for what you are doing. This
means that once the plastic resin has begun to cure, it becomes unusable,
and you may find you are wasting some of it. Start small, it is easier to
mix more, than to have a bunch left over.
Tips: I recommend gloves when mixing and handling all glues, but in
particular this resin which contains formaldehyde.
Clamps: Use them as much as you need to. The point is to use clamps to avoid any possible movement of a piece before you secure it. You will need as many clamps as you can lay your hands on. They all look strange, but believe me, get a few of each: pipe clamps, bar clamps, C clamps, of all lengths, shapes and sizes. Big is GOOD. Don't try and get by with flimsy wimpy little clamps.
Adding longitudinals to the frames
What the heck are Longitudinals? Well, they are
the long, thin boards that will link the notched frames together to form
the real shape of the hull on the outside. Additionally, most boats
require some long flat boards spaced out along the bottom of the frames
and connecting to the transom notches (these are called
"battens"). Great care and sightings need to be taken in
placing the outside boards (called "logs"). More terminology
here: a "Chine" is the log that forms the joint between the
side of the boat down to the bottom of the boat; the "sheer" is
the log that forms the joint between the side of the boat upwards to the
deck line. The whole thing about chines and sheers is that they are
critical to getting a fair hull. They will serve as the fastening
surfaces for the planking. These logs are sometimes "bent" or
steamed to bend around the frames. Don't panic with the words bent or
steamed. (see Tips below). Chine and sheer logs are install before any
battens, (but you will need to consult your plans if you use another
method of a sheer, i.e. sheer harpin etc). The chine and sheer logs will
first be temporarily secured to the transom. Use wood screws with
2"x2" 1/4" plywood gaskets to hold the logs in place, or
use clamps instead. Many times you will need another person to
"spring" (bend) the logs into place. I have always gotten by
with some jury rigged ropes and pulleys, or some inventive devise like
that, but friends can respond to your commands! I usually install the
chines first, bending as needed and re-notching to the correct angle up
front. Once the chines are installed TEMPORARILY, begin to temporarily
install the sheers. I emphasize the word TEMPORARILY because you now want
to take a hard, hard look at all your lines, just like before when you
installed the framing members. The logs should be smooth lines, curves
should be fair and above all else the boat should look SYMETRICAL (the
same on both sides). If all looks good, slowly glue and screw each log at
each junction in the same order you installed and bent the logs
originally. I personally, leave all the unglued logs secured by clamps or
gasket screws in place as I glue and screw the preceding log into place.
This keeps the structure secure and in shape. Once all of the logs are
done, re-check the lines, and be sure it is fair.
Tips: If you ever need to "steam" or bend or twist planks,
plywood, or logs, heat boiling water, place thick rags (towels are best)
over and around the area of stress and SLOWLY pour the water onto the
rags. The idea is to keep as much hot water on the stress area as
possible. After a minute or two, slowly begin to bend the member in .what
I usually do is bend it a little, temporarily secure it with clamps, get
more hot water, soak again, let sit for 5-10 minutes, then slowly clamp
it down a few more turns, and continue that way until it meets the
forward member. Wood will "relax" and begin to adjust to its
new shape if you take your time. Remember, the portion of the log forward
will now meet the stem piece at a new angle. It must be faired to fit
solidly on the stem.
Tips: Since boats can be quite long, it is almost
always necessary to "splice" or joint shorter lengths of log
boards together to make the required lengths. This is usually covered by
the plans, or get a copy of Glen's book and read up on it. Don't
fear. You can easily and successfully "butt join" long logs
with now problem. Most plans show you how. One note here though, always
place these joints as far aft as you can, and always on a straight line.
Never on a curve. You will save a ton of money and not have to shop
around at custom cutting lumber yards if you use this technique.
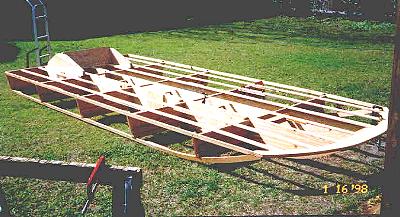
Well, now you have what should look like a boat. Remember, the above are general guidelines for most traditional plywood boats. I recently built the "Scooter" flats boat, and it used a totally new method of building. I am hoping to put together a write up on that boat's building forms, and methods for the novice in the near future. But, I want to emphasize to you that to get this far is the real battle. If your boat skeleton looks good now, it will look great when its done!
Next time, In Virgin Boat Builder, I will
continue with: hull fairing, planking, fiberglass do's and
don'ts, paints, the dreaded hull turning over (not covered in most
books), re-setting the boat upright and inside hull preparation. In a
later installment, I plan to move on to the placement and planing of
inside wiring, controls, consoles, floatation, fuel and water tanks,
battery boxes, bilge pumps, trailer purchase, decking, and
customizing/detailing the final hull. I hope this material has been
helpful, and I invite your comments and/or questions.
Dick Koepp
Onogolly@aol.com
Back to Web Letter 9