Building the Glen-L Whitehall
by Dave Gillette
As I could see the possibility of building several of these boats (with appropriate payments to Glen-L), I built the support platform a little beefier than would normally be called for; lots of bolts, lags, and steel reinforcing. It took a day to build the form. As I was laying out the station molds directly on the forms top edges, much care was used to square the form. Two x 2's across the top of the form located all the molds. The transom was built exactly as drawn, as was the inner and outer stem. The stem pieces were laminated from mahogany. The keel was cut from one of the 8/4 planks, as were the floor timbers (a little waste there, but 6/4 wasn't available at the time). Keel bevels were taken at each mold with the keel just clamped into place, and test fit with a short piece of planking stock. The bevels at the transom, inner stem, thwart riser, and molds are a little testy. Because, in my case, it took 70 plank strips per side, and only half of these are full length, fairing everything at first was a little stressful. This issue was resolved with a cloth tape measure. Each mold, along with the stern and transom, were marked off with colored markers at roughly 3" intervals. This allows some common points for fairing with long (18 ft.) batten strips. You know pretty closely where the planking is going to fall.
One thing t would do differently if I could, I would grind the keel to floor timber bolts with opposing flats on the heads. Counter boring a carriage bolt exposed some of this 3/4" hole when the keel was beveled per the plan. Grinding the bolt head would only require cutting a small mortise to sink the bolt head in. This gives you a mortise 5/16" w x 3/4" long (the 3/4" follows the keel centerline).
The planking stock was cut from the 4/4 mahogany. I ripped it to a "big" 9/16", and planed both edges slightly. Planning ahead, if the planking came out pretty smooth, not having to sand saw marks would speed up the inner/outer fairing work. The edges were bead and cove like a canoe plank joint. I worked with several radii, starting with just a radius (like maybe 1"). Not good, due to the sharps turns at the aft end of the hull, too many open joints, either inside or outside depending on convex or concave hull shape. Ended up with a half round cove/bead cut. In theory and application this was pretty much the best way to go. Downside is on sharp turns in the planking, one or the other of the cove cuts sharp edges will get sanded off leaving a small crevice to be filled. The farther you get from flat plank to plank joint, the more of an issue this becomes. Still the best way to go. The cove and bead joints were cut on a Williams and Hussey molder. It could just as easily be done with router mounted in a LOOONG router table. Finished width on the planks was a bit over 5/8". Possibly could go wider, but dramatic twists and turns would make installation needlessly tough.
The installation of the planking was for the most part, pretty easy. The 5/8" wide planking worked perfectly, except for a couple. When milling the plank stock I noticed one 11" plank had a wind break about 4 ft. from the end, problem was I saw the break after a few strips were already cut. I missed them when presorting later. With the planking being so small, fastening options are few. I chose an 18 ga. brad nailer with 1 1/4" galvanized brads. Worked well most of the time, except in the area of the thwart riser. One issue with any fastener is the nails have to go in straight, and often the planking is turning. End result is quite a few nails showing on the inside. Thought about clamps and wedges without nails, but the cove edge is fragile, the hull shape is radical in spots, and the huge forces required to maneuver the planks made this seem way to slow, considering the cure rate of the epoxy and the number of planks to install.
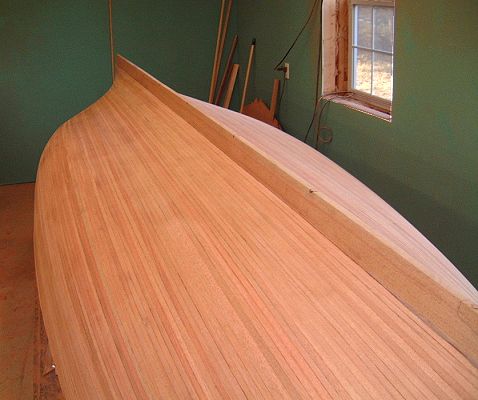
The planking took a couple of days. My wife and I did 12 planks per side, took a break, repeated the process until half of each side was done. Finished the rest the second day. Every 6th plank or so was tacked to the molds.
As Sue and I began arranging planking and tools/supplies to start the planking process, I had a couple of ideas to really speed up the installation and orientation of grain and color of the planks themselves. As we sorted and somewhat color matched the planking, it occured to me that a rack to hold them would be handy. I cut 3 pieces of 3/4" plywood with the lower edges notched to fit the keel, and an angled top leg about 8" long. The finished shape resembles the side view of a chair frame. With these brackets sitting atop the keel, a dozen plank strips will nicely stack up, leaning away from the side they are for, and in the order to be installed. Sue mixed the Poxy Grip while I stacked the planking. With both of us applying the epoxy, with flux brushes (also from Glen-L), I'd guess 10 min to glue up and nail one plank.
TIP- A 10" crescent wrench makes life pretty easy when planking the Whitehall. I had Sue constantly doing all the plank twisting with the wrench, keeping a couple of feet ahead of me. Especially nice at the transom and stem area. Eighteen foot plank stock allows just enough length to work the wrench on each end of the plank strips. When nailing, all I had to do was push the new strip snug to the previous one, and nail it, depending on the amount of twist, anywhere from 4" between nails to maybe 10" where things straighten/flatten out pretty well. The crescent wrench isn't mandatory, a metric open end wrench works well also if your planking fits pretty snug in the jaws. Personally, I like the adjustable wrench because it's adaptable to thickness, and it has a lot thicker/wider jaws, which prevents damaging the plank as you work.
Incidentally, because the planking is a nice length at 18', we always started in the center of the boat's hull and worked fore and aft from there. Seemed the easiest way to do it. By anchoring the center 5'-6', dealing with the ends was relatively easy. One way or another, you will have to deal with the Poxy Grip squeeze out inside and out. The outside is easy to wipe or scrape off, the inside is another story. Some areas aren't very accessible, reaching inside from the outside, sort of standing on your head. In addition to the awkward angles to reach from, you may/will run across some of the nails poking through, WATCH YOUR FINGERS when trying to clean the inside planking. We did a fair job of wiping up the excess when doing the first 15 pc's or so on each side, but soon lost interest in that task ( mostly because of the errant nail points ). Elected to just let the squeeze out bead up and cure, removing later with a SHARP scraper.
I waited 1 week for curing then started
sanding. Started with 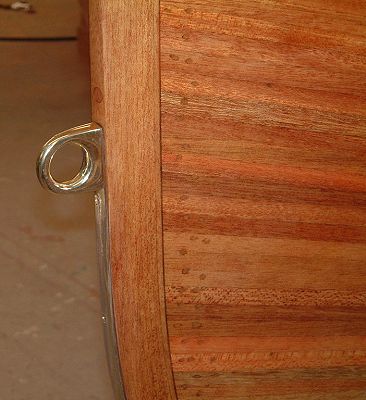 80 grit in a Dewalt RO 5" sander. Smoothed the entire
hull this way, then switched to 120 grit. Some hand sanding and long
boarding finished the hull. Wood flour and epoxy filled all the brad
holes and any other small cracks. Sanding exposed many nail heads on the
stem and transom. Pictures show the location of these. The seemingly
large nail spots were from having to use a 1/8" nail set to tap the
brads deeper. Smaller set just jumped off and made a bigger hole yet.
80 grit in a Dewalt RO 5" sander. Smoothed the entire
hull this way, then switched to 120 grit. Some hand sanding and long
boarding finished the hull. Wood flour and epoxy filled all the brad
holes and any other small cracks. Sanding exposed many nail heads on the
stem and transom. Pictures show the location of these. The seemingly
large nail spots were from having to use a 1/8" nail set to tap the
brads deeper. Smaller set just jumped off and made a bigger hole yet.
The hull is covered with 6 oz. cloth and 4 coats of epoxy. The original plan by me was to do the transom first (I did). Then with one piece of 50" cloth, do half the hull, P or S, wrapping over the keel as far as it would reach. Then repeat this on the other half. In practice that was a mistake. The height and taper of the keel made it nearly impossible to squeegee the cloth down towards the sheer without pulling it away from the keel. I ended up getting the hull perfect and cutting away the portion that wrapped the keel. Did both P & S this way, then I did the keel with 12" lapping this piece on to the hull bottom equally.
I probably spent a week hand sanding the epoxy to 120 grit. The varnish work took the longest of any part of the boat. Ten coats inside and out, sanding between coats with 320 grit sandpaper.
After flipping the boat from the mold form onto a cradle, the whole sanding process was repeated. Probably 100 nail tips to cut off from plank edge nailing. After sanding to 120 grit, hull interior was sealed with 2 coats of epoxy. Fillets were done next with epoxy and wood flour. Templates were made next for transom quarter knees, breasthook, and thwart brackets.
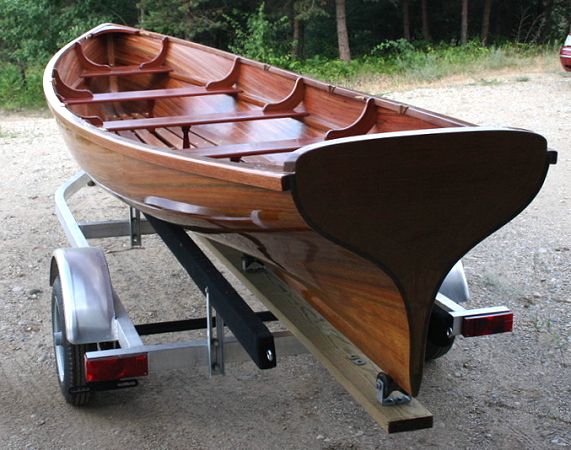
Because I routinely do curved laminated millwork, I decide to do these parts that way. Male/female molds were made to glue up laminated blanks in a size to cover each of those 3 parts. The knees and breasthook took 56 plies to get 5 1/4" wide blanks, probably could have physically bent thicker plies, but a blank that size is a handfull. All these parts were made of Jatoba. The thwarts were as well. Hand rubbed final coat of varnish on all the Jatoba parts, and a matte finish final 2 coats on the hull interior finished the boat itself. I added a few small cleats in polished bronze, cast bronze oarlocks, and 8' oars from Glen-L. I have drawings for hand made spoon blade oars and may switch to them as time allows.
Overall, this boat was a very nice project! I guess my skill level would be above beginner somewhat. Hard to say exactly because our day to day work involves a lot of irregular/curved details, so we just take that in stride. The plans are pretty foolproof though, so anyone with a modest home workshop and at least an 8' x 20' workspace could build this boat.
I highly recommend POXY-GRIP for gluing everything. I used maybe a gallon and a half for the whole boat. Bronze bolts and screws throughout, also from Glen-L. I used Philippine mahogany because of the cost and it was available in 18' lengths (perfect for planking in one continuous piece). After completing the boat I wish I would have stained the hull exterior. Although it looks OK, when buying small amounts of wood, your ability to color match everything is limited.
In the background of one picture is the beginning of a Stripper 17. Because I have pretty severe sensitivity to epoxies, this one is moving slowly. Also have a 28 foot runabout going, built the old fashioned way, also because of the same epoxy thing. Would REALLY like to build the Glen-L Reliant next. If I can get a handle on epoxy issues or something less caustic to ME comes out, I'll do it. Have already built it in my head a few times (sorry, no pictures on this one).