Building the Glen-L 14 - Part 1
by David Williams
Page 25-26 Took today (Friday) off to make a long Memorial Day weekend. Also, since Glen-L isn't open on the weekend, this is a good time to get the frame kit. [$423.15] Borrowed a friend's van to get it home.
I debated a long time about making the frames from the plans, and actually cut out some members to see how it would go. But decided in the end that as this is my first boat, I could use their work as an example of professional work. I may well do the next boat entirely from the plans. At the local price of mahogany and marine ply, I could have saved some money. But the time involved has to be factored in. As I said, maybe next time.
When I picked up the frame kit, I spent some time looking at the pictures in the Glen-L project binders they keep in their office. Got some good ideas, especially from a G14 that Thomas Arney built. While Glen-L has many pictures on their web site, they have more in-house in ring binders. I'll note in this log any additions or changes to the plans that I actually incorporate.
5-29 Started work by taking the frames out of the shipping crate. See Photo 2.
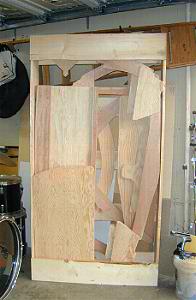
Photo 2. Glen-L 14 Frame Kit
Boy, those T-nails Glen-L uses to tack parts together in the frame kit are tough to remove. Probably shot from an air nailer. A claw hammer just breaks off the heads. I needed vice grips and a wedge.
While I have enough woodworking skill to build my own frames, I decided to purchase the kit for my first boat to see what the quality standard is in boat building. The Glen-L frames appear first quality. All the mahogany is good, none with wild grain. It appears to be the Philippine variety.
The notches for battens and the bottom of the transom are angled. The marine plywood gussets are radiused at the corners (a departure from the plans, but no doubt due to being finished on a shaper). A single wide board was used for the transom floor member, rather than the two pieces cut from 3" wide material called out in the plans. Same for frame 1. Holes for centerboard pin were marked and labeled on both the trunk and plywood centerboard, and they matched the plans.
Some of the frames had pencil lines on them where a pattern was traced but not used. Sanding will clean them up on the members I intend to finish naturally.
The forward-most frame did not have bottom batten notches cut in. The plan showed them, so I asked Glen-L. They said it was best to see where the battens actual fall during construction and cut appropriately. Apparently it is non-critical. Also, rather than a notch where the chine log goes, that frame only has small circular cutouts indicating where the chine should fall.
Decided to lay out the frames in their rough positions on the floor. Couldn't wait until the building form was set up.
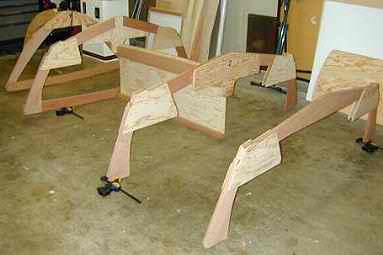
Photo 3. Initial Vanity Setup
First problem emerged: I forgot I have a drop ladder from a overhead storage area in the garage. The ladder hits the floor right where the bow needs to be. I'll have to build the boat in the center of the garage, rather than off to one side.
Glassing the Centerboard Trunk
Bought some fiberglass and resin at West Marine. I got the 6oz cloth because that's what they had. I got a gallon of the West System epoxy, slow hardener, and a shopping cart load of fiberglassing accessories (pumps, mixing sticks, gloves, hand cleaner, etc. - they saw me coming!) [$196.45]
I decided to go with store-bought stuff, rather than the Glen-L kit, because I wanted to have the convenience of pre-measured pump operation, and have a source of material easily available. Getting to Glen-L during their open hours is problematic for me.
One pump didn't, and I wasted some resin trying to fix it. Finally took it back and West Marine replaced it and gave me 1/2 off on another batch of resin.
Since I have never glassed anything before, I figured I'd start with the centerboard trunk. It was easier than I thought it would be. First, following the book (the "book" referred to herein is Glen-L's Boatbuilding with Plywood, by Glen L. Witt [$27.95]. Boy, do I recommend that book. Glen-L sells it, of course. So does Amazon.) I used some epoxy and filler to make a bit of fairing paste. One squirt of resin and one of hardener made more than enough to make fillets on the inside corners of the CB trunk. I used a tongue depressor mixing stick to radius the fillet and let it dry overnight.
Next day I put the fiberglass on dry and squeegeed it out. I was working on one of the insides of the trunk. While it was still wet (it took an over an hour to set) I did the other inside and clamped the two sides together.
While I was waiting for it to set up, I remembered reading advice to trim the glass before it got hard. So I periodically tried this with a razor blade. It finally worked, but not before I pulled up some from the edges of the trunk. I'll have to touch this up when I do the bottom.