On the Mark: Bottom Repair
Continued...
The scratch
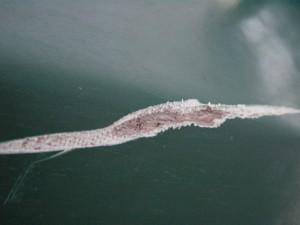
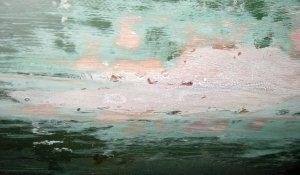
The boat sat on Monday in the garage. With the hot dry spell we had 95 degrees outside, ~105 in the garage. The scrape dried out nicely. The photo shows the scrape in the bottom after drying. The overall length was 8 inches with a 4" x 1/4" area that wore into the wood.
Now, I needed to get it filled, faired, painted and back in the water in less than 3 days. I also did not have excess vacation days to take off prior to the holiday. This ruled out using putty and then glassing and fairing with a normal schedule of 1 application every 10-12 hours.
It seems that every time I want to do fiberglass work on the boat it is either too hot or too cold. The cold weather had held up work this spring. Now it was hot (90 degrees plus every day). I was determined to take advantage of the hot weather to get the repair done quickly.
Preparation
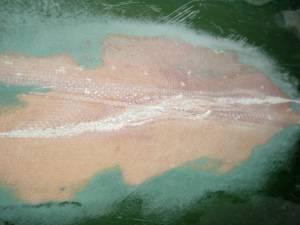
After work on Monday, I started the repair. The area around the repair was sanded with a random orbit sander and 80 grit pad. The scratch was also rasped to remove any loose fibers that would catch on the fiberglass repair or trap air bubbles. This photo shows the prepped area.
The paint was removed for a reasonable distance from the scratch. I did not want to go too far as the paint would help later when fairing the repair to show where to stop. The paint also absorbed the scratches from overshooting the edge of the repair with the rasp later on.
Originally, the bottom was covered with 6 oz fiberglass cloth. The cloth was doubled up for ~3-4" on each side of the keel. Looking at the depth of the scratch, I estimated that 4 layers of cloth would be needed to fill out the repair. The pieces of cloth were cut in graduated sizes to fill the faired scratch and were approximately 1/2x3", 3/4x4", 1x5" and 2x9"
With the warm weather, it was still over 90 degrees, there would be minimal working time. The fiberglass strips, masking tape, Saran wrap (plastic food wrap), a small "acid" brush for application, were all laid out. Since the area of the repair was above me, I also wore safety glasses in addition to the usual gloves.
Epoxy work
A 2 pump batch of epoxy was mixed up with fast hardener. The scratch was painted with the epoxy and the fiberglass was layered in. I saturated each layer with resin prior to adding the next one. After the last one was applied, we paused for 10 minutes. This gave the epoxy time to start to gel a bit. The epoxy was then painted on thickly. The goal was to be able to build up the epoxy thick enough that when faired, only minimal putty would be needed to fill imperfections. Even when partially hardened, the epoxy still would run and the glass would float to the surface and peel away from the repair. This meant that it had to be supported while it cured. That is what the plastic wrap is for.
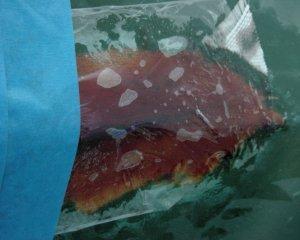
Now it is time for the covering. The plastic wrap is applied over the epoxy. The photo shows the plastic wrap applied over the repair. Next time, I will change gloves prior to handling the wrap. It is very hard to handle with sticky gloves. The air bubbles should also be worked out or popped with a pin. Any bubbles that remain will be perfectly outlined in the hardened epoxy. The plastic wrap releases easily from the cured epoxy and leaves a nice glossy finish.
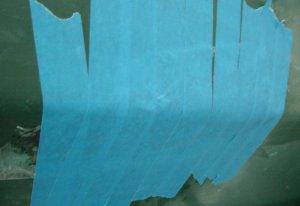
The entire patch is then covered with strips of masking tape to hold it in place and keep it in the proper shape. After covering the entire patch with tape, it is then faired smooth with a soft plastic scraper. Use the same type as for applying the resin to the fiberglass. The patch will now feel smooth and noticeably warm to the touch. This photo shows the taped patch.
Now it is time for dinner. So far it has taken about 45 minutes for the repair.
Fairing the patch
After letting the epoxy cure for about 1.5 hours, it is firm, but not rock hard, and ready for fairing. The epoxy/fiberglass mix is firm, and quite easily worked with a rasp. At this point I should have put on a long sleeve shirt despite the heat. The fiberglass bits are very itchy and rained down on me and were ground in my back as I squirmed on the cement floor.
The photo shows the patch partially rasped to fairness with the hull. Since the patch is noticeably softer than the rest of the hull, it is easy to know when to stop. The rasping takes about 30 minutes. About 50% of the outer layer of fiberglass has been removed in the process.
The air bubbles and a few other defects are still
apparent. I then cleaned off the dust and mixed up a batch of epoxy with
micro-balloons. This makes a nice light weight putty that is easy to smooth
out.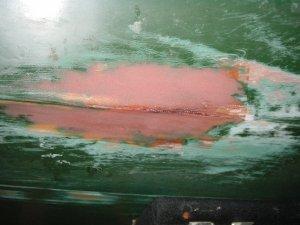
This photo shows the repair area with the epoxy/microspheres putty mix applied. It is put on as thin as I can get it without peeling the mix back off the repair. There is minimal mix applied over the paint, only enough to allow a nicely feathered edge to blend in the repair. All epoxy on top of the paint will be removed in the next step.