WebLetter 5
An Occasional Publication for the Home Boat Builder
Glen-L Marine Designs - 9152 Rosecrans Ave. - Bellflower, CA 90706
In this issue
- Feedback: TNT
- Featured design: Glen-L 10
-
More about plywood
Making big ones out of little ones - Who's in the mail room?
-
Boat Speak
 : Transferred to USEFUL INFORMATION AND SUPPLIERS/Glossary - Kick-up Rudder
-
POXY-SHIELD: The boatbuilder epoxy
Allyn Perry talks about epoxy - More Oars
Glen-L Update
- Web site:
- As always there have been a lot of changes to the GLEN-L web site. To answer the question "who's building the BoatName?" we have added the "Project Registry". We've been averaging about one entry a day.
- The Boatbuilder Connection is getting unwieldly and we're asking for suggestions on how to split it up. Would appreciate any feedback you would care to give.
- We have expanded our Customer Photo boards. We're trying to limit them to 10 photos each for quicker load time and will be adding more boards as required.
- We currently have a Stitch-N-Glue Garvey on the drawing board. Will be another month or so until it's ready. For information see: NEW/On the drawing board.
-
 Each WebLetter I ask for
articles, suggestions, or whatever, but nothing comes. If I don't
get some input it may be longer between editions.
Each WebLetter I ask for
articles, suggestions, or whatever, but nothing comes. If I don't
get some input it may be longer between editions.
- Look for 8 Ball-SG in BOATING Magazine: Joe Friedman built the 8 Ball-SG from Glen-L kits and wrote about it for Boating Magazine. Joe says look for it in the fall/winter 1998 edition.
Barry Witt
Editor
TOP
Feedback: TNT
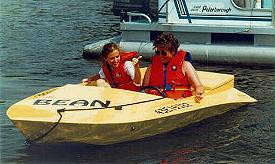
Subject: Our TNT project (Mr. Bean)
Date: 9 Jul 1998
From: Terry Mortimore
Sault Ste Marie, ONT, Canada
Hi Gang:
Just thought you might be interested in seeing some photo's of our TNT project that we built from your plans. A Berkley jet pump and Rotax engine were removed from an old Sea-Doo and installed in Mr. Bean.
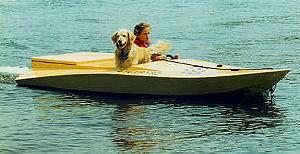
The plans were good and the boat has been a lot of fun since completion.
thanks, terry
TOP
Featured design: GLEN-L 10
The GL 10 is a great first sailboat. It's easy to build, but is a real performer.
In the past, it was common to find a "skimmer" pulled up on shore in lakes all over the country. These planked wood sailboats were similar in appearance to the Glen-L 10 but usually weighed in the 300 to 400 lb range. They were popular boats, but a world away from our lightweight plywood boat. The 10' GL 10 weighs less than 100 lbs and can easily be car-topped or thrown in the back of a pickup or van. But the GL 10 provides a thrilling ride with performance enough for the most experienced sailor. Ten foot of boat, 18' of mast, an acre of fun. Click HERE for a series of photographs showing the construction.
TOP
More about Plywood
Long sheets
Long sheets are frequently called out in our plans and in plans from other designers. While they may be nice to use, they aren't required. On our test models we use standard 4'x8' sheets, joined using one of the methods detailed below. Both methods have proven to be as strong, or stronger, than the plywood being joined.
Butt Joints
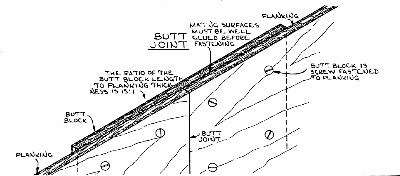
Butt joints are usually detailed in our plans, but basically consist of butting panels of plywood backed up with a butt block of the same thickness (minimum) as the plywood planking, extending 4" or more on each side of the joint. Butt joints can be glued without fasteners, but only if epoxy adhesives are used. Fastenings, when used, should be spaced about 2" apart and 1" from edges. When butt joining 1/4" panels with 1/4" butt blocks, screws that will not project through the opposite side have little holding power. Usually 3/4" bronze screws are used and the points projecting on the butt block side are ground flush. It is best that the screws penetrate fully, through both planking and butt block, regardless of their combined thickness. Butt joints tend to flatten the joined area, so care must be taken to join in the flattest section of the boat possible. Usual practice is to fit one planking panel to the boat, fasten in place, and then fit the butt blocks BETWEEN the longitudinals such as battens, keel, chine or sheer. Follow with the joining panel. If epoxy adhesives are used without fasteners, it is preferable to rough cut the joining panels and pre-join them on a flat surface so proper bonding pressure can be applied, either by weights or temporary fasteners.
Scarf Joints
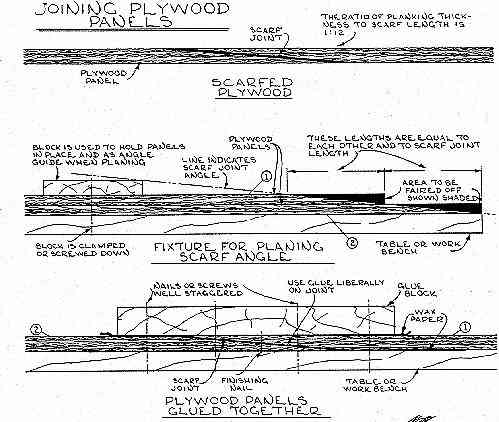
The scarf joint shown is at a ratio of 1:12 but some use a 1:10 ratio up to 1/2" and 1:8 for thicker plywood. The scarf joint length is found by multiplying the thickness of the plywood being joined by the ratio. As an example, at a 1:12 ratio, 1/4" thick plywood would have a scarf joint length of 3". Always cut the plywood panels to the minimum width as wide panels are more difficult to join. As shown in the sketch, the two plywood panels to be scarf-joined are aligned on the edge of a flat table or a sheet of 3/4" plywood. The upper panel is set back from the lower panel the distance of the scarf joint. Align the edges of the two plywood panels to be joined, the table or work surface, and the clamping block, so they are precisely parallel. Clamp, nail, or screw the block through both panels to the table or work surface. Both plywood panels are tapered simultaneously with a hand or power plane, or a disc sander for preliminary rough cutting. The panels are finished to a smooth surface with a long base joiner or smooth plane, or use extensions clamped to the side of the plane if the base is not long enough to extend from the block to the table edge and provide planing movement. Either resorcinol or epoxy adhesives can be used, although the latter is preferable for most because of its gap filling properties. Remove the panels from the fixture and give both surfaces a liberal coat of glue. (Pre-coating the mating surfaces when using epoxy products is advised). Place plastic film between the work surfaces to prevent them from being glued to the joining plywood panels and use finishing nails, driven through the scarf joint into the table, to prevent slipping. Screw or nail the blocking clamp over the joint with enough temporary fasteners to provide solid, even pressure until the glue sets. When gluing with epoxy, avoid excessive pressure that forces much of the glue out. CAUTION: BE SURE THE JOINT IS LEFT AT THE RECOMMENDED TEMPERATURE UNTIL FINAL CURING. At lower temperatures, use plastic, cardboard, or a blanket to make a hood or "tent" over the joint with an electric light as a heater, or an electric heater, to maintain the proper temperature. The holes caused by temporary fasteners can be filled with a hard-setting putty. Always use scarf joints in the flattest area of the boat and place the leading exterior edge of the scarf toward the stern.
TOP
Who's in the Mail Room?

Alfredo Rodriguez has worked at Glen-L for 5 years. He is in charge of our mail room and is also responsible for blueprinting and for much of receiving of the shipments from our vendors.
In his spare time, Fredo prepares for the next 10k run in our area, trying to get some running time every day. He brings his skate board to work and frequently "boards" to lunch. In the photo at the right you see him without his life support headphones. He lists "listening to tunes" among his hobbies.
If you call, you'll probably never get Fredo on the phone, but he's the one makes sure you get what you ordered.
TOP
Boat Speak, Part 3 of 4
Terms we use to describe our designs.
The four parts of "Boat Speak" have been consolidated and transferred to Useful Information & Suppliers/Glossary
TOP
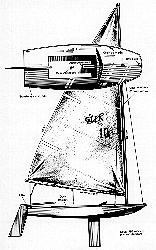
Shop talk: A Kick-up Rudder that you can make...
We have frequent inquiries about making kick-up rudders for our small sailboats. Here's one from our out-of-print book Rigging Small Sail Boats.
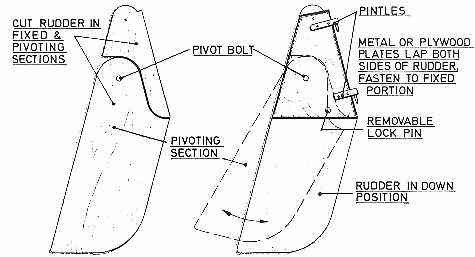
The drawing above shows a locking pin that holds the rudder in place. When the lock pin is removed, the rudder will automatically come up when hitting the beach.
TOP
POXY-SHIELD & POXY-GRIP
We interviewed the GLEN-L shop foreman, Allyn Perry, to get the answers to what are the most asked questions about epoxies. Allyn has worked for GLEN-L for more than 20 years. During this time he has built many testing prototypes and fiberglassed many a boat. He is featured in the GLEN-L video "HOW TO FIBERGLASS BOATS" and others.
Q: What type of adhesives have you used over the years?
A: I started off with plastic resin. When epoxy came along the advantages made the switch easy.Q: What adhesives would you use today to build your own boat?
A: Epoxy: POXY-SHIELD or POXY-GRIP.Q: Do you ever use polyester resin for gluing?
A: NO, polyesters are not intended for gluing wood.Q: You use both POXY-GRIP and POXY-SHIELD to build the GLEN-L prototypes?
A: Yes, primarily POXY-SHIELD, but for small jobs we sometimes use POXY-GRIP.Q: Why do you use or prefer one over the other?
A: POXY-SHIELD is more versatile; it's easier to work at lower temperatures than POXY-GRIP. It has a much longer shelf life; the chemists say "at least" a year, but we've never had any go bad from age. On the down side, the 5:1 mix is more trouble and for most gluing jobs, thickeners are required to allow it to bridge gaps. We probably use POXY-SHIELD with a silica additive for 90% of wood to wood junctions. POXY-GRIP is a 1 to 1 adhesive (easier to mix) and doesn't require any fillers that impart color to the joint. The shelf life is "approximately a year" per our chemist.Q: What additives do you use?
A: It depends upon the application. We use silica for gluing and a blend of microspheres and silica for stitch and glue fillets or filling screw holes.Q: What proportion of resin to additives do you prefer?
A: We recommend that you test any mixture to your application. We add 1-1/2 parts of silica to 1 part activated epoxy resin, by volume, for an adhesive. For filling cavities or making fillets, a blend of 2 parts microspheres and 1 part silica are added to the epoxy at a 2 1/2 to 1 ratio. Temperatures are a factor in mix ratios; at higher temperatures more filler will normally be required than at lower temperatures.Q: Any tips on using epoxies?
A: The number one concern about epoxies is working time. The moment epoxy resin is activated, the chemical action creates heat and heat shortens working time. To lengthen working time when working with larger quantities, get the activated epoxy into a container with a lot of surface area. Mix small batches and have the ingredients for the next batch measured and ready to mix when needed. At higher ambient temperatures, cool the resin components or store them in a cool place. Do not work in the sun. At approximately 70 degrees in a large surface area container, we expect to have 20 minutes working time; more if the mixture is removed from the container quickly. Like many other materials used in boat construction, epoxy can be hazardous. The best protection is preparation. Get a box of disposable gloves (if you run out you'll probably proceed without them). Have dust masks and wear them when sanding to prevent a reaction to the dust (several types of wood, including mahogany, are also sensitizers). For cleaning skin, a waterless hand cleaner should be used. For cleaning tools, the best solvent is denatured alcohol (shellac thinner).
TOP
Oars
The following email was received concerning oar length.
In the instructions for the Power Skiff 12 you mention that the recommended oar length is 8-9'. Unforturnately the only 8' oars I can find are $47 a piece. However I can find 7' oars for about $20 apiece. The normal use of the boat will be with a small motor. Would 7' oars work and what problems might I encounter?
Finally, you mention that the oar locks should be mounted about 9" aft of the center seat but how do you determine the correct place for the mounting on the oar. I bought the north river style mount and I would like to avoid drilling extra holes in my oars.
Answer:
When it comes to oars, there is no hard and fast rule. Some rowers
install the oar handles to lap 1", most rowers prefer a small
clearance. To answer your question using extremes: if the oars were
6' long, and mounted so that the handles just touch, they would have
to be at an extreme angle in order for the oars to touch the water,
requiring your hands to be relatively high. If they were very long, the
rowing angle would be more comfortable, but the oars would probably be
unwieldly. Long oars also require that the handle end be lowered more for
the oars to clear the water on the back stroke. This can be a problem if
the seat height is close to the oar lock height.
R. D. Culler in his book "Boats, Oars, and Rowing" (out of print) gives a rule of thumb that the oar length should be twice the beam plus 6", with the caveat that length will vary with type of boat, rowing style, etc. A formula that I like, because it seems to have some logic to it, comes from the book "Sail and Oar" by John Leather (out of print). Figuring the ideal oar lock position as 7/25's from inboard end, the oar length is half the beam, divided by 7, multiplied by 25. Neither formula takes into account, the height of the sides (the higher the sides, the longer the oar needed). If you figure oar length using both methods above you will come up with a big difference... I said there is no hard and fast rule.
If you are not going to do any serious rowing, 7' would probably be fine, easier to stow, and not that far off from the second formula.
Build more boats
Glen-L boats, of course