A place to share YOUR boat building story
Glen-L Marine Designs - 9152 Rosecrans Ave. - Bellflower, CA 90706

 In this issue
-
Fitting Oars to the Boat
-
Glen-L Boatbuilder of the
Month
-
A ZIP-Builder's Diary by Dave
Coleman
-
Designer's Notebook: … a
belated "THANKS"
-
A New Outboard by ArtDeco
-
Photos posted since the last
WebLetter...
-
Inboard Propeller Installation
Procedures
-
Shop Talk: Useful
Racks
-
Recent email
GLEN-L Update
- Don't miss the very special New Year's message from the founder of Glen-L Marine Designs in the "Designer's Notebook" section of this month's WebLetter (below). He has some very important thoughts which he'd very much like to share with all of you.
-
- Have you made your reservations yet for The Gathering of Boatbuilders 2010? It will be held this coming September and last I heard even thought it's only the 1st of January, more than 25 floating (on the lake) cabins had already been reserved by Glen-L boatbuilders - don't wait too long and miss out on what every year becomes a larger, friendlier, more fun event!
-
- Wishing you and yours a Happy New Year from all of us at Glen-L!
Until next month . . .
Editor
Fitting Oars to the Boat
"THE BEST OAR LENGTH FOR YOUR BOAT"
Shaw & Tenney, longtime oar
manufacturer in Orono, Maine, has published a guide for
sizing oars to your boat. The aim is to come as close as you
can to achieving an oar length that gives you a 7:18 leverage
ratio. Using this ratio will put 7/25 of the oar's length
inboard of the oarlock and 18/25 of the oar's length
outboard of the oarlock.
To calculate your boat's best oar size, begin by
measuring one-half the boat's width between the oarlocks
in inches. Add 2 inches to that measurement and then divide
the sum by 7. Next, multiply the result by 25. Then, divide
by 12 to get your distance in feet. Finally, round your
answer to the nearest half-foot (6 inches) to get your proper
oar length in feet.

The skiff illustrated above is 9'6" long and has a
total width between oarlocks (measured at the amidships
rowing station) of 3'10" (i.e. 46 inches). One-half
of the width between oarlocks is 23 inches.
To apply the formula for best oar size:
Begin by adding 2" to that 23" measurement, which
gives us 25 inches.
Then divide 25" by 7, which equals 3.6 inches.
Next, multiply the result by 25, which is 90 inches.
Now divide by 12 to get your distance in feet, in this case:
90"÷ 12 = 7 ft. 5 inches (7' 6").
Finally, round your answer to the nearest half-foot
(you're already there). Your oars should be 7'
6".
Glen-L Boatbuilder of the Month
Peter Tonkin - Bo Jest
 Hi
Glen-L Team - Greetings from down under!
Hi
Glen-L Team - Greetings from down under!
As you will see by the attached pictures my Bo Jest is now complete and on the water.
I can tell you that the build from start to finish has been
an absolute joy and I have had very few moments of
frustration or disappointment.
She is officially named "ShellyKeel" after my twin
girls Shelby and Keely. We took her away on holidays and the
20HP diesel inboard and 80 litres of fuel carried us over 400
Kilometres with still an inch of fuel left in the bottom of
the tank when we finished.
Anyone who has owned or built a Bo Jest knows that they are
not built for speed. Her average speed over the 400k was 5
knots with an absolute top speed (with tail wind) of 9
knots....but why bother; she does 6.5 knots at 2300 revs
(silently) and top speed at 3400 revs for a lot of noise and
bluster.
 I have had her out in the open ocean and while
I wouldn't say she is an open water boat she preformed
fantastically well in two metre seas.
I have had her out in the open ocean and while
I wouldn't say she is an open water boat she preformed
fantastically well in two metre seas.
A ZIP-Builder's Diary
by Dave Coleman, San Francisco Bay Area, California
Like, "What year is it?" - they couldn't believe it is a 2009.
The little 25 horse Honda pushes it up to about 25 mph even with 4 adults, a baby, 2 ice chests, and a bunch of picnic gear."
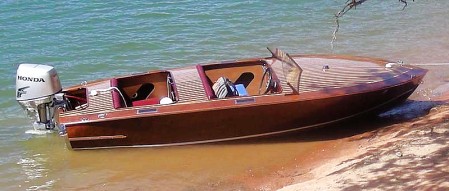 Here are the notes from my ZIP building experience to date, more or
less in chronological sequence. I've declared the boat
DONE since I launched it August 2009.
Here are the notes from my ZIP building experience to date, more or
less in chronological sequence. I've declared the boat
DONE since I launched it August 2009.
I expect some more fine-tuning as I use it. Any comments or
questions are welcome. It was a great project, larger than I
expected, but I had fun and I'm very pleased with the
result.
Location - My garage is
way too small even for a ZIP so I built a small 8x15 deck on
the side of the house. I built the deck frame to last but I
know the top would be thrashed by my boat building efforts so
I put down cheap 3/4" flooring ply and painted it. My
plan is to pull it up later after it rots (I give it about a
year) and put down better decking. It was raining here in
Northern California when I started building the boat (Feb
2009) so I'd work when it was dry then cover the boat
with a tarp.
Frames - I used Sipo,
real nice hardwood, not quite as expensive as Honduran
mahogany, but looking about the same. For screwing into it I
had to predrill giant holes and wax the screws. I struggled
for a while with the Frearson screw heads, trying to use
Phillips drivers. I finally saw the light and got a Frearson
(Reed Prince) screwdriver and ordered the Frearson bits from
Glen-L.
Designer's Notebook: … a belated "THANKS"
|

A New OutboardMy boat plans specifiedOnly a modest outboard Since that's what I had I was in complete accord But as the years went by That engine got weaker A new one is required I am now a power seeker New outboards abound All have power to spare They have now gone green For true environmental care These motors are complicated Their fuel is often injected Computers are used to see Air and water are not affected Four stroke is what most are Though one or two are not But they all weigh a good deal I'll have to give that some thought Their shafts are longer too Short shafts are getting rare I must strengthen the stern and Raise up the transom with care When I have the new outboard I'll show it off with a splash All the effort will be worth it Now, if I can just find the cash -ArtDeco |
Photos posted since the last WebLetter...
|


Inboard Propeller
Installation Procedures
-
Push propeller snugly onto shaft taper WITHOUT key in
either keyway (propeller or shaft).
-
Make sure the propeller is snug and there is no side to
side movement by gently moving propeller back and
forth.
-
Make a line on the shaft with a non-graphite marker at the
forward end of the propeller where it stops up against the
shaft taper.
-
Remover propeller.
-
Put key into keyway on shaft taper with radiused or
chamfered corners down in shaft keyway (if propeller shaft
keyway has radiused corners).
-
Put propeller onto shaft taper.
-
Check to see that the propeller moves back to the forward
line made in Step 3. If it does, skip down to Step 8. If
not, perform the following:
-
-
Remove propeller from shaft.
-
Place a file on a flat surface area or work
bench.
-
Run opposite end of chamfered key back and forth
over file (to remove any burrs) with a downward
pressure on key until side being filed is
clean.
-
Install cleaned key in shaft keyway with chamfered
corner side down in shaft (the cleaned, filed side
up in keyway).
-
Replace the propeller on the shaft and fit snugly on
taper. Check to see if it reaches the line made as
in Step 7. If it does not line up then repeat Steps
"a" through "e".
NOTE: A vise can be used to hold key while it is being filed, but care must be taken not to overly tighten the vise which can cause burrs and irregularities on the key.
-
Remove propeller from shaft.
-
When propeller hub moves to correct position, install
propeller nut on shaft and torque to seat the propeller.
Install the torque jam nut also, if your shaft is so
equipped.
- Install cotter pin at end of the shaft.

 The time will pass anyway; we might just as well put that passing time to the best possible use." |
Shop Talk: Useful Racks
Overhead Tool Rack
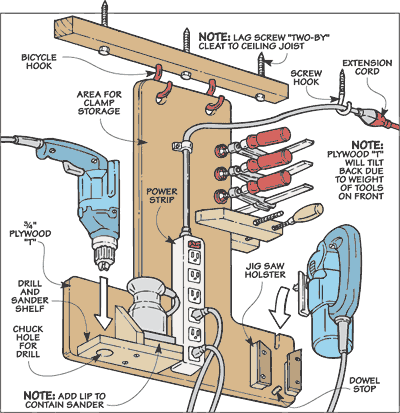 If your project or
workstation is in the middle of your
shop/garage/carport/barn, there often isn't an electrical
outlet nearby in which to plug your power tools. Of course,
trailing an extension cord across the floor is a safety
hazard, so why not hang a strip of outlets above your
workstation? With the cords running up there is less of a
chance of tripping on them or accidently cutting through
them. To make it even more useful, attach the outlet strip to
a plywood tool rack which can also store tools and clamps
near your work area.
If your project or
workstation is in the middle of your
shop/garage/carport/barn, there often isn't an electrical
outlet nearby in which to plug your power tools. Of course,
trailing an extension cord across the floor is a safety
hazard, so why not hang a strip of outlets above your
workstation? With the cords running up there is less of a
chance of tripping on them or accidently cutting through
them. To make it even more useful, attach the outlet strip to
a plywood tool rack which can also store tools and clamps
near your work area.
As you can see in the drawing, there's not much to this
tool rack. You just cut a piece of ¾" plywood to
shape and screw a power strip vertically in the middle of
it.
Then to hang it from the ceiling, drill two holes in the
long end and hang it from a pair of bicycle hooks that are
screwed into a cleat attached to the ceiling. This way the
power strip/tool rack can be easily removed if you need the
extra space for working on a tall project.
Next, make a couple of shelves and holders for the power
tools you use most often, such as a sander, drill, and/or jig
saw. All that's left is to run an extension cord across
the ceiling and plug in the outlet strip.
Pickup Plywood Rack
You may have discovered that
hauling large sheets of plywood in a small pickup truck
isn't a good match. So to make your truck a little more
accommodating, build a simple plywood rack.
The rack is made from common 2x4s. As you can see in the
drawing, it's nothing more than three supports connected
with two cross rails. The rear cross rail is positioned just
behind the tail gate to keep the rack from sliding. Be sure
to position the front rail to clear the wheel wells of the
truck.
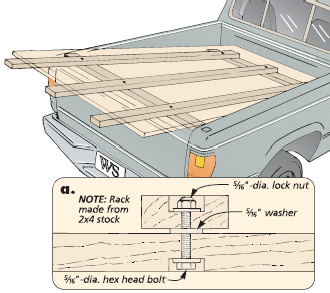
The detail drawing shows how the supports and rails are
fastened together with hex bolts and lock nuts. The heads of
the bolts and nuts are counter-bored to prevent damage to the
sheet stock or the truck.
You can also place washers between the supports and cross
rails. This will allow you to easily fold the rack and store
it out of the way when it's not in use.
Recent email:
Subject: A Poem for your WebLetter
"BOAT NAMES" by Ernest Bumby
A name for my boat
Has been a chore,
Many different names,
Yet each was a boor.
I tried "Will of the Wisp,"
"Dry Waves Clapping,"
"Mechanic's Dream."
Then "Tap, Tap, Taping?"
"Aweigh In A Manger,"
"This Boat's For You,"
"Lofted to Float,"
Or "Just Blue."
The inter-net I looked
There were names aplenty,
I wanted one special,
Not just any.
Then I thought
It just could be,
The right name is
"Poet's Tree!"
-- Ernest Bumby
Farmington, New Mexico
Subject: Glen-L Calendar
Thanks for the great calendar this year!! I'll have you
know the Glen-L calendar has replaced my long-standing
subscription to the "Ghosts" calendar (vintage WWII
airplanes) as the "official" calendar in my
office.
Now, if I could just find a copy of "I've Got Boats to Build"
to play in the background, I'd be set!!!
Happy New Year to you and yours.
-- Dan Crummett
an Oklahoma boat racer and boat builder wannabe
Subject: Fond Memories
Whenever I was hired to deliver a rag bagger I was in my glory. Sailing is the fondest of all my memories. Especially in the fall when the winds are steady and moderate.
As you know I am building the Fancy Free. This boat has become my "other woman", however this has not disturbed my wife as she is just as proud of the "Alexandria" as I. I am about two-thirds done and plan on a May launching.
My sons reminded me the difference between a power boater and a sailor is the power boater is in a hurry to get to a party; the sailor takes the party with him.
Merry Christmas and a very happy prosperous new year.
-- Gale Elenbaum
Marietta, South Carolina
Subject: 2009 Gathering of Glen-L Boatbuilders
The DVD of the weekend looks great and the interviews are just wonderful.
Thank you for allowing me to do this project for you. It was truly a great experience, and I'm blessed to be able to work with such nice people.
-- Chris Dixon
Vineyard Productions, Marietta, Georgia
Subject: Sissy Do
I just re-powered it w/ a 9.9HP Suzuki. I had a blast in it when I was younger and now I hope my kids take an interest in it in the next couple of years.
-- John Hankinson
Subject: ?
I’m 39 years old and work as an Art Director at my own Advertising Agancy. I have a lovely whife and two wonderful daughters and live in a town call Östersund in the middle of Sweden.
I really appreciate that you are following up the order as you do and your interest in our building success. In Sweden we are not used to that.
I have wanted such a boat since I was 12 years old and then saw one for the first time and this project has grown in my head for a couple of years. Now is the time to start building. Our house is in order, the company is going great and my father-in-law has a comlete set of tools that I can use. Could not be better. I look forward to showing you the proceeds of my work.
I have also a good contact with a guy from Stockholm who built the same Barrelback a couple of years ago which became a beautiful piece of work. It´s because of him that I find out about your company and the Barrelback plans.
Yours sincerely,
-- Markus Trapp
In the middle of Sweden

![]()
GLEN-L boats, of course