WebLetter 22
An Occasional Publication for the Home Boat Builder
Glen-L Marine Designs - 9152 Rosecrans Ave. - Bellflower, CA 90706
In this issue
- Pedal-It plans available now!
- Feedback: Flying Saucer
- Class CD: Father/Son project
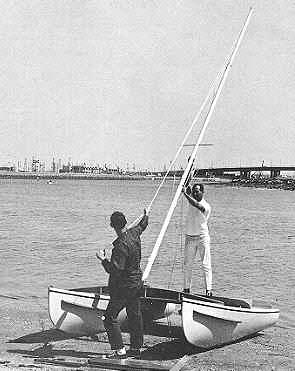
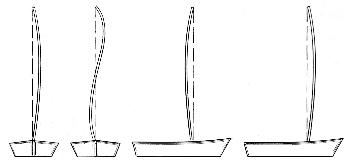
- Rigging Small Sailboats - Chapter 9
- Feedback: Monaco
- Let's see if I can tear up this man's design...
- Glen-L builders in the news
- Shop talk: Making fiberglass components
- Recent email
Glen-L Update
-
Website:
-
Web site:
The following are some of the changes made to Glen-L.com since the last WebLetter.- The "Inboard" section of the Boat Design Catalog has been updated, with additional drawings and bills of materials. The last section to be updated will be the "Work Boats". We hope to have this done before the next WebLetter.
- On some of our design pages you will notice "Notes" links (next "Bill of Materials" and "Photos" links). There are very few of these at present, but we will be adding more in the future. Most of those now on site have been answers to specific questions from builders; some concern performance, some show detail drawings.
- As always, many new photos in "Customer Photos" and new entries in the "Project Registry". Thank you all for sharing.
- The PEDAL-IT plans and patterns are now available; see below for details.
- Shopping cart. Hope to have this ready by the end of the year... we'll see.
- When was the last time you visited the Boatbuilder Connection? The Connection is meant to give you a chance to talk to other builders about your boatbuilding concerns. We would like to thank all of you who have shared your expertise with other builders. Builders like Mark Bronkalla provide thoughtful, in depth answers that are well worth checking out. Thank you Mark and all of the rest of you for helping our boatbuilding community.
- When you look at this WebLetter you may notice that the majority of what we publish comes from builders just like you. Some of the entries are "how-to", but many are reports or comments about their projects. This "real life" feedback provides the best answer to whether "I can build a boat". I hope you will share your experiences with your fellow builders.
- Tell us about your Glen-L sailboat. In a future issue I would like to post comments on as many Glen-L sailboats as possible... performance summaries, articles on building, perhaps just: "Built the Glen-L 14 from frame kit, took 8 months part time, performs great in all airs"... or whatever. Email your report whether the boat was just completed or finished 10 years ago. List subject as "Sailboat report".
- Marketing. The whole point of having a news letter is to sell more stuff. This is a point I frequently forget about when preparing the WebLetter. I usually ask Darla.. "do you think this is enough, do you think people will find this useful", when I should be asking if she thinks we will sell more. Anyway, I have noticed that I have again neglected the marketing part, so if you enjoy this WebLetter, buy something, and tell a friend about us. Since Christmas is coming up, you might want to put a fastening kit or gallon of Poxy-Shield on your Christmas list. It will save your family a lot of hectic shopping and you will get something you really want.
-
Web site:
Barry Witt
Editor
At last... The Pedal-It plans & patterns are ready
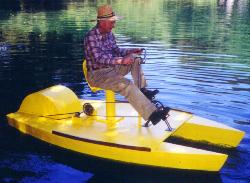
In answer to all of you who have asked when the Pedal-It would be ready... it's ready now. For those new to the WebLetter, the Pedal-It is a pedal powered boat that uses stitch and glue construction and scavenged bicycle parts to make a twin hull boat that is propelled by human power. There are lots of pictures of the construction in the New section of our website.
The Pedal-It plans and patterns are $63.00. Order your set today!
Feedback: Flying Saucer
All and all, this was a very fun project. From the time it (frame kit, fastening kit, and fiberglass covering kit) arrived to completion was about 7 weeks. I work full-time so there were lots of late evenings and weekend project time.
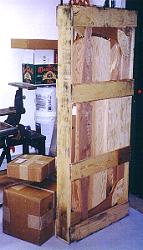
A couple of things to note. (1) There was a little damage on one of the ribs at delivery; looks like it (packing crate) might have been dropped. Easily fixed, no problem. (2) I bolstered the transom with two additional knees to support the weight of the Honda 25hp that I put on it. (3) I located the wheel at a point closer to the bow due to the weight of the motor. I had heard on the Internet that another person had suggested moving the wheel toward the bow. I guess with a lighter motor it would be ok as spec'd.
The boat is really fast. A couple of jet skis came up beside me last weekend as I was just cruising. They took off and so did I. They were left in my spray. Lots of fun!
Thanks for the project and when late Winter/Spring rolls around it will be time to build another one.
Sincerely, John T. Dutton, Media, PA
Mr. Dutton sent a large number of photos of construction, we are including a few to illustrate the construction and have added captions.
Flying Saucer construction photos
Class CD: Father/Son project
Wed, 25 Oct 2000
Hi, my name is Adam Twiford. I have recently bought a Class CD Racing Runabout (frame kit, bronze fastening kit, epoxy fiberglass kit). I started building it in early September and have come quite a long way on it considering that we have only put in about 40 hours. Your plans and frame kit make the boat quite easy to build and because of the epoxy resin it is as strong as rock. I am 13 years old, and the boat is pretty much a "Father/Son" thing. We have decided to paint the boat yellow with black racing stripes and we are going to name it "Yellow Jacket". We have pictures of it in the box all the way to it being completely covered in plywood. We are fiberglassing it (probably the hardest part) and will continue to take pictures until I am taking it on it's test drive. I will probably send some pictures of it to you and I would appreciate it if you would put them up on the website. It would be really cool to tell my friends to go to your website and see me in it. I am starting to like building boats and I will probably never buy a company boat in my life. It is too much fun to build it yourself, and cheaper. Thank you for giving me the opportunity of building my own boat and such a good one. You will probably receive pictures in about 2 months of my boat.
Thank you
Adam Twiford
Feedback: Monaco
Mr. Yonescu has built both the Monaco and Riviera. See Customer Photos/Photo Board 1.
Thanks for posting the Monaco, it's nice to see both my boats on that "front page". It's OK to keep my email address on your web page, I do get email and answer all that write. It would be nice to hear from someone wanting a boat built for them, something like the Stiletto would be fun. WEYonescu@flashcom.net
The 19K$ covers everything, including 1K$ for the final clear coat spray (done in a booth by a local auto body shop) and 1K$ for the upholstery (done by a local auto upholstery shop), 1K$ for the complete windshield, $500 just for the bow light. 1K$ for a fancy CD-Stereo system with Bose speakers, separate amplifier and powered subwoofer and dash mounted remote. There is a digital compass, a digital depth-finder, and other fancy gold plated gauges (Faria) that were more expensive than may really be required. I used a custom 40 gal fuel tank ($350), about $500 for 10 coats of 2-part polyurethane clear as a pre-finish to the final spray, $500 in epoxy. About 1K$ for the underwater gear (available from Glen-L) and propeller. (I used a chromed rudder, strut and stuffing box.) $200 for a Mahogany steering wheel.
The bottom is 4 layers of 4mm Okoume plywood (approx 12 4x8 sheets) ($400) Sides - 2 layers of 3mm Okoume plywood (8 sheets ) ($300) with a final layer of 1/4" mahogany ($500). Deck - 5 sheets of 3mm Sepele plywood ($350) over 4 sheets of 9 mm Okoume ($250) The bottom got 3 coats of epoxy, 3 coats of 2-part barrier paint, and 2 coats of white bottom 2-part epoxy paint. Sides and deck were stained, covered with 3 coats of epoxy then the 10 coats of 2-part poly, sanded and sanded and sanded and then the final spray coats. The stringers were laminated out of 2 and 3 layers of 3/4 fir. Engine logs solid 4"x4" mahogany. The engine/transmission cost approximately $7K. All hardware was stainless steel. Other items make up the rest.
All these number are approximate. I wanted the nicest boat I could build and didn't spare expenses. There would be lots of ways to cut costs and still have a very nice boat.
I hope this is helpful -
Bill Yonescu
Let's see if I can tear up this man's design...
Subject: one of your boats
Date: Thu, 13 May 1999
From: Shelby Dean Aaron
To Mr. Glen L. Witt,
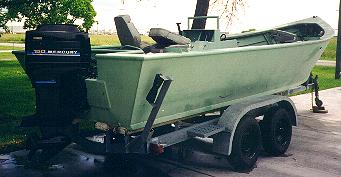
I purchased your 22 ft. Hunky Dory plans for aluminum in 1991 to build a rugged, simple, dependable boat. I now have a computer to see your site... the world turns, does it not. Anyway, I believe I have a humdinger of a testimony about how idiot-proof your designs are. I built the craft with the intention of making a sensible fishing boat. I welded it up with a 3/16" hull and center console. But along the way, somehow I ended up with a 150hp Mercury V-6 on it. After I realized what I had done, I said, well let's see if I can tear up this man's design. I'm here to tell you that your craft are immune to crazy people. I have made by accident, this 22 ft boat fly like a bird; to say it is extremely fast is putting it mildly. We have even driven it (accidently) upon parked black barges at night, that just appeared. That was not me, but a buddy who did not have the halogen lights on... go figure. I know a man of sound judgement like yourself, and your fellow professional designers would not do this, but we have not had the first leak on the hull. ...The pictures I took in '91, before the initial launch.
|
|
P.S. The boat was just sitting idle in the driveway one
day, when a tug captain who had hurt his back and was
disabled, wanted to know what I was going to do with
the boat. I asked why and he said he could haul
groceries to the area tugs and support his family. So I
sold it to him 6 years ago, with the 150 on it. It is
working 7 days a week on around the clock call, still
to this date. By the way, it was the tugboat captain
who was trying the boat out upon purchase, with me in
it; after I said not to turn this boat at wide
open throttle, did so. Ha, you ought to see how a 70
mph boat stops in less than 1/2 boat length after it
comes down from being airborne. I doubt Boston Whalers
could stand up to this punishment. I just thought you would enjoy my note about one of your vessels. It is all verbatim and true, as I have said. Shelby Aaron |
Glen-L builders in the news
Two builders of Glen-L boats were featured in the "Launchings" pages in WoodenBoat magazine, Sep/Oct 2000.
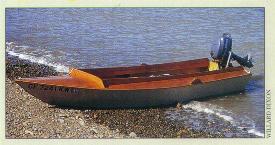 "Working with epoxy and okoume plywood, Willard
Dixon built this duck-gunning boat to Glen-L
Marine's plans for the Duck Boat Too. A 4-hp Yamaha
outboard powers the 12' 100-lb skiff. Willard
reports that the boat rows well, and he finds it
'satisfying all around'. You can reach the
builder at 5 Belloreid Ave CA 94901."
"Working with epoxy and okoume plywood, Willard
Dixon built this duck-gunning boat to Glen-L
Marine's plans for the Duck Boat Too. A 4-hp Yamaha
outboard powers the 12' 100-lb skiff. Willard
reports that the boat rows well, and he finds it
'satisfying all around'. You can reach the
builder at 5 Belloreid Ave CA 94901."
|
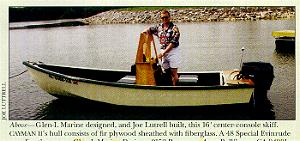 "Glen-L Marine designed, and Joe Luttrell built,
this 16' center-console skiff. Cayman II's hull
consists of fir plywood sheathed with fiberglass. A 48
Special Evenrude supplies the power. Joe Luttrell, 160
Carabell Dr., Huntsville, AL 35803"
"Glen-L Marine designed, and Joe Luttrell built,
this 16' center-console skiff. Cayman II's hull
consists of fir plywood sheathed with fiberglass. A 48
Special Evenrude supplies the power. Joe Luttrell, 160
Carabell Dr., Huntsville, AL 35803"
|
If you would like to submit your project to WoodenBoat...
Send color photographs (slides preferred) of your recently launched boat to: Launchings, WoodenBoat, PO Box 78, Brooklin, ME 04616.Include the following information:
(1) Length on deck; (2) Beam; (3) Type, class, or rig; (4) Boat's name; (5) Names and addresses of designer, builder, and owner; (6) Port or place of intended use; (7) Date of launching (should be within the past year); (8) Brief description of construction or restoration.Note: WoodenBoat is particular about the photo. It has to look good. Simple backgrounds are best. Avoid shooting in bright sunlight.
Shop talk
Making a fiberglass shaft tube, daggerboard trunk, spar tube
We are using the construction of the daggerboard trunk for the Bull's Eye to explain a procedure that can readily be adapted to a variety of projects, including non-boating applications.
- Materials required:
- Polyethylene plastic film.
- Newspaper or card stock.
- Form (in the case below, a daggerboard).
- 7 to 10 oz. fiberglass cloth, cut in widths at least 3" wider than the desired finish piece is long.
- Poxy-Shield epoxy resin.
- Gloves.
- Wrap card stock or newspaper around the daggerboard (about 1/16" thick) and tape in place.
- Wrap one layer of polyethylene sheet plastic over the newspaper and tape in place. (Resin won't stick to polyethylene.)
- Clamp the daggerboard in a horizontal position with the covered end readily accessible. Put newspaper underneath to protect the floor from dripping resin.
- Put on gloves.
- Tape one end of the fiberglass cloth to the form and wrap one time around daggerboard form with additional cloth hanging down.
- Wet cloth resin and wrap around an additional layer, wetting out as you go, pulling the cloth snug to the form with each turn. Continue to a total of about 5 layers.
- Smooth the cloth with hands and squeegee, wringing out excess resin. The laminates should be translucent, white spots indicate that the cloth is not completely wet out.
- After an overnight cure, slide the fiberglass trunk off the form. The piece will be trimmed to length during installation.
In the case of the daggerboard trunk, a hole is cut in the bottom of the boat to match the outside contour of the trunk. The trunk is slipped into the hole, held in position, filleted in place, and the fillet reinforced with cloth. The trunk excess is trimmed off on the outside and ground smooth.
If you were making the PowerYak or Electric Drive Mount, or the shaft through-deck supports on the Pedal-It, the mast tube for the Eight Ball-SG, or prop shaft tube for the Amp Eater, the procedure would be the same.
Recent email:
Subject: hint
Date: Sun, 17 Sep 2000
Do not fasten your frames to your building form in a way that
you can't remove the screws after you have planked the
hull. Don't ask how i learned this trick.
I am a first timer, but didn't think I could be so
stupid.....
JOE P.
RE: Glen-L Marine Designs Update
Date: Mon, 18 Sep 2000
From: Dutton, John
Gail,
Please leave me on your mailing list. I have just about
completed my Flying Saucer that you shipped mid-July. This
past Saturday and Sunday I was in the water for the first
time. WOW, does it move. I have a HONDA 25hp on it and it
moves... What a great project. Didn't do much for my
marriage of 30 years, just kidding, but ended up with a great
boat. This boat is faster than a jet ski, unbelievable.
Almost airborne.
Thanks for sending this reminder so that I could write back
to you.
Subject: Project
Date: Wed, 27 Sep 2000
From: Ibsen Stephan (Brazil)
GLEN-L MARINE DESIGNS
In the year of 1975 I built the GUNG HO, a 28' express
cruiser, built in plywood, and powered with twin
inboard-outboard motor of 130 SHP each.
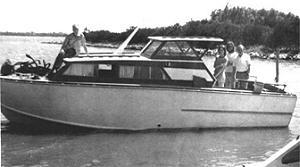
Afterward, in 1987, I built the ODYSSEA, a 36' cruising
yacht, built in STEEL and powered with a single diesel engine
with 150 SHP.
Now I am studying the plans of other GLEN-L boats for STEEL
construction, and powered with one or twin diesel
engine.
The goal, is to fish in head seas and sometime powerful
wind.
I am in doubt between the ANDANTE, 38' yacht (build in
steel) and the MARAUNDER 44' Sport Fisherman build in
steel too.
I receive, last week the MARAUDER Study plans.
Now I need the study plans of the ANDANTE.
Thank you for your attention.
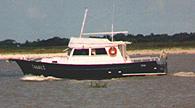 The Odyssea 1987 |
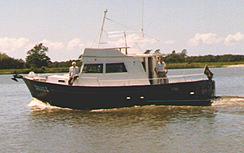 The Odyssea today. |
Note: Mr. Ibsen modified the Odyssea plans for steel. We do not offer a steel version.
September 29, 2000 at 13:30:49
---------------------------------------------------------------
name: Reinaldo Mora
Comments: I love this page.
Sunday, October 1, 2000 at 20:43:05
---------------------------------------------------------------
name: nick
Comments: i really like your site. im building a boat at the
moment and your site comes in handy for finding ways to build
a boat like your step by step pictorial guide with captions
on building boats with ply.
email:
hello, i was wondering if you could tell me what the degree of the vee at the bottom of the hot rod is. a representative from glen l told me that it was too flat for a jet, but the design catalog description says it is a vee bottom. i figure i can find out what some jet manufacturers say is OK and then go from there. if i am stuck with v-drive i guess that's the way it is, but i'd really prefer jet if it is at all do-able. thank you so much for your help. Matt holmes
ANSWER
- 4 degrees @ the transom
- A flat bottom: the Sissy Do
- A modified vee or vee bottom: Hot Rod, Thunderbolt, etc
- A "flat bottom" when referring to a ski or race boat: Hot Rod, Thunderbolt, etc
- A deep vee, 12 degrees or more: Rampage, Roustabout
- Performance: The best performance is a rear mount, v-drive. A jet will not compare.
- Even though not considered desirable, several Thunderbolts have been built with jets... they "get by".
-
Manufacturers recommend 12 degrees or better. When the
boat is on a plane, a "flat bottom" tends to
lift completely out of the water, starving the pump of
water. No water= no thrust, no steering. Deep vees do not
come completely out of the water insuring a constant
supply of water (also more drag).
brw
Subject: Re: Glen-L Order
Date: Thu, 12 Oct 2000
From: EL Anderson
To: Glen-L Marine Designs
Gayle: The Frame kit (Glen-L 15) arrived yesterday and is already unpacked. While I feel like I am cheating I'm very pleased with the work done...saved me a couple of months and a lot of errors. You also used a lot more mahogany than I may have.
Good job!
Build more boats
Glen-L boats, of course