WebLetter 46
An Occasional Publication for the Home Boat Builder
Glen-L Marine Designs - 9152 Rosecrans Ave. - Bellflower, CA 90706
In this issue
- Feedback: Tunnel Mite
- Emerald Coaster in the Florida Keys by Don Hodges
- Designer's Notebook: Bills of Materials & Lam Schedules
- Feedback: Outrage
- Inboard Hardware: Stuffing Box Packing
- Shop Talk: Odds and Ends
- Lunatic Fringe by Dale Mogk
- Recent email
GLEN-L Update
- I have continued emailing builders in the Project Registry to check whether email addresses are current. I have included some of the responses in the Email section of this WebLetter. The Project Registry is a great resource, it is not just a brag board, but a way to contact other builders. Take advantage of the experience of the builders who are listed.
- A new page on the web site: Boatbuilders. We have had requests from customers for the names of builders who would help or build a boat for them. We are adding this page as a resource for our customers. These will be builders who have had some experience with Glen-L. The only builder presently listed is Shawn Auman who has built several Glen-L designs. We will be adding more as names become available. If interested, send an email with Name, address, phone number and/or email address. Use Shawn's entry as a guide.
- Using Search: Some of the Project Registry Updates I receive contain no boat name and are therefore difficult to locate. By using the Search feature on our site, entering name or email address, I am able to discouver what boat is being built. Use it to find additional information about boats you are interested in, or...
- The Boatbuilder Connection is also a great resource, but it only works if builders participate. Many builders have been able to find the answers to questions or sources for hard-to-find items by posting a question on the board. The Connection is also a place for sharing. Why not share your expertise or knowledge; your fellow builders will appreciate your input.
- As you will see, this WebLetter was mostly created by your fellow builders. I hope you will consider sharing your experiences, hints, or encouragement with our readers.
- I mentioned some time ago about a new design... the Gentry, it is still a way off, but there are photos of the frames in the New section.
- The next-to-last email in the email section is from Bob Warner, who just launched the Jack Tar. I received a package today with photos and have added a link to them. The building and launch will be covered in next two issues of the UK magazine, "Water Craft".
Editor
Feedback: Tunnel Mite
I purchased a set of your Tunnel Mite plans as a weekend project. I'm including several pictures that show progress for the Glen-L photo archives. As a first time boat builder, I found the plans very descriptive and easy to follow. I took extra care in assembling the seams of the bottom so there is no fiberglass used, just marine grade fillers and sealers to make the bottom impervious to water. Only a few modifications to the original plans such as slightly higher coamings which results in a higher dash for the steering wheel and "triangular" blocks to re-enforce the transom. I used a 25 hp Tohatsu which is plenty of power and just slightly over your 100 pound weight suggestion. Speeds in the upper 30's with an aluminum stock propeller. I suspect 4 to 6 mph faster with a higher pitched SS propeller. The boat rides a little "shifty" from side to side at slow speeds but smoothes out and really begins to lift at top speeds. Handles very well in light chop water. This boat was fun to build and a blast to drive. Got "White knuckles"?
Steve Powers
Aliso Viejo, CA
Emerald Coaster in the Florida Keys
by Don Hodges
The Emerald Coaster is Don's version of the Sweet Caroline.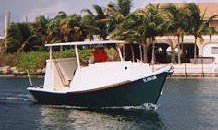
After 18 months building, my "Emerald Coaster" was ready to go to sea in March 2001! Her shakedown cruise would take me and Tom Hillegass to the Keys, far from her home waters in the Florida panhandle. Tom's son married my daughter in 2000, and this 6-day cruise let us build some common experience. Tom wanted to snorkel the ocean reefs at Looe Key and the Pennekamp Coral Reef Preserve along Key Largo, and I wanted to explore the capabilities of the little 20-foot dory skiff.
(Link to website no longer valid. 6-05)
Designer's Notebook: Bills of Materials & Laminating SchedulesIn our description of what a GLEN-L plan and pattern set consists of, the terms "Fastening Schedule" and "Laminate Schedule" are often used. Perhaps we originated these but we're not sure, not much is new in boating. In any case, we popularized the methods of listing the fastenings required to build and the use of laminates at seams for stitch-n-glue boats. A fastening schedule lists in tabular form what type, size, and the spacing or number of fastenings to use at each junction in the boat. The proper type for each particular joint, the length, diameter, and gauge of fastening to use is specified. For example, junctions may require bolting, screw fastenings, or nails. We also always stipulate that each permanent junction of wood members should be glued; epoxy is currently our first choice. As an example, bolts are specified by type, diameter, and length. Mostly carriage bolts are used for wood to wood junctions. Screws would be specified as wood type round, oval, or flat head, with flat head the most common. The overall length is specified as well as the gauge (diameter). Nails used are mostly the ring type common to boatbuilding and specified by length and gauge. The type of material used for fastening is also specified, generally hot dipped galvanized or bronze. Although other materials such as brass or "Monel" are available, we don't list them as an option; the brass are weak and deteriorate rapidly in salt or brackish water, and while Monel or similar metals are excellent the cost is high. We might add that the term "stainless steel" encompasses a wide range of metals, many stainless steel alloys will rust, and most are subject to crevice corrosion. We seldom specify these alloys, as the proper ones are expensive and suppliers are too frequently selling the inferior type for marine fasteners. As a cost saving, particularly on smaller boats, galvanized fasteners are listed. This is NOT the common bright finish electroplate found in the local hardware or building emporiums; these are not acceptable. Galvanized refers to the hot-dipped type where the screws are submerged in a vat or molten galvanizing metals. The hot dipped surface is dull gray after exposure to the elements. This does result in a fastener that may have some burrs or clogged threads; the price paid for a cheaper fastener. It's preferable to not mix fasteners; bronze and galvanized, for example, although with trailerable boats that don't remain in the water, particularly in fresh water, the inter mix doesn't cause a problem. Each junction of two wooden members is listed with the proper size and also the number or spacing of fasteners required. In practice, more or less fasteners may be needed and a shorter or longer one more adaptable. However, through the years of building many boats, our calculations have proven accurate. The number of fasteners required for each size and type is then tabulated, with a reasonable safety factor included. This is done with the designers and shop people going over each junction and checking the sizes, spacing and fastener totals. The result is a complete listing of the type, size, and total number of fasteners required to build the hull, all in tabular form, resulting in the "Fastening Schedule". Stitch-n-glue and some other plywood boats require laminations of resin impregnated fiberglass material for seam and other junctions. The "Laminate Schedule" lists the size of the fillet (epoxy resin with thickeners added) to make a cove at inner junctions, which varies with each. The type of fiberglass laminate used at the junction is listed; fiberglass cloth, mat (seldom used), bi-axial or similar material of various types and weights depending on the design requirements. Widths and number of laminations are also listed. Again the totals of resin, hardener, additive fillers, and widths and lengths of fiberglass material required are totaled and noted. No need to search the plans or fine print, everything you need is listed in the Laminate Schedule. This reminds me of the remarks of a mentor of days gone by about a boat I had recently designed. I was very proud of the fact that many details were given, as the boat was intended to be built by average DIY boatbuilders. He dressed me down with the comment: "Never furnish Bills of Materials and other listings. If a guy can't figure it out himself, he shouldn't be building a boat." I think he was wrong. And, with other designers adapting our procedures and the acceptance by customers of our methods, it doesn't appear there is much doubt. It's a lot of extra work, but this is the right way to do it, and what you get with GLEN-L plans. |
Feedback: Outrage
Yes, my email is still working.
Yes, I have finished the boat.
Yes I am very happy with it.
No, I don't have any cool construction pictures (I deleted them by mistake from my HD).
The boat went together in much less actual working time than I imagined. I took, however, about 7 months to complete it. That included only a couple hours here and there and very few 8-hour days. I kept no log and regrettably, have very few pictures of the process. I would say that I could do it again (better), knowing what I know now, in a couple weeks not including painting. It really is THAT easy. Of course the glassing was no treat but even that took less effort and had less problems than I imagined.
Three cheers for Glen-L!!!!!! The design was straight-forward and completely logical. Even so it yielded a really slick package that looks and performs better than the sum of it's parts.
The Outrage is lightning-quick out of the hole. With a normally tuned 120 it rides on only the last 6 feet of keel which I think is really cool! But, trying a change of direction at full onions is something you will want to avoid.
Modifications:
- I increased the size of the cockpit about a foot forward and a couple inches aft.
- The seats are back to back and fold down.
- I added a flat floor with storage access.
- The coaming rises above the deck plywood only 1" and is filleted with putty. The coaming is covered with padded vinyl as is the dashboard.
- The transom is 1/2" thicker.
- I added a 26 gal(approx.) custom built ply/glass tank under the floor at the center of gravity. I would be happy to send you the drawings for your opinion.
The change in the rear involved using more wood and building a rear end like a 70-80's vintage production model with the motor well being about 1/3 the width of the transom. The boat is heavier as a result and it really was a pain in the neck but it looks cool. Anyway, the design in the plans is the way to go on that score.
The change forward involved a thicker dashboard joist mounted to the carling/coaming between the 3rd and 4th frames. The carling/coaming are thicker and higher than the design and made of vertical grain cherry (EXPENSIVE here in Japan). They really were beautiful but now covered up completely.
I don't know if these changes were prudent or dangerous but I approached them carefully and logically. I hope they are over-engineered. Anyway no related problems since. I would not recommend these changes to anyone.
Mike Irace Lake Biwa, Japan
The following is in response to my question about the response of the local people to the Outrage.4-11-03:
Barry,
No the shape of the outrage is not strange here. But it is not like any other boat at my marina. Most are larger, more comfortable types.
But the list of non-professionals who would even attempt to build his own boat over here is extremely short. The first day I trailered her to the marina for her maiden, the crowd that gathered was very excited. They said it looked too fast. They were also amazed that anyone would build his own. There were also many comments about how surprised they were that a hand-made boat could look so finished.
Thanks again. Always happy to answer any questions.
Mike Irace
Inboard Hardware: Stuffing Box Packing"I have one question about installing the flax packing. Do I need the entire flax packing when installing it in the stuffing box or do I have to match the contour of the stuffing box. Anything else I should know about installing the flax packing?" ...FSAfter the shaft log is in place, the stuffing box (which is sometimes called the packing box or gland) can be secured. There is more than one type of packing or sealing method available, hence there is more than one method of application. The common packing methods are the packing gland type and the patented seal types. Although a matter of personal preference, the packing gland type has an important advantage. In the event that the packing fails underway thereby allowing water to enter the boat, it is possible to replace the packing with more packing simply by stopping the boat, removing the packing nut, and retightening. Even if spare packing is not available, there is usually some "make-shift" material that can be used to form the packing, such as an old shoe string or small rope. Granted, such a packing would not be suitable for the long term normal operation of the boat, but it would allow the boat to limp back to port. With other types of seals which cannot be removed without pulling the propeller shaft free from the motor or coupling, a repair at sea would be much more difficult if not impractical. With the packing gland seal, packing is quite often installed incorrectly. The packing usually consists of a waxed flax or other impregnated braid that looks like a small piece of rope (although never use graphite impregnated packing that could corrode the shaft). The end of the packing should be cut at a 45° angle. The packing is wrapped one turn around the shaft and cut at a 45° angle, so that the ends lap. At least two rings of this packing are placed around the shaft with the joints staggered so as not to end together in one position. The number of rings used will depend on the type of stuffing box. The packing nut is used to force the packing against the gland and should be tightened by hand only, or at best with very light pressure from pliers. The locking nut is run up against the packing nut. A check should be made after by turning the shaft several times. It should turn freely without binding. When the hull is launched, the packing will undoubtedly leak slightly after the motor has been run awhile. Loosen the lock nut and tighten the gland again, being sure to run up the lock nut after. Going through this procedure several times may be required until the packing is seated. Many individuals use a wrench and tighten the nut so tightly that the packing is forced against the shaft. This can cause the shaft to become overheated and it may possibly freeze to the gland. If this occurs, the shaft may tear the rubber hose loose thereby causing a serious leak. Many skippers are willing to accept a slightly dripping stuffing box when under power which is assurance that the nut is not too tight. A little water seepage will also help keep the packing cool, and what small amount of water enters the bilge can usually be ignored. With the seal type packing, all these procedures are not necessary since the sealing is automatically provided by the "O" ring seal. Seal type packing are available with single and double type seals, with or without water discharge outlets that can be used to cool the packing. In addition, a Zerk fitting is often provided for grease lubrication. With these a waterproof-type grease should be used as required. Most seal type packing use a Neoprene-type ring seal. |

Shop Talk: Odds and ends
Bow eye: As a general guide, the bow eye on small boats is located approximately 20" above a straight line extended from the keel. It should be installed perpendicular to the angle of the stem. We recommend fitting before fiberglassing as it is easier to correct mistakes or to flatten an area for the eye if necessary. After fitting, remove the bow eye, fiberglass and redrill the hole. The bow eye should be bedded in a marine mastic or sealant.
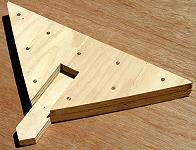
Breasthook/stem fairing breasthook: The breasthook mounts on top of the stem and provides a place for the sheers to attach. In our plans, the breasthook is usually made of two pieces of plywood, glued together. The bottom piece is notched to fit around the stem, the top rests on the end of the stem and is glued and fastened to it. The forward end of the stem will stick out beyond the stem, more or less, depending on the design. On some designs such as the Tornado, which has a long bow, the overhang can be long. This is necessary because the breasthook is faired so that it continues the curve of the stem.
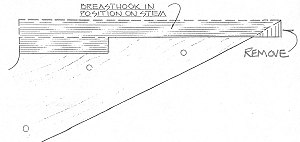
See the drawing at the right.
We have frequent questions asking why the point of the breasthook extends so far... "perhaps the notch is too deep?"
I hope that the drawing answers this question.
Poxy-Shield as a glue: Although this is discussed in many places on our web site, we still get questions asking what glue we recommend and what filler we use for gluing. Our glue of choice is Poxy-Shield. This epoxy resin is also used for coating, fiberglassing, and stitch and glue fillets. When we use it for gluing, we always add a filler. Fillers insure that the resin will bridge gaps between uneven surfaces and allows you to put more glue into the joint. The filler Allyn uses is our #1 Silica (Cab-O-Sil or Aero-Sil). #1 Silica is a fumed silica. When mixed with the resin, it acts like adding flour to water: it becomes thicker and less runny. Other fillers will work, but none is as creamy and easy to use as #1 Silica.
For more information about using Poxy-Shield see our on-line Epoxy System Technical Manual.
Lunatic Fringe
by Dale Mogk
My best friend and I bought plans for the Rebel in October of 1985. We were living in Lompoc, CA at the time (just north of Santa Barbara in CA). By July of 1986 the boat was in the water in Lopez Lake which is behind Arroyo Grande, just south of San Luis Obispo. It was a 9 month gestation period.
Our boat is named the "Lunatic Fringe" and we actually had the name before the plans. We went to our local drive-in movie and watched Vision Quest and the ending credits rolled to the song Lunatic Fringe by Red Rider (an obscure Canadian band). I announced that this was the name of our (imaginary at this point) boat. After looking through the CA registration requirements we decided upon the Rebel as our preferred design.
Soon after we received the plans we were headed down to the intersection of Anaheim and I-710 for wood. Except for the frames, which we bought from you folks, the structure is oak - we expected to need the strength. We got "spiral cut" mahogany plywood for the deck area, it looks great - the deck changes color as you walk around it. We clear coated it with Z-Spar Polyurethane. The rest of the hull is white and the sheer, plus some accents, is a dark blue. The motor well and interior is a much lighter blue.
We have a full array of the necessary deck hardware including open chocks, cleats and snap sockets (or whatever those gizmos are) for fenders, two on each side. It really looks like a late 1950's vintage ski boat. Just aft of the bow cleat is a button sticking up just a little - it's the (electrically) retracted antenna for our AM/FM Cassette deck and CB radio. When we launch we play Lunatic Fringe on the cassette deck.
We looked through all the "Penny Saver" type handouts for older (1950's - 1960's) Mercury motors in our area. Eventually we wound up with a number of Mark 78's and 700's. We then raided our local Mercury dealership for all their on the shelf stock of parts for these motors. Now, the boat has a Direct-Reverse Mark 78 with a Merc 700 power head. Extreme care must be exercised when approaching the dock as the motor must be stopped and re-started in reverse when coming in hot - a dicey operation to be sure. We know it's not the stock color for this vintage Mercury motor, but we had the motor epoxy-coated black.
As it is a left hand rotation motor, we put the steering wheel, instruments and controls on the left side of the boat. The right side of the dashboard has our (ski) glove compartment. The front seat is actually two bucket seats, but the area between them is filled with a 15 gallon fuel tank (we can go all day!). The rear seat faces aft. There is no windshield.
When the Lunatic Fringe was complete we contacted our local DMV office. They got a general description of her and decided we didn't need to actually bring her down so they could see her.
"A homemade, 14'-10" plywood boat with an outboard motor" was a sufficient description. They assessed her at $650, sight unseen. This represents quite a savings in unsecured property taxes, I assure you. We paid the fees and got our hull number. We never actually totaled the cost, but it must come in around $8,500 somewhere. Remember, this was in late 1985 and early 1986. Things have changed here in California, I understand.
They did want to see the trailer, also built from Glen-L plans. We had it welded by a fellow who worked at Diablo Nuclear Power Plant - the welds are outstanding!
With the direct reversing motor, it can be a real handful in marinas. With the oak construction, it will do about 36 MPH at redline on the (somewhat less than) 77 hp the motor puts out through our Volvo/Penta 3 bladed prop. Viewed from the front she puts out quite a bit of spray, but it stays outside the boat except in conditions we don't want to be out in anyway. Skiers report a very nice, small tabletop and minimal wake. I don't know as I just love driving her and my uncorrected vision leaves something to be desired. With a moderately sized skier at the end of the ski rope we can do about 33 at full throttle and a couple of hundred rpm below redline.
All-in-all it has been a very satisfying project. We have pictures in two large albums, unfortunately my brother, my best friend, nor I have any idea where they are at the moment. My best friend swears they are with the boat. My brother swears he never got them. The boat is back in Lompoc, in my brother's custody.
As I just bought a set of "Bayou" plans for my '92 Dakota, perhaps when I complete the camper I'll go over to Lompoc, hitch up, and drag the whole shooting match down to Bellflower to show off.
Dale - top of the Cajon Pass, Phelan, CA
The greatest difference between genius and stupidity is: genius has its limits!Recent email:
Subject: Re: Glen-L 17
Date: 4-23-03
Hello, Barry...
Thank you for your Email request! I really appreciate how you're always upgrading your website & keeping in contact (like your message to me)! Yes, my Email address is still good. The project, GL17 isn't completed (kidding) have been sailing her for 15 years. The reason 'it isn't completed' is because I'm always upgrading...or trying to. A few months ago I added roller furling to the jib...one of the best things I've ever done. Then, over the Holidays, added a 60 watt stereo system that is fabulous to listen to...especially downwind. I'm also, in the process of adding a battery cut-off switch because of the additional electronics added. New cushions are in the future as well. Thanks again for your question...and...I hope 'the project is never complete'! Peace & great sailing to all.
Mike
Subject: Super Spartan model
Date: 4-21-03

Just thought you might like to look at my model Super Spartan. It's 50 inches long, 24 inches wide and does 40mph +. Runs 3BHP weed eater engine
Ben Mitchell
Below is the result of your feedback form. It was submitted on Friday, April 18, 2003 at 16:35:01
-----------------------------------------------------------------------
name: Johann Hedinsson
Comments: Hi.
I am Johann in Iceland, I have been flipping through the pages of your web site and I am impressed to say the least. I have dreamed of building a boat for years and actually built a few kayaks and after these pages I am more than eager to go ahead and start something.
My problem is that I do not know where to start, everything is so tempting and the pictures from your customers incline that it is not as difficult as one might think to do it. I am a crafts teacher and I even am thinking of a boat building as a school project and have ordered plans (Tiny Titan) to do some studying this summer.
Anyway I am looking forward to doing something about this dream of mine now and you will be the first to know. Very thorough site and helpful.
Greetings from the frozen north.
Johann
Subject: my completed mai tai
Date: 4-17-03
Glen-L:
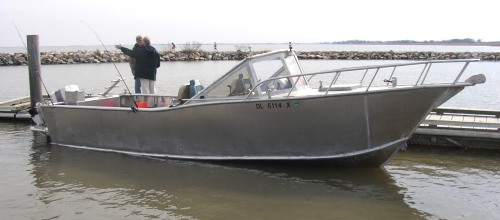 I've had these( Mai Tai ) plans for a long time & I finally built it. I am one of those guys that has always had a boat. I'm a certified welder, used to be a commercial diver, and scuba dive off of Delaware as often as the wife will permit. By the way, if she was not behind me on my projects, I couldn't do them. In my case when all these things are put together, the end result is a 25' ( 29'6" counting the swim platform & bow pulpit, with an 8'3" beam) Mai Tai. The hull is all 5086 aluminum , about 1700 lbs. with a 1/4" bottom & the rest is 3/16, I put a 4" chine on the hull, the boat is a rock on the water. It does 30.2 kts. with a used 150 h.p. outboard, and I still have to raise the motor 2" on the transom. I want to start a Double Eagle with a 4 cyl. diesel, but first I have to make a river rat for my cousin. Previous to this I have been experimenting with fixed shaft surface drives. Any way here's a picture.
Thanks for your time. Bill Zubko.
Note: The Mai Tai is designed for plywood and is not detailed for aluminum. It can be found in the Cruiser section of our on-line Catalog (with cabin).
Subject: Re: Scull Boat
Date: 4-17-03
Barry,
My project is complete and I hunted out of it for the first time this past fall. I was successful in trying to scull but will need a lot more practice. The boat is very stable and I took it thru some rough waters with breakers going over the bow just past the port hole on occasion :(. It held tough and I did not have far to go. I punished it in the ice and it was great. A well designed boat.
Thank you for asking,
Scott
Subject: Squirt in the works
Date: 4-15-03
Hi,
We thought we'd send you in some pictures of the boat we are building from your Glen L "Squirt" plans.
It was started during the Christmas holidays, and we're hoping to have her ready to launch this summer. It is for our 11 year old daughter, Vanessa.... and she has already christened the boat "L'il Nessy".
We have take 10 pictures of the boat in progress.... from the construction of the frame... to it's present state - the deck caulked and varnished, and the hull painted black.
Love your website, love the Squirt!!
Regards,
John and Cindy Hendren
Subject: TNT
Date: 4-12-03
Jeff Westwood
Peterborough ON, Canada
Ready to apply paint
04/12/03
Completed boat in Jan. Made alot of modifications. I raised the deck
1.5", boxed in the back, made a frame to hold the gas tank, boxed in a
storage section, put in a floor using Aluminum 'L' bracket, made a center
arm rest which I had upholstered, made cushioned side panels to match.
Fitted a carpet, installed a stereo system--Tape deck--/two 6X9's--two
5" mids/Antenna and a 280W Amp. Made a windshield out of Lexan,
Modified Dash, Installed Speedo, Installed Lights, Installed Mooring
cleats, Installed Aluminum Transom plate, Installed paddle bracket under
the deck which hold 3' paddles, made custom battery brace, made speaker
boxes. Made a box for the tape deck, Installing a Tack. Had to use ten
pulleys for tiller steering system to hide all the cables, I should have
spent some money and put in guide rod steering. I'm re-painting my old
motor to match the boat, made a stencil for the lines and graphics.
Purchased a new product from Sea Ray called a Hydrofoil, not like other
Hydrofoils this is guaranteed to improve performance, it mounts easy on
the lower unit of your motor and only cost $50 CAN. Currently looking
for a two bladed prop for my 40 hp. Purchased a two part epoxy high-gloss paint, just waiting for the warm weather to paint. The epoxy paint
is very strong smelling so I need to open the doors for ventilation.
Boat has been glassed on the hull and double coated with Resin on the
top side. Used West Systems Resin and hardener which is used for gluing
as well as glassing. The stuff is great to work with and has no smell to
it and it hardens like a rock. In fact, they told me I could take the
screws out of the boat and the stuff would still hold the boat together.
I won't be trying that.. I'll be sending pics as soon as the paint is
on.
Some things to be aware of if you're new at this boat building thing,
1) Soak the Chines or they'll most likely snap, I soaked them for two days
in a piece of ABS pipe and one still snapped.
2) It's easier to install steering systems, wiring or anything that's going to be under the deck in hard to reach areas before you put the deck on. It's also advantageous to put the motor on the transom at this point to line up
steering cables etc.
Well boat builders it's been alot of fun and sometimes frustrating. I think I'm going to build the Tunnel King next winter, I've got a nice 200 to put on it.
Safe Boating Dudes
Subject: For the WebLetter
Date: 4-11-2003
...DarlaOle died, so Lena went to the local paper to put a notice in the obituaries. The gentleman at the counter, after offering his condolences, asked Lena what she would like to say about Ole.
Lena replied, "You yust put 'Ole died'."
The newspaperman was somewhat perplexed and asked, "That's it? Just 'Ole died?' Surely there must be more you'd like to say about Ole. If it's the money you're concerned about, the first five words are free. We must say something more."
So Lena pondered for a few minutes and finally said, "O.K. You put 'Ole died. Boat for sail.'"
Letter
April 8, 2003
Re: Audeen
Dear Sir:
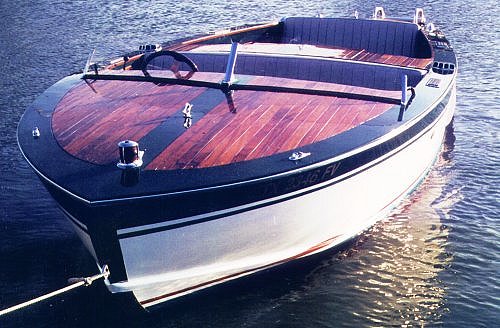
This is the 3rd of four Glen-L designs I have built. The Audeen has mahogany frames, decks, cabin trim and motor cover. The longitudinal battens are oak with stiffeners. The outer hull is 3/8 marine plywood. It is powered with a 283 V/8 engine. The boat was completed in 1988 and is still pristine and being used regularly. The hardware, including the windshield brackets are from a 1954 Chris.
I just completed my second Topper and will forward pictures soon.
Very truly yours,
Warren C. Lyon
Dallas, TX
Subject: Recent email
Date: 4-11-03
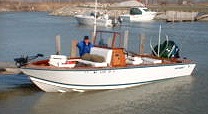
Hello Barry, the Power Skiff is complete and it saw some serious action last year. After a few test trials on a local lake, I took it up north for a week of fishing and camping. It performed beautifully! We had some pretty rough water to contend with on the trips in to the campsite, at first I was very cautious, not being real used to the boat. I soon found my comfort zone and had a real good time skipping over the waves. I had bought a tiller extension which seemed to really help when I was out by myself. The other guys were real impressed with the boat. The best thing? I had always had the slowest boat out of the group, now with the light skiff, I have the fastest. Kind of nice getting to the fishing hole first for a change!
I actually ordered another set of plans from you for the Gypsy. I have most of the lumber now and plan on starting building soon, this winter has been very long and cold, and I am looking forward to starting another Glen-L project. I love the registry, and am currently in contact with Kurt Ayers from Illinois, who is building a Gypsy now as well. So between us I'm sure you will have some questions directed your way!
Thanks Barry,
Daniel Rullman
There is more about Daniel's project in the Project Registry. Plus some other good information from other builders.
Subject: Re. Malahini
Date: 4-11-03
I completed the Malahini last summer. It looks great. I put a 70 horse Merc. on it and it runs great. Making changes to the seats. Putting captain's seats in and adding a stabilizer. The one thing I wanted to do was have a mahogany deck. I didn't do a good job in finishing the deck, so I had to paint it. Either this summer or next I think I would like to do the deck over. Mahogany plywood is hard to finish. I've seen some really great looking finishes that I will have to find out how they were done.
To be honest, the fun has been in the building not as much in the cruising. I'd love to build another boat. After all I have learned, I could do a better job and much faster. Overall I am very pleased.
Rich Davis
Subject: Kingfisher update
Date: 4-11-03
Hi, sorry I didn't get the time to update my progress. As of today, April 10 2003: The frame members were assembled. I used epoxy glue with a mixture of silica and microspheres for most of my permanent contacts and stainless steel flat-head screws for fastening. Then I built the building form and started to place the frame members on the stringers. After that, I placed the battens, chine log and sheer clamp. I had a bit of trouble with the chine. What happened was, I had started fairing the chine just after frame #5 and in the blink of an eye, snap it broke, even with the boiling water on it, it broke. Oh well, better now than in the water. That was probably the worst thing that has happened, other than that, everything is going very well.
I have all the plywood panels put on, I could not find any 10' B.C fir plywood so I had to use 8'. It just meant that there were 2 extra butt joints. After that I applied the 10 ounce fiberglass with epoxy. I found the video that I bought from you great to have. I watched it about 8 times and didn't make one mistake. When the fiberglassing and sanding was done I used a two part epoxy primer to cover the glass and then I used a white Interlux bottom coat for the bottom of the boat and ocean blue for the sides. It was 3 weeks ago today that myself and my brothers turned the boat over, it was quite a moment, I was very happy. The motor well is in, the deck is on, the cockpit sole is on, and now I am in the process of making the seats and the control console. Oh, and about a month ago I purchased a 150hp Johnson. It is a 1987, but I was told that she works great. I will write you when I am finished.
Thanks Ian.
P.S thanks for answering all of my crazy questions
Subject: Re. Squirt
Date: 4-10-03:
Barry:
My Squirt project was completed about a year ago in May. It has worked out great with the retrofit jet ski engine and drive installation. The jet ski engine has so many advantages. They are marine ready, they all have electric
start, the oil is injected automatically and I have a charging system for on board perks like a radio and some day, lights. The greatest advantage I think is that there is no prop under the thing so my small children can stand by it on the shore in very little water. I would recommend the jet conversion to any one who can find a good deal on a jet ski engine, and is willing to think through the necessary steps needed to make the system fit and work properly in the boat. Thank you for asking. The pictures in customer photos have sparked a lot of interest in this type of retrofit fit for the Squirt plan. I have tried to help those who ask with a description of the steps I used to plan for the job. I'll try to send a picture of the open engine compartment since a lot of people have asked for that.
Cheers: John
Subject: Re. Stripper
Date: 4-11-03
Hi Barry,
I was able to finish my boat late last year and finally take it out in the water a few weeks ago. The boat performed real good and the wife felt very much at home in the front. I sent in an update a few weeks back and believe it is in archives.
It was just like I heard. When you take a strip built boat out you meet people that are interested in it. It happened to me in the Chick-fil-A parking lot. I'll be taking the boat to the wooden boat show in Beaufort NC next month. I think it will be a good time, since I've only been a spectator in the past.
Thanks for a good boat design and I'm looking forward to starting your center console next year.
Chris
Subject: Minuet update
Date: 4-10-03
Attached is a picture and it tells it all! Launch was January 14th at Port St. Joe, Florida. 'MISS BOO' lives up to all my expectations. She sails better than I expected. Is faster for her size than I expected. Points very well. Is extremely stable in rough seas. Thanks to GlenL for their advice during construction.
John Van Newenhizen
Subject: Re. Marauder
Date: 4-9-03
Hi Barry,
We launched in May of last year, although to be honest have not really completed performance trials - the day job got in the way - the boat has been in dry dock for the winter and is due to be relaunched in the next few weeks.
As you are aware from earlier correspondence we actually fitted 2 No. 291mm Hamilton Jets each coupled to Ford Magnum 400hp Mermaid Marine Engines. When launched the boat was left for approx. six weeks before we started motoring - work got in the way again - but during this time unknown to us there was huge growth of barnacles on and within the Jet Intake plates ( having missed this area with the anti-fouling, I know, don't go there ) which resulted in the intake plates being closed approx. 70%. We didn't realize this until we took the boat out in October for the winter, even still she would comfortably achieve 17/18 knots at 1800 rpm. We are interested to see the performance this year now that the intake blocks have been cleaned, and yes, anti-fouled.
Best Regards,
Brian.
Subject: Kingfisher
Date: 4-9-03
Been done for 3 years now I think. She runs at 53mph with a 200 merc EFI. I lengthened the hull to 20'4" and it has a 15hp kicker on it.
Lots of great comments from onlookers.
...How old is it?
....Is that a ChrisCraft?
Lots of fun.
Bruce
Subject: Re. James Cook
Date: 4-9-03
Thanks for the interest in my James Cook. I'm finishing my standing rigging with only a couple more to make up. If everything goes OK I'll be stepping the mast to make sure all my lengths are correct. That being said, I'll be able to launch in a few months. I got my fingers crossed and hope everything goes all right. Ken
Subject: Minimaxed
4-9-03
Dear Sirs,
I just finished your Minimaxed with some minor modifications. It came out quite well. I'll be sending some pictures at a later date. This was a plan I had seen in a magazine some 30 years ago and at the time I was too poor to afford the plywood. Thanks for the chance to have one of my childhood dreams fulfilled. Over the years I've had several boats including some rather large and expensive boats, but am just as proud of this eight footer as any.
Thanks Nick Isabella
Subject:
Below is the result of your feedback form. It was submitted on Tuesday, April 08, 2003 at 10:37:58
-----------------------------------------------------------------
name: Marc Draleau
Comments: I am presently building "Tiny Titan" with my 15 year old son. This is our first boatbuilding experience and so far we've enjoyed every aspect of it. From hunting through lumber at the lumber yards to trying to decide a color scheme. We're hooked!
Subject: Lord Nelson for the old boat registry
Date: 4-8-03
Lord Nelson 33 / Keith Zwart / Glen-L Lord Nelson 33, purchased November, 2002. Boat is in pretty good shape. Cold-molded mahogany hull and plywood decks. The paperwork indicates that the boat was built by Lyle, and the hailing port for at least 8 years has been Seaford, VA.
I am repairing some deck rot (chainplates) and doing a re-power. Also rebuilding some deck hatches and prepping the deck for repainting.
Any information about the history of this particular boat is greatly appreciated. Some items on-board suggest that she's been to the California coast, and I'm curious about her travels.
Planning a voyage up the east coast to Newfoundland, Iceland and Norway.
Love this boat. Extremely comfortable accommodations!
Anyone know anything about this boat? Mr. Zwart can be reached through the Old Boat Club on the Glen-L site.
Subject:
Date: 4-8-03
My Glen-L 15 was finished in May of 2001. We now live on a small lake in northern Indiana and the boat saw a fair amount of use last summer. I was not a "sailor" until I built the boat, so I don't have much to compare it to. The boat is very stable and is easy to sail. We get a lot of compliments since it is the only wooden sailboat on Loon Lake. This will be our third season and the boat is holding up well with a minimum of maintenance. I will probably re-finish the mahogany decking in the fall. We may look to repaint the hull which is white enamel next year. I am looking to built more boats, but with the move I do not have an appropriate building right now.
Walt Hessler
Subject: Tango update
Date: 4-7-03
04-07-2003: For the past 2 weekends I have been building a trailer for my Tango. I ordered the metal delivered from a local supplier for $188.00 and I ordered a utility trailer kit from Southwestwheel for $351 including shipping. The kit included a 3500 lb. axle, springs, bolts, hangar kit, 14 inch wheels & tires, fenders, coupler, jack, lights, wiring, and license plate holder. http://www.southwestwheel.com/traileraxles.htm
They delivered the same week I ordered. The trailer is nearly finished. I have rough fit bunks to the trailer and I will pick up rollers for the keel this week. You can view pictures at the customer photo site. The axle is currently clamped to the frame. I will position it by tongue weight when I turn the boat onto it. I will then bolt these to the frame. I have not welded the fenders at this time since I have not permanently located the axle. Looks like I will come in under $600.00 for the trailer. This is hard dirty work but worth it in the end. I plan to use an oil base primer coat and then a 100% Acrylic Latex top coat. Based on information from the boatbuilder connection site, this seems like a good way to go. The book "How to build boat trailers" by Glen L. Witt was a good investment for this project. We are now having our seasonal winds and it is too miserable out to work on the boat. I still need to put a smoothing coat of epoxy on the bottom. Then maybe one more light sanding and a final coat before painting.
George Vernon
I must tell you I brag about your website all the time. Thank you for being there. Thanks for all the help. Is there a short history available for the Glen-L enterprise. I would be interested in reading the Glen L. Witt story sometime. I am trying to keep a really good photographic & text record of my experience as I progress. I am a design engineer at a weapons laboratory. I build guitars & mandolins (and a bass now and then) as a hobby. Boat building is new for me with my Tango. I researched in libraries and on line for 3 years before deciding on your Tango for my project. I started last year in April and I have allowed myself 3 years for completion. I think I am ahead of schedule for now. Your own expert guidance as well as the boat builder connection were my main reasons for choosing the Tango, after of course, the design. I hope to turn my entire experience into a manuscript of sorts which I will pass on to you with full release & publication rights. I hope to encourage others to follow in my path. I must confess that although I grew up swimming, skiing, and boating, I had never sailed until last year. There is a really great lake within 45 minutes of my home that is a no wake lake and lots of sailboats. I was fortunate enough to meet a friendly seasoned sailor who invited me to sail with him. I will be sailing with him again and taking lessons as I build my Tango. This is by far the most rewarding endeavor I have ever undertaken. I will keep you up to date. Once again thanks for all the help and thanks for being there. Just for your information, I am 52 years old and expect to spend many years sailing my Tango.
Ed Vernon
04/08/03
Subject: Glen-L 15
Date: 4-7-03
Barry,
The project has been completed for a while. The first outing went well right up until I pulled the boat out of the water and hit a branch and snapped the mast mount and all the rigging. It took most of the summer to get it back up and running. It still leaks a little, but you can finish your beer before you need to bail a can of water. :-) On the bright side, at least the mast didn't break.
Photos, including my first boat, a Topper with TopHat sail, are located at: http://www.thesonntags.com/ark2.html Actually, I used the main from the TopHat sail (with a little trimming) as the jib for the Glen-L 15. I haven't actually taken any pictures under sail, but hope to this summer.
First impressions:
* Handles well
* The cleat/pulley combo was worth the extra cash as it enables one person
to handle the tiller and lines very easily.
* Light enough that even a trolling motor has some speed.
* Haven't tried the 1968 3hp Mercury outboard yet which I bought at the end
of last summer (just snowed here last night, so it will be a few more months
before the trial run)
* Used a 6'x8' trailer kit and extended the hitch with a 2"x2"x10' square tube and it works great -- you guys should sell those.
* Just renewed the boat license for another 3 years.
* Bought my wife a new sewing machine after more or less trashing hers
making the sails. (Did you know that the average sewing machine is not made
to go through 9 layers of material.) Hindsight tells me that purchasing the
sail would have been cheaper. :-(
Jon Sonntag
Wood Dale, Illinois
Subject: Glen-L 12
Date: 4-7-03
Barry,
It is good to hear from you guys out in California. I have completed my Glen-L 12 and have made two good weekend trips to Panama City, FL to play on it. She handles great. She is very responsive to her rudder and has a surpassingly large amount of speed capabilities when sailing both up and down wind. The boat sails particularly well wing and wing on a downwind run. You can set the jib to the desired position and then gibe the main over and away she goes. I really appreciate all of the help that you at Glen-L provided for me throughout the building process. When I get around to it I will scan some photos and e-mail them to you.
Thanks
Will Autrey
Subject: Glen-L 36 Delphin
Date: 4-6-03
GLEN-L 36 Delphin (midship cockpit) / Miguel Abaunza Sr. & Miguel Abaunza III / El Paso, TX / After a long period of research, learning about boatbuilding purchasing tools and lots of clamps we finally purchased the GLEN-L 36 Delphin plans back in January 2003. After studying the plans and instructions we have now completed the building form on April 6 2003.
NOTE FOR GLEN-L:
While doing our research, my 14 year old son and I had decided to build the GLEN-L Francis Drake. We ran into the name of Mr. Miguel Occttaviani on your site. Mr. Occttaviani happens to live also in El Paso, about 1/4 of a mile from where we live. He is in the process of building a GLEN-L 36 Delphin. After meeting for several weekends with him, it became obvious that by joining efforts, we could solve many of the boatbuilding problems together.
We jointly decided to build identical sailboats about 1/4 mile apart. The experience has been great. We research a problem at a time and meet on weekends to discuss possible solutions. Living in El Paso, Texas around one thousand miles from the nearest ocean and in the middle of the Southwest Desert, finding Mr Occttaviani with similar sailing interests and dreams was a strock of luck. Thanks to your web site.
Miguel Abaunza
Subject: S&G Eight Ball
Date: 4-4-03
The project went very well. My first association with Glen-L was when I was about 9 or ten years old ( I am now 54). My Dad and a friend of his built a ski boat from Glen-L plans called L Dorado. I saw some pictures of this very same boat on your website a while ago. This whole process somehow imprinted on my mind and I have had the bug ever since. In 1974 I built a Glen-L 12 and taught myself how to sail with that boat. This too was a very successful project for me. I owned this boat for about 10 years and had many, many compliments on how well it sailed and how great it looked. I now own a Catalina 27(1973 model, hull #902 of about 6600 built) and needed a dinghy as tender. I turned to a trusted resource, Glen-L Marine, and chose the stitch and glue Eight Ball. I have had the boat in service for about two years now. The construction concept is great, I tried to do a very good job so I probably had more time invested than some might have used. I would estimate that I have the straight time equivalent of about 100 hours in the boat. I used all Glen-L epoxy and fiberglass supplies as well as the deluxe hardware kit. I cut my own sail from a blown out Genoa on the Catalina. The Eight Ball performs well rowing, with 5 horse outboard, or with sail. I will be teaching my 4 year old son to sail this summer with this boat. Thanks again for a great and world class customer service.
Regards, John Knoll
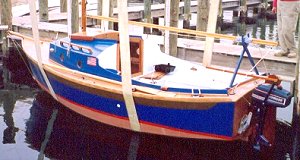
Subject: Mummysue is Launched
Date: Wed, 2 Apr 2003 20:33:52 +0100
Dear Gayle and all at Glen-L
Mummysue, is Launched and at her berth, she is the talk of the Marina,
got her up to 5.6 Knots at sea, she handles like a dream.
More E-Mails, lots of Photos.
Lost for words at the moment,
Sincerely
Bob Hertfordshire England
Mummysue is Bob's version of the Jack Tar. The construction and launch will be featured in the next two issues of the British magazine, Water Craft.
Subject: Re. Eight Ball
Date: 3-27-03
Hi Barry:
You bet you have the right email address for me, and YES I finished the Eight ball. They are wonderful little boats. As you might have read, I built my first one back in the mid 70s, the sailing version.....and loved it. I towed it behind a Pearson 26 sailboat all over the Great Lakes, up into Canada.....all over. I'd sail it all over when we were in port. I got so good with it I could come up into the wind.......reach out and hold the boom out........let the wind fill the sail from the front and BACK the boat into the slip along side the Bigger sailboat. People would just stare !!
Last year, I decided I missed my old eight ball and could only find one of the two original pages of plans so had to buy a new set. I cut out two of everything so I could build TWO Eight-Balls at the same time. But you really can't cuz you can only use the jig to build one at a time. I'll start the second one in a week or two. I used Luan Plywood from Home Depot for the first one and it came out just fine. I'm going to use standard 1/4 inch ext. Plywood for the second one and see which I like more, and what the difference in weight is.
I did not build the stitch and glue version. I'm from "the old school" and just use glue and screws to put it together. I don't cover any wooden boat I build with glass and resin either. We never needed to do that 30 years ago......so why do it now? It adds a ton of weight and, unless you are AWFULLY good at squeegeeing it out and sanding it smooth........it always looks cheesy to me !!
Hey....Columbus didn't cover the Santa Maria with fiberglass.........and he made it here 3 times!!
Build yourself a good, straight, true jig.....and your boat will come out great.
Don't hesitate to ask any questions you might have......and I have a full set of digital pics of the building process I can share with you.
Good luck !!
Brian Amato
Traverse City, MI
Build more boats
GLEN-L boats, of course