
An Occasional Publication for the Home Boat Builder
Glen-L Marine Designs - 9152 Rosecrans Ave. - Bellflower, CA 90706

In this issue
- Featured design: Sissy-Do and IMP
- Feedback: Kodiak by Terry and Louise McLay
- Alabama River - Montgomery to Pensacola by Ray Macke
- Building the Sea Knight Part 1 by Catherine (Katie) Allen
- Conversion of 3.0L Chevy to Velvet Drive Inboard by Ken Schott
- Feedback: Gentry by Jack Rouse
- Inboard Hardware: Marinizing the engine
- Darla's Corner
- Turning the Bo-Jest by Mark Jones
- Shop Talk: Odd bits
- Boatbuilder Connection
- Feedback: Pot Luck-FG by Anton Blok
- Recent email
GLEN-L Update
-
Why didn't we answer your email?
550 5.7.1 ... Access denied, 550 5.1.1 ... User unknown, ... Mail box full.
I have received 4 or 5 messages back that answered builder questions. Gayle has answered one builder three times and they all came back. The last email from this customer was "why won't you answer my email?" If no one ever answers your email you might want to check that your email address is correctly entered into your browser's preferences. If you rarely check your email and have a question, check your email before asking your question to insure that your mailbox is not full. - On the Drawing Board: You asked for it... Stitch and Glue Cabin Skiff, just under 20'. When will it be ready? No due date yet... guess: 2 months. Will have more to report in the next WebLetter. More info
- This issue of the WebLetter features the Sissy-Do and IMP. The next WebLetter will feature the Double Eagle. If you have photos or feedback on this design, I hope you will share them with our readers. A reminder: This section is in response to reader requests. I will try to present as wide an array of designs as possible, attempting to add additional information from what is currently on the site, which can be difficult without your input.
- Thanks... Terry and Louise McLay, Anton Blok, Mark Jones, Ken Schott, Jack Rouse, Katie Allen, Ray Macke, Todd Wolf and all the others who contributed to this WebLetter. Your participation makes a difference.
Editor
Featured Design: Sissy-Do and IMP
13' 3" and 9' 9" flat bottom plywood rowboats
The test model for the Sissy-Do sat for 20 years, tied to the dock, on a lake in Southern California. There was an automatic bilge pump in the boat to pump out rain, but frequently the battery was dead when it was needed, the boat filled with water, and it sank in 5' of water. ...time to haul her out and bail. I remember poling the Sissy-Do over the mud with an oar to get to deeper holes at the shallow end of the lake where the big bass hid. The kids used to run her into the reeds or use her as a diving platform. The Sissy-Do is extremely stable and because of the ease of construction, many have been built, and there are probably many builders with memories similar to mine.
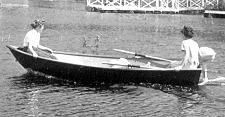 The Sissy-Do with Gayle's sister
Janet and a friend. Gayle used to say "sissy
do" when asked what happened. I'm not sure
whether the boat was named in honor of Janet or
Gayle. The Sissy-Do with Gayle's sister
Janet and a friend. Gayle used to say "sissy
do" when asked what happened. I'm not sure
whether the boat was named in honor of Janet or
Gayle.
|
The IMP was designed for those builders who requested something smaller, easier to store. Both the Sissy-Do and IMP are very easy to build, only slightly more difficult than comparable stitch and glue designs. I have been asked which would be a good boat to start with. "It depends on what your purpose is. Is this to give you experience for a larger project?"
The Sissy-Do or IMP would be good choices if you eventually plan to build a conventional plywood boat. Both are easy to build and require all the steps used in more mature projects: Stiletto, Mist Miss, Sea Knight... but on a much smaller scale.
Sissy-Do/IMP Links:
Sissy-Do Design page
IMP Design page
Sissy-Do
Construction Pictorial
IMP
Construction Pictorial
Additional Sissy-Do
Photos
Additional IMP Photos
Feedback: Kodiak
Terry and Louise McLay
I am sending two photos of our completed Kodiak 29. You have had three photos of our boat partially built on your site for years. This is how it looked when completed.
We lived aboard for two years and at that point decided to convert the cockpit to an aft cabin. It worked out very well with a double berth athwartships, a companionway sloping down from the aft wheelhouse door, two opening portlights, and two hatches. We ran the deck from the existing cockpit coamings and it complemented the existing lines very well. We located the galley in place of the mid single berth. We fitted a shower just aft of the head, accessed through the head aft bulkhead. Aft of the shower is a large hanging locker. This layout worked extremely well for us.
Alabama River - Montgomery to Pensacola
by Ray Macke

The depth sounder's bottom alarm is screaming and flashing 3 ft. Off the bow I can barely make out the tree covered shoreline about 20 yards away and it fades in and out. The view in all other directions is nothing but a ghostly white. I am working back and forth across the width of the river looking for the channel. It has to be here somewhere! Earlier I had thought about just staying in the berth and sleeping another hour. Now it looks like that would have been a much more sane choice. But I am getting ahead of myself. As with all my river trips, the real story starts days before with the preparation, or in this case the lack of it.

Building the Sea Knight - Part 1
by Catherine (Katie) Allen
Barry, of Glen-L, asked me if I would write something concerning my experiences regarding a female of the species building a boat so, here it is.
All my life I've had a passion for the water and early on during high school built a small ski boat from the ideas in my head... surprised a lot of people. I think it cost $100 or so to build. Before leaving college, I decided that a bigger boat would be more fun and contacted Glen-L and subsequently built a 17' cuddy cabin model with a raised sheer from plans. I rented a two car garage to do that one. Nobody believed I'd do that one either.
Since then I've helped build a catamaran with my father-in-law and worked for Chris Craft in Sarasota, FL building fiberglass cabin cruisers and some 40' target boats for the Navy.
Now, having said that, it is still my opinion that if you can bake a cake or sew a dress, you can build a boat. Why? It all amounts to the same thing, namely, the ability to follow directions. It's as simple as that. (Unfortunately, once I know the rules, I usually break them). Unless you happen to own or have use of a band saw, I would recommend that you buy a frame kit, as building the frames is a critical step and allows for no mistakes. And, in my experience, even with the kit, you WILL make some mistakes which, hopefully, you will find in time to correct.
A lot of women see a project like this and say, "Oh, I could never do anything like that", but my own philosophy, which has proven fairly accurate, is that you can do almost anything if you put your mind to it and invest of yourself to the completion of the task.
For my current project, I chose the old classic design of the Sea Knight 17' cabin cruiser and ordered the frame kit. As I'm looking for the summer rains to come in two months (an every day occurrence in central Florida), I began construction in the middle of February when the frame kit arrived. From that time to today, 3 weeks later, the framework is complete and ready for "fairing". At some point I suppose it deserves mention that I've stretched the frames to produce a boat of 18 1/2 feet, adding about nine inches to both the cabin and cockpit.
It is St. Patrick's day 2004 and, over the balance of the week, the framework will be faired and the planking begun. To avoid all the squatting once the hull is flipped, I'm going to encapsulate the framework with resin BEFORE planking. Planking will be encapsulated as it goes on. When it is flipped, all braces will be in place already. In my experience, the more rigid the hull, the better, so all bottom battens have vertical and corner bracing. Any flexing of the hull will only serve to cause you problems down the road. I learned this from observing construction of factory boats whose bottoms are actually stronger than steel.
Two extra transom knees have been made and installed with longitudinal braces going to the #1 frame. The keel and adjacent battens are braced all the way to the #3 frame. These are along the battens next to the keel, which also has a bracing to the #3 frame. You will notice from the pictures (not yet included, ) of the framework that I've also installed side battens which are not called for but again go to the strengthening and rigidity of the hull. (they will also come in handy for setting up interior cockpit shelving.
Another variation from the plans is the installation of a second transom, glued and screwed to the original. This was done due to the high horsepower and torque of today's engines. A single thickness of 3/4" plywood simply makes me nervous. Remember, these plans have been around since the 50's when the most powerful motor was less than 50 horsepower*. My first 17' had two 30 horsepower Evinrudes and ran 28 mph. Then, in the late 50's or early, 60's, the V4-50 came out from Johnson and Evinrude.
- To be continued -
* Glen-L recommends adding additional motorboards to the thickness recommended by the motor manufacturer.Conversion of 3.0L Chevy to Velvet Drive Inboard
by Ken Schott
Here is some info on my Double Eagle project. I started the project with the engine, to get the expensive part of the project out of the way. The lumber is affordable, as fast as the project moves along. The power package on hand and out of the way was a great motivator.
Feedback: Gentry
by Jack Rouse
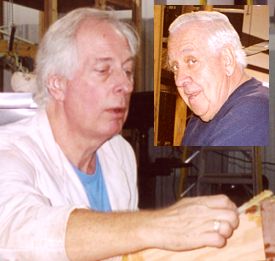 I am the one on the left. The guy in the inset is my brother-in-law and sometimes helper, Don Phillips. |
The bottom of the hull is now painted red, the hull rightside up and on a dollys. The deck framing is now in progress, with finishing boards and decking to come shortly. I am going to install a Chevy 350, 300 hp (new), which is to arrive at the end of the month.
Someone in West Palm Beach has already talked to me regarding a Gentry and is planning to come for a look see.
I'm having a good time doing this project and look forward to the next one. My last project was building a 300 mph Glassair III airplane.
Thanks for your help. I have included pictures of construction.

Darla's corner
by Darla Schooler
I welcome your contributions
![]()
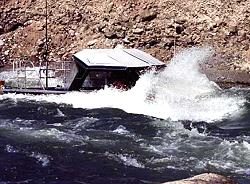
Hello,
I enjoy your site, thanks for all
the great information. I hope you enjoy this photo. And yes
this was done intentionally. ...Todd Wolf
![]()
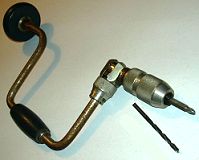
I finally found a cordless drill/screwdriver that NEVER needs battery charging. I have attached a pic. ...Ken Schott
![]()
Turning the Bo-Jest
by Mark Jones
I know that many builders have found the task of turning a hull somewhat daunting. It was certainly cause for a lot of forethought in my case... especially being my first time. I have made an effort to include a number of detailed photos in the hopes that some other builder might glean some useful information, should he or she be somewhat puzzled.
First I built an overhead hoist beam comprised of triple laminated 2 x 6 members, built a "saddle" to fit on same out of 3/8" plate steel that I had laying about the shop.
For the purpose of narration, nautical terms are used in their normal meanings, irrespective of the hull being inverted or righted.
Shop Talk: Odd bits
Planking aides from Bill Whitney
Bill is building the Squirt in Bothell, WA. His Shop Talk hints came with photos, so I have put them on a separate page.
I have a tip for my fellow builders on filleting corners in preparation for fiberglass cloth application. Take a large, heavy duty freezer bag, snip 1 corner off (1/8"-1/4" depending on the desired fillet size) and fill the bag with activated resin putty. Close the bag and squeeze the putty out the open corner like bakers apply frosting to decorate a cake. This allows a precise bead to be applied to the corner with little excess. Then use a scrap piece of 1" (or other desired size) PVC pipe about 6"-8" long and drag it along the joint at about a 45 degree angle for a perfect, smooth fillet that will require very little sanding. This works great.
...Don Slomke
I get questions asking if or how-to use Gelcoat on wooden boats. I usually reply that Gelcoat was formulated to be sprayed into a polished female mold and I know nothing about applying it over a male surface. If anyone knows anything about this, send any comments, descriptions, or... I will put it in an upcoming WebLetter.
Boatbuilder Connection
The Boatbuilder Connection? I am often surprised to learn that many visitors to our site don't know the Boatbuilder Connection is there, or that they don't know what it is. The Boatbuilder Connection is a forum for people to post questions and for others to answer. There are some really knowledgeable people who regularly visit and post answers to questions. There are also some interesting conversations about boatbuilding and related topics.
You do not need to register to view or answer any posts. If you sign up, you will have the option of viewing posts since your last visit, which will be marked when you log on. There are a few other benefits of registering, but registering is optional. The "Connection" can be accessed from the home page using the Boatbuilder Connection link in left-hand column. This will take you to a page with a link to the current board and links to archived (non-postable) messages from the old board.
I hope more of you will visit and contribute to the "Connection"... share the knowledge.
Feedback: Pot Luck-FG
by Anton Blok
Find attached the completed project based on the Pot Luck plans. We christened her "Persistence", and this picture was taken at a recent Fishing tournament on the beautiful Island of Bonaire in the Caribbean, about 120 NM from our home port in Aruba. The picture shows the master carpenter (on the right with the baby), and the project manager owner (in the middle back with the boy) accompanied by friends and family.
The boat has a Volvo KAMD-300 engine, uses 0.5 Gallons per mile, cruises at 19 Kts, and tops out at 22 Kts, it has a range of 360 nm ( with 15% reserve), Raymarine autopilot, and to date we have logged over 400 nm. of ocean crossings to different Islands in three trips. The boat out runs 50' Bertrams and Hatts in really bad weather, where we can easily run 15-16 Kts, while the large neighbors need to slow to 12-13 Kts to avoid getting pounded. The hull design is ideal for our weather and water conditions.
The plans provided us with a very robust and stable rough water platform.
Recent email:

Below is the result of your feedback form. It was submitted
on Thursday, April 1, 2004
------------------------------------------------------------------
name: Bob
Comments: Great web site and a great selection of plans. I have just purchased a Hercules class trawler tug built from your design plans. It is one of the three that are currenlty listed on your site, previously owned by Doug Booth of Canada. It was build using the best of materials, encapsulated, fibreglassed and painted. The orignial builder was meticulious in his workmaship. I fell in love with the design and the lines of the boat the first minute I saw it. I will be picking it up in April and should have it in the water in May, I will forward some pictures to you.
Subject: Eight Ball-SG progress report
Date: Wed, 31 Mar 2004
This is the second Dinky (designers name) to be called the "Mine" after the sea gulls in "Nemo".
All seams fiberglassed both in and out...sanding finished and now ready to paint.
Couple of weeks and another one finished...
Big question now is what next?
Not another strip built for sure. Have to stick with the stitch and glue process I guess.
Andy
Subject: Project registry info and photos
Date: Wed, 31 Mar 2004
RIVIERA / Craig Strike / Victoria, Australia.
Construction on the frame started in November 2002 and the
first 2 layers of marine ply were finished by the end of
march, then progress slowed somewhat due to other
commitments. Then in October 2003 it got back on track with
the application of the final layer of Brazilian Mahogany. The
frame is made of Blue Gum and Messmate, which
are both local eucalyptus. Both have similar strength,
density and working properties to Mahogany, and have been
used in boats here for many years. The plywood is Pacific
Maple from Malaysia. The hull was turned over late November
and the deck was started straight away. I have used Mahogany
for the deck planks and Celery Top Pine from Tasmania for the
striping, and the finishing boards and king plank is
Blackwood (another stunning local timber). The final layer on
the topsides and deck have been veneered without stapling or
using any fastening through the timber. It takes quite a bit
longer but the results are spectacular.
Cheers,
Craig Strike
Subject: Project Registry
Date: Fri, 26 Mar 2004
Hello all at Glen-L,
I am currently building two Glen-L Sea Kayaks for touring
the Adirondaks. My name is Ken Perry and I reside in
Rochester, NY. I began building in late January or early
February of 2004. The project has been a fun and easy one. I
am currently nearly done with one of them, and fast catching
up with the second one. I should have both complete in about
five weeks for a 60 mile kayak trip through the Adirondaks.
If you like, you can check my progress at http://home.rochester.rr.com/kayakbuilding/.
I plan to include a link to your web site in the future so
that others interested can purchase their own plans to build
the sea kayak. Feel free to use any of my pictures on your
web site. When all is said and done, I expect it will have
taken about 2 1/2 months to build two of your sea kayaks.
Also, be sure to check out the cart I designed to help on
long portages. Thanks again for the fun winter project!
-Ken Perry
Subject: Mr Ron Shady
Date: Fri, 19 Mar 2004
Hi I'm currently building a squirt. I have always
particularly admired the boat Ron Shady built. Can you put me
in contact with him or forward my email address to him saying
I would like to ask him some questions, if he would be so
kind as to email me back.
Looking at the customer photos it hard to imagine that all
the squirt boats have been built from the same plans.
The beauty or otherwise of building in timber I guess.
Thank you Johnny Malthus
ANSWER:
Unfortunately, Ron is not in the Project Registry and we do
not have a mail contact. I will post your email in the next
WebLetter, perhaps he will see it...
Barry
Subject: scale model of my future project (Ski King)
Date: Tue, 16 Mar 2004
Just sendin' this to ya for gee-whizes, I've been working on it since last Thursday, its actually starting to look like a boat. Its 12'' long and is 3/4" to 1' scale out of balsa... See Ya, Louie Miranda, Merced, Ca
Subject: hello question about glues
Date: Fri, 12 Mar 2004
A long time ago I built a Sissy Do and that was the best boat
I have ever had. I have owned bass boats, john boats but for
just the ability of that boat it was the best. I am thinking
about building it again but with the new tools and
techniques. We now we have much better screw driving and
other time saving tools. However, when I built that boat it
was with Elmer's waterproof glue that came in a powder
form in a 1 gallon can but I can't find that anymore. Why
did the Elmer's waterproof glue go away?
Thanks
Dave
ANSWER: The glue you are talking about is urea-formaldyhide (plastic resin). It is classed as "water resistant". It is a good glue, but required much tighter joints for a good bond. Epoxy is much more forgiving and fully waterproof. We sell Plastic Resin glue in a 4 1/2 lb. container: #10-162 $20.32 plus shipping.
Below is the result of your feedback form. It was submitted
on Saturday, March 13, 2004 at 15:03:28
-------------------------------------------------------------------
name: Darrell Davis
Comments: I visit your web site often. Of all the boat building sites on the web today, yours is the best.
Subject: photos on your site
Date: Sun, 14 Mar 2004 15:00:19 -0330
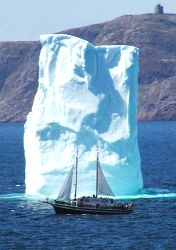
Hello,
I just found that you have 2 of my iceberg photos displayed on your website. They seem to have been submitted by a reader (WebLetter 48).
I don't mind, but would you please credit me with taking those pictures? My name is Karen Chappell and my website is www.Bitstop.ca
Those pictures were taken from my website on the following
page:
http://www.bitstop.ca/pictures/icebergs/default.htm
Thank you,
Karen Chappell
St. John's, Newfoundland, Canada
Note: Karen also has some great photos of Newfoundland light houses for those interested in such things.
Below is the result of your feedback form. It was submitted
on Monday, March 15, 2004 at 06:22:33
------------------------------------------------------------------
name: Fernando Rodrigues
Comments: This is my favorite web site. Being near to retirement I am looking forward to fill my leisure days ahead building a boat.

GLEN-L boats, of course