WebLetter 12
An Occasional Publication for the Home Boat Builder
Glen-L Marine Designs - 9152 Rosecrans Ave. - Bellflower, CA 90706
In this issue
- Shaft Angle and Layout From our book Inboard Motor Installations
- For the Rag Man About sail boats & sailing: Weather Helm
- Builder feedback: Utility
- Book Review: Howard Chapelle
- Recent email
Glen-L Update
Website:
- Visitors to our site comment on how much they like it. But we can't do
it alone. We depend on your input: in the Project Registry, the Customer Photos
pages, and articles for the Web Letter. There is much talk on the internet
about "community", we would like to be a part of your boatbuilding
community by providing a place for dialog. Each morning when we open the email
we hope for an article or new entries for the Project Registry. If you think
boatbuilding is a worthwhile endeavor, won't you contribute? Add your
project or answer queries on the Boatbuilder Connection. Other builders are
intersted in what you have to say.
- If you read the last WebLetter, you know that I invited builders to send
photos of their boats in "exotic" locations (family and boat on
vacation). No response...
- Missile... I received two photos of the Missile, a boat that is no longer in the catalog but that was one of our most popular boats in the 50's. Unfortunately, I lost the email (or letter?) that came with them, so I don't know who sent them. I've searched my browser "Trash" and "Sent" folders but found nothing. If you sent these photos, please let me know. I plan to add a Missile page to the web site and would like to use your photos.
- We edited the Boatbuilder Connection again, filing useful information in the archives. Check the archives for questions and answers on specific Glen-L designs. There is a lot of good information concerning performance and other topics.
- If you read the last WebLetter, you know that I invited builders to send
photos of their boats in "exotic" locations (family and boat on
vacation). No response...
- In the "unfinished business" category: Work has stopped on the
PowerYak test model because of increased demand for frame kits. I would like to
say we are going to start again within a month, but...
The Fife was featured in the last issue of "Boatbuilder" magazine. Many of you have asked whether I have yet run the Fife with an electric motor until the battery ran out, and how long it ran; well, no I haven't. But it's on the list.
Barry Witt
Editor
Inboard Motor Installation: Angles & Layouts
In response to questions concerning "how to determine shaft angle", "...distance of the propeller from the rudder", "...distance from bottom of the boat to propeller", we are re-printing Chapter 11 from our book INBOARD MOTOR INSTALLATIONS.
CHAPTER 11
Shaft Angles & Layouts
The layout for a straight shaft inboard installation requires consideration of several variables. With the many variations possible in the size, power, and weight of the motor, this will also cause a variation in the size of propeller that can be used. This in turn can alter the strut angle and drop, and position of the hole in the boat for the shaft. As can be seen, a change in one element can lead to a change in another part of the procedure, with many variations possible in the same boat. To fix things in order to provide a starting point, it is therefore essential that the diameter of the propeller to be used be known, along with the specific motor, in order to determine the shaft angle and the shaft hole position.
The proper way to determine the accurate position of the various units that constitute the inboard motor installation is to make a full size layout, or a physical substitution or "mockup" of the entire propulsive system. This is the point where many individuals will throw up their hands in despair and shout, "I ain't no blankety-blank engineer or draftsman. How in blue blazes do you expect me to understand this kind of nonsense? The heck with this business, I'll do it my way". This type of person then goes out and punches a hole in the bottom of the boat at some point where he thinks that it "looks right", and hopes that the motor will fit close to the point where the designer intended it to be. The chances are that he will be WRONG and the boat may turn out to perform in any manner except the RIGHT one. The layout does take time, BUT it is not complicated. If a person feels he can install an engine, he should be able to make a layout as well. So the advice is to stick to it and follow through the procedures a step at a time by following the text and illustrations provided.
New - Epoxy Manual on-line
For a quick source of information about our POXY-SHIELD and POXY-GRIP epoxy resins, visit our new "EPOXY" pages. Learn how to handle epoxies safely, mixing procedures, various uses for epoxy, and much more.
Epoxies are considered indispensable for boatbuilding by many builders.
- What will it do?
- What fillers should I use?
- How can I control working times?
You may order our $2 "Epoxy Manual" or read it on line.
For the RAG MAN
About sail boats & sailing...
Weather Helm
Most sail boat people agree that a slight weather helm is desirable in a sailboat. Exactly how much is a "slight" amount is at times difficult to explain. In fact, we'd better get a basic explanation of just what this "weather helm" is.
A boat has a weather helm when it tends to head into the wind when the tiller is released. Small boats may well have a slight lee helm (the opposite of weather helm or a boat that will head away from the wind when the tiller is released) in very light airs. A properly set up craft, however, will tend to head into the wind when a gust comes or with strong airs.
When you first launch your sailboat, it is very possible that adjustments will need to be made to bring the hull into the proper balance. This can be accomplished by shifting the passenger weights fore or aft, increasing or decreasing the rake or position of the mast or adjusting the belly in the sail.
First of all, suppose the boat has quite a weather helm. That is, it tends to head into the wind too strongly. The cure would be to do one or more of the following depending on the severity of the condition. (1) Decrease the rake of the mast or step the mast farther forward. (2) Shift the crew farther aft. (3) Pull up the centerboard partly. (4) Decrease the belly in the mainsail.
If the boat has a lee helm or tends to go away from the wind, the solution is the reverse of that for a weather helm. Thus, to correct for lee helm (A) Increase the rake of the mast. (B) Shift the crew farther forward. (C) Let the centerboard down to its extreme position. (D) Increase the belly in the mainsail.
From the above it is apparent by careful tuning the sailboat can be made to have any degree of helm within a reasonable range by a series or possibly only one adjustment. Trying various adjustments will enable the sailor to trim his boat not only to his own desires, but also for best performance.
...glw
Builder Feedback: Utility
Subject: Utility Update
Date: Sat, 26 Jun 1999 18:52:19 -0400
From: Tom Rosling
Just read your newsletter and thought that I would send an update on the Utility boat project.
I initially had a 9.8hp Nissan engine on the boat but with the combination of my weight (215) and the seating dictated by a tiller I had a bit of a problem getting the boat up on plane. I have ordered a 25hp Nissan from Browns Outboard (outboard@bellsouth.net). Dennis has really worked with me to get the correct engine and controls at a great price.
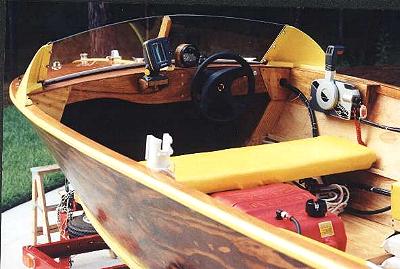
Since I was going to a steering wheel on frame two I decided I needed a windshield. I started by cutting a couple of foam blocks to shape for the brackets. I covered them with epoxy-glass and then dissolved the blocks with acetone. I then made some wooden bases to match the curve of the deck and used epoxy and screws to attach the fiberglass. I attached 1/8"x1 1/2" aluminum strips to the leading edge of the fiberglass for windshield anchors. The center support was cut from 3/4" yellow pine. I used 1/4" ply to form a template for the lexan windshield and cut plastic to shape with a scoring knife. The windshield was attached to the brackets with 1/4" ss bolts and acorn nuts. It came out pretty fair. Gives the boat that 1950 look I wanted.
I'll send you pics of the entire update when I get it completed.
Thanks for your help
Tom Rosling (tom.jo@worldnet.att.net)
Date: Fri, 23 Jul 1999 20:53:44 -0400
Last spring when I sent in a photo of my boat, you asked that I write up how the project went and any details I thought might be of interest. So, here it is.
In Aug 1998 I ordered a set of plans for the 11' Utility design. I had decided I needed a small fishing boat I could put over by myself. I also had a 10hp engine that was the right size, according to the plans. I ordered the bronze fastening kit and 1/2 gal of epoxy. I guess that I built too heavy because I needed another 1/2 gal of epoxy and another 2 gross of 1 1/2" #8 screws (I found that the screws you use on house decks were a cheap source of 1 1/2" stainless steel screws. They will break, so use them where you're not depending on the screw for much strength). I used ground fiberglass in all joints.
For the scarf joints, I built a large table and nailed/clamped the wood with a 12:1 overlap and planed the joint with a motorized hand plane and a final sanding. The frames and jig built up quickly. The chine curve at the bow gave me the most trouble. If the curve at the bow were slightly more gentle and matched the curve from frame 2 to the bow it would simplify bending. Builders may want to look at this before they get locked in. The only other problem I had was fitting the sheers to the frames. You might want to cut some small blocks the final thickness of the sheers and use them for checking the notches in the frames.
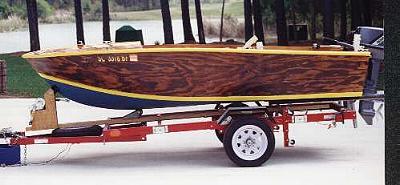
When the hull was completed, I covered it with polester resin and fiberglass. I have built a lot of boats and the polyester is very durable. Epoxy has some advantages but the cost is higher. I sealed all the wood inside the hull with polyester resin, as I have done on all the wooden hulls I have built over the last 14 years.* I added a strip of 1/4 ply from the aft edge of the bow to the transom. It smoothed the look of the sheers. The hull I varnished walnut and the deck, pecan, using colored Minwax polyurethane. It worked out very well. Trim is polyurethane. I took about 6mo, to reach this point. With an extra pair of hands now and then it would have been quicker.
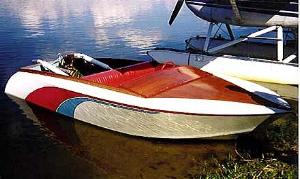
I mounted a 10hp motor I had bought as a backup for my Renkin 17' Classic. I also put on a downtroller, a fish finder and a folding bracket for an electric trolling motor (and a big deep cycle battery) for my 2hp Johnson. Here is a picture of the boat as it looked then.
My weight and the driver's position dictated by the tiller on the 10hp, combined with the extra gear I wanted to carry, prevented the hull from easily getting up on plane. As a result, I decided to put on a 25 hp. It turned out to be a good choice. However, I did have to make some changes to the boat.
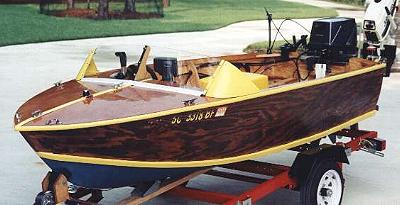
I decided that I needed an electric start engine with remote engine controls so I could move my weight forward. I also designed and built a windshield to keep any water that comes over the bow, out of my lap (see details in the Builders Registry section). I had to splice in a section on the starboard side of the dash (frame 2) to be able to mount the steering wheel. The lower edge of the original dash was curved on both sides and the area where the wheel was to fit was too narrow for the steering hardware. I built a bracket at the rail, to mount the remote engine controls. I moved my fishfinder to the dash and mounted a speedometer. Since there was not enough material in the dash to accept a hole the size of the speedometer, I mounted it in a hand made wooden bezel on the dash. The trolling battery I mounted under the port side of the drivers seat. As a result, I had to rewire the boat. I also added an aluminum strip under the bow to minimize wear and tear when I beach her.
The boat performs very nicely and does not feel overpowered or too heavy. It accelerates smoothly (read quick like a bunny) and comes up on plane at about 12 kts. The engine is not broken in so I haven't tried top end. It does pop right up to about 30 kts. The hull turns very smoothly and is a joy. It is, however, not a deep vee and the ride can feel like being pulled off the curb while sitting in a wooden box or driving a late 50's Corvette down a dirt road. If you're looking for a boat that's easy to build and a joy to run, you may like the Utility. I like mine. To save two thousand words here are a couple of pictures of the "CLASS OF '51".
Thanks for your Help. Tom Rosling tom.jo@worldnet.att.net
* We will not agrue with success, but our experience using polyester resin as a coating has not been as successful as Tom's. We have found that it has tended to crack when used as a coating without fiberglass cloth. How about some feedback from other builders? ...brw
Book review: Howard I. Chapelle
This is not a review of a specific book, but of a specific man, Howard I. Chapelle (1901-1975). The following is from the dust cover of the latest edition of Yacht designing and Planning.
Howard Chapelle spent his childhood around the harbor of New Haven, Connecticut, where he sailed a traditional New Haven Sharpie and began his career. As a young man he worked for the best boat and yacht designers of the time and moved on to become a widely esteemed designer and professional naval architect. Chapelle traveled extensively, working and studying abroad, first to England's National Maritime Museum, then to Turkey to study their fisheries and vessels for the United Nations, and later working within the New Maritime Museum in Singapore. In the United States, he was appointed curator of the Museum of Transportation at the Smithsonian Institution and was for many years senior historian there. During his career, he authored an array of classic books on American small crafts, yacht designing, maritime history, and traditional vessels.
We have three of his books in our Boatbuilding Books pages: American Small Sailing Craft, Boatbuilding, and Yacht Designing and Planning.
Howard Chapelle wrote about subjects he knew well and obviously loved. If you are interested in the history of boatbuilding, as well as how-to of traditional construction, his books make great reading. I particularly like American Small Sailing Craft, which discusses the development of the various types of traditional sailing boats from European and even American Indian roots.
Recent email:
Subject: (no subject)
Date: Wed, 7 Jul 1999 00:27:23 EDT
To: info@glen-l.com
Hi my name is Gary Nichols, in 1960 when I was 19 years old I built the Glen L 13ft tuffy. It was nice to see your name on the internet after 42 years it brought back a lot of old memories. It is good to see your still in business at my age of 58 I have told a friend about you and he is planing to order a kit. He has seen the picture of the boat I built and was impressed. Keep up the good work.
Gary
Subject: Sissy Do
Date: Mon, 19 Jul 1999 13:11:58 EDT
To: info@glen-l.com
Hi
My name is dave, i built your sissy do boat back when i was fourteen. That vessel did many things for me, it allowed me to expand my horizons. All the chines and sheers i cut with a black and decker sabre saw. I was fourteen at the time and couldn't use a circluar saw, but my cuts were percise. My dad and I built her over the week of easter break from school. Well, i went on to form the first Junior BASS sanctioned BASS Club in the state of MD with the help of Ken Penrod who know runs life outdoors unlimited.
The story behind the vessel is long, it served me from 1982 until in 1996 when i broke it up and took it to the dump, it just could not keep up with my bass boat!!! i am now going to order plans for its little brother the IMP, to replace my beer can john boat and has higher horse power rating with much better safety built in, i do swear by glen-l designs... nothing but the best!
Thanks for listening
David Robinson
You list the max engine size for the Tunnel Mite as 100 lbs. Normally, engine max is rated in horsepower. What is the maximum horsepower for this craft? Is this a stitch-and-glue? When driving the boat, is it a seated or kneeling position? Thanks for your time. John Z.
ANSWER: On the Tunnel Mite test model we used a 20 hp motor for
approx 35 mph. Engine hp ratings are determined by a formula in the US Boating
and Safety Act. This formula results in extremely low hp for small hydros and
tunnel hulls, so weight is given instead. The Tunnel Mite is not stitch and
glue.
You kneel when driving Tunnel Mite or the hydros.
--
Barry,
Customer Service
name: mike eaton
City: oshaw
State: on
Country: canada
Comments: ...i once built an 8 ball. i took it out in fairly heavy weather in lake ontario and lived to tell the tale. it also served as a tender and a fishing boat and once as an ice chest for beer and wine for a big party. a very useful craft indeed.
Walt Conrad wrote:
Hi,do I need To waterproof the lumber used in in the boat,or can I coat the whole thing with epoxy when it's done?If I need to waterproof, what do I use?
ANSWER: Where epoxy is going to be exposed to sun light, it must be
painted or varnished. In order to paint or varnish, it must be thoroughly
sanded. So... If you intend to coat with epoxy, it is easier if you coat AND
sand prior to assembly.
Instead of epoxy, you can use an anti-rot coating and paint.
I'd like to use fir and built up plywood where I can, is a plywood stem much weaker than oak?
ANSWER: Douglas-fir is a good boatbuilding lumber, but do not use
construction grade. It must be clear, straight grained, and properly
dried.
Plywood stems are used because they are more dimensionally stable. The use of
oak for the stem can cause the planking junction at the stem to crack, whether
fiberglassed or not.
Is red oak suitible for boat building?
White oak is special order here and costs more. Is it advisable to use fir in place of hardwood. I've heard oak splits easily. Fir seems like it would be easier to work with ,plus it's cheaper. I'd use hard wood for the skeg And outer sheers. I'll be using the boat in Lake Mead NV. Thanks Walt
ANSWER: It is not recommended as it is more prone to rot.
--
Barry
Customer Service
Ben Packard wrote:
I have built two boats from your collection, but have been unable to get a
nice glossy finish like a Factory made boat has. I'm about to throw
together a Glen-L 13 sail boat, so I've read up on it and it seems like it
requires a Gel Layer to make the effect. If I were to layer epoxy over the
cloth so I can't see the weave bumps, is it possible to sand it into a
glossy finish. I understand it also has to do with the paint used, but the
marine paints I've used are not real durable. Any suggestions? Thanks for
everything.
A Very Happy Customer
-Ben Packard
ANSWER: We fiberglass, covering the weave with resin. The boat is
sanded "level smooth", so there are no runs or bumps or dips, with no
finer than 100 grit sandpaper. Next we use a high-build primer. The one we have
been using is Z-Prime Pro. It is not marine, available at our local paint
store.
We sand the surface using wet and dry sandpaper to 220 or finer grit. For the
final coat we use InterLux Brightside, but any marine or industrial enamel can
be used.
The finish will be no better than the surface it is put on. Allyn usually would
spend 8 hours sanding the primer on a 13' boat. Preparation makes the
difference.
If you have brush strokes or roller stubble showing, check with mfr for
application suggestions.
We generally spray paint, but recently have been rolling with very thin (our
epoxy) rollers. Do not paint in the sun, use thinners recommended by mfr.
We have never used Gelcoat.
--
Barry, Customer Service
Thomas Watson wrote:
When building the Eight Ball, am I restricted to using spruce or mahogany as listed in the bill of materials? If not, please recommend what other types of wood are acceptable to use. Thank you, Thomas Watson.
ANSWER: Because of weight, spruce is preferred, especially for the
mast. For the boat hull you can use white oak, lonf-leaf yellow pine, clear,
straight-grain Douglas-fir. Ultimately, this is your boat; the above are
recommended woods, but you can use any wood you choose. It should be relatively
strong and water resistant, and free of knots, splits, and properly
dried.
--
Barry, Customer Service
name: Michael M Farish
Comments: Have built several of your boats over the years and enjoyed them very much. I appreciate your hard work. I started reading your publications in the early 60's. Thanks for showing me how to build a boat!
From Guest Book: Friday, July 16, 1999 at 14:47:53
Comments: I am starting with a 14' flat skiff as my first project.
Unfortunately, I found Glen-L a little too late. I have already decided, that
once this project is complete, my next one will be a Glen-L boat! You guys have
a lot more to offer than any other companies I've been to! I'm glad I
found you.
Christopher Day
Build more boats
Glen-L boats, of course