WebLetter 6
An Occasional Publication for the Home Boat Builder
Glen-L Marine Designs - 9152 Rosecrans Ave. - Bellflower, CA 90706
In this issue
- Feedback: PEE WEE
- Featured boat: Jimbo
NEW A 16' Stitch-N-Glue Garvey - Notes on Building the Power Skiff
by Roger Clauer - Boat Speak Transferred to Useful Information and Suppliers/Glossary
- Feedback: TNT
- POXY-SHIELD: The boatbuilder epoxy
Tiny bubbles
Glen-L Update
- Since the last WebLetter we seem to have been having computer problems:
- We downloaded a program to manage the Boatbuilder Connection and had a hard drive crash... down for a week. Will try again when we get caught up.
- WebLetter 3 has been "rebuilt". When we moved the WebLetters to a new directory we somehow got an incomplete version on the site.
- We are in the process of preparing our catalog of motor conversion and inboard installation parts for the web site, but will be at least another month until it will be up. Also in progress: BOATBUILDING METHODS/Strip planking.
- Also considering adding a new page: STATS. Page will list statistics from customers: Design/hours to build/cost of boat only/date. Expect this page will grow very slowly. If you have this information on any of our designs and would like to send it, we'll start the page when we get five entries.
- Re: JIMBO. Drawings are mostly done, but not proofread. Expect plans to be available by the end of September. (If I've quoted an earlier date to any of you... I'm sorry.) See Featured boat below.
- Eureka! Study plan for the Eureka now available ($10.00).
- Special thanks to Roger Clauer for the article on the Power Skiff. Our readers ask for more input from other builders... send in yours. You can describe a part of the project or a list of hints, anything you feel would have helped you in your project.
Barry Witt
Editor
Feedback: PEE WEE
The following email was received 14 July 1998:
Subject: guest book entry
From: Frank Civera
Memphis, TN
When I was a kid around 10 years old, I built an 8' runabout (Glen-L PEE WEE) and used it 'til I was well into my teens. I gave the little boat to some friends that had kids and they still have it today. Many have enjoyed the boat and I am in my late twenties and am thinking of building a new boat for my wife and child. I will never forget the fun and ease I had when I was a kid building that little boat. Thanks Glen-L, I hope to relive the experience.
Frank
I was checking our photo albums to see if Frank had sent in a picture when he built the boat, and found a letter from 13 year old Steven Hyman of Lutherville, MD. The letter was received September 16, don't know the year.
Dear Glen-L,
I've lived on the water for the summer every year of my life. And as I grew older and saw all the other kids with boats I decided that summer I was going to get a boat, either by making it or buying one. It took half the summer finding a boat that I liked. And when I saw one I liked one day I knew that was my boat. It was not hard talking to the boy who owned it for he was a friend of my neighbor. When he docked his boat at my neighbors I went over to talk to him about the boat. I found out it was a wooden boat built by plans from Glen-L Marine designs. And that was the first time I ever heard of your company. The rest of the summer went fast for me because all I was dreaming and thinking about was my very own boat.
The first thing I did when I got home was write in for the plans. I thought it would take long, but I got very good results. The first thing my father and I did was make the cradle for the boat. It took the whole winter for me and my sister and father to make the boat. When it was totally finished I bought an engine (6 hp). When the night came before the day of launching I prayed it would not rain. When I woke up the sky was dark and on my way down to my summer house on the Maguthy it started raining. By the time we got down there the rain had stopped for the time. It took 10 minutes getting the boat in the water and 5 minutes putting the engine and steering cables on. But what I am trying to say is, it was worth the effort of building this great boat! The Pee Wee is a great boat for kids!!!
|
Steven Hyman (Age 13) 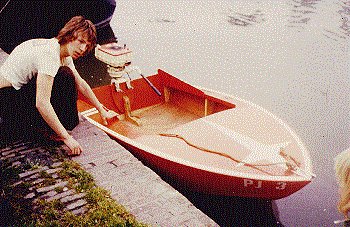
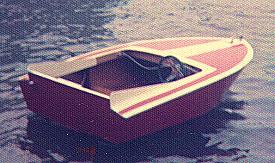
The PEE WEE |

PEE WEE |
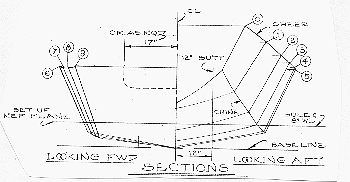
Featured boat: Jimbo
A 16' garvey hull for STITCH-N-GLUE PLYWOOD construction
This design is currently on the drawing board. We hope to have the drawings available by the end of September.
CHARACTERISTICS
Length overall: 15' 9"
Beam: 6' 8"
Draft @ 890 lbs. displacement: 6"
Hull depth midships: 27"
Bare hull/deck weight (approx.): 450 lbs.
Average passengers: 2-4
Cockpit size: 5' x 10'
Hull type: Garvey shaped, vee bottom, developed for stitch-n-glue sheet plywood construction.
Power: Single long shaft outboard motor to 85 hp maximum, 50 hp is more than adequate for most uses. Lightweight inboard/outboard optional but not detailed.
Trailer: Designed for use with Glen-L series #1000 boat trailer.
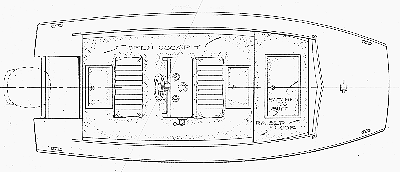
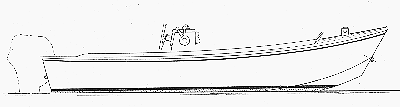
The JIMBO is a utility boat capable of filling many needs. With its shallow draft, it can be a flats boat. Bring the raised sole closer to the deck, add a couple of swivel seats, and she'll make a fine bass boat. The console can be removed to make a great work boat, or build it as shown and use it as a water ski tow boat... or whatever, it's a boat for all uses. A stable craft at rest with a cushioning vee forward.
JIMBO has excellent load carrying capabilities. With a total displacement of 890 lbs., the hull draft will be only 6" and 600 more pounds will sink her only 2" more for an 8" draft.
T>he stitch-n-glue building method is one of the fastest and easiest boat building methods, especially with full dimensional layouts of the side and bottom planking. No complex building framework or jig; only one temporary cross form is required. Wire stitch the bottom panels together to form the vee, put in the form, spring the sides around the form stitching progressively to bottom, add the bow and transom... the hull is formed.
The seams are filleted with epoxy putty and covered with fiberglass laminates. Wire is removed; when, depending on procedure followed. Sturdy longitudinals reinforce the bottom and support the wide, flat, interior floor. Additional cross bulkheads provide rigidity to the husky monocoque construction, combining for a lightweight but very strong hull.
We will offer:
PLANS AND PATTERNS or FRAME KIT WITH PLANS, STITCH-N-GLUE KIT, and FIBERGLASS COVERING KIT.
More Plywood
Okoume/Marine
Many of our builders have gone to lumber yards to price marine plywood, were given a price for okoume, and received the impression that okoume is the only choice. Okoume is an African hardwood. The plywood made with it is not necessarily marine. But one of the best marine plywoods is, and is commonly referred to simply as "okoume". Marine okoume is identified as "BS1088" (British Standard). Okoume comes from Europe and Israel. It takes a finish better than Douglas-fir and is less likely to check. Okoume is much lighter but also less rot resistant than Douglas-fir. We use okoume in thinner thicknesses where light weight is desired. (7mm from national supplier: $76.50).
Difference between marine & exterior plywood
There is no government standard for plywood, the plywood industry sets their own. In the past, when old growth trees were common, the A and B face veneer designations meant: A - clear, no knots or plugs and B - plugs but no open knots or splits. Today, plugs or fills are common on both A and B faces, the difference being how many are allowable. Douglas-fir marine plywood uses the same type of wood and same glue as Douglas-fir exterior; it is no more rot resistant. Marine, however, has better inner plys with no open knots and no gaps between the veneers. In boat planking applications, or any application where the plywood is bent, there is always a potential for exterior plywood to crack or break at a gap between veneers; particularly on high speed boats or where the bend is subject to high stress. Marine plywood is meant to eliminate this possibility. Essentially, marine uses select veneers. (1/4" AB Marine from national supplier: $34.50).
Don't assume that all plywood within the same classification is the same, it's not. Some mills have access to old growth trees, some are knocking on the doors of land owners trying to buy the rights to cut 30 year old trees. Some plywood seems wet and tends to check more as it dries out. When buying plywood, look at the faces and the edges. Check for gaps in the inner plies. Check to see if the outer veneers are "splintery", i.e. the grain is separating. The grain on this type of panel tends to open when bent. Check to see how many fills or plugs there are; make sure plugs are not loose at the edges. Always use your best panels in the forward sections of the boat where there is the most curvature.
Other stuff - hearsay
The plywoods I've mentioned are the ones that
we have used and have had good experience with.
Luan - What I have seen: Three ply, thin outer veneers= not structurally
suitable. Glue is frequently questionable, most suppliers can't tell you
what type of glue is used in construction.
Luan marine - Haven't seen, but reportedly available on East Coast. If
stamped "marine" or sold as marine by a reputable dealer, should be
okay.
Underlayment, red meranti - Reportedly used with success, "bent
funny". We have used meranti hardwood for framing, seemingly short grained
and brittle.
MDO (Medium Density Overlay) - Have heard reports of excellent results, but
others have questioned the integrity of the glue bond and fiberglass adhesion.
HDO (High Density Overlay), which is primarily used for concrete forms, treated
so concrete won't stick to it, is not recommended.
Checking
Covering with fiberglass will prevent checking on the outside of the hull. Degree of checking probably has something to do with tightness of grain in outer veneer and moisture content. Epoxy might slow down checking, but will not stop it.
Notes on Building the Power Skiff
by Roger Clauer
Twenty seven years ago my father and I built a Glen-L 14' sailboat. So last winter when I decided to build a boat with my 15 year old son and found Glen-L on the Internet, they were a natural choice for my project. I was looking for a boat that could be used with an old 7 1/2 horsepower motor, but was light enough to easily be carried by two people and put on a car top. There were a few options in the Glen-L catalog, but the Power Skiff 12 seemed to be the best fit.
I am a fairly experienced woodworker, but this was my first boat so I wanted to make sure there was support behind the plans. Since the Stitch and Glue technique was unfamiliar to me, I started by emailing a few design questions to Glen-L. I was very pleased to get quick responses to my questions. In fact, over the 3 months that we built the boat, I sent in perhaps 10 questions and it never took longer than 24 hours to get a response. The responses were always accurate and helpful.
One area of building the Power Skiff that was a surprise was the budget. I expected the boat to cost about $700-$800 (plans, frame kit, fiberglass and plywood). What I forgot was the cost of paint ($100 - marine paint was over $20 per quart), oars ($20-$50 each), mahogany for the keel and sheers ($50) and hardware (oar locks, anchor, etc.). The final total came closer to $1,000. Not bad, but more than I had planned.
The next area that deserves mention is supplies. In the fiberglass kits, Glen-L supplies 7" foam roller covers and a limited number of bristle brushes. It turns out that frames for 7" rollers are somewhat hard to find. I tried 3 different home supply chains and a few specialty paint stores before I finally found one. When I did find it, it was a professional roller frame that cost more than the one from Glen-L. Unless you know where to get a 7" roller frame, buy it from Glen-L with your supplies. The kits also include a limited number of bristle brushes. These are fairly readily available, but I found that not all of them are created equal. Some of the ones I bought at my local home supply store shed and left bristles in the resin as I spread it. The brushes from Glen-L didn't have that problem, so you might want to buy a few extra when you buy your initial supplies.
We actually began construction in April and floated the boat in early July, but we took about a month off during spring to do yard work. The building process went pretty smoothly. The best advise is read the instructions over multiple times. Since this was my first boat, sometimes it took three or four readings before certain areas made sense. The layout is fairly simple except that the plans are on one very large sheet (12') that can't be cut because pieces overlap. This was a little inconvenient, especially for the small pieces such as the front seat and bulkhead. Some of the other small pieces (breasthook and knees) were included in the frame kit, but these would have been difficult to trace off the bulky pattern. One piece of construction that caused me a problem was the thickness of the motor board. The plans call for 3 pieces of 3/4" plywood (total of about 2 1/4" thick). It turns out that the clamps on my old (circa 1950) Johnson motor did not open this wide. Unfortunately, I didn't find this out until I got the boat out on the water the first time and tried to mount the motor. The problem was easily solved with a belt sander by shaving off about 1/4" of thickness. This may only be a problem with old motors, but it is worth checking out.
Even though I have done a fair amount of woodworking I had never worked with mahogany. Other than being very expensive, ($4.00 / board foot rough) I found out that it splits quite easily. I had some trouble driving temporary screws into the keel and the sheers. As long as you drill adequate pilot and shank holes, you are okay. I also had some problems with splitting of the inner sheer at the splice (it's pretty hard to find a 12' mahogany board). Follow the recommendations for scarf joints and make sure the epoxy on the joint is cured before you try and install the sheers. One last comment about mahogany is that the dust stains clothes, so wear old clothes when you are sanding.
One other recommendation would be to glue the butt
joints. If you choose to screw them together, Glen-L recommends you use
3/4" screws which means that roughly 1/4" of the screw needs to be
ground off. This is a real pain (although a belt sander makes relatively quick
work of it), since there are almost 100 screws in just the bottom alone. The
biggest problem, however, was that when I formed the sides, the outer edges of
the side butt joint slightly popped out. The result was that you can still
slightly see the joint on the outside even when the boat is finished. In
retrospect, I possibly could have feathered this by sanding, but I think gluing
would have eliminated the problem.
(NOTE: We specify all butt blocks should be glued, with or
without fasteners. ..Editor)
One other small construction problem had to do with the reinforcing cleats. The cleats aft of the butt block went on just like the plans said but the ones forward of the butt block didn't have enough give for the curvature of the hull. When I tried to fasten the first one, it snapped in two. Upon the recommendation of Glen-L, I placed the forward cleats parallel to the keel and everything was fine. I also decided to putty around all of the cleats to feather the cleats into the bottom. This gives a little nicer look and hopefully make it a little easier to clean.
Finally, all of the screws provided in the fastener kit are bronze phillips head. This is good since they will never rust and bronze is harder than brass, but it's still relatively soft. I used a drill driver with the torque set fairly low, but I still had problems with the bit slipping and stripping screw heads. Again pilot and shank holes and proper countersink depth were important. It would also be nice if they offered the fastener kit with square drive screws. Almost anyone who has a drill driver has a square drive bit and I can't imagine building the boat without a drill driver (there are a lot of screws).
Fiberglassing was perhaps the most difficult part of the project. When you start taping the seams make sure you use the squeegee to even out the resin. For the inside seams, I put the resin on with a brush as a roller would not have worked well, but I didn't use the squeegee at first. The result was uneven resin buildup. This was solved with sanding but it was a lot of extra work. Speaking of sanding, I found that hand sanding or a random orbital sander seemed to do the best job. I also found that stearate coated sandpaper worked much better and clogged less than other types (Klingspor has excellent sanding products www.klingspor.com). I used 60, 80 and 100 grit for all of the hand and disc sanding.
Finally, even though I sanded fairly carefully, you could still see my seams after I painted. If I was going to do it again, I would use a coat of epoxy putty to fill and feather all the seams and joints. This would have been a lot of extra work, but I think it would have given a better finished product.
The final reward came in two stages. The first was my neighbor's ooh's and ahh's about how great the boat looked as we put on the final coats of paint (of course I agreed). The second was when we took it on the maiden voyage and it performed well -- no leaks and more favorable comments from those at the boat landing.
Thanks to Glen-L for a good design, good support and a very pleasurable experience. Time to go fishing.
P.S. - Sorry we stole your paint scheme, but my son really liked it when we saw the video.
Boat Speak, Part 4 of 4
Terms we use to describe our designs.
The four parts of "Boat Speak" have been consolidated and transferred to Useful Information & Suppliers/Glossary
And now a word from our Sponser...
If this sounds like an advertisement for Glen-L, that's what it sounded like to us. Thank you Mr. Motta for the email.
Subject: TNT Plans and Building
Date: Mon, 20 Jul 1998
Dear Glen-L,
I'm an amateur woodworker and I work as an outboard motor technician at a small marine and power equipment repair shop. I recently ordered plans for the TNT. I received them in the mail a few days later and I'm in the process of laying out and cutting the frames. I would like to commend you for a well thought out product and great customer service. My main decision to buy came after several emails were sent back and forth between myself and Barry. He answered my questions thoroughly and promptly.
Everything is going well so far. I understand marine terminology so things are moving quickly. The full size plans are precise and clear, the detail drawings are informative with exploded views of key features. I would like to see angles given in the full size views for all parts, but this isn't a problem as they're not needed. The directions are well written, very detailed, and most importantly easy to understand.
Thank you for introducing me to a whole new dimension of woodworking and a brand new hobby. The only problem I face now is finding enough room for the next one. I'll be starting another for my dad after the first is ready for planking.
Thanks
Mike Motta
POXY-SHIELD: The boatbuilder epoxy
"Help! There's bubbles in my resin!"
Three people in one week asked about bubbles... sounds like an article for
WebLetter.
There are two common causes of bubbles in resin. One, air escaping from newly coated wood. This usually only happens on the first coat, but may occur on subsequent coats if the wood is not sealed with the previous coat. Sometimes the bubbling is minimal, sometimes there are lots of bubbles. Why? I've heard... differences in temperature between wood and ambient air temperature, between wood and resin temperature, when the wood is warm... so maybe it has something to do with temperature. Anyway, what do you do about it? Lightly sand and recoat. If you are going to fiberglass, lightly sand and fiberglass.
Two. The other cause produces bubbles that look more like foam, that make the resin look milky, and can occur any time you apply resin. What causes it? You do. When you use a roller to apply resin (as we do) you may sometimes roll the roller quickly back and forth in order to wet out a particularly stubborn patch of bare wood or cloth. What you are doing is "whipping" the resin. To correct the problem, drag the surface lightly with a brush. The bubbles may migrate out of the resin on their own, if the resin doesn't set up too fast, but if the surface is ultimately going to be clear, it's best to brush them out.
Build more boats
Glen-L boats, of course