Tubby Tug: A father and son project
by Bob Ellison
Continued
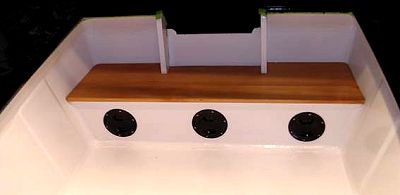
I did not put a lot of brightwork on the boat since I am hoping that my son will be doing the maintenance from now on. But a little looks nice. I used edge-grained fir for the seats, the compartment underneath is still water tight but with hatches so that it can be used for storage.
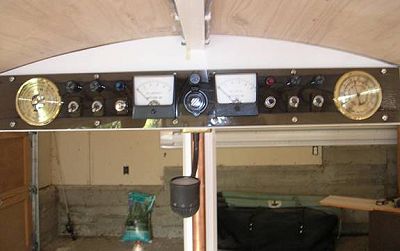
The electrical panel was a lot of fun to do. The boat is powered by a deep cycle marine battery that is under the center seat, which I modified to go all the way across. The copper pipe you see goes from the dash board to the overhead and is merely a conduit to route wires from below. It looks rather tug-boatish as well. The four circuits are cabin lights, navigation lights, anchor lights, and fire pump. There is a power point in the centre to power the spot light and to plug in the solar panel. All the circuits are fused and can be routed through the volt meter and ammeter with the switches and lights adjacent to the gauges. There is also a barometer and thermometer for good measure. The panel light/cabin light can be seen below the panel. The boat is, after all for a ten year old, so the more bells and whistles the better. What better way for a young man to learn about electricity.
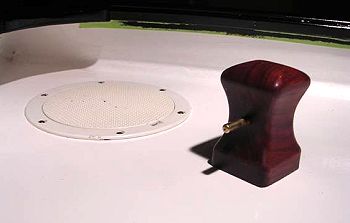
The foredeck has a large hatch so we can use the watertight compartment for a chain locker to house the folding anchor and line. The towing bit was made from padauk and brass, finished with epoxy and varnish.
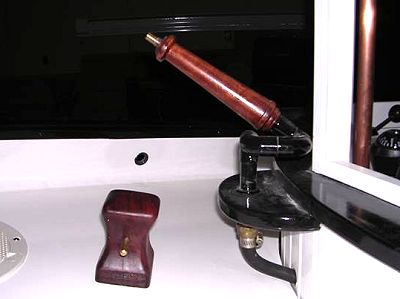
The water cannon was a must for my son, it shoots about 30 feet and is powered by a bilge pump under the center seat that draws water from a through-hull on the side just below the water line. It is remotely controlled from a lever in the cabin that swivels it through about a 90 degree arc. I used the throttle cable from a lawn mower to connect the cannon to the lever. We have surprised a lot of people with it so far. The nozzle is brass and rosewood with the rest of the cannon made from copper plumbing fittings and an old sealed bearing. The wooden nozzle was made from two pieces of wood laminated with paper in between to form a blank, a couple of inches square by a foot long. After shaping it on the lathe and boring it to fit ½ inch copper  pipe, it was split with a chisel along the paper joint. The joint was cleaned up
with sand paper and re-glued over the copper pipe after all the soldering and painting was done. It was finished with epoxy and varnish. Underneath the mount is a 2 ½ inch arm attached to the pipe that is activated through the throttle cable by another 2 ½ inch arm and lever inside the cabin.
pipe, it was split with a chisel along the paper joint. The joint was cleaned up
with sand paper and re-glued over the copper pipe after all the soldering and painting was done. It was finished with epoxy and varnish. Underneath the mount is a 2 ½ inch arm attached to the pipe that is activated through the throttle cable by another 2 ½ inch arm and lever inside the cabin.
The engine controls are through an old two-lever set that I found in a boat shed. Once again, if it is for a ten year old, the more levers and gadgets the better. The long arm shifts and the short arm is the throttle.
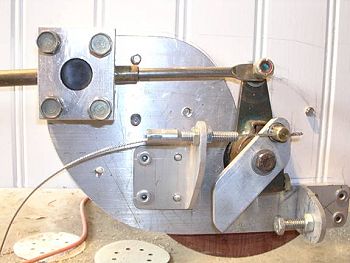
The back side of the engine controls had to be fabricated from scratch. It worked out well. We have about 45 degrees of travel for the throttle and the same for forward and reverse. This was all made out of 6061 aluminum and took as much head scratching as construction time.
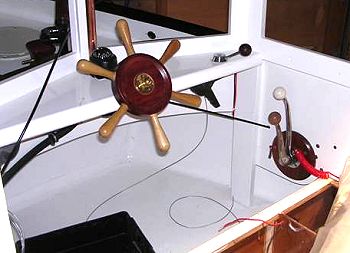
The interior layout is pretty straight forward. The engine controls on the right with a safety switch and lanyard, the lever for the water cannon is on the right side of the dash board. The height of the dash board worked out well with lots of leg room even for an adult, I would not make it any lower. The battery, bilge pump and fender storage are under the seat which has a hinged top. The steering wheel is made from padauk as well, with a brass hub and acorn nut. The spokes are made from maple file handles that can be ordered from any tool supply. I found that most steering mechanisms are both too big and too expensive for this little boat so I built it using motorcycle clutch cables and a few machined brass or nylon parts here and there. The cables are routed around both sides of the boat to join at the motor with a spring and a swivel. On the shaft from the wheel and under the dash is a spool that has a couple of wraps of cable on it from each side. As you turn the wheel the cable winds up from one side and unwinds on the other, with the slack in the system taken up by the spring. It is very positive and light and has enough spring in the system to absorb torque and allows you to tilt the engine up.
The boat is a delight on the water and trims out nicely. I put the boot stripe about 4 ½ inches from the bottom and that seems to work. The graphics were designed on the computer and cut so we could stick
 it on. Our Mercury 5 horse is perfect on the boat, it has in internal fuel tank
so it eliminates the need for a fuel tank on the already small deck. I made floor boards for the back half of the boat to keep our feet dry since the boys will be in and out of the water all day long in the summer. We found the front windscreens nice since we launched on a chilly spring day. It goes fast enough that the wind is cool. We plan to make roll-up side curtains as well.
it on. Our Mercury 5 horse is perfect on the boat, it has in internal fuel tank
so it eliminates the need for a fuel tank on the already small deck. I made floor boards for the back half of the boat to keep our feet dry since the boys will be in and out of the water all day long in the summer. We found the front windscreens nice since we launched on a chilly spring day. It goes fast enough that the wind is cool. We plan to make roll-up side curtains as well.
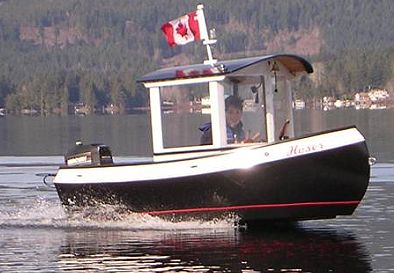
'Hoser scoots right along on 5 horse power. She was a little slow getting up on the step so I made a small cavitation plate for the motor and now she pops right up with two kids on board. She leans into the corners nicely, does not porpoise, and is dry. As you can see, about a third of the hull is out of the water when she is planing. What waves we found were not a problem at all. It may be hard to find a happier little boy.