A place to share YOUR boat building story
Glen-L Marine Designs - 9152 Rosecrans Ave. - Bellflower, CA 90706

 In this issue
-
The First "Stitch and Glue" Boat
in the World
-
Glen-L Barbuilder of the
Month
-
Featured Design:
Bull's-Eye
-
Designer's Notebook:
…about Sheet Plywood
-
How Do You Make a Bar...? by
ArtDeco
-
Photos posted since the last
WebLetter...
-
Shop Talk: Clamps &
Pencils
-
Recent email
-
eMail of the Month
GLEN-L Update
-
The excitement here at Glen-L is building with every
passing day as the weekend of this year's Gathering of Glen-L Boatbuilders draws
closer and closer. Gayle and I are really looking forward
to another fine festival of fun, food, friendship, frolic
and flotation with our extended Glen-L family.
Although we recognize that many of our friends live continents away, and that for some the economy makes vacations or even weekend trips cost prohibitive, we sincerely hope that no one who can make the time and find the means misses out on what is always a wonderful 3 days that will enliven, enrich and inspire anyone with a pulse. -
-
Speaking of inspiration, I want to point out the email
from 13 year-old Mike (see below). Mike should be an
inspiration to all of us; he has a dream of building his
own boat and isn't going to let anything get in the
way of living his dream.
Would that we all live our lives with the attitude that, no matter what obstacles we might face, we CAN find a way get where we want to go; we just might need to get a little creative, but where there's a strong enough will there's always a way.
Heck, if a 13 year-old with limited funds and no experience can build his dream boat, what's stopping us adults? -
Until next month . . .
Editor
The First "Stitch and Glue" Boat in the World
by B. Barba
S titch and glue may be the most widely-used boat building technique by amateur boat builders. It is simple, the boat hull is assembled quickly, requires no special tooling or skills, and the spare material is minimal. Many people consider it their favorite boat building technique.
In 2007 I was working in Zadar, a city at the north of Dalmatia, and there was one great restaurant and cocktail bar in the old town. It was actually a former Venetian military ammunition warehouse built in the 16th century; a huge mono-space building, restored in a classic avant-garde style.
On one of the walls of the restaurant hangs a part of an ancient ship's hull.
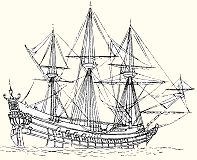
The 2000 year-old wreck was found buried in the sands at the island of Pag. It was a "liburna," one of the fastest and lightest boats from ancient times. Librnae were built and used by the Liburnian people, the inhabitants of the northeastern Adriatic coast at the time of the Roman Empire, in what is Croatia today. Not a small boat, similar to later Viking warships, it was powered by both sails and teams of oarsmen sitting in two rows.
The Liburnians were excellent boat builders. It is said that all the later Roman ships were copies of the Liburnian ships. The Liburnians also developed and built the world's first mechanically-driven boat. It was propelled by two paddlewheels, one on each side, powered by a couple of oxen on the deck. It is interesting that more than one thousand years had to pass before the paddlewheel boat was reinvented.
If you look at the photo of the wreck, you will see that the planks are stitched together with some kind of rope or a narrow strip of leather, and then glued with resin. The stitched and glued skin was then nailed onto the frames placed inside the hull for greater rigidity.
Representation of a typical Liburna
With the fall of Roman Empire, the Liburnians disappeared and their boat building techniques were all but forgotten.
Note: With the advent of modern adhesives and epoxies, stitch and glue boat building has matured into an excellent method of boat construction which delivers stronger, better boats. Using epoxy to bond and seal all parts together results in a stronger, one-piece boat design which is quicker, easier, and simpler to construct than other boatbuilding methods. It also generally results in a boat that is much easier to maintain over the long term.
Learn about Glen-L's FAST-G Fold And Stitch Then-Glue system.
Just about anybody can build a boat using this system. It eliminates many pieces that ordinarily require fitting, fairing, and beveling, thus it's ideal for beginners.
A hand saber saw and drill are about the only power tools required. The resulting boat is incredibly light weight, strong, and durable.
Glen-L Barbuilder of the Month
Charles Smith - Riviera
Our resident poet, Art Deco, recently was surfing through the Customer Photos section of the Glen-L.com website when he came across the Glen-L Riviera built by Charles Smith of Kingston, Tennessee. Art was fascinated by Charles' idea for converting a Riviera into a bar, and wondered how Charles would accomplish such an interesting task.
Thus inspired, a poem sprang forth from Art Deco's fertile imagination (see "How Do You Make a Bar…?" below), as well as the hope that Charles would show us all his final results and provide the readers of the WebLetter an interesting story.
So, this month, instead of the "Boatbuilder of the Month" we present you - in his own words - our "Barbuilder of the Month"…
 "March 16,
2008: I am just starting on the Riviera. Got the design
and frame patterns in February and I now have some of
the frames built and am building the building
form.
"March 16,
2008: I am just starting on the Riviera. Got the design
and frame patterns in February and I now have some of
the frames built and am building the building
form.
I am having a great deal of fun with this project.
Actually I am not building all of the Riviera....only half of it. I am building a bar for my den. I am making several alterations as I go to facilitate the bar. However, this is also serving as a dry run for the real thing.
It is making me appreciate those who really build one of your great Glen-L designs. I will send photos when done."
"July 14, 2009: Finished it last Christmas. What a great fun project!
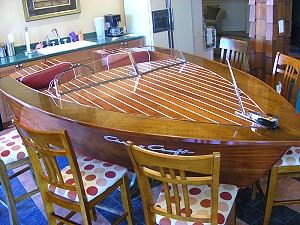 I have a Chris-Craft boat (a 1965
Capri) and have had several of them. You can see in the
photos that I put Chris-Craft logos on your design
(sorry!).
I have a Chris-Craft boat (a 1965
Capri) and have had several of them. You can see in the
photos that I put Chris-Craft logos on your design
(sorry!).
You folks at Glen-L did a great job with the Riviera plans. This was my first attempt at building anything resembling a boat. Your "Boatbuilding with Plywood" book was priceless.
My bar is a great place to sit and enjoy a boat with friends, even in the winter. It's also a great conversation piece. I would be flattered to have it in your WebLetter."
-- Chuck Smith
Well, Chuck, you got your wish! You built a beautiful, ingenious "conversation piece" and we're delighted to showcase it in the Glen-L WebLetter!
We always say that one of the biggest advantages of "building it yourself" is that you get to build your boat exactly as you want it - no compromising - even if what you want is more bar than it is boat!
I'm sure that there are many, many boatbuilders out there right now planning on lifting a glass in honor of Chuck Smith's imagination and his completed "boat." Since Chuck tells us that the bar was "a dry run for the real thing" I'm also quite sure that we're all waiting breathlessly to see what Chuck comes up with next!More Photos of the "Happy Hour"
Featured Design: Bull's-Eye
 A sweetheart of a boat that's
easy to build, the 11' BULL'S-EYE is an ideal first
time boatbuilding project and a great way to get into
boating.
A sweetheart of a boat that's
easy to build, the 11' BULL'S-EYE is an ideal first
time boatbuilding project and a great way to get into
boating.
The BULL'S-EYE uses Glen-L's FAST-G Stitch and Glue construction. The plywood planking is cut from standard 4' x 8' panels, assembled flat on the ground and folded to form the boat. Patterns are furnished for virtually all contoured parts; more than 25 full-size patterns, including planking. Just lay the patterns over the wood, transfer them to the wood and saw to shape. No complex grids or tedious layouts from dimensions are required.
The BULL'S-EYE is versatile, easy to row, and adapts readily to a small outboard. You and your family can graduate to sailing with the simple free-standing Cat Rig, or for a more lively craft you can use the fully-stayed Sloop Rig, although traditionalists may prefer the Classic Sprit Rig with wood spars that can be carried inside the boat for portage.
BULL'S-EYE builder Andre Moos of British Columbia, Canada tells us
"I wish to thank you for helping make a long time dream of building my own boat a reality. I have sent along a few pictures; as you can see from the images, it is a Bull's-Eye sailing skiff. I stuck fairly close to the design details from your plans, but with some variation to the detail on the thwart... found your plans and instructions to be very easy to follow and understand." (Click here to view Andre's photos)
"And Herb Strom, also of British Columbia, states
"Here are a few shots of my completed 10-month BULL'S-EYE project. It was my first attempt at stitch and glue but I was able to overcome my over-cautious concerns with the procedure. I was particularly impressed with the accuracy of your patterns and plans." (Click here to view Herb's photos)
So, why delay your enjoyment? The water's waiting and now is the time to start!
Designer's Notebook: …about Sheet Plywood

P lywood is wonderful stuff. It's lightweight, stiff, strong and readily available in most areas. It is, however, limited as to the shape into which it can be formed.
Sheet plywood requires a developable surface or it won't bend in place. The designer uses a method often referred to as "conendric" development. This uses a segment of a cone or cylinder to determine the natural bend the plywood will take. As an example, take a sheet of paper and form a cone with it. Now take any continuous segment of the outer surface and it will be one that any sheet material will form to without kinking. There are, of course, limitations as to the amount that plywood can be bent, based on its thickness. The same thing applies to a cylinder.
Note that the outer surface of the plywood is either straight or convex; it cannot be concave. Prove the fact by bending the sheet of paper in a half moon shape and then attempt to bend the half moon; no go, it kinks.
It is possible to induce a small amount of concavity at the end of a plywood panel, particularly if there is little or no curvature in the plan view. This is seen on sheet plywood-planked boats which have a clipper shaped bow or stem. The amount of concavity is usually not great and the plywood thickness minimal.
Some use the terminology "tortured" plywood to describe a plywood shape. Our philosophy is that a plywood planked hull should bend in place without splintering or checking. It is bent, often severely, but it is a natural developed bend, not a tortured one.
We have many designs that have a flare, particularly on the sides or bottom toward the bow, however they aren't for sheet plywood. They use strips of plywood most often applied diagonally in two or more laminations called "cold-molded" or "double diagonal" planking.
Our designers spend considerable time working out a plywood development. Thus, we frown on the idea some have of altering the sectional contours of a sheet plywood boat.
We aren't being dogmatic; we're saving you money and time.

How Do You Make a Bar...?
How do you make a bar
Out of half of a Riviera?
Someone is doing just that
I hope he will tell us where it's at
Charles Smith says he has a plan
I believe him, but then again
That hull is all curves and angles
There’s no place to lean or dangle
How does he plan to do it?
Where will the patrons sit?
Can they set a drink right down there? Will there be for them some bar chairs?
Are there bottles behind the bar?
Can you see them from afar?
For washing is there a wet sump?
Or perhaps he’ll use a bilge pump
To me, this plan’s a conundrum
I must see it when it’s all done
Unique and stylish that’s for sure
For attitude adjustment, it’s a cure
But will this bar plan ever work out?
To build a bar does he have the clout?
Sometimes success is just good luck
But in this case, my buck’s on Chuck!
-ArtDeco
Photos posted since the last WebLetter...


What great thing would you attempt if you knew you could not fail?
Shop Talk: Clamps & Pencils
Overhead Clamp Holder
As a boatbuilder, you can never have too many clamps. At some point you'll probably find that you've accumulated so many small clamps that storing them can become a problem. Here's a storage system that will keep your multitude of bar clamps and spring clamps out of the way but still within easy reach. In fact, you'll find the perfect spot may be right over your head.
 As you can see in the drawing at
right, this small clamp storage consists merely of a
couple of pieces of ¼" plywood hanging from
the joists of your shop, garage, or other work area.
Each piece of plywood simply slips over a couple of
large nails. When you need a clamp or two, simply reach
up, lift the plywood off its hangers and remove the
clamps you need.
As you can see in the drawing at
right, this small clamp storage consists merely of a
couple of pieces of ¼" plywood hanging from
the joists of your shop, garage, or other work area.
Each piece of plywood simply slips over a couple of
large nails. When you need a clamp or two, simply reach
up, lift the plywood off its hangers and remove the
clamps you need.
Now your clamp collection will stay out of sight, out of the way, but always at your fingertips.
Tool-belt Pencil Sharpener
 All
boatbuilders know that a dull pencil can lead to
inaccurate measurements, leading to wasted material and
time. To avoid these problems, try installing a small,
hand-spun pencil sharpener in the pencil pocket of your
tool belt. To keep it in place, drill tiny holes in the
side of the sharpener and in the bag pocket; then use a
small screw with a washer to keep the sharpener
stationary. To prevent shavings from accumulating,
remove a few stitches from the bottom of the
pocket.
All
boatbuilders know that a dull pencil can lead to
inaccurate measurements, leading to wasted material and
time. To avoid these problems, try installing a small,
hand-spun pencil sharpener in the pencil pocket of your
tool belt. To keep it in place, drill tiny holes in the
side of the sharpener and in the bag pocket; then use a
small screw with a washer to keep the sharpener
stationary. To prevent shavings from accumulating,
remove a few stitches from the bottom of the
pocket.
Now when you're outlining a frame pattern or holding up a piece of wood to scribe and you pull out a broken or dull pencil, it's a quick fix. Instead of putting down the pattern and sharpening the pencil with a knife which eats up time (and the pencil) or taking the time to find a pencil sharpener, just give the pencil a few turns in the sharpener in your tool belt, and get back to getting the job done.
Recent email:
Subject: Thank you
Date: 29 July 2009Friends, thank you so much for your email newsletter, the WebLetter, and all the support your site offers. Keep up the great work and again, thank you and God bless.
-- Joe & Betty Austin
Mt. Home, Arkansas
Here are some shots of my recently completed Rob Roy. She's a beauty, a real head-turner! Very swift, agile, and easy to handle. Subject: Rob Roy
Date: 7 July 2009
This was my first boat building experience and I loved it. Anyone with high school woodshop skills can do it and learn alot as well. I extended the deck, fore and aft, and added fittings for a simple "balanced lug" sailing rig, reminiscent of the original design by MacGregor ( "A Thousand Miles in the Rob Roy Canoe on Rivers and Lakes of Europe").
Thanks for your support and for publishing these photos.
-- Tony Caminiti
Long Island, New York
Subject: Inspired by Your Website
I am very interested in building the Zip; have really enjoyed reading your web site and really got inspired by pictures and words posted by your satisfied customers.
Date: 11 July 2009
Looking forward to getting started soon.
-- Paul Bull
Beerwah, Queensland, Australia
Subject: Squirt 10' Runabout
When I first saw this boat, I felt a little *click* in my head. This boat is a true gift from God.
Date: 12 July 2009
I have ALMOST decided to build it, but first, I have to ask you a question. Can this boat be built in Stitch & Glue construction? If so, would it be cheaper than conventional construction?
I am 13 years old, and I am looking for a first boat, not an ugly one. I want to impress my friends with my boat, and I'm sure the ladies will hang around me ALOT more often.
I currently have saved 230 or 240 dollars (I haven't counted it in awhile) - is that enough money? I'm sure I can get my dad to loan me 100 - 200 more dollars. As for the outboard, I'm sure I could convince the people at some marina to give me a partially broken one.
Thanks!
-- Mike
Editor's Note: Upon reading this email, Gayle exclaimed
"Mike gets it - ALL the women are attracted to men with boats!"
Subject: Teleseminar Feedback
Gayle,
Date: 15 July 2009
Have just now replayed your teleseminar with Carl Puehl regarding wiring and hydraulic steering.
I would like you to know how helpful and easy to follow I found this information and I thank you for all your efforts in getting this up and running. In particular the references to specific books and products was extremely valuable.
I should add that I have a hearing difficulty but was able to easily understand all the discussion despite the fact that neither of you spoke like "fair dinkum Aussies."
Once again, thank you both for your efforts.
-- Bob Foster
Australia
Subject: Teleseminar Feedback
Gayle,
Date: 15 July 2009
Thanks for forwarding Bob Foster's comments to me. I listened to it myself today, and it sounded better than I thought it would.
Anyway, I hope it helps people to work on building their dream.
There is nothing better in the world than tooling along in a boat that you yourself built.
-- Carl Puehl
Saginaw, Michigan
eMail of the Month
Subject: Boat Launching Procedures
Date: 16 July 2009So here it is.
-- Bill Matthews
I just finished building my new boat and decided to take 'er for the maiden voyage this past weekend. This is my first boat and I wasn't quite sure of the exact Standard Operating Procedures for launching it off a ramp, but I figured it couldn't be too hard.
I consulted my local boat dealer for advice, but they just said "don't let the trailer get too deep when you are trying to launch the boat."
What am I doing wrong? I don't know what they meant by that, as I could barely get the trailer in the water at all!
Click here to see photo of the problem
Capetown, South Africa
Build more boats
GLEN-L boats, of course
WebLetter Index
Glen-L Home Page