A place to share YOUR boat building story
Glen-L Marine Designs - 9152 Rosecrans Ave. - Bellflower, CA 90706
 In this issue
-
Priceless Memories by Jeff
Neiman
-
Glen-L Boatbuilder of the
Month
-
Life in my Floating Home by
Jillian Simensky
-
Designer's Notebook: Drilling
the Shaft Hole for an Inboard - Part II
-
Rain by ArtDeco
-
Photos posted since the last
WebLetter...
-
Skipper's Checklist for Road and
Ramp
-
Shop Talk: Three Clever Clamp
Racks
-
Recent email
-
A Guy Brings his
Boat...
GLEN-L Update
- To all of you who have served or are currently serving in the armed forces, THANK YOU for your service.
- I hope everyone makes time this Memorial Day to spend just a few moments reflecting on the sacrifices which every serviceman and servicewoman makes in order for people all over the world to live as safely and securely as possible.
- We hope you'll click on the banner at the top of the Glen-L home page for the Wounded Warrior Project to learn about how this fine organization demonstrates appreciation for all military veterans.
- Please enjoy this edition of the Glen-L WebLetter, and keep your letters, emails, photos, stories, etc. coming in to us because it's YOUR contributions that make our WebLetters interesting and special.
Until next month . . .
Editor
Priceless Memories
by Jeff Neiman
"THE BOAT WE BUILT TOGETHER"
I just wanted to say
"thanks."
Recently my father passed away, but during his last few
months, we spent a great deal of time reminiscing about many
of the things we did together. One thing that always came up
was the boat we built together.
 Back in the early
1970's I saw the 10' Tunnel Mite featured on the cover of
Popular Mechanics and found your ad inside the magazine with
your address. I was 13 years old at the time and from the
earnings from my paper route I sent off a check for the
plans.
Back in the early
1970's I saw the 10' Tunnel Mite featured on the cover of
Popular Mechanics and found your ad inside the magazine with
your address. I was 13 years old at the time and from the
earnings from my paper route I sent off a check for the
plans.
Once my dad realized I was dead serious about building the
Tunnel Mite, he helped me buy the materials and oversaw my
initial construction and assembly. As I got farther along it
became a project which he and I worked on every night. We
spent hours working on the boat together, and the plans and
detailed instructions made it so easy that the time we spent
was filled with excitement looking forward to our first test
run of the boat. Even some of the engineers from my dad's
work got involved welding and customizing the trailer. It was
a great experience and time well spent with my dad. It was
just as much fun building the boat as it was terrorizing the
fishermen along the lakes and rivers we chose to run it
on.
After the maiden voyage, we had several good summers taking
the boat out on weekends with family and friends. It was all
a great experience and Glen-L made it happen.
Thanks again. I plan to build another boat, this time with
my grandchildren, to create more great memories.
Jeff Neiman,
Lisle, Illinois
Glen-L Boatbuilder of the Month
Bill White - Sea Knight
 I
am 68 years old, retired, have a wife and 4 children, 6
grandchildren, and 1 great grandchild. I have been in the
automotive profession for 50+ years, specializing in
restoration of vintage British cars.
I
am 68 years old, retired, have a wife and 4 children, 6
grandchildren, and 1 great grandchild. I have been in the
automotive profession for 50+ years, specializing in
restoration of vintage British cars.
Plans for the Sea Knight arrived in March 2008, and I
began working 7 days a week nonstop. I must say the following
15 months were a real pleasure and a learning experience as
woodworking is not my profession.
 The
Sea Knight emblems were milled out of 1/2" aluminum
plate on a CNC machine. The letter design was scanned from
the May 1957 Popular Mechanics article. Making this was a
little pricey for my budget, so my 4 children chipped in for
Dad's 68th birthday.
The
Sea Knight emblems were milled out of 1/2" aluminum
plate on a CNC machine. The letter design was scanned from
the May 1957 Popular Mechanics article. Making this was a
little pricey for my budget, so my 4 children chipped in for
Dad's 68th birthday.
I installed a bow rail from a 60's boat that I think
really enhances the look of the boat.
The Sea Knight was completed at the end of the boating
season, so I haven't used it extensively  other than a few shake down
cruises. After putting the boat in the water, I found the
performance exceeded my expectations. It has performed
beautifully with no disappointments. As for performance, with
all equipment aboard, and powered by a 1970 Johnson 85HP, it
reads 40 MPH on the GPS.
other than a few shake down
cruises. After putting the boat in the water, I found the
performance exceeded my expectations. It has performed
beautifully with no disappointments. As for performance, with
all equipment aboard, and powered by a 1970 Johnson 85HP, it
reads 40 MPH on the GPS.
The total cost of this project has been around 6 thousand
dollars. I have over 250 photos documenting construction of
the Sea Knight that I am editing and adding text, which I
will be glad to share with anyone who has bought plans and is
currently building.
The building of this boat has been such a pleasure I was a
little sad to see it come to a conclusion. The plan now is to
tow her to the Florida Keys to do some reef and gulf
fishing.
Thank you Gayle and thank you Glen L for a masterpiece in
design!
-- Bill White
Edgefield, South Carolina
Glen replies:
Thanks very much for sending the photos of the Sea Knight
that you built. It is always a pleasure for a designer to see
his work carried through to a conclusion, however when the
craftsmanship is such as your boat shows it is a double
pleasure. Your attention to little things and the workmanship
enhances the appearance of little details and makes your
craft unique and very attractive.
The drink holder/grab handle is especially unique. The trim
around the transom motor well is something you seldom see but
the result enhances the entire boat. I like the way you
radiused the many edges of mahogany trim; it improves the
appearance greatly.
And, of course, let's not forget the emblem. That
obviously is a one-of-a-kind that most wouldn't even
think of.
Thanks again for sharing your story and photos with us - it
made my day.
Life in my Floating Home
by Jillian Simensky
"...THIS LIFE IS ONE I WOULDN'T TRADE FOR THE WORLD...."
I began my new life aboard towards
the end of the summer. The place I found is a small boatyard,
about 40 slips, with a homey feel to it, unlike most of the
fancier marinas. The owner (affectionately referred to as
"the water lord") lives onsite and takes care of us
like family. There are 10 of us here in the yard living
aboard year round, divided amongst 7 boats. Our little
community is wonderful. Someone is always around to offer a
hand when you need one. There's always a little
get-together going on, gathering at a picnic table in the
summer, on someone's deck in the winter.
In the several years I have lived here, I have never locked
the door to the boat (as a matter of fact I don't know
where the key is). To me this is an incredible thing. In all
the years on land, I couldn't go to sleep without
checking the doors and windows and making sure the alarm was
on.
The summers are filled with activity. The yard fills with
seasonal boaters, friends we see only for those glorious
months. Spending the weekends on the bay, or a trip to
Catalina, instantly washes away the residue of the week's
stress. Starting the day off with a cup of coffee on the
deck, feeding the ducks and swans that gather noisily at the
waterline, makes all the difference in dealing with the
upcoming day at work.
Designer's Notebook: Drilling the Shaft Hole for an Inboard - Part IIDRILLING THROUGH A KEEL OR DEADWOOD 
Drilling the shaft hole in a solid wood skeg or one not progressively made can be done by some of the methods described in our last WebLetter (WebLetter 119). However, since there is no strut acting as a guide the boring tube is impractical. Drilling with an auger bit and electrician's extension or ship auger are typical boring tools. Marking the shaft angularity on the side of the skeg and tacking a batten parallel to that line will serve as a guide for drilling the hole. One person drilling the hole with another sighting along the drill bit calling out instructions to assure the hole is being aligned to the shaft centerline works well. Some prefer a guide similar to that shown in the photo in WebLetter 119. The inner surface of the shaft hole is similar to that described last month; epoxy only, epoxy with fiberglass or shaft tube. If the shaft hole is long fiberglassing the hole may be impractical. When a boat has a skeg it is imperative to install the stern bearing and then fair around it so a free flow of water is provided to the prop. |


RainRain falls on the sides of hillsAnd trickles into the creeks The creeks build into rivers To provide the water that we seek Boat builders should be glad it rains After all, water is what boaters need To have a place to row, sail or fish Or just to run about at speed But when it rains for days and days And I think it will never stop I can’t build a boat or go boating And I feel like I’m going to pop We’ve had enough rain for now You know, summer is nearly here Still there are dark clouds above me It’s going to rain again, I fear I know I should be silent Be happy more rain is on the way But the creeks are close to flooding They may overflow today For now I’ll keep my mouth shut And watch for the rising tide, amen But if the water reaches my lower lip I'm surely going to mention it again -ArtDeco |
Photos posted since the last WebLetter...
|


Skipper's Checklist for
Road and Ramp
Just as any good pilot goes over
his safety checklist before taking off, it's wise to do
the same when towing and launching.
Here's a list of key items you should address every time
you head to the water (click on the image below to open a
full-sized .pdf to make copies):

 |
Shop Talk: Three Clever Clamp Racks
BAR CLAMPS
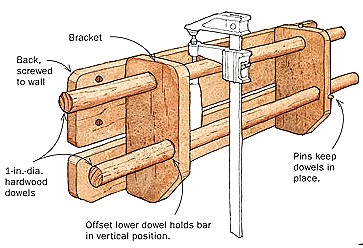 Store your bar clamp collection on a simple
rack, consisting of two 24-in.-long, 1-in.-diameter oak
dowels supported by two oak brackets that are mounted, in
turn, to two oak backs. The dowels are positioned in the
brackets so that the clamp handles slide down behind the top
dowel and the clamp bars are supported vertically by the
lower dowel. To fix the position of the large dowels, use
smaller dowels to pin them in the right-hand bracket.
Store your bar clamp collection on a simple
rack, consisting of two 24-in.-long, 1-in.-diameter oak
dowels supported by two oak brackets that are mounted, in
turn, to two oak backs. The dowels are positioned in the
brackets so that the clamp handles slide down behind the top
dowel and the clamp bars are supported vertically by the
lower dowel. To fix the position of the large dowels, use
smaller dowels to pin them in the right-hand bracket.
C-CLAMPS
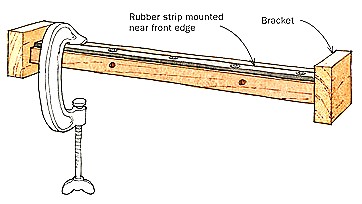 Store C-clamps on a narrow shelf. A rubber
strip, cut from a black rubber stretch tie-down, prevents the
clamps from falling off the front, while brackets prevent the
clamps from falling off the ends. This storage shelf has
several advantages. The clamps will stay put without having
to screw them closed, and it is easy to pick out a particular
clamp because they are all visible. If you have several sizes
of C-clamps, build a shelf for each size.
Store C-clamps on a narrow shelf. A rubber
strip, cut from a black rubber stretch tie-down, prevents the
clamps from falling off the front, while brackets prevent the
clamps from falling off the ends. This storage shelf has
several advantages. The clamps will stay put without having
to screw them closed, and it is easy to pick out a particular
clamp because they are all visible. If you have several sizes
of C-clamps, build a shelf for each size.
EASILY CARRY & STORE SPRING
CLAMPS

This caddy is one of the best ways to organize a collection
of spring clamps. To make it, cut a 1-ft.-long handle, thin
the lower edge with opposing rabbets, and pop the clamps onto
the caddy.
You can carry the clamps from place to place, where they
stay neatly out of the way until you need them.
Recent email:
Subject: Fond Memories
My husband built the Glen-L Missile in 1961-1963 when we were just a
young couple with two small kids and one on the way. They
grew up with that boat and have very fond memories including
taking naps in the bow of the boat. They all learned to water
ski behind it, the youngest at age four.
We used it in the San Francisco Bay Estuaries, Clear Lake
California, The San Joaquin River, and finally at Lake Shasta
and Whiskeytown when we moved to Redding. Whenever we took it
out people gathered to look it over.
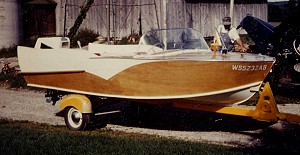
 One of my daughters found this
picture of our Glen-L. It was taken in the San Joaquin River
outside of Tracy, California in the early 1960's.
One of my daughters found this
picture of our Glen-L. It was taken in the San Joaquin River
outside of Tracy, California in the early 1960's.
We actually still have the boat although it's seen
better days even though he has reskinned it a couple of
times; no one in the family can bear to part with it. It has
been left in neglect and somehow along the way the plans
disappeared. I'd like to replace those
plans…
The main reason I want the plans is to encourage one or some
of my children or eight grandsons to build another one.
Thanks for your nice newsletters.
-- Sally Mayr
Redding, California
Subject: A Very Rewarding Experience
I have been familiar with your company for many years. My dad
built a 20 foot Luger in 1963. I grew up on that boat and
have been into boating ever since.
In 1968 (I think) I built a Glen-L TNT all by myself at 15 years old. It was
a fun experience and all these years later, I find myself
thinking about it again.
I presently have a 1989 Maxum cuddy and love the boat, but I
am pondering, when finances allow, to build a boat again. I
have added many skills since building my TNT and think it
would be a very rewarding experience to do again.
Thank you for your newsletters. They help keep the idea
fresh in my mind.
Sincerely,
-- Gary Chase
Subject: My 4th Glen-L Boat!
I am, in fact, now on my 4th Glen-L project. A Squirt when I was 12 with my father, another Squirt at 16, a Tornado with a big block Chrysler engine at 19, and now at 57 my 3rd Squirt. This one will be an inboard and shortly I will be ordering more hardware.
On this 4th project I would like to do the deck in the striped mahogany like shown in the picture from John Korte on the newsletter you recently sent me. I don't yet know how to go about it, but know I'll get good documentation and learning from Glen-L and the builders in the Boatbuilder Forum.
Thanks again for your help and advice.
-- Neil Copland
Winnipeg, Canada
Subject: My High School Boat
 I built this 1958
Swish when I was in high school. All of the
plywood cost me $100.00 and the hardware cost another
$100.00.
I built this 1958
Swish when I was in high school. All of the
plywood cost me $100.00 and the hardware cost another
$100.00.I put a 40 hp Evanrude motor on the back and I did a lot of water skiing with it.
I sold the boat in the 1970's but I still have the plans that were published in Popular Mechanics magazine.
-- Donald Timm
Green Lake, Wisconsin
A Guy Brings his Boat...
A guy brings his boat up to a bayside
restaurant's dock where he plans to eat lunch.
The dockhand says "I'm sorry, sir, but I
can't let you dine here today. This
establishment has a necktie policy, and you are not
wearing one." Give a man a fish and he will eat for a day. Teach him how to fish and he will sit in a boat & drink beer all day. |
![]()
GLEN-L boats, of course