WebLetter 17
An Occasional Publication for the Home Boat Builder
Glen-L Marine Designs - 9152 Rosecrans Ave. - Bellflower, CA 90706
In this issue
- Time and money
- Launch of "Up the Creek"
- New Electric Videos
- Great Lakes Small Craft Symposium 3
- Rigging Small Sailboats - Chapter 4
- Building the PowerYak
- Book Review: The Complete Canvasworker's Guide
- Feedback: Building the Tubby Tug
- Recent email
Glen-L Update
Website:
- Although we add to the web site almost daily (Project Registries and Customer Photos), this has been a slow month and a half for the site. We are in the process of printing our hard copy catalog and it has been taking most of our time. The List of Lumber Suppliers has been added to and re-formatted. I appreciate the additions and corrections that have been sent in, but we still have customers calling for sources in areas that are not covered by the list. Be sure to check to see if your supplier is listed. If not, please share them with fellow builders. Email , subject: lumber list.
-
 I would like to thank Max
Blakely, Mark Jenson, and emailers for their contributions
to this letter. I believe that our readers learn alot from
the experiences of other builders. I hope you will
participate in our boatbuilding community by sending your
story, hints, or suggestions for articles.
I would like to thank Max
Blakely, Mark Jenson, and emailers for their contributions
to this letter. I believe that our readers learn alot from
the experiences of other builders. I hope you will
participate in our boatbuilding community by sending your
story, hints, or suggestions for articles.
- Our "Electric" videos are finally here. Glen is more than glad to have these behind him... time for a new project. See farther down in this WebLetter for more information.
- Glen asked me if we had ever put a story in the WebLetter about the PowerYak, "sure", I said confidently... duh. Well anyway, you may have seen the PowerYak in our "NEW" or "Book of Boat Design/Special Purpose" pages, but its official debut is in this WebLetter.
- We are continuing our serial edition of Rigging Small Sailboat with Chapter 4 in this issue. We will continue in future issues until we publish all 11 chapters.
- The shop is strewn with bicycle parts and hull mock-ups for our next project, a pedal boat. I have no idea when this will be ready, but will post progress in the next WebLetter.
Barry Witt
Editor
Time and money
Help! How do you think I should answer this question, "How many man hours will it take to build the Tempest and how much will it cost?"
Virtually no one reports how many
hours it took to build their boat... usually "started
Oct 98, launched last week...". Cost... how much does
mahogany cost in Bozeman, Montana? I'm thinking of adding
a "how much does it cost/how long does it take"
page to the site. I will take info from the Project Registry
and Customer Photos and list them, something like:
Roustabout: 7 1/2 months. Josh
Forbisher, Bozeman, MT
Stiletto: 8 months , $1750.00
includes steering and seats. J. Pisher, Newark, NJ
(1999)
Or whatever info we have been given.
You can help by sharing your stats with other builders.
Email: info@Glen-L.com Subject: Builder stats.
I welcome any other suggestions on how to answer this question.
P.S. It is not practical to keep current costs on 240 + designs.
The Launch of "Up the Creek"
Letter dated 11 January 2000
Dear Customer Service Representative,
I wanted to let you know how much enjoyment that your little Dinky kit has brought me while building it and also to my family and friends in a variety of ways.
Christmas 1997 my wife bought the basic plans, the DINKY STITCH-N-GLUE KIT, and the Glen-L FIBERGLASS COVERING KIT. After seeing the plans I ordered the DELUXE DINKY HARDWARE & RIGGING KIT and the hardware for the rowing option.
The original purpose for the boat was to be used in the creek behind our home which is approximately 5 to 8 feet deep and 15 to 20 feet wide with a lot of variation. We wanted a small lightweight boat that would be easy to get in and out of the creek to chase kid's lures, balls, and sometimes trash. The Dinky was just what we needed.
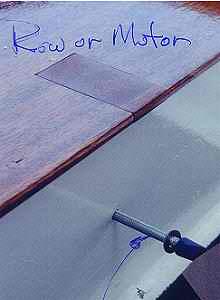
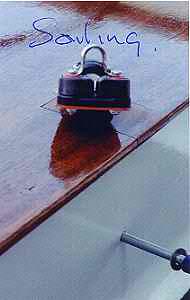
I love to work with wood, so it seemed like a great project. The wife thinks I got a little carried away but it was great fun. The "Stitch-N-Glue" method worked great! When it came down to making the sheers and seats I made them from mahogany, including the transom, and put a curved sheer over the bow. In the center seat I inserted a modification that put the Cam Cleat for the sail on a 2x2 slide when in sailing configuration. When used as a row boat or with a trolling motor, a smooth 2x2 slide is inserted to make the seat more comfortable. Both slides are held in place by a 4" x 3/8" bolt.
|
|
My grandaughters asked me to make a presentation about the boat to their 3rd and 5th grade classes in Kearney, Nebraska. I have included a copy of that presentation and some pictures of the neighborhood launch and the sailing and trolling motor test.
Thank you and your staff (who answered many questions during construction) for the great experience and a fastastic project.
Sincerely,
Max Blakely
New Videos: The Electric Boat, Part I & II
Electric boats are not new; they were popular in both England and the U.S. in the early nineteen hundreds. There has been a resurgence in electric boating due partially to improved performance through electronic controllers and environmental considerations. The electric boat is environmentally friendly, it's quiet and non-polluting.
THE ELECTRIC BOAT PART I gives an overview of these craft, their advantages, limitations and how they operate. More than three years were spent compiling information and building three entirely different electric powered craft. This hands-on process results in work tested information augmented by the latest electronic and boat manufacturers input enables the video to provide the latest in electric boat technology. Seeing the many electric craft and their simplicity of operation broken down into understandable segments clarifies and details exactly how these craft work and why they are gaining in popularity.
THE ELECTRIC BOAT PART II describes
building three electric powered boats by the composite
plywood/epoxy stitch-n-glue method. Each boat is a different
type. The 15'-7" LO VOLTAGE is a striking mahogany
strip decked launch with a central helm console and spacious
lounge seats port and starboard. The original was powered
with a surplus golf cart motor and electronic components
running through ED, the electric drive, a method of
converting a fully contained drive system from the used
underwater portion of a typical outboard. And yes...the video
shows how the drive is built as well as the boat. The second
featured craft is the 13'-7" AMP EATER, a four 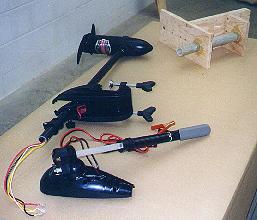 place
utility craft powered with a 1/2 HP permanent magnet DC
electric motor running on 24 volts. The prop shaft encased in
a skeg is driven through reduction vee belts. The unique
POWERYAK is a 17' two place kayak powered with an
electric trolling motor (ETM) converted and modified with the
submerged powerhead projecting through the boat bottom and
the tiller/control separated and mounted forward convenient
to the helmsperson. And again, the video shows how the ETM
motor bracket and control bracket are built either for the
POWERYAK or adapted to most similar craft.
place
utility craft powered with a 1/2 HP permanent magnet DC
electric motor running on 24 volts. The prop shaft encased in
a skeg is driven through reduction vee belts. The unique
POWERYAK is a 17' two place kayak powered with an
electric trolling motor (ETM) converted and modified with the
submerged powerhead projecting through the boat bottom and
the tiller/control separated and mounted forward convenient
to the helmsperson. And again, the video shows how the ETM
motor bracket and control bracket are built either for the
POWERYAK or adapted to most similar craft.
Each step of building these projects illustrate using the Glen-L full size pattern package that contains templates for most every part in the boats, including planking to build an electric boat second to none...and it's within the realm of most handy people.
#16-105 "The Electric Boat Part
I", 45 min, $24.95
#16-106 "The Electric Boat Part II", 45 min,
$24.95
#16-038 SPECIAL -Both videos, $40.00
Videos are shipped post paid, Book Rate within the US. Add
$3.00 (each or for the special) if you wish them sent
Priority Mail.
Great Lakes Small Craft Symposium 3
Taken from the Boatbuilder Connection. If you have any boat related event send information well in advance and I will try to get it in the next available WebLetter.
Hello,
We encourage everyone to attend the "Great Lakes Small Craft Symposium 3" August 19, 2000 in Saginaw, Michigan. Open to all types of wooden boats. For more info, view our web-site at: http://glscs.hypermart.net or call (517) 781-3546, e-mail is gmcquinn@tm.net There is online Registration at the website.
Lots of new things this year with the first 50 registrations receiving a really nice embroidered event hat. There will be a raffle for a beautiful, completed Cajun Pirogue. The focus of this event is boat building and restoration. There will be epoxy seminars and ongoing boat building and restoration demonstrations. As always there will be door prizes, unique awards and more.
Thanks, Gerald McQuinn
Tri-City Amateur Boatbuilders
Rigging Small Sailboats
In response to inquiries about an out-of-print book published by Glen-L, we are starting a series in our WebLetters, reproducing Rigging Small Sailboats. This issue contains Chapter 4; to be continued in the next WebLetter.
Chapter 4
.....standing rigging
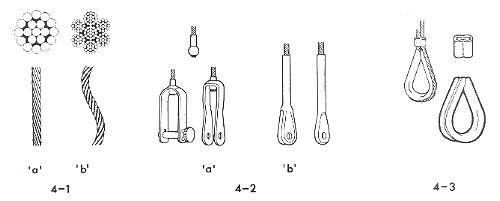
The STANDING RIGGING consists of the wires that hold up and support the mast. Because the mast is in compression and tends to buckle or bend, the standing rigging helps to control the bending. Some small sailboats do not use any standing rigging, and these are said to have free standing unstayed masts (see Figs.2-4 and 2-5). The calculations and methods of figuring the strength of spars and associated rigging are very technical and involved, and should not be undertaken by the novice. Rig your boat as the designer or manufacturer recommends; don't make shortcuts. The material used for the standing rigging is wire rope, usually made from stainless steel, although regular or galvanized steel wire rope is available. Wire rope is measured by the diameter and specified by the composition of the wires used to make up the wire rope (see Fig. 4-1). For example, wire rope designated 1 x 19 would consist of one wire made up of 19 strands. This type is the most common for standing rigging because it is not flexible and is strongest. Another type designated 7 x 19 consists of 7 ropes each consisting of 19 strands. This type, while not as strong, is used where flexibility is important. On boats which use wire rope halyards, the 7 x 19 wire rope is utilized.
|
|
|---|---|
| FIG. 4-1 -Wire rope for rigging is generally in two configurations; stiff and flexible. FL-. 4-1 'a'shows a length and section of I x 19 wire rope which is considered stiff. The length is made up of 19 individual strands and is the type usually used for stays. Fig. 4-1 'b' shows a length and section of 7x 19 wire rope which is a flexible type commonly used - for halyards. The length is made up of seven ropes each consisting of 19 strands. | FIG. 4-2 & 4-3-Common methods of joining fittings to wire rope. Fig. 4-2 'a'shows a swaged ball which can be readily connected to a shackle or forked jaw. Fig. 4-2 'b' shows a swaged fork or jaw and a swaged eye commonly used to connect to tangs, turnbuckles, chainplates, etc. Fig. 4-3 shows a typical Nicopress fitting. The wire rope passes around the thimble and the end is clamped with the special clamp shown. Flexible wire rope is best used with this type of fitting. |
Obviously fittings must be attached to the wire rope for it to do a job, and these fittings can be attached by any of several methods. One method is to SWAGE the fitting to the wire rope. Swaging means that the fitting is compressed cold between a pair of dies., Fig. 4-2 shows some swaged fittings commonly used on small sailboats. Another method is the NICOPRESS fitting, a patented method which uses a sleeve wrapped around the wire forming an eye, and gripping both strands together, as shown in Fig. 4-3. A special vise-like tool is, used to clamp the junction tight. With the Nicopress junction, a THIMBLE (grooved metal ring in the looped eye to prevent chafe) must be used. Because of the bend required in the wire rope at the thimble, flexible wire rope such as 7 x 19 should be used for ultimate strength at the junction.
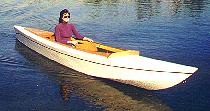
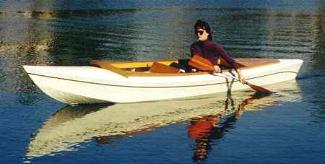
PowerYak, an electric kayak
KAYAKS ARE FUN! The're sleek and attractive... graceful and manueverable... quiet and environmentally friendly... lightweight and transportable but even the staunchest supporter will admit that getting back to home base after a long day of paddling can be a chore (Translation: helluva lotta work). Do it the easy way, come back with power. Or for those not inclined to paddle propulsion, kayaking can still be fun with the POWERYAK.
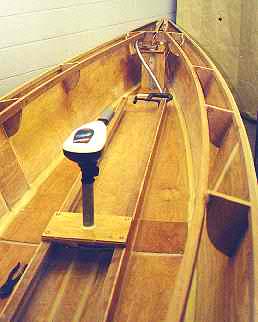
The POWERYAK runs on a battery powered DC electric trolling motor (ETM). They're inexpensive and cost a fraction of what a fuel burning outboard does. But this isn't the unsightly looking gadget seen hanging over the side of a fishing boat. The underwater motor with projecting shaft and housing is entirely concealed under a removable hatch. The controls, steering, speed and forward, nuetral, and reverse are located forward, convenient for the helmsperson. When moving silently through the water without paddling, viewers are fascinated...what makes it go? The hull hardly ripples the water; it's quiet, almost eerie for a boat. And conversation is held with normal voice or even a whisper... you are a part nature.
The POWERYAK is more comfortable than the typical kayak. There are real seats with adjustable locations; the forward seat allows the passenger to face forward or aft in a friendlier position. Shifting the seat position also helps to distribute the weight for proper hull trim whether there are one or two passengers.
The hull has a little more beam and depth than most kayaks to provide better stability and a drier ride. A generous vee bottom and flare forward provides the ability to slither through the chop or into the wind with comfort. This kayak can be paddled, but, when you want a rest, flick on the power and sit back and relax.
The kayak is built by the proven Glen-L Stitch-n-Glue method that makes building easier and quicker than conventional methods. Full sized patterns are furnished for virtually every part in the boat including the planking, and only four sheets of standard size 4' x 8' (1/4" or 4mm) are required. Cut the parts from the patterns, drill the stitch holes, wire the planking together around a single cross form, glue/fillet the seams, remove the stitches, reinforce the junctions with fiberglass laminates, and the hull is formed. No complicated building jigs are required; the patterned plywood sides and bottom are bent around a single temporary form. Procedural Instructions plus the Glen-L Stitch-N-Glue Manual describe each step with photos, drawings, and text.
Build a powered kayak, amaze your friends and learn what real FUN really means.
Available for the PowerYak
- PowerYak Plans and Patterns (Includes ETM Mount & Bracket) - $113.00
- ETM Mount & Bracket - $31.00
- Stitch-N-Glue Kit - $162.23
- Fiberglass Covering Kit - $184.59
Book Review: The Complete Canvas Worker's Guide 2nd Edition
by Jim Grant
We've carried this book for some time but I must admit that I had never read it. Looking for more material for the WebLetter, I noticed it sitting on the shelf, and... this is a cool book.
"Literally every question is answered in this book." - Yachting
"Chock full of everything from basic information to a variety of ideas designed to improve, upgrade, and protect a boat." - Small Boat Journal
"An immensely practical book." - Practical Boat Owner
"A concise and to-the-point workbook." - Soundings
What first caught my attention was the chapter on Bimini tops. We had talked about putting one on the Amp Eater, but never got around to it. This book shows you exactly how to fit and measure the canvas, answering questions that I had not thought to ask.
My Whitehall is stored in the driveway with a heavy black plastic cover from Home Depot. Chapter 6, "Boat Cover", shows how to make a cover, how to accommodate antennas, windshields, or other protrusions, and how to make a drawstring tie for securing it to the boat. I know I could have figured something out, but after looking at this chapter, I know it would have been much less effective than what I would make now. I'm going home tonight and put a fore and aft ridgepole and upright tent pole under my cover. The set up I have cannot stand up to the cats.
I know not every boatbuilder wants to take on this type of project, but if you do, buy this book. It will save you money and give you a better end product... did I mention the reinforcement patches? Or, canvas outboard motor carrier? In addition to those subjects I have mentioned, the following are covered in this great little book: Sea anchors, Awnings & enclosures, Sail & ditty bags, Bosun's chair, Cushions & cushion covers, Flags & pennants, Companionway dodgers, Trapeze & safety harnesses, Sail covers, Tote bags, Weather cloths & hatch covers, and Windcatchers.
# 12-481, 176 pages, 180 illustrations, 8
1/2" x 11", soft cover, $19.95
See Boatbuilding
Books for additional information
Building the Glen-L Tubby Tug
by Mark Jenson
What's it like to build the Glen-L Tubby Tug? Lots of fun!
What's it like to go cruising in the Glen-L Tubby Tug? Even more fun!
In this article I hope to provide a brief description of what's involved in building and outfitting the Glen-L Tubby Tug, as well as what it's like to actually be in the boat after it's finished. (Well, mostly finished - I still have some things to do). My goal is to help others who might be considering the Tubby Tug as a project to decide if it's right for them.
I worked mostly by myself with occasional help from family or neighbors when it was time to move the hull around. My daughter, Emily, was about 18 months old when I started, and will be 3 in April of 2000, so she was too young to really participate (although she certainly knew I was building a boat!)
Before starting, I felt I had to make a major decision regarding how "good" a job I wanted to do. Did I want to use less expensive materials, since this was a "kid's boat", might not last very long, and kids tend not to notice the quality of construction anyway? (Many adults don't either, for that matter). Or did I want to treat it as a scaled-down version of a "real" boat that adults would also admire, and which could conceivably become a kind of family heirloom, hopefully being passed down to future generations of kids and grandkids? Since it was my first boatbuilding project, although by no means my first woodworking project, I decided to opt for the heirloom approach, using premium materials and workmanship. Part of the reason for my decision was that I wanted the opportunity to learn what it was like to use marine grade plywood, epoxy, and fiberglass sheathing, since I had never used these materials before (you can also use exterior grade plywood and polyester resin). I also wanted a "wooden boat look" - bright (naturally finished) interior, trim, and cabin. Finally, experienced builders on various websites seemed to agree that it takes just as long to build a boat using the cheapest (i.e., least durable) materials as using the best (i.e., most durable and most expensive) materials. Therefore, using the best materials is usually the best use of your time also. I feel I made the appropriate decision for me, but of course it might not be the right decision for someone else.
Having made my decision, I purchased 3 sheets of 6mm (1/4 inch) and 1 sheet of 9mm (3/8 inch) BS 1088 okoume. I chose okoume because it is light, takes epoxy well, and looks good bright. Did I have to use BS 1088 material? No, but that was what was available at the nearest supplier where I could drive in my pickup truck. Finding a supplier of marine grade plywood relatively close by was a bit of an issue (there are none in the immediate Philadelphia area, to my knowledge, and I dislike paying shipping costs when I can use my truck). To save on material costs I laminated 1/4 inch luan underlayment for the motorboard and also used it for the cabin roof.
Recent email:
Subject: Project Registry
Date: Tue, 14 Mar 2000
From: David White
Coaster- Hull and deck compleated. Boat was trailerd from Canada to Mexico. I have been sensitized to epoxy and would like help in finishing the boat next winter, in Cetumal , 250 miles south of Cancun. Have large yard for R.V. also have converted bus availible. Come and spend the winter in the Caribiean. David White
Subject: RE: Glen-L February Update
Date: Sun, 20 Feb 2000
From: McNally, Robert (JUS)
Can't say how much I appreciate being on your mailing
list. Was a fan of Glen-L when I was a teen. Am now in my
fifties. I have a suggestion or request for what it is worth.
On your model making page ...(before I build a boat I make a
model of it. Haven't built any boats yet, repaired a lot,
but have made a lot of models)...perhaps folks could send in
names and addresses of sources for scale models of outboard
motors to enhance their finished models. They are hard to
find, likely few and far between. As well, what is available
is likely offered in a different scale from one company to
another. If I know the scale of a model outboard motor, I can
use the same scale on a scaled down plan I may want to
"model". So far the only company I have been able
to locate are:
Alterscale
1965 Fountainbrook, Ct.,
Woodbridge, VA 22192
They currently have Evinrude and Johnson high performance
V-8s at 1/9 scale. Their next production will be Mercurys.
Cheers
Bob McNally
name: Jay Gilmartin
City: Missoula
State: Mt
Comments: Greetings, I recall Glen-L from my youthful dreaming of boats. I also remember saving my allowance and sending off for your info at least twice. That was over 40 years ago. I have owned a number of boats since then, but I still recall the fond memories of rebuilding many a family ark with my dad. He's 85 and going strong, but still laments that we never did get around to building "our" boat. Well, to put things into perspective, I have 3 children ages 14,12& 8. We own a lakefront cabin here in Montana, and have a beautiful 21' factory ski boat (21' Bayliner w/ 220 hp, etc). Great boat, but it still isn't "our boat". When I came across your site on the web it reminded me of my dad & I attempting to raise a proverbial "Titanic" in the backyard. Priceless memories! Perhaps my family should build a sailboat? A trailerable sailboat that could also double as weekender or cruiser? The 7.9 looks great. I'll pray about it. I'll dream about it. I'll take my wife to dinner and see if she'd be willing to share in the experience. It sounds like a plan to me. Keep up the exceptional job you've done over the years, allowing folks like me the opportunity to share and grow with their families. Cheers, Jay Gilmartin
Subject: Duck Boat Too
Date: Mon, 13 Mar 2000
From: Storey, Allen
I built the Duck Boat Too two years ago and have had a great time with it. The plans worked well. By fiberglassing it, I have a boat that works extrordinarily well in the duck hunting areas of south central Alaska. I've used it with 4 and 7 horsepower outboards as well as a 8 horsepower go-devil motor. It is extremely stable when set up as a blind, low enough for the dog to swim to and climb in, but lite enough to handle by myself (with a bit of effort).
From Guest Book:
Comments: I have built the Glen-L 12, Tunnel Mite, and the
Outrage. I tried typing in your site. . . and there it was.
Glad to see things are going well. My next project will be a
kayak, which i will explore next.
Mike
From Guest Book:
hi glen,
Just thought i would drop a line. my name is kurt hewell. i
found your web site a couple of days ago. i noticed that
several of your designs looked familar. i did some digging
and found my dads copy of "Mechanix Illustrated
How-to-do-it Encyclopedia" volume 3 copyright 1961. dad
and i built my first boat from this book, the rowboat pg 420
"make it for $ 35..." it cost us a little more.
since then i have fallen in love with boats and building
them. i guess i was 14 or 15 when we built that first boat.
now i'm 36 and my son and i are building our first boat
together. over the years i have built a number of those row
boats ( i always manage to get myself talked out of them) one
of the peanut pg 416 a couple of the canvasback pg 456, and
i've always wanted to build the malahini. i can't
tell you how excited it makes me to know that your company is
still around, and from the looks of your web page and the
photos from customers you have certainly stood the test of
time.
kurt
Subject: TO: Barry Email for newsletter
Date: Thu, 06 Apr 2000
From: Ray Macke
Dear Barry,
I thought I would pass along some information I have learned concerning paints for my Cabin Skiff project. My Skiff is not going to stay on the water and will live most of it's life on the trailer stored indoors. But once or twice a year it may sit for five or 6 days in the water.
Because of this I was not interested in an Antifouling bottom paint. In fact, most suppliers I contacted advised against using an antifouling paint on a trailered boat. They stated that if the compounds in the paint wascontinually exposed to the air they would quickly oxidize and loose its effectiveness. Also, from what I have seen, they tend to chalk badly when stored out of the water.
Still I was in need of a paint that could withstand total submersion. All of the non-antifouling marine paints I was seeing in catalogs were billed as "topside" and not design for use below the waterline. My first thought was to use am industrial enamel. I went to the local Sherwin Williams store and explained my application and ask for their recommendation. They informed me that they had nothing that would work for my use. They stated that their enamels would weather just fine above the waterline but would fail very quickly when submerged.
I then decided to give Interlux a call and ask what they had available. The first Paint Tech I spoke to recommended their "Brightside" topcoat paint. I questioned its use below the water line and was told although it really wasn't designed for that it would hold up if continuous water contact was limited to seven days. If it was there longer than that it would blister. Sounded good to me and I decided that was the way to go. I asked them to send me a color chart and spec sheet.
When I received the information I looked over it and had a few questions. I called back and got a different paint tech and asked the questions. In the process I decided to again ask about using Briteside below the waterline. This time I was told it would work OK if left in the water for a maximum of FIVE days. A few days later I had a few more questions. I called and got another paint tech. I decided to ask about the bottom use. This tech rep told me that THREE days was the max and it would blister in FOUR. Nowhere on their printed spec sheet did it list the total days it could withstand water contact.
Disgusted I decided to try a different brand. I called TopCoat that sells Pettit marine paints. I explained my application and asked about their "EasyPoxy" which is similar to Briteside. They immediately told me not to use it. The explained that it would not hold up and blister. What they did recommend was their PolyPoxy. It is a 2 part epoxy based paint. They explained that their spec sheet stated that the suggested submersion time was four days but said that was a conservative number and that 5 or even 6 days shouldn't be a problem.
The answer still wasn't what I was looking for but it looked like it was the best I was going to find. The faxed me a spec sheet and in reading it I noted that they stated that the paint would have a tendency to chalk if used to paint horizontal surfaces that would be exposed to sunlight. It added that chalking would be minimal on the vertical sides on the hull.
This wasn't the greatest news but it seemed I had little choice. I found that Interlux also has a epoxy based paint called VC Underwater that sounded similar. But the literature they sent me didn't even mention it and neither had their tech reps. It may be acceptable but after my experience with their "mixed" information I didn't even want to call them back.
I decided to go with the PolyPoxy but am only going to use it up to about 2 inches above the waterline. Above that I am changing to a topside paint. This should eliminate the chalking problem but still provide the protection I need.
I purchased the paint and have applied it. I used the roll/brush method and it gave a decent finish although not as nice as spraying. But there was a lot less mess evolved. It did require a certain technique to get it on smoothly and I would suggest anyone using it start in an area that will be mostly hidden so they can get a feel for the process.
In the course of choosing a paint I have been very surprised by two things. First, I am amazed that there is not actually a bottom paint available other than antifouling that will handle longer submersion. I realize this is a somewhat limited market but I still would have thought that there would be something. Second, that a big company like Interlux that specialize in selling marine paint has no better tech support available. You would think that ALL the tech reps would at least be reading form the same book not just making it up as they go.
I plan to add this info and more detailed description of the application technique I found that worked for me on my web page at -http://lightning.prohosting.com/~raymacke/ when time allows.
Sincerely,
Ray Macke
Comment: I have found that generally the paint company tech reps are very helpful and very knowledgeable, but not on this subject. I believe the problem lies with the manufacturers. Their paints are not designed for indefinite immersion, and their "official" recommendation is that they not be used below the waterline. The tech reps know that they can be submerged for short periods of time, but for lack of concrete data, they make their own conservative or not so conservative "guesstimates". I asked Glen what he used on the Sissy Do. It was kept constantly in the water for over 20 years. He used marine bottom paint. - brw
Build more boats
Glen-L boats, of course