Building the Tunnel King - Part 3
by Matthew Green
Continued
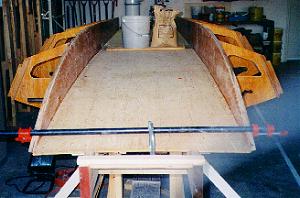
The tunnel bottom (or top, depending on your point of view!) is installed. The scarf joint can be glued before or after panel installation. Note: The screws are staggered to prevent splitting the tunnel side cleats and bottom battens. Link to additional photos at the bottom of this page. |
Bottom Battens
The main longitudinals are four 1x2" bottom battens. They run from motor board to bow piece and are attached to the solid wood transverse members. At the transom, the batten ends need to be angled 10 degrees and left short of the main transom member to accommodate the tongue of the motor board. Later, when the hull is turned over, angled gusset blocks are fastened at the junction of each batten and frame member.
Tunnel Planking
The tunnel top (or bottom depending on your point of view) is planked next; either 1/4 or 3/8" plywood may be used. The tunnel planking should be a snug fit in the tunnel, so some trimming with a plane may be necessary. Fasten as specified, being sure to stagger your screws to avoid splitting the tunnel side cleats and bottom battens.
From now on, when you install plywood pieces on the boat, make sure you wipe up the epoxy that squeezes out of the solid wood/plywood joint. Simply taking a gloved finger and wiping it along the joint, making a small fillet, works great. This is a quality touch and helps keep dirt and water from being trapped in crevices, et cetera. Chipping away dried epoxy blobs is not my idea of a good time!
The "hull" is now flipped over to allow installation of the chine log and sheer clamp. Three or four people can easily flip the boat over. At some point during this stage of construction, limber holes should be drilled at the lowest point of the plywood frame gussets to allow bilge water to drain aft. Forstner or brad-point drills should be used to prevent splintering the thin plywood frame gusset.
Bow piece
The bow piece is made from two identical halves. They are provided with the frame kit; otherwise they are made from a full-size template provided. The bow piece is located by the bottom battens and notches in the tunnel side panels.
Sheer Clamp
The sheer clamps are quite challenging to install. They fit into notches in each of the frames and another notch at the bow piece. The problem arises when you try to make the sheer clamp mate with the bow piece. While they are at basically the same plane (the sheerline on the Tunnel King is not curved), they are at diverging angles, and the bow piece, being 3/4" plywood, will not bend very much to mate with the sheer clamp. This will be compounded if your sheer clamp stock is too stiff to bend easily (as was the case on my boat).
Glen-L does not detail a procedure to ease this problem. They suggest using a cross-brace between the bow piece ends the ease their bending, but I didn't find this helpful. I ended up steaming the sheer clamps into place, modifying the bow piece notches, and adding additional blocking below the joint. As long as your joint is adequately fitted, fastened, and blocked, I wouldn't worry if it isn't made in exactly the same fashion or location specified. This joint must simply be strong and result in a fair sheerline.
Chine Log
To further complicate the joint described above, the chine log terminates at this point as well. The chine is notched over the existing bow piece/sheer clamp joint. Like the sheer clamp, the chine is notched into the frame members. I strongly suggest steaming the chine into place. With my grandfather helping me, we steamed the chines, temporarily screwing them into their notches, and clamping the forward end approximately in place. After letting them "cure" overnight, we undid the clamps; the spring-back was minor and overcome with hand pressure. As one person held the chine, the other used square, bevel, and dividers to transfer the required notch shape onto the chine. We then cut the notch with chisel and rasp. The chines were then glued and screwed in place and blocking fitted behind them. It should be noted that the hull is not particularly stiff at this point, so when members are bent into place, they should ideally be done simultaneously to avoid twisting the structure.
Fairing
Now that the "skeleton" of the lower hull is complete, the chine log and sheer clamp must be faired and bevelled before they can be planked. This is best done by filing (or "rasping") notches in the chine and sheer at each frame at mating angles to the frame. You them plane in between the notches, producing fair curves. A long-board will help in this procedure as well.
Side Planking
The 1/4" side planking is installed next, again scarfed as required. This piece need not be closely fitted; simply make a somewhat oversize panel, glue and screw it in place, and then trim off the excess. It was at this point in construction I switched to #6x1" screws rather than 3/4-1" 12-14 gauge boat nails: I found I could more easily bend the panel in place with one hand and operate the drill with the other. Also, when doing final side panel trimming with a plane, I could easily remove and replace the odd screw that was too near an edge; removing ring-shank boat nails is extremely difficult.
Runner Bottom Planking
The 3/8" runner bottom planking (the bottom of the sponsons) is installed next. You will find considerable fairing is necessary on the bow piece and runner stems to make the plywood lay flat. Glen-L details a tricky transition joint for the junction of the side planking and runner bottom planking, but this is only necessary if the hull is NOT fibreglassed. I assume you are building an epoxy boat, so don't concern yourself with this step; concentrate on doing an accurate fairing job and properly fastening the runner panels. You may find the panel pulls tight around the runner keels and chine, but bows outward slightly between them, where there are no fasteners. Weights and temporary blocks installed inside the sponsons can be used to pull the planking tight to the frame gussets. This is important to ensure the riding surfaces of the boat are flat. As before, I left the panels slightly oversize and trimmed them after the epoxy had cured.
Bottom Finishing and Glassing
Congratulations, you have now fully planked the hull of your Tunnel King! Your work has only just begun, however. Those hundreds of screws holes and other divots must be filled, the plywood, if not already epoxy coated, needs a prime coat, and everything will require LOTS of sanding. I have some advice regarding screw hole filling on this boat: use the hardest epoxy filler you can bear to sand because it will be subjected to high compressive loads as the boat cuts through chop. I used an "easy-sanding fairing mix", which was child's-play to sand, but after two seasons of use, the filler (under a layer of 4 oz. cloth and epoxy), had compressed 1/16" or more, leaving these neat dotted lines of screw holes the length of the bottom. I spent weeks under the boat grinding the depressions away and refilling and glassing them properly. This is simply one of those learning experiences and I hope future builders will avoid my mistake: just because the product literature says a certain goop is suitable for a purpose in general, does not mean it is suitable for YOUR project.
It's a good idea to go over the entire hull with a long-board as part of your final sanding on the bottom filler. Keep in mind the edges at the runner keels, chines, and transom MUST BE KEPT SHARP; you may need to build them up if your sanding was excessive. Don't underestimate the amount of time you will spend on filling and preparing the bottom; I spent two weeks preparing for glass, and it was time well spent.
Now the hull bottom is ready for glass. Heavy cloth or roving is entirely unnecessary and will only add lots of weight. I used 4 oz. "boat cloth", which only required about three coats of epoxy to fill the weave. There are lots of other reinforcing fabrics available, but since the cloth on the Tunnel King is not really needed for strength, many of the fancy fabrics are unnecessary; feel free to use whatever you wish. I strongly urge first time 'glassers to read up on this subject beforehand. WoodenBoat and Glen-L are both good sources of material on wood-epoxy fibreglassing. You will find covering the hull with glass much easier if you break it into smaller parts. I did mine in four pieces: two from the centre of the tunnel up to the inner sponson edges, and two more covering the sponson and side planking. After glassing the bottom, the spray rails should be attached to the hull sides.
Bottom Painting
Painting over epoxy is a much-debated topic, and I won't get into it here. Sufficed to say, surface preparation is the key, and make sure you select a paint that will cure over epoxy. I brushed and rolled Petit Easypoxy over a fair, well sanded, and well washed surface, and four seasons later, I'm still very happy with the results.