WebLetter 16
An Occasional Publication for the Home Boat Builder
Glen-L Marine Designs - 9152 Rosecrans Ave. - Bellflower, CA 90706
In this issue
- NEW Videos
- New magazine
- Model making ...and ramblings about the Tiny Might
- Rigging Small Sailboats - Chapter 3
- Feedback: Stiletto
- Building the Tunnel King - Part 3 by Matt Green
- Glen-L hats and T-shirts are finally here
- Shop talk: Table saw jig
- Recent email
GLEN-L Update
Website:
-
When the time comes to write this section of the
WebLetter, it is often hard to come up with a list
of additions to the site, even though I know that there
are additions almost every day. This month we are in the
process of preparing our "hard copy" catalog for
the printer. It will be larger (216 pages), a new format,
and many more photos. Because this is a complete re-write,
there is a lot of work involved. Gayle has all the
pictures cropped and ready, the copy is done and ready for
proofing. The next section of our on-line "Boat
Design Catalog" is also ready for proofing, but will
have to wait for the printed catalog to be finished. All
of this has been occupying our thoughts and time, so that
site changes have been slower than usual.
- For those who have been breathlessly waiting Glen-L Boatbuilder caps and T-shirts, they are here and the page has been added (see below).
- The plans are now available for the PowerYak... see NEW pages.
- Information about our new ELECTRIC BOAT VIDEOS is now in the Boatbuilding Videos pages. See this WebLetter for further information.
- I don't know how many new photos and Project Registries have been added... but a lot. Some of our builders have sent additional photos which have been added to the existing file. The Project Registry can be very informative if you read the progress reports with an eye to the dates. As this section grows, we hope it will help answer that common question, "how long does it take".
- This issue of the WebLetter has great contributions from our builders. The third installment of Matt Green's article on building the Tunnel King. More about model making, Stiletto feedback, and interesting letters in the email section. As always, we would like to invite you to contribute. We are looking for articles, boat building hints, and photos for future WebLetters. The point of this WebLetter is to be a resource for boat builders... why not put in your two cents worth? How about "Shop Talk" about a particular procedure, special jigs you have made, or the right tool to use?
- We have added Chapter 3 of our out of print book, Rigging Small Sailboats. For those who are rigging or re-rigging a sailboat, this should provide valuable hints to help you with your project.
- I received an email that suggested that it would be helpful if we had a glossary of boating terms for novice builders. In case you also haven't found it, it's in the Useful Information and Suppliers pages.
Barry Witt
Editor
The ELECTRIC BOAT VIDEOS are here
So, you didn't know they were coming?
I haven't talked much about the videos in the WebLetters, but these have been "in production" for almost three years. The idea of electric videos started with the first electric boat, the Lo Voltage, and the videos have used this design, the Amp Eater, and PowerYak to illustrate the various types of installations.
The final cut produced two videos. The following describes the contents.
"The Electric Boat, Part I... an overview".
45 minutes #16-105
Did you know electric powered boats were popular in the late 1800's; that they can reach speeds in the 70 MPH bracket; that they have probably the most environmentally friendly boat propulsion system? Learn all about these craft in THE ELECTRIC BOAT-PART I, a general overview of electric boats, their propulsion systems, and how they work.
The video begins with a brief history of electric boats and the general hull lines of such craft and the various motors and drive systems that are used. You will be shown: How the speed is controlled using the electronic "black box" controller and a potentiometer or simple dial. How direction is controlled manually or electronically.
Basic formulas are given to find boat speed, battery duration, voltage versus amperage, along with discussions of wiring and multiple battery bank diagrams. Also covered are electrical vehicle batteries, types of cable and wires, crimping cable ring eyes, and series connections, battery chargers as well as the helm control consoles and instrumentation used on electric boats.
"The Electric Boat, Part II... how to build three electric boats"
47 minutes #16-106
ELECTRIC BOAT-PART II shows and describes building three electric boats, using the Stitch-N-Glue method, each with a different drive system.The first boat shown is the 15'7" LO VOLTAGE, a striking mahogany deck launch with a central helm console, powered with a surplus golf cart motor and related parts running through the electric drive (ED). ED uses the lower portion of an outboard motor with the electric motor to make a fully contained drive system that is an integral part of the boat and pivots for steering. The video illustrates how easy ED is to make and its feasibility to power most boats.
The second featured craft is the 13'7" AMP EATER, a four place open utility launch powered with an inboard mounted 1/2 HP electric inboard motor, belt driven by a prop, with shaft running through an underwater skeg. Details on how the boat is built, the propulsion system installed, and how the electronic system controls the motor speed and direction of rotation are all shown.
The 17' POWERYAK is a two passenger kayak powered with an electric trolling motor (ETM) converted and modified, with the submerged powerhead projecting through the boat bottom and the tiller/control separated and mounted forward. Building the ETM motor mount and control bracket is shown and described in detail as is each facet of building the boat.
If you want to know more about electric boats, how to build the boat and related drives, both videos are a must for your video library. The videos are $24.95 each or $40.00 for both if purchased together.
Lumber Suppliers List
At the bottom of the hypertext buttons on the left side of our home page is Useful Information & Suppliers. Clicking on this hypertext will take you to several choices, one of which is List of Lumber Suppliers... I have received several emails from builders saying that a certain supplier is no longer in business. These suppliers have been deleted from the list, but hey guys, the list is getting smaller and no one is sending in new suppliers. Our list is the only list I am aware of that lists suppliers of boat building lumber. The names have been collected over the years from advertisements, customer referrals, and a now 12 year old book published by WoodenBoat magazine. There are boat builders in your area who are looking for lumber and don't know where to find it. Check our list, see if your supplier is listed, if not, share it with others by sending an email with address, phone number and what they carry. Also, because of area code changes around the country, some of the phone numbers are no longer current. Send changes and I will post them to the list. This list can be of great value to other boat builders, but only if there is accurate information. Do your part, send in those email cards and letters.
New Magazine: Small Craft Advisor
We recently received the first issue (Jan 2000) of "Small Craft Advisor". In the prolog, the editors stated that "Small Cmall Craft Advisor... is going to be the magazine for sailors and owners of boats 25-feet and under". The magazine is based on the west coast, at Morro Bay, CA. One of their models is "Small Boat Journal", a magazine that many boatbuilders remember with fondness. Their aim is to provide practical information and stories of interest to "average guy".
If you think you might be interested visit their web site (www.smallcraftadvisor.com). There is not much there yet but table of contents for the first issue, bulletin board, and subscription information. We hope they succeed. There is a need for more magazines that cover small boats and aren't just filled with boat tests and and other manufacturer promotions.
Model Making - and ramblings about Tiny Might
Letter dtd 19 Dec 99
Re: Webletter 15...Model
I just read your Webletter #15 and was pleasantly surprised to learn that I was not the only one who made models of a pending project.
I originally built the "Tiny Might" in 1956 after helping my father, an accomplished cabinet maker, build a 16' cabin cruiser from a set of your plans. I was looking through his "new" Glen-L catalog and immediately fell in love with the "Tiny Might". I sent for the plans and after quite a bit of persuasion, I was able to talk him out of a piece of mahogany lumber he had stored in the overhead of his shop, on the condition that none of the material would be wasted. The piece of lumber was 1" x 30" x 24'. Try to find a piece of lumber of those dimensions in today's market. He taught me how to loft the components and made me make full size patterns for the frames, stem & breasthook. I was able to get ALL of the frame components, including chines, battens, shears, keel and motor stringers out of that one piece of lumber. I managed, with his guidance, to assemble the frames and construct the hull skeleton. In those days we were able to obtain 14' plywood, and I skinned the bottom and the sides. I already had two (2) Ford V860 engines from a roadster project that was terminated when my father thought that an 86" wheelbase was too short (another story). After skinning the bottom and sides and applying the first couple of layers of fiberglass cloth, the hull was turned over and placed on a cradle in preparation for locating the engine and hardware. When I placed the little Ford V860 in position as noted on the plans, it seemed to me that there was an awful lot of unused space. With very little encouragement from my buddies who had been helping on my latest project, I moved the engine over and placed the second V860 next to it, but reversed. When my father saw that I was attempting to put TWO engines in this little boat, he lost it and insisted I get rid of the boat. No amount of explanation could change his mind and he made me sell the hull to a neighbor for $100. The neighbor made it into an outboard.
When I got close to retirement in 1996, I knew I had to have a project to fill my idle time and decided to build the Tiny Might without any restrictions or authority figure to stifle the construction. I located two pages of the original plans in my archives and after a big of searching (a copy of Popular Science, I Think) found out that Glen L was still in business. I sent for and received a new catalog and immediately ordered and received a new set of plans for the boat. As I proceeded to gather/purchase the equipment required to build the boat, I made a decision to build a model to see if I would run into any problems constructing the full size version. By the time of my retirement in January '97 I had all the equipment I needed to construct the boat.

In the following year and a half, while gathering material for the full size boat, I constructed a 1/8th scale model of the Tiny Might. As was mentioned in your article in Webletter 15, the scale on the drawings for the frames, etc. was 1-1/2" = 1', which is 1/8" = 1", or 1/8th scale, so this made it pretty easy to fabricate the components. I made patterns from the plans, machined the material and cut the frame components from 3/32" mahogany, as well as motor stringers, breasthook, stem, etc. The hull skeleton was assembled in the exact same manner as the full size boat, utilizing fabricated horses for the motor stringers and following procedures described in the instructions. I used glue specifically designed for wood models and fabricated spring clamps from miniature alligator clips to hold things together while the glue set. The bottom and transom of the model was skinned with 1/16" sheet balsa and the sides, deck and hatch were covered with 1/32" thick balsa sheeting. The model received two layers of very fine fiberglass cloth as used on model airplanes, purchased at the local hobby shop.
Rigging Small Sailboats
In response to inquiries about an out-of-print book published by Glen-L, we are starting a series in our WebLetters, reproducing Rigging Small Sailboats. This issue contains Chapter 3; to be continued in the next WebLetter.Chapter 3
.....masts and booms
|
|
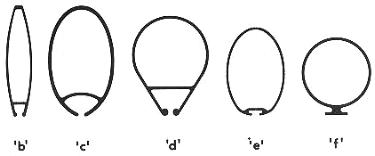
| FIG. 3-1-Some typical aluminum mast sections. Sections 'a', 'b', 'c', and 'd' have built-in grooves for the bolt rope of the sail. Sections 'e' and 'f' are made for sails with track slides, with 'e' using and internal slide and 'f' using an external slide. All these sections are made by extruding the metal. Ordinary aluminum tubing is also used for spars in some cases, where the strength is sufficient. Most of these sections could be used for the boom also, if of the appropriate size and shape. | |
Most people know a SPAR when they see one, and in sailing, the spars are the "sticks" (mast and boom) to which the sails are attached. To BEND the sails means to attach the sails to the spars and rigging. The MAST is the more-or-less vertical member, while the BOOM is the more-or-less horizontal member attached in some manner to the mast, and usually capable of pivoting about the mast. Most sailboats of the type discussed in this book have one of each. One exception is the lateen rig, which often has two booms, with the upper boom correctly referred to as the "yard" (see Fig. 2-5).
Spars on sailboats are usually made either of wood (solid or hollow), or aluminum (extrusions or tubing, both hollow). It is not uncommon nor undesirable to have an aluminum mast and wood boom in combination. Some typical sections through masts and booms are shown in Figs. 3-1 and 3-2, both for wood and aluminum. Masts made from aluminum should be "anodized"; a special coating process which minimizes oxidization. It is also desirable to wax aluminum masts.
Observe the methods used for sail attachment. The groove-type mast in either wood or aluminum makes the neatest installation besides being the most efficient. Wood booms are usually solid in the size boats being discussed in this book, due to the small relative size required for the boom. On small sails such as used on lateen rigs, the spars are often nothing more than round wood poles or aluminum tubing.
|
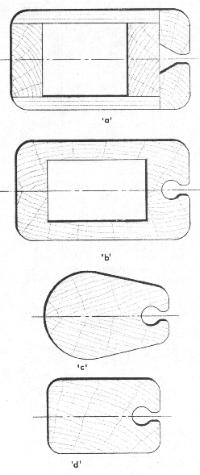
FIG. 3-2-Some typical wood mast
and boom sections. Section 'a' is a mast made
from plywood which can be relatively easy to build by
the amateur. Section 'b'is made in two halves
glued at the centerline. Because sections
'a'and 'b'are hollow, the halyards can
be run internally. Blocking for reinforcement is
provided in the hollow area, where fittings are
located. Section 'c' is a solid wood shaped
mast built in two halves about the centerline in a
similar manner. Section 'd' is of single piece
wood construction. Sections 'a' 'b 'c,
and 'd' have built-in bolt rope grooves. That
of section 'a' is easily cut on a saw set to
the proper angle. The groove of sections 'b'and
'c'can be cut before the two parts are
assembled by running the spar angularly over a circular
saw with the blade raised to the proper depth.
Optionally, the groove can be cut with a core box bit
and router. The groove in section 'd' must be
cut with the core box bit because of the one-piece
construction. Any of these sections could also be used
for the boom if there is a bolt rope in the sail along
the foot, and the boom was properly sized. Boom section
'e' is a typical "T" configuration
which could also be inverted. A track is shown for use
with a sail with slides on the foot. Section
'f' is a rectangular boom used with
loose-footed sails. If stiffness was required, the
"T" configuration could be added, or a square
piece added to each side making a cross-type section.
Some degree of flexibility, however, in the boom is
desirable.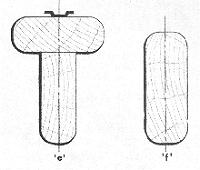
|
Feedback: Stiletto
Letter dated 20 January 2000:
To the Glen-L staff,
While exploring your web site recently, I was pleasantly surprised to find a photo of myself driving my father's 'Utility' on your 'Utility' internet information page. I recall that my father sent some photographs of this boat several years ago.
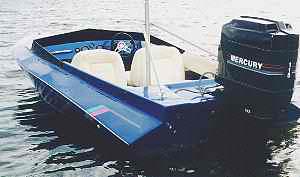
I have continued the tradition and became a second generation Glen-L boatbuilder. Enclosed are photos of my 'Stiletto' built from your frame kit.
Construction was started in 1988 while in high school and the hull was fully sheeted by the time I left for college. Construction was then limited to holidays and summer vacations, with the boat being ready for launching in early 1992.
Construction details:
Glen-L frame kit, sitka spruce stringers, marine plywood,
brass fastenings.
Fully fiberglassed with epoxy. Built-in 12 gallon fuel tank
under deck.
Automotive primer, paint and clear coat applied by body
shop.
3M brand adhesive stock for color accents.
Two tandem mounted Glen-L skid fins.
Modifications:
Smaller motor well with rear deck added to support ski
pole.
Doubled (1 1/2" thick) side cockpit coamings.
Transverse 2x4 across transom (under motor well) to
distribute motor thrust.
Black plexiglas windshield.

Powered by a 1992 115 HP Mercury with 21" pitch aluminum propeller, the top speed is 48 mph which would doubtless increase with a more exotic prop and higher engine mounting. This boat is used exclusively on a sheltered lake which makes the flat bottom design ideal. The twin skid fins give great tracking for water skiing and tight, flat, high G turns.
After eight summers of fun, the Stiletto is still in fine shape and going strong. Thanks for a great design with timeless styling.
Yours truly,
Douglas Wittkowsky (N. Tonawanda, NY)
For additional photos see the Customer Photos pages
Building the Tunnel King, Part Three:
Full-Scale Construction
by Matthew Green
(Part 1: WebLetter 8, Part 2: WebLetter 13)
Ah, the dead of winter - the perfect time for building boats! In the last installment, I covered the building jig, frame construction, and transom assembly. This article will delve deep into the frame system of the boat, and the beginning of the planking stage.
More on Setting Up Frames
In the previous article, I briefly described setting up the frames on the building jig, but after rereading it, I think more detail is in order. To ensure the hull is fair, it is CRITICAL that the transverse frame members are parallel, correctly spaced, and properly centred. I attached a string line onto the building jig as a centreline to align all the frames. It is preferable not to nail the frames to the jig, as the nail holes will be visible afterward. I used blocks fastened to the jig and battens between the frames to hold everything in alignment. The frame set-up is fairly tedious, but care during this step will save you grief in the long run.
Tunnel Sides
The first longitudinals to be installed are the tunnel side cleats, runner keels, and runner stems; they are actually added in conjunction with two plywood pieces, the tunnel sides. The tunnel side is a full 16' long, so if full length plywood is not being used, a piece will have to be built up with scarves (the merits of scarves over butt-blocks are covered elsewhere on the Glen-L website).
The tunnel sides are identical so should be tacked together and cut as one. Glen-L supplies full-size patterns for the tunnel sides. Follow the instructions on the patterns and mark through them with a prick-wheel. No matter how well you cut the pieces out, the edges must be planed afterward to ensure the curves are fair, and, most importantly, the straight sections are STRAIGHT. I clamped my tunnel sides in a portable workbench and faired them with a jointer plane (except the forward section, where I used a small smooth plane). Notches must be cut at the bow and transom ends of the tunnel sides; these are detailed on the patterns.
The two pieces can now be separated and the tunnel side cleats, runner keels, and runner stems attached. If you are using a frame kit, the runner keels are provided pre-cut; otherwise, patterns are used as above. The runner keels and stems should be bevelled 10 degrees before attaching them to the tunnel sides. The endgrain present on the runner keels will make planning difficult, so I bevelled them freehand with a sanding disc mounted on my tablesaw. As always, glue generously and fasten as required on the fastening schedule.
The whole tunnel side assembly is installed as a unit on the frames. Notches must be cut in the frames for the runner keel and stems. In their instructions for making the tunnel side panels, Glen-L states, "Be sure and mark clearly on both sheets of plywood the position of the various frame members". That is, they are implying using the tunnel side assemblies to locate the frames. This is an interesting way of assembly, and does away with much of the frame alignment procedure I have previously described. I have included both methods in this article because I think both can produce accurate boats. My method worked fine but is complex and somewhat time consuming. I think if the tunnel side panels are built extremely accurately, the Glen-L method will work better. The only difficulty I foresee if the epoxy kicking off while you are trying to line-up and fasten the frames; helpers would be in order here. In any event, glue and screw the tunnel sides in place, then give yourself a pat on the back; fitting and installing them is one of the most important steps in building the Tunnel King.
Tunnel King - In the next installment: decking, transom, and interior finishing
Glen-L T-shirts & caps are here at last!
Many of our builders have asked why we no longer had T-shirts... so we decided to have some made.
Going to that special party and don't know what to wear? The Glen-L Boatbuilder T-shirt is always appropriate, even in the most fashion conscious circles. Our luxurious Hanes Beefy-T's® are made from 100% pre-shrunk cotton. The deep navy color and white lettering provide the understated elegance that boatbuilders demand. You will be the envy of the guys at the hardware store and it goes without saying that when worn with white pants and deck shoes you will bow to no one as the stereotypical yachty. Our Boatbuilder T-shirts are the perfect night wear to add that certain sparkle at bed time, worn with or without our Boatbuilder cap.

But there is more to our Boatbuilder T-shirts than style. The heavy cotton will keep you warm in the coldest weather when worn under a really heavy coat, yet is also appropriate to wear as you walk along the beach on a balmy summer evening.
Lettering on front: Glen-L logo, with "Boatbuilder" beneath. On back: Large logo, with "marine designs" beneath. Order one for yourself and extras to give as gifts. Available in handsomely large or manly extra large.
#15-111 Handsomely Large: $14.95
#15-115 Manly Extra large $14.95
Shipping: $3.00 in the US for any quantity.
Cotton Glen-L Boatbuilder Caps
Protect yourself from harmful ultra-violet rays with our stunning bio-degradable brushed cotton twill Boatbuilder cap. Low-profile crown and adjustable sizing strap make it versatile and adaptable to wearing either forward or backward so that you can seamlessly fit into any crowd. Color coordinated with our Boatbuilder T-shirt and embroidered with the Glen-L logo and the word "Boatbuilder", this cap will easily turn the conversation to your favorite subject. Buy one for working on your boat and one for special occasions.
#15-120 Uni-sex sized to fit all: $12.95
Shipping: $3.00 in the US for any quantity. Free shipping
if ordered with Boatbuilder T-shirt.
Shop talk: Table saw jig
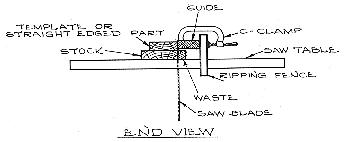
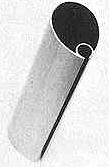
This drawing is taken from our book Boatbuilding with Plywood. The jig shown is used to true up irregular stock without using a joiner. It can also be used to make any number of duplicate parts with or without tapers or bevels as long as the edges of the part being reproduced are straight. It is particularly useful for making breasthook and transom bevels and making frame member components. (Top view)
We welcome your contributions to this section.
Recent email:
Subject: Re: Roustabout/ Teddy Panganiban
Date: Mon, 20 Dec 1999
From: Teddy Panganiban
Barry,
Thanks for featuring my Roustabout in your web letter. I am
now building the Trail-a-camp camping trailer. The 2"
square tubing and channel bars are being welded together. I
will also send pictures.
Cheers
Teddy
...Following are some notes on my Roustabout which I named SK8ER shortcut for skater. This is my youngest daughter's email name. She is a serious ice skater and participated in the International Ice Skating Institute's World Recreational Championship held last August 1999 in San Jose, CA (where I also bought most of the boat's accessories in Boaters World) where she won 1st place in two of three events she joined - the other one she won 2nd place.
This is the first time I built anything made of wood. I have not even built a table or chair before. The plans and the patterns were really helpful. Of course, I had help from real carpenters, Tino and Inggo, but they have never built boats - being house builders. There was some diffulty at the start understanding boat terminology which is different from house plans terminology. Once we got familiar with stringers, battens, chine logs etc it was a breeze. The boat and trailer was built in the yard of our house in Quezon City and was a curiosity for our neighbors and friends. Not to mention the beating I got from my wife for the mess it created.
Inggo is the thin guy you see in the pictures. I am the healthy one. The guy whose back you can see is Bart, the Evinrude mechanic - engine installation and sea trial support come part of the purchase price of the outboard from the local dealer, ALS Marine Center. The background is Taal Volcano lake which is actually the freshwater filled crater of a very old volcano and the island you see is actually an active volcano within the crater lake. The last major eruption was in the mid 60's and it last erupted about 15 years ago.
I used your epoxy fiberglass and silicon bronze fastening kit. Both were not enough to finish my boat. I had to get one more gallon of epoxy glue and three more gallons of the thin type for laminating all of the other wood surfaces. The fiberglass cloth was only enough for the hull, I had to buy some more for the deck and floor. The 1-1/4" screws were not enough but the 1" ones were more than needed. I wasn't able to find silicon bronze screws locally so I substituted stainless steel screws. I also used stainless steel 1/4" diameter hex bolts and nuts where required. The 1/4" x 7" bolts for the stem couldn't be found. I had them custom made. Same for the 3/8" U bolt for the bow.
I added double walls of 3/8" plywood for a neater appearance inside the cockpit. I used local marine plywood and had problems with the thicknesses. 1/2" plywood was actually 3/8" so I used 3/4" (actually 11/16") for the floor. I had to make adjustments in the frames for the stem which came out 1/8" less than 1-1/2". The solid wood was worse, they were actually 1/8" to 1/4" less than the labelled size. I had to buy thick pieces and had them re-sawn to net sizes required in the plan.
For the frames, stringers and other parts where solid wood was required I used a local hardwood called yakal which is stronger and heavier than Philippine mahogany. This wood was used in the old days as door jambs and stairs.
Laminating with epoxy and painting with two part polyurethane was a challenge in our warm but humid climate; specially, this year we never really had a dry season because of the La Nina weather phenomenon ( We have only two seasons - wet and dry). The two battens which extended near the bow were too long in the plan, I had to cut them shorter. The overlapping pattern drawings were sometimes confusing for me. For the transom I substituted the additional 3/4" plywood layer with 1" x 4" planks of solid yakal wood. The keel was not the lowest part of the boat so the garboard drain had to be positioned on the side of the keel.
Sanding epoxy filler wasn't easy - it took long. I used white epoxy primer paint for the whole boat. Below the water line I finished the hull with two part white epoxy enamel same with the floor. The deck and the sides of the hull above water line were painted with matching white polyurethane paint and finished with two part clear polyurethane top coat - giving it a wet look. This wasn't my idea. This good advice was given to me by the technical man in the epoxy paint factory who contracts painting of ocean going vessels and does work at the Manila Yacht Club. He said epoxy paint was good in the water but will not stay shiny under the sun. The polyurethane paint I used were the same ones used for production cars and made by Bayer A.G. in Germany. The decals were bought from a car accessory shop and was meant for a minivan and the name SK8ER I had custom designed by a graphics person.
I used two reclining car bucket seats in front and added bench type storage seats at sides and followed the plan for the seats at the back. I also made a stainless steel towing pole for skiing and wakeboarding - which the kids still have to learn. As for me I prefer to drive, navigate and fiddle around with the mechanicals.
I probably spent almost US$10,000 for the complete boat, the lion's share of the budget was spent for the Evinrude 115 costing about US$6,500. US$1,000 was spent for the epoxy/fastening kits, plans and accessories(bilge pump, swim platform, steering kit, gauges etc) and US$2,500 for the wood, paint, bolts, screws etc and help from the carpenters.
I had a good time building the boat and the feeling of accomplishment was unique since both my mind and hands were at work - quite different from the normal work I do as senior operating officer of a local bank.
Cheers
Teddy
Mr Bokros was looking for a drawing to repair his Chris Craft.
Subject: Chris Craft 1976 Tournament Fisherman
Date: Fri, 12 Jan 2000
From: Edward Bokos
Edward Bokros wrote:
Thanks for the quick response. The Mariner's Museum in Newport News has a Chris Craft archive. They have 55,000 plans in house obtained from the Chris Craft plants. If you call the Chris Craft plant this is who they refer you to. I have fax and phone numbers if anyone is interested.
Mariner's Museum/Chris Craft Collection 100 Museum Drive, Newport News, VA. 23606-3798, FAX 757-591-7310, (chriscraft@mariner.org) 1-800-565-6846.
Subject: Guest Book entry
Date: Mon, 31 Jan 2000
From: Mickey Lux
Comments: My Dad and brother and I built an "Albert E" in 1970-71, with a Dowty inboard marine jet driven from a big block Chev engine (409). We've re-fit it several times, but it still runs great, still looks real good, and draws a lot of interest. We used to take it to northern Saskatchewan in the Canadian Shield (precambrian rock country - with lots of lakes and clear water) and "Boat" has brought us through some pretty rough water.
I believe my Dad might have obtained your plans in 1962-64, when we lived in Portland, OR. He had built a few other boats prior to "Boat", but this was his biggest, and our proudest achievement as builders.
Thanks for the opportunity to make memories!
Yours truly,
Mickey Lux
Saskatoon, SK, Canada
Build more boats
GLEN-L boats, of course