Turning the Monsoon
continued...
After taking careful measurements, we determined it would be possible to right the hull in the garage, if we rotated it like a chicken on a rotisserie. Our solution had three components:
- Rollover frames on one side to force a smooth, circular rotation
- Chain hoists to lift/lower the hull
- Come-alongs to keep the hull centerline parallel to the diagonal of the garage.
Equipment purchased was:
- Four 1-ton chain hoists with 16' reach from Harbor Freight for $60 each (which we'll use later for the engine installation).
- Four 2-ton come-alongs from Central Farm and Tractor for $16 each
- Two nylon cargo tie-downs from Wal-Mart for $10 each
- Assorted small lengths of chain from Sears Hardware.
Total cost was just over $300, much of what will be
reused on this and future projects.
Note: Those confident enough not to employ redundancy can accomplish the same
with only two hoists and two come-alongs, reducing the cost to about half.
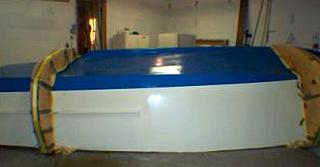
The rollover frames were made out of two pieces of 3/4" plywood that sandwiched some 4x4 lumber to make the surface contact area wide. They were held in place by nylon cargo tie-downs. Not shown in the photo are the 2x6's we used to connect them. We were confident the transom side frame would remain perpendicular under pressure as that section of the hull is flat. We were not so confident of the rollover frame toward the bow due to the curvature, thus the connecting lumber would keep the front one from bending. The inside of the plywood was cut to conform to the patterns and the outside to a large circle. Carpet padding was placed between the frames and the hull.
Our garage has prefab rafters. Even though the rafters are of 2x4 lumber on 24" centers, local builders insist if the load is spread evenly they are unbelievably strong. Thus the chain hoists were mounted to the ceiling by wrapping a 2' length of chain around a pair of 2"x6"x10's. The come-alongs will not have that much force on them, thus on each side of the garage, we secured 2"x4"x2's to the walls as low as possible.

For mounting points on the hull we laid four 2x6's inside the hull on top of the 2x4 cross-members (the 2x4's that gave the frames the setup height when on the setup jig). We then wrapped some chain around them in 4 locations.
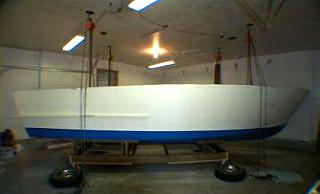
The first task was to remove the setup jig to lower the hull as low as possible. The chain hoists were mounted directly above the sides of the boat about 6' from each end. After unscrewing the frame cross-member 2x4's from the setup jig, we slowly raised the hull. We then slid the setup jig out from under the hull and lowered the hull to the ground on some foam padding.
If all went well, we'd have 1' of clearance when the boat is on its side. We then relocated two of the chain hoists to the centerline of the hull. At this point, we could have discarded the other two chain hoists - but being an engineer, I like redundancy thus we left them in place even though once the hull was at the 45-degree angle they'd be useless. Beside, once you get to the 45-degree angle, you're close to the balance point.
The plan and execution was actually simple. We used the centerline chain hoists to raise one side of the hull 2" at a time. We then used the come-alongs on each side to keep the hull centered like a chicken on a rotisserie. We actually spent more time walking then we did using the equipment. With only 1-2 feet between the hull and the walls, we didn't want to squeeze through between the hull and walls once lifting began for safety reasons. Therefore, having only two people working the hoists and come-alongs required we make 2" of progress, walk though the house and across the driveway, and enter the side door of the garage to readjust the come-alongs on that side. Being slow and careful, it took 5 hours to rotate the hull. Well-engineered tasks are always uneventful!
See "Glen-L Projects on-line" in this WebLetter for a link to Joe & Teri's project on-line.