WebLetter 21
An Occasional Publication for the Home Boat Builder
Glen-L Marine Designs - 9152 Rosecrans Ave. - Bellflower, CA 90706
In this issue
- Converting a Briggs
- Cabin Skiff Project Report
- Monsoon: Turning the hull
- Rigging Small Sailboats - Chapter 8
- Links to Glen-L Projects on-line
- Feedback: TNT
- Feedback: Bo-Jest
- Recent email
Glen-L Update
-
Website:
-
Our re-formatting of the on line catalog continues;
still to be done: Work boats and Inboards. As
always, there are many more Project Registries and
Customer Photos.
- New Boat Design Catalog/Houseboats and Cruisers. These sections have been updated to the new format. Each design now has its own page with a link to a Bill of Materials.
- We have also added a "How Fast?" page, accessed from the bottom of the Boat Design Catalog Contents page. We welcome submissions of performance on your Glen-L design to add to the list.
- We have also added a link to Customer Photos and the Project Registry to the Boat Design Catalog Contents page. These are links that first time visitors have missed.
- The Pedal-It is undergoing minor changes in steering hook-up and gear ratios. We hope to have it out for another test drive before the next WebLetter.
- For those of you who have been asking about the hydro steerer, we have decided to make our own since we can't find a suitable replacement for the one we used to carry. Patterns are made and at the foundry. Next will be machining and testing. Have no firm date for availability. Will give an update in the next WebLetter.
- Would you like to become Internet famous? We are looking for articles, boat building hints, and photos for future WebLetters. The point of this WebLetter is to be a resource for boat builders... why not put in your two cents worth? How about "Shop Talk" about a particular procedure, special jigs you have made, or the right tool to use?
-
Our re-formatting of the on line catalog continues;
still to be done: Work boats and Inboards. As
always, there are many more Project Registries and
Customer Photos.
Barry Witt
Editor
Converting a Briggs
by Douglas Keith
Doug mentioned that he had used a Briggs in his boat, so I asked him to share how he did it since others have asked about converting smaller motors.
Here we go...The tough question you asked is "how would I tell someone how to do this". Boy, when I thought about it in those terms, I realized how hard this would be. Well, here goes.
First a summary: As for cooling, the Briggs I used was splashed lubricated, so I had to mount it on the horizontal, then come off with a jack shaft to a pillow block with a thrust bearing, then to a universal joint {I used a Spicer}, then thru the floor through a 16 degree shaft log. In short, it kept the motor upright and in the relative wind. It is a small boat designed for a special purpose, coon hunting, or you could use it in back waters where wave action wouldn't be a big deal i.e. sloughs, small lakes, etc. It gets excellent fuel usage and makes about 10 knots full bore. Transfer of power was done thru a centrifical clutch w/double row chain to the jack shaft. I tried routing the exhaust out the transom, but it was too noisy, so I ended up with a straight up pipe w/muffler.
The details:
1. I used a Briggs model# 130202.
2. Overheating wasn't a problem, in fact I never
considered it. They are cooled with a fan, so it was never a
thought.
3. I used a standard centrifugal type go-cart clutch w/double
row chain. I found out by trial and error, that a single row
works, but durability is not there.
4. After the clutch, down to a shaft with a sprocket, the one
I used was held in place by 2 pillow blocks, fore and
aft.
5. Then to a u-joint. You need one with strength, so I used a
Spicer rated at 40hp.
6. Next a thrust bearing. This is where you get your shaft
log angle, so the thrust bearing is mounted at the angle of
the shaft log. In my case at 16%. I got the bearing from
Kaman Bearings. It was adjustable, so I could mount it flat
and then rotate it to match the angle I needed.
7. Then you go through the floor using a standard shaft log
and packing gland then to the strut, and prop.
Cabin Skiff Project Report
by Ray Macke
Attached are a few photos of my Cabin Skiff project. I incorporated several modifications which included stretching to 18', moving forward decks up to top of bulwarks, changing cabin & berth shape, and making the windshields tilt open for ventilation. I started the project on 10/26/99 and slid it off the trailer for the maiden voyage on 7/22/00.

There is still a lot of work to do. The idea was to float it so I could find the waterline. I plan to paint the sides of the hull blue but the Easypoxy is only going down to about 2 inches above the water. Problem is I have been having so much fun cruising around I haven't been able to force myself to stop long enough to get it painted. As of 8/4/00 I have about 9 hours on it and the trip log on my speedometer shows 102 miles.
I haven't had enough time to really nail down the performance numbers yet, but this is what it is looking like so far. With the new Honda 50 hp four stroke I find it will plane at about 17 or 18 mph. Top speed is 30 mph.
I built the Cabin Skiff with the intention of doing some long river cruises and good fuel economy is essential because fuel facilities are scarce. I am equipped with Horizon's Speed/Trip meter and their Fuel Flow meter. What it is showing me is at 21 mph I am burning 2.1 gph which equals 10 mpg. At 25 mph it goes to 2.6 gph or 9.6 mpg. At full throttle 30 mph the burn is 3.3 which equals 9 mpg. Again these numbers are preliminary as I still am fine tuning both the instruments and the Skiff but so far I am quite pleased.
I must say I get a LOT of looks from other boaters. You just don't see anything like the Cabin Skiff on the rivers here in the midwest. Also, in one of the photos you see the trailer and I built it from Glen-L's plans. Everyone that sees it is surprised when they find out it is not a "factory" job.
If anyone is interested in the
building process they can visit my web site at
http://www.lightning.prohosting.com/~raymacke/ .
It tracks my progress from the beginning with lots of photos
and text (also has a section on building the trailer). I will
continue to update it as the project continues with both
building info and my impressions of the Skiff.
My biggest concern at this point is getting it done. I have enjoyed the process so much I hate to see it come to an end!
Turning the Monsoon
One of the biggest worries of builders and potential builders is... how do I turn the hull? There are almost as many answers to this as there are builders. The answers range widely, and usually end being a relatively easy process. The following comes from Joe & Teri Carozzoni. - brw
Per Glen-L plans, the length of the Monsoon hull is 22' 3" and should weigh about 1,400 lbs. The inside dimension of my garage is 21' square, thus the hull was built diagonally with about 2' clearance from the walls. With the hull perfectly faired, primed, and partly painted, we were apprehensive about turning it over in an uncontrolled manner (e.g. rolling it over in the grass, using a backhoe, etc.).
Glen-L projects on-line
The following is taken from our site: Useful Information & Suppliers/Links:... There is a lot on our site that visitors often overlook. If you haven't checked out these other builders, give them a visit. We welcome additional entries of Glen-L projects.
- Tom Strong's ALPHA 2 "More pictures of parts & pieces have been added", 7-16-00
- CABIN SKIFF: Building a boat! The Henry Clan page.
- CABIN SKIFF Step by step photos; nicely done page by Ray Macke. Mr Macke has added pages on building his own boat trailer. Check it out if you are considering building your own trailer.
- CHIPPEWA Tom & Jeff Mills 15' veneer Chippewa progress in photos.
- CONSOLE SKIFF, a work in progress with regular updates as construction proceeds.
- DELTA KING Progress photos of John Higgins' Delta King.
- GLEN-L 15 History of my project with photos, ready to launch October 1999.
- LUCKY PIERRE "Watch progress on my site".
- MARK TWAIN Site shows Sandi and Lee Freeman's Mark Twain project. Lee and Sandi previously built the Gypsy. (See WebLetter 1 in "News Letters" on our site.)
- MONSOON "Building a 22 1/2 foot classic cruiser."
- RIVIERA This is an exremely well done site. If you are interested in the Monaco or Riviera, or in cold-molded construction in general, go to this site. Mark Bronkalla has great information on tools and jigs for making longitudinal scarf joints and notches. Good information all well written and displayed.
- SWEET CAROLINE being built by Don Hodges, Florida.
- TANGO If you are interested in the Glen-L Tango... Welcome to Bob's World.
- THUNDERBOLT "Pictures of my Thuderbolt project and my dad's Rebel". (1-2000)
Feedback: TNT

Subject: A new TnT for Posting
Date: Thu, 10 Aug 2000
From: Mike Moore
Hi my names Mike Moore, I'm 20 years old from Newmarket, ON, Canada. I keep my boat at my Cottage on Healey Lake ON, just outside of Mactier, Ontario. My dad and I have spent the last two years working on our TNT. I would like to post my boat on your site with the rest of the lovely TNT's you have.
The length was increased 4 inches in the back behind the divers seat. The hull was professionally fiberglassed and gel coated. Seven coats of varnish so far on the deck; 2 go-kart seats side by side, all Mercury components: Tach, Speedo and control box. A friend of mine who owns 3M Trim Line of Newmarket did the graphic. The TNT on the side is mirrored and the Merc Racing was custom made.
Fiberglassing the hull is highly recommended in my book. It added about 60 lbs. but the weight is low and it is indestructible now.(*) The motor is a 25 Merc Stock electric start with a 18 inch Mercury Racing copper which so far after two weekends has pushed the boat to 42 mile per hour. I have a line on a very rare 25 Xs... that would be nice.
Maybe before the summer's out I will put reeds in the stock motor, something to keep me busy, will see. It tends to porpoise a little but there is no weight in the front. I would recommend a built in gas tank to keep the weight balanced. Oh and I placed a piece of plywood under the seats to act as a sub-floor and so I could put a carpet down. Most important is that there is a squeegee under the passager seat a must if you intend to corner with some control. Thank you for making a great design. The fun has just started.
Thanks Mike
(*) Ed. note: On the last test model we did (17' PowerYak), fiberglassing added 11 lbs.
Feedback: Bo-Jest
After 4 1/2 months this is what I have completed. I had purchased the plans for your 18' Bo-Jest and have followed the plans for the hull to a "T". However, I made several alterations to the cabin to suit my liking, such as extending the cabin roof to cover the rear deck and added canvas drop curtains which makes it more comfortable in bad weather. The interior has a fresh water tank beneath the floor (20 gal.) and a cupboard with sink and pump and exterior drain. I also installed a marine-type toilet and a 20 gal. holding tank under the floor in the sleeping area. I power it with a 15hp Merc O.B. with remote controls. I have added a VHF radio, depth and fish finder, spot light, horn, Loran, compass, bilge pump, etc.
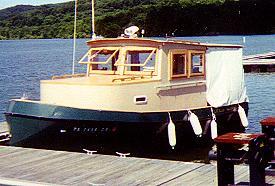
I have boated on our local lake where this picture was taken, also in the Chesapeake Bay, and NY Finger Lakes. Everyone who sees it has compliments and there have been at least 50 people who have taken pictures of it.
My wife and I have spent many weeks cruising and fishing, living on board in comfort for days at a time. I have added a downrigger and it is the perfect boat for lake fishing and trolling.
I am very proud of this boat and people repeatedly ask me how much I would take for it. My reply is "you don't have enough to buy it".
I thought that you may sometimes wonder what becomes of the plans that you sell, so I thought I would share what became of mine. In addition to countless days of work I have a cash investment of approx $12,000 which includes the used motor and tandem axle trailer and all accessories.
Jim Heath, Captain
PS. The name of the boat is "Dixie Queen".
Recent email:

Subject: Thank you for memories
Date: Mon, 31 Jul 2000
Dear Sirs:
This past June, I bought plans for the Kidyak. My son and I decided to build it as our "summer project". Six weekends later, I had the greatest pleasure to see my son beam with joy. I hope that these past few weeks will last a lifetime. Attached is a picture of our kidyak, which was launched successfully on July 23, 2000. Thanks again for the memories (and the easy-to-follow plans especially since I was a novice).
Frank Coumou
BASS BOAT/Neil Gaughan/ 8/7/2000: Fairing the chine, keel, sheer, bending battens.
I began the Bass Boat in May. I purchased the Frame Kit, and am using African and Honduras Mahogany. Working outside in a small 24' x 24' work yard, fenced for privacy, on gravel/rock. Laid the center member for the support structure onto 5 cement pads, which are leveled end to end. Support structure cross members likewise supported on cement pads. Established the reference center line on the 14' member using aluminum fence wire.
In setting up and leveling the support structure, I used 2' and 4' levels, but found the best tool for this was a water level. This is just a 3/4" or 1" hose (transparent) to measure and level the structure end to end and side to side with respect to one corner. Also set position of bow piece using the water level. I will be glad to describe this in more detail if anyone is interested.
Currently: frames mounted on the support structure, the keel, stem, battens, chines and sheers installed: fairing of the bow piece completed. Started on fairing of the chines and keel/battens. Gradually bending battens to shape forward of frame #4.
Next step will be side planking and then bottom planking.
Neil Gaughan
Tucson, AZ
Subject: Bob Warner (Jack Tar) Glen-L Update
Date: Fri, 14 Mar 1980
From: Bob Warner
To: Glen L
Dear Gayle,
Thank you for your e.mail, concerning the drawings of Jack Tar being reduced to A4 size, so i can frame them, and display on my boat, my plans are five years old now, so i intend to copy them as they are, with creases and splits, because they are the originals, and that is how they should be framed. Five years, the time has gone so fast, that said I have built a boat of my dreams. With one year to go before launch, the photographs are on their way to you, all the decks are teaked. I am at present on the wood laith, turning the rail stanchions. Will try to complete the exterior work this year, before winter, when i can concentrate on the interior work. The engine is in place, and ready to marinize, all the cabin lighting is wired. I have decided to have solid fuel heating with radiators so we can use the boat all year round. She is looking very good at the moment, and thank you to all at Glen-L.
Bob Warner
8 August 2000
....By the by, you folks gave me hours upon hours of wonderful dreaming when I was a lad. Thanks for all of the islands I discovered, pirates I conquered and round the world races I won...all as a 12 year old. I couldn't have done it without you! And I still have your 1970 catalog. It was the best two weeks of mowing the neighbor's lawn money I ever spent!!!
Thanks for your time and help!
Best regards,
Grant Griffin
...Sure you can quote me! It's the truth.
I probably built more of your boats (in my mind) than any
living man or woman. I even tried to design my own at
times...built one raft...sailed her nearly 50 yards...and
swam home....geee, I wonder if it's still near the end of
Mr. Campbell's Pier? Had one first-rate oar lock on
her.... and six tractor innertubes!
Subject: Thank You
Date: Mon, 31 Jul 2000
Back in 1962-1964 I purchased the plans and Frame Kit for a Ski Boat. It was 16 Ft. long with a 6'10" Beam. I do not remember the name. I did build it and had many years of fun with it. The most fun was building it. I remember I was sending you letters asking questions, you always answered them. At the time it was the king of the Ohio River. I remember there was a Hydro-Foil that ran between Cincinnati and Cony Island Park. It was fast, about 55 mph. In your boat I would pass him up. It is nice to see you are still around.
Also thanks to Glenwood I think they supplied the V-Drive.
Cleon Wingard
:::::::::::::::::::::
...It is OK to use my e-mail in your news letter.
The Boat that I built was inboard with a V drive. I used a 1964, 327 Chev engine with 3, 2bar carbs. Edelbrock exhaust headers. I drove off the front of the engine, and sheared off the 1/8" woodruf key. I had the crank shaft and collar machined for a 1/4 hard key and had no trouble after that. I used your frame kit, white oak for the stringers and bottom runners. The bottom was 3/8 marine 5 ply and the sides and deck was 1/4 in mahogany 5 ply. I glassed the bottom and sides. The decks were mahogany plywood with a mahogany cowling and raised cowling deck in front of driver and passenger, no windshield. I used two bucket seats in the front I got from an office supply store and two rear facing bench seats each side of the enclosed V-Drive. The V-Drive had a 13% overdrive, a 1" stainless shaft and 12" x 18" pitch three bladed prop. The V-Drive had No reverse only in and out of gear, I used a gear shift from a 1957 Ford T Bird. I had to aim it out put it in gear and start the engine. I do have some old photos of it under construction. I would be willing to make copies and send them to you if you would like.
Unfortunately I sold the boat in the late 70. I kick my self when I think of that. The new owner did not take care of it, he did not have the blood and sweat invested, the last I know he got drunk and wrecked it on a rock shelf on Cumberland lake. He called me to find out where to get parts ot repair it, I told him I made a lot of them my self and he would have to do the same. I never heard from him again.
Cleon Wingard
Monday, July 31, 2000
-----------------------------------------------------------------------
name: Per Olav jamt
Comments: I am writing to you from a town called Trondheim in the middle of Norway. Four years ago I build a boat of your design; Flying Saucer. I really enjoyed it, and my two sons (and my wife,too!) loved it. Now I am in the mood of starting a new project. I have your boat design catalog and probably I will end up building your design "MAI TAI". I hope I can come back with some questions about this later on.
Regards
Per Olav Jamt
Friday, August 11, 2000 at 14:30:19
-------------------------------------------------------------------------
name: Jack Jordan
Comments: Over 30 years ago I built your Hyroplane (Tiny Titan) at the age of 12. Now I hope to find something for my son and I to make.
Subject: Is it all right if I use your comment in the next
WebLetter?
Date: Tue, 22 Aug 2000
...Of course it is alright to use it. Could I also get a catalog of your designs? I want to find a plan that I can use with my kids as a project this winter. We are homeschoolers and this will be their vocational project this year. My son will be 13 this fall and my little girl is 11. This will be their frist real project.
I could never tell you how much building your plans meant to me so many years ago. My Grandfather was a cabinetmaker who taught me from the age of five. I wanted to build something he had never made before. One day while with him I was asking about things he had made, he said that he had never made a boat.
I decided that I would make a boat to show him that I could make something he never had before. I don't remember were I found your company but I do remember spending hours looking through the catalog and dreaming of each design. I ordered the hydroplane and a book about "Boat Building With Plywood". This made building your plans easy for a 12 year old.
I spent the winter building the boat in our basement. My Mom helped me layout the plans on the plywood in the middle of the living room. The rest I did downstairs. That spring I surprised my Grandfather, taking him downstairs to show him. In his typical Irish humor he said "How you going to get that 'thing' out of the basement?" It was his way of saying that he was proud of what I did.
Thank you and Mr. Glen Witt for something which will always be a piece of my heart.
Jack Jordan
Thursday, August 10, 2000
-------------------------------------------------------------------
name: robert a. maghy
Comments: I helped my father build a Thunderbolt back in the early sixties and will never forget the great family times we had with it. My dad still owns a Thunderbolt, though sadly it's not the one we built. I found it in Redondo Beach about five years ago and we just had to buy it! I'm so glad to see your company still alive and well after all these years. Best of luck and keep up the website - it's great!
Subject: Up date !
Date: Wed, 09 Aug 2000 14:15:05 -0700
From: Brad and Gwen
Eight Ball / Brad Wiebe / Surrey, B.C.,Canada
(Advice from a builder)
(1) When I got my plans two things were a bit of an "Ouch". I ordered the Eight Ball plans for 31.00 + the 9.95 New design book (I still had the old red one) so along with a modest mailing rate I expected a $60.00 bill by the time it landed at my door. Being from Canada I had to put in a 47% exchange on my money. I asked for a fast way to get it to me and was given the rate for UPS express mail. When it landed in Canada thru UPS I had to pay another $35.00 customs and duty! NOW DON'T get me wrong this is not against Glen-L this is just to let others know - if I would have had it sent Air Mail it would have gotten to me two days sooner and I would NOT have had to pay the customs and duty. The guy at UPS told me this when I went to pick up my package. So ask before you go ahead and send by ground or air mail.
(2) *NOTE* I read some one's E-mail that said it was tuff
putting the dots onto the plywood from the plans -Well good
news. There is a company here in Canada that's on the net
that sells a pen like tool that has a (cowboy type) spur on
it's end and you just draw the line on the paper and it
prickes thru the paper and right into the wood as quickly as
you can draw the line .
The company is Lee Valley Tools at
http://www.leevalley.com/
They are a wood worker toy store.
You get three of these spur pens for$16.95 Cnd and they are
on page 130 with the name "Pounce Wheels". Very
handy!
On with the plans: I bought two 1/4" sheets of Mahog
exterior grade good one side plywood and one 1/2" sheet
of Exterior Fir sanded both sides cost of $18.95 Cdn on the
1/4" and $29.95 for the 1/2" total $78.00. With my
Lee Valley Tool "Pounce wheels". It took me about
two hours including my screw up on part #1 to lay out the two
1/4" sheets...it's nice to feel like I'm on the
move. I'm about to go out and cut out the 1/4"
parts.
Till later.
Brad
Friday, September 8, 2000 at 10:59:29
-----------------------------------------------------------
name: Mitch Rohrbach
Comments: It's great to see your page! Many years ago I owned one of your Glen-L 14's. It was the greatest sailboat ever!, and very fast in heavier winds. Used to cream those round bottom "glass" sailboats @ the lake and they hated it!! Was looking around for a rowing scull kit. Mitch R.
>
killore wrote:
>Please don't blow this away yet!!! Several of us were
watching the
>boats on a local lake today when one asked, "Why are
the steering
> wheels on the right side of power boats?" Nobody
had an answer!
> Anyone there know the real reason???
>
> Thanks,
> Ed
ANSWER: If the propeller rotates clockwise, it will tend to lift the right side of the boat. The boat will ride more level if the driver is on the right side. Not all motors rotate clockwise, therefore it is sometimes advisable to put the steering on the left. - brw
Build more boats
Glen-L boats, of course