WebLetter 27
An Occasional Publication for the Home Boat Builder
Glen-L Marine Designs - 9152 Rosecrans Ave. - Bellflower, CA 90706
In this issue
- The Honker is here! - ahead of schedule
- On the Mark: Notes on the Riviera Engine Compartment
- How I make models from Glen-L plans
- Minimax Memories
- Designer's Notebook: Double Planking Hints
- The Connection: What do I really need to build a boat?
- Feedback: Jimbo - Aluminum
- Recent email
GLEN-L Update
- Web site:
- I used to keep a list of changes to the site, but any more the changes are so many and so often that I can't keep track. As always there are new Project Registries and Customer Photos. There are additional "Notes" pages in the Boat Design Catalog pages. There are still only a few designs that have them but several new ones are being added each month. The Notes pages contain a variety of different things, usually posted in response to a specific question. In time we hope to have Notes pages for every design, and add to them as questions arise.
- The following are sections that are regularly added to, with new
information based on YOUR letters, photos, and email.
- Customer Photos
- Project Registry
- How Fast?
- Old Boat Club
- Check back often to hear what others are doing, and be sure to share your project with your fellow builders. When you look through these sections and enjoy the input of other builders, think what your input will do for the next would be builder.
- We've had some great input in this WebLetter. Thanks Mark, Shawn, John, and all the others who have contributed. What about you?
Barry Witt
Editor
The Honker is here, the Honker is here!
What... you didn't know it was coming? Then you haven't been checking the NEW section... On the Drawing Board.
 |
 |
The Honker is a 15' duck boat; the newest addition to our duck boat collection. The Honker offers more room for dog, decoys and you. See the NEW section for more information. Only a limited number of Frame Kits were made in the first run, so don't wait or you may miss the season.
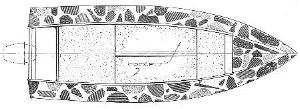
On the Mark: Notes on the Riviera Engine Compartment
by Mark Bronkalla
The Challenge
Two of the things that give the boatbuilder nightmares are what to do when you MUST modify the plans to suit your specific needs and also the "joy" of cutting big holes into your beautiful creation. The next few columns cover both of these topics. My first "big hole" was the angled hole prop shaft which kept me up nights worrying about it. The other one that caused lost sleep was the engine hatch. The hatch and its framing is what I cover this month in some detail.
This column is specific to the Riviera and Monaco, but is applicable to any of the other inboards where a hatch must be cut in the deck. The method used results in a beautifully fair and perfectly matched hatch. The downside is the traumatic step of taking a circular saw and sawing it out of the finished deck.
As a further point, not everything went smoothly. I made some mistakes, but was able to recover and cover my tracks. It did cost a few evenings of time in the process.
The 5.7 L engine is the common choice for this boat. Unfortunately, it does not fit the plans. It is too tall and depending on the transmission, it may be much too tall. To minimize the height, I went with the PCM 1.23:1 transmission. This provides an 8 degree down angle, so the engine only needs to be mounted at an 8 degree angle, to provide the final 16 degree prop shaft angle used with the recommended strut. In addition, the MPI (Multi-port Injected) version is shorter than either the carbureted or throttle body injected versions.
Now the deck must be raised to be able to enclose the engine. One of the other Riviera builders, Bill Yonescu, cleverly used a single hatch opening. This has a couple of benefits: Easier access to the engine, and reduced deck height due to not having center hatch edge braces running over the top of the engine. The lack of center braces allows the deck to be ~2-3" lower than using the traditional two hatches. After looking things over, I decided on this approach as well.
Install the engine
The center frame was cut to allow engine installation. The initial cuts are only large enough to fit the engine through. The ends are re-cut once the final hatch opening framing is figured out.
Get the engine into final alignment and verify that the engine mounts are roughly centered in their adjustment range. This is your last chance to do it the easy way. Later, once the deck framing is in place it gets MUCH harder to do the alignment.
Do not start the engine hatch area framing until the entire drive train installation is complete. I was lacking a transmission shaft flange and proceeded ahead anyway - and paid the price. (I thought it looked close.)
| Hot Items: Transfer Paper a must for transferring patterns to plywood Exposed drum steerer for small hydros... Sexy Glen-L T-Shirts and Caps You're a boatbuilder, flaunt it! New Designs
|
How I make models from Glen-L plans
by John Hurd
I have used the plans supplied by Glen-L. The plans come with views of all frames drawn to scale (1 in. to 1 ft.). I trace each frame view. Frames that are attached to bulkheads are traced in one piece. I decided that the critical area was the boat bottom and/or keel arrangement. The keel needs to be longer than to scale, to assure the bottom shape and/or rocker. The keel and stem should be cut as one piece. If the boat in question is a double ender, the keel, and fore and aft stems should be cut as one piece. If the boat has an external keel, the external keel can be used to define the rocker of the bottom.
Once the frames, bulkheads and keel are cut out, you can assemble them. This assembly can be accomplished in one of several ways, depending on the design and desired result. You need to decide whether you want to spoil the interior with an out of scale keel running throughout the boat. If the keel will not be visible, you can simply notch the keel and frames so they fit together. If this internal keel poses a problem and the design has an external keel, you can define the bottom shape by gluing the planking to an external keel and establishing a centerline on the inside bottom. This only works on designs with fairly straight lines from chine to chine. (Such as the Chessie Flyer - my first model.) You can now locate the frames along this line and glue them in place.
With the frames and keel glued up, you can begin planking. You will want to finish the interior before adding decks and cabin.
Materials:- 1 by pine for keel and stem
- 1/8 in. plywood for planking - door skins can be used, they come 3 by 6 ft.
- 1/8 in. plastic for windows
- wood glue
- various clamps
Most of the interior components can be cut from
solid stock and glued in place.
Masts and spars are dowels connected with screw eyes.
Sails can be traced onto ripstop nylon, add 1/2" to the outside
dimensions. Roll the edges and sew down.
Cushions can be made with 1/4" thick cardboard. Spray the cardboard with
contact glue and cover with fabric.
Minimax Memories
William Jackson... probably not a household name, but many people know his work.
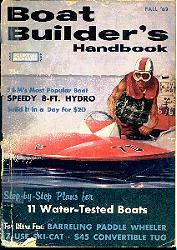
Circa 1960, boat plans were published in "handbooks" marketed by different major publishers on a semi-annual or "sometime" basis. The plans for MINIMAX appeared in the "Boat Builder's Handbook" several times. The publishers sold larger scale drawings and reported MINIMAX to be the most popular plan they ever published. The plans were of a printed type with, in those days, a minimum press run of one thousand. According to an editor, "many" reprints had been made. How many were built is unknown, but selling plans in the thousands means many liked the concept of the little MINIMAX.
We've been in business quite some time and people keep asking about one boat time and again. You guessed it, MINIMAX. So we have decided to "re-do" MINIMAX. We're changing a few things, refining others and bringing it up to date; but MINIMAX is essentially the same boat that grandfathers tell their offspring about. We will keep you up to date on how we are progressing in the NEW section of our web site.
It's regrettable that William Jackson never received the credit he deserved. He was a builder/designer who designed and built a tremendous number of boats. Most were in the under 20' range, but the variety was unbelievable. My collection of old handbooks has information on a 27' 6" sheet plywood auxiliary sloop that he built shortly after WW II. Mr. Jackson's designs included hydros, runabouts, ice boats, rowboats, canoes, kayaks, sleds, hydrofoils, and most types in between. Some were very unusual, perhaps weird, to many. However, he built the boats and tested them. He also worked on a very limited budget and used low cost materials; AC plywood was a common building material. According to one editor, Bill Jackson was paid very poorly and never did make more than a meager living. The plans became the property of the publisher and to the best of my knowledge, he never received a royalty. I've never seen his drawings, but was told that they were primarily sketches. The magazines did a nice job in their art department to present workable plans for his many offerings.
In his era, Bill Jackson probably had more of his boats built than most of the name designers combined, and we still hear from builders who are constructing one or are trying to locate one of his designs. It's a shame that someone doesn't research the man and write an article about his many accomplishments.
Designer's Notebook: Double Planking HintsMany vee bottom boats use two laminations of sheet plywood to form the contour of the forward bottom. The bend may be difficult or impossible with a single layer of the thickness required. Over the years we've tried many methods of applying double planking, some worked some didn't. In the following, we'll provide a few hints as to some procedures we found that made the task easier and provided a positive bond between the laminates. Frequently only the forward vee section of the bottom planking is made with two laminations of sheet plywood while the aft flatter section is applied in a single layer. Obviously, the two laminations must be equal to the thickness of the single aft plywood panel, two layers of 1/4" forward butting to one layer of 1/2" aft would be equal. Right? Possibly unless you get "scant" plywood. Yes Henry, math has changed; 1/4" plywood is not .25", 1/2" is not .50, etc., scant plywood is about 1/32" less in thickness. Now you understand why few understand "new math". True marine grade plywood is not scant, but much exterior is. In any case, be sure the double plywood layer thickness is the same as the single joining panel. Plywood bent around the bottom vee of the typical sheet plywood planked boat is convex in shape, a section of a cone. Depending on how the plywood is bent, the contour can change slightly, but perhaps enough to cause a void between the laminations. We've found that forming each layer of the forward vee in the same manner is desirable. This applies whether fitting or permanently fastening the plywood in place. Fasten the plywood along the keel to a point where the major curvature starts aft of the stem/keel junction. From that point, go out at about a 30 degree angle forward from the centerline in plan to the intersection of the chine and force the planking down. The angle is not critical and will vary from boat to boat. The principle is to fold the planking down from the stem to the chine; not fold from the chine to the stem. Each lamination should be bent and fastened in approximately the same manner and sequence. We prefer POXY-SHIELD with thickeners added as the adhesive between the plywood laminations. Silica #1 added to the activated resin to form a soft butter-like or thick syrup consistency will provide void filling capabilities with positive adhesion. Prime both contacting surfaces with activated resin followed by a generous coating of the adhesive rolled on with a short nap foam roller such as the Glen-L #08-529. Work quickly and have a helper; particularly if the area is large. How do you know if the two layers mate solidly together? Before applying the outer layer, drill some small holes in the outer lamination about 6' apart, well staggered inward from the keel, stem, and chine. When the outer lamination is bent in place, the adhesive between should come out of the holes. Try rapping the outer surface after application lightly with a mallet, it'll help fill small voids with the adhesive. There is also a different sound between contacting areas and those with a void. There are several methods that can be used to force the planking laminates together. If you are fortunate to be working in a garage or similar structure, use uprights extending from joists or other roof structure and wedge to the planking surface. Any number of these can be used to provide firm pressure and assure a positive bond between the glued planking panels. The planking layers can also be forced together by weighting the outer laminate to force it against its mating counterpart. Plastic bags filled with dirt or sand draped over the surface will form readily to the arced contour. Alternately or additionally, use temporary screws with a plywood washer under the head driven through both layers. For more tension, use a block on the underside to give the screw threads more pulling power, or use small bolts with washer blocks under head and nut. Washer blocks are usually 1/4" plywood about 2" square. A long strip of 1" wide plywood run diagonally from chine to keel or stem both top and underside fastened with screws or through bolted. Make sure washer blocks have a sheet of plastic wrap or wax paper between them and the plywood so they are not glued to the planking. A power staple gun is a fast way to drive fasteners and force the two layers together, but may not have enough holding power. Staples should be removed after the adhesive cures. Driving them through a strip of plastic filament tape will facilitate removal. After cure and removal of all temporary fasteners, fill the holes with thickened epoxy and sand smooth. The foregoing referred to applying planking in sheet form, however, the suggestions also can be used in cold molded construction. See our web site under "Boatbuilding Methods, Multi-Diagonal Planking". |
The Connection: What do I really need to build a boat?
by Shawn Auman
Shawn is a frequent contributor to the Boatbuilder Connection. His column is based on the questions that are asked there.
"Your reward is based on how you handle the challenge."Building a boat is both a rewarding project and a big challenge. The plans, terms, procedures, and materials are different from the typical home project. You will be taking standard dimension lumber, cutting it to approximate size with different angles, then cutting a new angle by hand as it is installed. Visualizing and building a three dimensional hull with complex angles and curves from a set of two-dimensional plans is a challenge. But don't get cold feet now, there is hope.
It is important to bring some knowledge to the project. Knowing the basics in any project is important. Expecting instructions or plans to give everything you need to know is foolish. Think about the time and money you are about to spend. Unless you are building a small dingy you will spend at least $500-$1000. When is the last time you spent that amount on a home project without doing some investigation first?
If you do electrical work in your home, knowing the difference between 120V, single-phase, and 220 would be wise. Even though there are simple instructions and easy diagrams on the back of a dimmer switch, you could burn the house down if you wire it into a 220 line. Boat building has its own special terms. Get a good book and read it from cover to cover. Even if it covers things you don't think you will be doing, read it anyway. The more aspects you know about, the better off you will be. I would actually recommend getting a couple of books to get different perspectives. The first ones I read were actually found at the local library. However, I ended up purchasing them because they were useful to have around during my building projects. Even if you do not build a boat, you will notice your carpentry skills increasing. Nautical terms are one thing; boat-building terms are almost another language. Learning the terminology is key to understanding the plans. Then when the plans say take a 5/16" batten and make a fair arch to build your jig, it will be done with confidence because you know what it means.
Feedback: Jimbo - Aluminum
The following is from the Project Registry
JIMBO-ALUM / Brian Burton / bburton@csnewfrontiers.qc.ca /
3-12-01: Started construction on the Jimbo Aluminum on March 12, 2001 with my
class of 8 students enrolled in a Welding Assembly course, purchased 5' x
16' aluminum sheets in order to eliminate as many seams as possible to
ensure structural integrity.
Day 1 we cut out the bottom in one piece instead of two separate halves,
removing the wedge piece at the bow from "0" to "4". We are
planning to score the outside part of the bottom half the thickness in order to
form the bottom "V" with ease and then weld the groove to fill it up
flush. Sides, Transom, and Bow were also cut, all the cuts were made with a
skill saw fitted with a fine toothed blade and then deburred with files.
Day 2 - March 13. Placed the bottom in the jig and formed it to fit the
"v" and then tacked the seam in the middle. Started to tack the side
at point #5 and worked our way back to the stern and then worked our way
forward to the bow. Placed the transom and the bow with small tacks.
Day 3 - March 14. Began welding the joints and seams up full starting
with the outside on the chine. Things are going well, too well.
Day 4 & 5. Spent these two days welding all the seams on the hull.
When the chines, transom, bow, and keel were finished welding we turned the
boat upside down and welded the underside of the keel.Drilled the hole in the
transom for the drain plug, we then flipped it back right side up, moved it
close to the door and filled it up with water while the boat sat in side the
jig in order to check for any leaks. The next morning (Sat. March 17) three
students and myself showed up to see if there was good or bad news, and to our
relief everything was dry under the boat. We then pulled the plug, sat around
and watched the water drain from the boat and told each other how good things
were progressing.
Recent email:
Subject: Hot Rod needs a home
Date: Wed, 23 May 2001 09:08:25 - 0700
From: John Porcella
Hello- I called yesterday about a project boat I need to part with. The
project is a Glen-L Hot Rod. I am the third owner- The original owner passed
away years ago, and I bought the boat from his nephew. The hull and deck
carpentry is complete. The hull was fiberglassed (7oz S-glass with marine
epoxy) about 2 years ago. The cockpit area is completely empty. No signs of
rot, or delaminations. It's in pretty good shape and just needs someone to
finish it up. I do not have a trailer and it is currently stored upside down in
my carport. My wife and my checkbook will not allow completion of the boat and
I would like to see it to go to someone who will finish it. I have the complete
plans and some reference material for the boat. Anyone who is interested can
contact me at one of the following. If I seem slow to respond, I am probably
traveling for work and will respond as soon as I can.
The boat is in San Jose, CA.
Thank You,
John Porcella
408-361-2024
porcella@ix.netcom.com
Attention: Glen-L builders in
Minnesota
Subject: Glen-L Fan Club
Date: Wed, 9 May 2001 19:06:05 -0500
From: "Paul Jacobsen" pejacobsen@peoplepc.com
Dear Mr. Witt,
I'm sure you don't remember it but I stopped by your place of business back in '72 and you gave me a personalized tour of your organization.
Since that time I have built one of your boats from scratch and have rebuilt one that was made by someone else. I have now located another older Glen-L boat that needs restoration.
I know how hard it can be to 'guess', without having anyone there to ask as a boat is being built. I always get over cautious and then I don't get any work done..... My question is this: Is there such a thing as a Glen-L fan club in Minnesota? If there was then there would be more of your boats that would be built.
I envision a Glen-L fan club as meeting monthly at the various sites that have Glen-L's under construction. I believe it would soon grow to dozens or even hundreds of members who all share the passion of this hobby.
If there is no such club, then may I have your permission to start one? I'd call it the Viking Chapter of the Glen-L Fan Club.
Please let me know what you think.
If you are building in Minnesota, let Mr. Jacobsen know what you think.
Subject: Celerity
Date: Mon, 14 May 2001 17:08:09 -0500
From: Tom Reid
Finished the boat and got it in the water last week. The results were
terrific!
The boat is very smooth and fast with the 90 horse Merc (60 mph+). The deep
hull keeps you nice and dry and the boat tracks straight as an arrow with no
bad handling characteristics at any speed. This is a great boat that will fit
in almost any garage. Thanks for the great design and frame kit. I have
included some pictures.
Sincerely,
Tom Reid
Mukilteo, WA
Subject: "J" class Runabout
Date: Thu, 12 Apr 2001 05:02:14 -0400
Thought that you might be interested in these photos. I bought your "J" class runabout plans and have built a modified version of the boat as a gas powered inboard model. The hull is about 1/2 (48" x 24") sized but has a six degree deadrise and uses a modified 25ccHomelite engine. The attention getter is the driver--a 28" tall guy named Willie (will he win?). Here are a couple of pictures
Subject: Guest Book entry
Date: Thu, 12 Apr 2001 13:51:10 -0600 (MDT)
Below is the result of your feedback form. It was submitted on Thursday,
April 12, 2001 at 13:51:10
---------------------------------------------------------------------------
name: Mike Fenton
Comments: You are so helpful----I wish I had known about Glen-L before I built my first couple of boats------I learned--But the hard, and expensive way!!!!
Mike Fenton
Friday, April 13, 2001 at 00:26:01
---------------------------------------------------------------------------
name: Scott A. Ochocki
Comments: Really pleased with the plans I bought, but even more pleased about the all the "Extras" offered by your web-site. The project registry and photos are a real plus. Now I'm in contact with a fellow in Dublin Ireland who is building the same boat, what a joy!
April 19, 2001 at 19:51:25
---------------------------------------------------------------------------
name: John Grubb
Comments: I am currently building the Minuet. I have been very impressed with the plans and instructions, they have been very thorough. I am not finished with this boat yet and am already looking at building another of your larger sail boats.
Subject: Two-man sculling skiff
Date: Sat, 14 Apr 2001 10:43:56 -0400
These are photos of the Sculling Skiff. This boat is an alteration of the plans and patterns provided by Glen-L. We adjusted everything, extending the fair lines, to create a two-man Sculling Skiff. The boat was built over the last 8 months as part of the senior project for two graduating St. Mary's College of Maryland students. Local high school students also helped in all aspects of the design and construction, and now they are getting the chance to experience rowing in the boat they built. The pictures are taken on the St. Mary's River in southern Maryland.
Clayton Culp
Jamie Wasser
St. Mary's College of Maryland, Class of 2001
Department of Mathematics
cwculp@osprey.smcm.edu
Below is the result of your feedback form. It was submitted on Wednesday,
May 23, 2001 at 00:32:54
---------------------------------------------------------------------------
Comments: I have a set of plans for the Ski King that my brother and I purchased in high school and have promised myself it will be my next project. Great site with good stuff. Thanks kennyo
The Ski King is no longer in our catalog, but is available through this web site. Click here for more information.
Build more boats
GLEN-L boats, of course