WebLetter 30
An Occasional Publication for the Home Boat Builder
Glen-L Marine Designs - 9152 Rosecrans Ave. - Bellflower, CA 90706
|
Our thoughts and prayers go out to all of those affected by the terrorist attacks in New York, Washington DC, and Pennsylvania. No part of this country has been unaffected and I'm sure we all offer support to our nation's leaders in their efforts to help those affected and to bring the culprits to justice. I believe it is also important to remember that this is a nation of immigrants and that we not take out our frustrations and anger on our fellow citizens who may be of the same nationality of the terrorists. I would also like to share with our readers that we have repeatedly been offered sympathy by our foreign customers. In this tragedy, we are one people. |
In this issue
- Featured Design: Ski Tow/Malahini
- On the Mark: Tool vs. material tradeoffs
- Cruising the Tennessee River in a Cabin Skiff
- Designer's Notebook: Transom Reinforcement
- Shop Talk: Alternative Rub Rail
- Glen-L design in the news
- On the drawing board: Mahogany barrel-back runabout
- Feedback: Sherwood Queen
- Recent email
GLEN-L Update
- Web site:
- We have had a hard time keeping up with email, new Project Registries, and Customer Photos. Many of the photos have been added to previous files, showing the next "stage" of construction.
- As you click through the various pages of the Glen-L site you will notice many pages are in a new format. This is part of a project to write the code in the most recent html format. This is all done by hand (no automated program), so will be continuing for some time.
- WebLetter
- In our last WebLetter, we featured canoes and kayaks. The idea was to give additional information that is not available elsewhere on our site. This issue features the Ski Tow and Malahini with a pictorial showing the construction. We will feature additional designs in future WebLetters. We plan to have a sailboat issue, so anything you sailors would like to contribute would be appreciated.
- Those of you who have read past WebLetters will be familiar with Ray Macke. I am very happy to include his story of cruising the Tennessee River. I know of few people who have so thoroughly enjoyed their boat. This is great reading.
- In answer to several questions concerning transom reinforcement for heavier 4-cycle outboards, see "Designer's Notebook" below.
- There is a very brief write up on out next "mahogany runabout" in this WebLetter. Because of other projects now underway, this will not be a rush job; but hope to have it ready within 2 to 3 months.
- I again thank Mark Bronkalla for his continuing column, as well as George Remington for his "Shop Talk" contribution. I urge all of our readers to share their thoughts and boatbuilding experiences with their fellow builders. As you build your boat you are best qualified to give helpful advice to would-be builders.
Barry
Witt
Editor
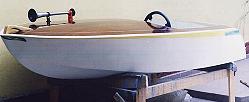
Featured Design: Ski Tow/Malahini
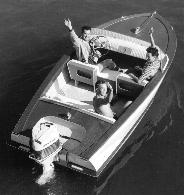
The Ski Tow and Malahini are two classic outboard runabout designs based on the same frame patterns. These are great designs for builders who want "the look", but who aren't comfortable with inboard engines. These designs faded in popularity when the low profile v-drive hulls came into vogue, but they're back now. The new popularity of these designs and the Audeen and Mist Miss inboards is the reason we designed the Riviera and Monaco a couple of years ago. And the reason we have another mahogany runabout on the drawing board.
But unlike the mahogany runabouts, these hulls are designed to utilize sheet plywood, making them a much better project for the beginner. The compact 14'8" Ski Tow is easily trailerable and a great choice when storage space is limited. The 16' Malahini offers more room for carrying passengers and gear. Both designs look great with a natural deck and painted sides, scrounged period hardware, and an "antique" motor.
The links below will take you to the catalog pages for more information on the designs. The Construction Pictorial shows the construction process, using over 40 photos to give the potential builder a realistic idea of what is involved in building these two "instant classics".
On the Mark: Boatbuilding Tools - Part 2
Tool versus material tradeoffs
by Mark Bronkalla
Since we normally do not have unlimited budgets or shop space, each stationary tool addition requires some careful thought and planning.
Here we are primarily looking at whether that new stationary power tool is worth it. While you may lust after the shiny hunk of cast iron on the show room floor, in the back of your mind the following questions come to mind:
- Can I really afford it?
- Is it worth it?
- Where do I put it? You can fit in twice as many tools if you have caster bases.
- How much will I really use it? This includes on this project and subsequent projects. You may even want to sell it when you are done with the boat.
- How much will I need to spend in accessories (blades, fence, etc.) so is can actually be useful.
- After the project, will there be any useful life left in it?
The "can I afford it" question usually first balances this (big) tool vs. a few other smaller tools or secondarily tools vs. materials. Another question buried in the "Is it worth it?" part is whether it will offset enough hours of hand work or reduced material cost to immediately cover the cost of the purchase.
The useful life question most often comes up with hand tools (especially sanders), but when ripping a lot of stock, destruction of motor, belts, blades and bearings is a real risk.
The scope of the tool investment logically goes up with the scope of the project. What may be tolerable for a small project, becomes impossible to deal with for a large one (Try fairing the hull of a 20-50' boat with hand tools alone). So, how do I justify it?
The easiest trade off is tool versus material. For the Riviera, a mahogany planked hull is required. In costing out the boat, I attempted to find the recommended veneer and planking. The veneer for the inner laminations was not to be found at a rational price. The outer planking strips could be found at about 90 cents per linear foot for 1/4"x2" strips. This translates into ~$20 per board foot which is more than normal sized pieces of mahogany go for locally (~$5-6 per board foot).
The questions then are:
- Can I make these strips with reasonable sized (not industrial sized) piece of equipment?
- Can I justify the purchase of it?
For my rule of thumb, the justification is easy / rational if I can cover >50% of the cost of the tool in the immediate project. If I run the numbers, and come up with 10%, then I need another reason to justify the purchase (It can even be that it is just a fun toy, but do not kid yourself.)
Cruising the Tennessee River in a Cabin Skiff
by Ray Macke
It's three o'clock in the morning, very dark, drizzling rain and here I am making my way across Kentucky Lake looking for a sheltered cove. I know there is a shore over there somewhere but I'll be darned if can see it. An old proverb says that a trip of a thousand miles begins with one step and I am sitting here at the wheel thinking I am about to stumble trying to take it.
For a couple years I have had the urge to do some serious river cruising. I have been a boater more than twenty-five years but have seldom ventured far from home. I am fortunate that with in an hours drive I have the choice of several nice lakes and rivers. But lately I find my view of them has become routine and I developed a burning desire to explore new water.
In fact, the yearning was so strong I built a small boat specifically to make long river trips. The finished product is 18-foot, all plywood and powered by a 50 hp Honda four stroke outboard. There is a small berth that will sleep two and the cockpit is enclosed. Equipment is minimal but includes a mapping GPS, depth finder and handheld VHF radio. No, I won't be traveling in the lap of luxury but it will cruise at 26 mph and yield better than 9 mpg. Like many people our household has budgetary constraints and although boating is high on my list it is still below making the mortgage payment. For me, at this time in my life, this is the perfect boat. A few of my friends have said it is way too small for this type of cruising but I am about to try to prove them wrong.
Even with somewhat limited experience I still knew that heading out for several days down unknown waters is a whole different game than spending the afternoon at the lake. Obviously some planning was in order. I decided a Tennessee River chart from the Corps of Engineers and a Quimby's Cruising Guide were both mandatory equipment and obtained copies of both. After a few short shake out runs I felt I was ready and decided on a 900 mile adventure on the Tennessee river.
The plan was to trailer my boat to the top of Kentucky Lake near Paducah, KY and head upstream to Chattanooga TN. The chart put the mileage at 442 and since this was to be a round trip that number would be doubled. My best guess that it would take six days to make the run. The actual mileage could be covered in just four days but I knew it would probably take considerably longer. The problem was that I would need to pass through five locks each way. And I had learned from experience that delays can range from 40 minutes to more than four hours at each! So the plan was for six days to be on the safe side.
One of the reasons I choose this trip was the abundance of marinas along the way. This would make fuel management a minimal issue. Also, with a little luck each day I would be able to reach a marina or town with a restaurant for the evening meal. With no cooking facilities onboard, lunch would be sandwiches from the ice chest so a decent meal in the evening would be welcome.
My planned day of departure finally arrived and as usual something came up at the office and I got away late. By the time I dropped the boat in at Green Turtle Bay Marina on Lake Barkley it was almost dark. I thought for a moment about leaving it on the trailer and just sleeping there but this was a "boat" trip and the idea was to spend the time on the water not a parking lot. I backed down the ramp and slid it in the water.
There was a light rain falling but I quickly made the two mile run on Barkley and through the canal to enter Kentucky Lake at about the 25 mile marker. The wind was out of the east so I decided to anchor along the eastern shore for shelter. I pulled into a small cove that was fairly open to the lake, but since the wind was from the opposite direction the water was calm. I thought it would work just fine for the night. This was mistake #1. I dropped the anchor and I decided just to attach the rope to a cleat in the center of the hull rather than go out and walk around the cabin in the rain and use the forward cleat - mistake #2.
All was well until about two o'clock when the wind shifted and started out of the northwest. The waves really weren't that large but the boat was sitting sideways to the wind because of the centered anchor cleat. The waves were smacking the hull making noise and causing it rock enough to keep me awake. Not knowing if it would get worse I decided to head for the opposite shore about a mile away and find a more sheltered cove.
The clouds had completely swallowed the moon and in the dark the lake and shore had become one. Fortunately I had the mapping GPS and it allowed me locate a suitable spot and then direct me there. I took it slow and had no problems. Crawling back into the berth I hoped that this wasn't a preview of things to come.
Next
page
I could have simply made a link to Ray's site and told
you to go there and read this story, but I enjoyed it so much that I wanted to
have at least part of it in our WebLetter. If you enjoy this story, I urge you
to visit Ray's site for more about his Cabin Skiff Odyssey.
Transom Reinforcement
|
Shop Talk: Alternative Rub Rail
George Remington
I was more than somewhat depressed by the fact that the guard rail strips (1" brass half-oval ) for my 26 ft. Hercules would have cost me about $700 Canadian for the 108 ft required to run both the sheer strake and the knuckle rail at the lower sheer. After considerable headscratching I came up with an alternative which has a lot going for it, ultra-high density polyethylene. I bought this in sheet form and machined it on the table-saw for a nice bevel on the bottom and routed a 1/4" round on the top. After a trip across the joiner-planer, it was as smooth and pretty as if from mahogany. Total cost about $300 Canadian, and it looks terrific in black.
I bedded the strips in silicone after dry-fitting, and mounted with #10 x1 1/4" s.s. pan-head screws recessed and covered with black life-caulk. These strips are a perfect fit to the beveled mahogany rails, which the half-oval would not be.
This material is so hard and slippery that it should be very nearly impervious to damage. It is used as fender pads on the BC ferry landings and takes the bash of repeated bad landings without a mark, something even steel didn't do.
Glen-L design in the news
From the September/October 2001 "Launchings" pages of WoodenBoat magazine:
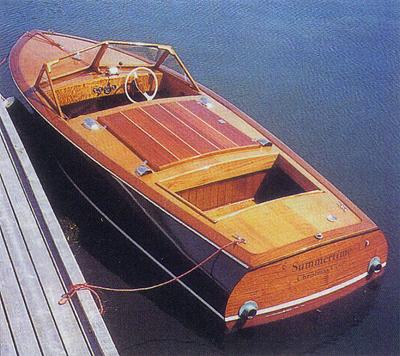
Working to plans from Glen-L Marine, Henry Thorpe built this 20' runabout. Powered by a 351-cu-in V-8 engine, SUMMERTIME can reach 53 mph - a speed that Henry describes as "way too fast". Plans from Glen-L Marine Designs, 9152 Rosecrans, Bellflower, CA 90706. Henry Thorpe, Middle Haddam Rd., Middle Haddam, CT 06456.
Mr. Thorpe built the Glen-L "Monaco".
On the drawing board: Mahogany barrel-back runabout
If you take a stroll through our Customer Photo pages you can't help but be impressed with the photos of the Monaco and Riviera. These are very popular designs, and why not? If you want one of these classically styled runabouts, you probably can't afford to buy one... but many builders can afford to build one.
We now we are working on another choice, a 24' LOA x 7'2" barrel-back that were are calling Monte Carlo. The boat will have 3 cockpits and an in-line motor like the Monaco and Riviera. Glen has just begun to layout the lines, so don't look for this in less than two months (min). We'll keep you informed of the progress.
Feedback: Sherwood Queen
Characteristics:
Type MINI-TUG
LOA 15' 6"
Beam 7' 4"
Hull Depth 3' 11"
Height overall 7' 4"
Weight (approx.) 1000 lbs.
Type Semi-Vee /Hard Chine
Attached Accessories: VHF Radio, Depth Sounder, Fish Finder,Remote controlled
spotlight.
I was looking for a retirement project, plus a boat I could put to practical use. I selected the "Sherwood Queen" as the project. We live on a small island in South Puget Sound and we must put up with very limited ferry service. We needed a small boat that could serve as transportation to the mainland and keep us out of the weather. It sometimes rains in this area. I figured with the broad beam and hull design that the boat would be very stable. I was not disappointed. I lengthened the cabin and put in sliding glass side windows with a tilt out front window so we would be dry for the 1 1/2 mile ride to and from the mainland.
To compensate for the added weight above deck I used 140 lbs. of concrete ballast in the bilge. I don't know what the designers think of this. But it stabilized the boat even more.
I put cushioned benches on each side of the cabin wall and this allowed me to carry three passengers in dry comfort. With our short days during the winter I added running lights, motorized spot light, with an electrical panel that allowed for hooking up a depth finder, windshield wiper, small fan to keep the windshield clear, and interior lighting.
The boat was constructed with mahogany frames, stringers, and plywood. I
also used clear straight grain Sitka spruce that is light and strong and when
epoxy is applied it is nearly indestructible. The boat is a displacement design
and isn't fast, 8-10 knots 12 with a tail wind, but she is stable, dry and
reliable. We have been using the boat "Little Toot" for commuting six
years now and the only thing I would do to this design is lengthen it by 2
feet, which I think it would improve the handling in a following sea. With a
new EZ loader trailer I had a package that cost 8K including the 35 hp Johnson
I hung on the transom (the recommend motor for this boat is 10hp). It took me
two years to build even with open-heart surgery during the building period. The
plans were excellent, detailed enough that when I made my cabin modifications I
felt confident that they would work. I exceeded the designed purpose of the
boat but it has served us well.
Frank Stiles, Ketron Island, WA
Recent email:
Subject: My G.L. boats
Date: Sun, 9 Sep 2001 11:30:19 -0700 (PDT)
From: Frank Cassianna
Just thanks for being in business...
I've been using both with friends and by myself my Seakayak and canoe
fishing on the Spayge River, where I've recently purchased some water front
and I'm in heaven. Thanks to the fine building instructions and materials
from Glen-L. Thank you all ... Frank.
Subject: Tubby Tug Completed
Date: Fri, 31 Aug 2001 18:47:19 -0400
From: John Calande
Hello everyone,
As promised, here are more images of the completed "Tubby Tugboat". I launched it 2 days ago (August 2001) in salt water and she did outstanding. The trailer pictures were taken prior to final touch-up painting.
I've kept a record with images from when I started in March 2000, the
building process can be found here:
http://home.maine.rr.com/shipcove/gettingstarted.html
Thanks again!
John Calande
Cape Elizabeth, Maine
Subject: More pictures of my Riviera
Date: Fri, 31 Aug 2001 13:01:15 -0400
From: Terry Mortimore
Hi Gang:

Here's the latest shots of my Riviera. We launched in July and have been using Amelia a lot ever since. Other than a few minor snags the boat has been a real pleasure and always draws lots of comments. This winter we plan to install the upholstery, carpet and finish the varnishing in the cockpits.
The boat was named after my 92 year young grandmother which you see doing the honors with the Champagne.
Thanks for all the help, Terry
For more pictures of Terry's boat see Customer Photos/Riviera.Subject: L'DORADO circa 1957-1959
Date: Fri, 31 Aug 2001 20:39:24 -0700
Glad to see your company is still thriving! I built an L'Dorado while in
high school in Vallejo, California. My boat ended up with a Ford V-8 60 motor
and a Halibrand V-drive with an 8 degree angle in the shaft log if I remember
correctly. I made plywood "cavitation" plates with turnbuckle
activation and had an exterior mounted rudder on a cast aluminum bracket made
for that purpose.
It was a nice boat, but the passenger count went to 2 as the middle seat had a
shaft tunnel with the throttle mounted on it. The boat ran well and the V-8 was
sold when I went into the Air Force and was replaced with a Ford Falcon 6 upon
my return. It was sold for college tuition and I have no idea where it
went.
If you get some info about and inboard version of that boat, it was probably
mine....
Keep up the great designs.
Best regards,
Matt Guzzetta
Subject: Tnt
Date: Tue, 28 Aug 2001 16:37:46 -0500
From: Roquemore Rocky
Thought you could use this in your registry. I do update this often.
Thanks,
Rocky
Subject: Hydrofoil on TNT outboard?
Date: Tue, 28 Aug 2001 10:39:17 -0700
Just wanted to let you know I installed a "Doel Fin" hydrofoil on
my TNT motor, a 25hp 4-stroke Yamaha. What a difference! All tendency to
porpoise disappeared and it planes at a much slower speed. I strongly recommend
it. Rick Meyer
PS ...but it didn't increase my top speed.
Subject: bass boat
Date: Mon, 20 Aug 2001 13:30:16
BASS BOAT / Neil Gaughan / kb7c@qsl.net / 8-20-01: The boat is finished and has been launched. I am attaching several .jpg images showing the finished boat. I even threw one in showing the trailer, which was modified from and existing one, but along the lines in your trailer book. The engine was mounted last week and the boat tested at Lake Patagonia, AZ on Saturday August 18. It performed great under power, top speed was 25 mph as measured by a following boat trying to match speed. The engine is a 1989 Johnson 40HP, just rebuilt and running like new.
I did finally find insurance, from Haggerty. It was very reasonable and I got coverage for both boat and engine.
Thanks for your great support throughout the project. I am sure a lot of my questions seemed like they were being asked from a very naive person, and they were. But then, look at the final product. The design works!! When we launched it last weekend, there were a bunch of people drooling over the boat and couldn't believe I made it myself. Now that felt good!.
Neil
Subject: Airboat
Date: Sat, 11 Aug 2001 22:32:05 -0700
From: Joe Wahl
Hi Barry....my son and I built the glen-l airboat and I thought you might like this little information...almost a year after we finished the boat...Airboat World Magazine did an article on it for the July issue....go to www.airboatworld.com ....c-ya joe wahl..
Subject: Question about the MINI MAXED
Date: Thu, 09 Aug 2001 08:28:08 -0700
Good morning to all,
One quick question about the hp. for the outboard. The question is this; The
original plans was for a 3 - 15 hp outboard, I had a 10 hp Mercury Hurricane on
mine back in '67 and it ran like the wind. I noticed on the MINIMAXED it is
recommended for a max of 5 hp. Is the transom design exactly the same design as
the old mini max ??? Or, will yours handle a 10 hp. Merc. Believe it or not, I
still have the one I had back then. It has not been run in over 25 years, but I
still have it. I bought a set of the original plans but I was hoping to buy
your plans because I remember how interesting it was to make the bow cut back
then. Your improved version has got to be easier... I have never heard of the
stitch and glue system, could you explain it to me??? This sounds like the way
to go to me...
Thanks for your time, and thanks for the update,
Allyn Nichols and Daughters
++++++++++++++++++++++++++++++++++++++++++++++++++
Answer: In the sixties, the government was not in the act and you used any power you wanted. Today the US Boating and Safety Act dictates a rating system that gives low ratings for small outboards. The MiniMaxed has a reinforced transom that is stronger than the original.
As for Stitch and Glue, see our site: Boatbuilding Methods/Plywood.
--
Barry
Customer Service
Below is the result of your feedback form. It was submitted on Tuesday, July
31, 2001 at 21:54:07
--------------------------------------------------------------------------
name: Don Kernan
Comments: nice to see you are on the Internet. I think I built my first Glen-L boat about 40 years ago from a paper back magazine that featured home made wooden boats to build from plywood.
Subject: Problems with my Riviera
Date: Sun, 05 Aug 2001 21:01:12 -0400
From: Terry Mortimore
Hi Gang:
My Riviera was launched for the first time two weeks ago and it has been a hectic couple of weeks. Over all I'm very pleased with the boat and have had many, many complements on it.
Unfortunately it has scared the sh*& out of me on three separate occasions and I can't figure out what is going on. What happens is that at about a 30 mph cruise and starting a slight turn to the left the front of the boat will start an uncontrolled turn to the left and the nose will start to dig in. The first time it happened I thought it was going to submarine on me, but it does not go completely under. Immediate opposite rudder has no effect and the only cure is to pull back the throttle and let it settle down and start over.
It almost feels like the nose is digging in and the rear of the boat raises up which aggravates the problem. It has not happened to the right yet, only two the left. I have a left hand turning engine (counterclockwise) and the helm is on the left of the boat. It has happened with various loading configurations and at slightly different speeds.
I have to change the geometry of my steering linkage, I'm only getting 30 degrees travel left and right of center and it does not turn in a very tight radius. I don't think this would cause my problems though.
I have my doubts but, I'm wondering if a skid fin would help correct this?
Any thoughts would be appreciated, terry.
++++++++++++++++++++++++++++++++++++++++++++++++++
Answer:
Terry,
We would assume that a wall of water appears on the right side and a plume of
water arises from the prop area. This is not uncommon in speed boats of this
type, however, this is a "first" for the Riviera.
The condition is caused by rudder cavitation; the rudder is virtually in an air pocket. A rudder close to the water surface, with a wide blade area at the top, or extending aft of the transom to any extent will cause the problem. The rudder specified on the plans (our 90016) is of a shape that usually eliminates the problem, if not close to the transom.
An almost sure solution is to put a cavitation plate behind the rudder. This
is simply an extension of the bottom aft; it needs to extend 6" to 9"
and be 18" to 24" wide. If you have drain holes in the transom, you
can through bolt a temporary wooden extension of 3/4" plywood and give it
a try. The turning problem can be dangerous - correct it ASAP.
--
Glen
Subject: Squirt in Brazil
Date: Thu, 2 Aug 2001 18:27:59 -0300
My name is APARECIDO SANTIN, I made an order of the "Squirt" in the name of Valter Fernandes Garcia, because I don't have an international Visa. I received the Plans and I'm very grateful. Thanks for your help. The boat is finished and is beautiful.
Aparecido Santin
Subject: Re: Guest Book entry
Date: Sun, 29 Jul 2001 20:56:37 -0400
Received fabric and epoxy to use with it a day or two ago. Spent most of the weekend installing stringers in the 19' MFG power boat I am restoring. Materials work great. Like the lack of smell in your product. Working properties are perfect and it dries with a very strong bond.
Stan Pratt
Honesdale, PA
Build more boats
GLEN-L boats, of course