WebLetter 32
An Occasional Publication for the Home Boat Builder
Glen-L Marine Designs - 9152 Rosecrans Ave. - Bellflower, CA 90706
In this issue
- Gift suggestions
- On the Mark: Stainless steel fasteners
- Exploring the Green River
- Designer's Notebook: Fastening sheet plywood to frames?
- Feedback: Renegade
- Feedback: Bandido performance specs
- The "Red Dart"
- Visiting expert - Planing the Tiny Titan
- Recent email
GLEN-L Update
-
Web site:
- Our reformatting of the web pages to conform to future format standards plods on. Over 4500 pages, with about 30% left to be updated.
- "Notes" have been added to several design pages, including information that has been specifically requested by our visitors. We will be adding more as we have time.
- Many more pictures and Project Registries have been added. Are you in the Registry?
- Mark Bronkalla has given us a good explanation of why stainless steel may not be the best choice for boatbuilding in this WebLetter. This is something that is frequently asked about and we are glad to have Mark's article to refer to.
- Speaking of... Mark dropped in for a visit last week from Wisconsin. We always warn visitors that there's not much to see since we are primarily mail order, but are always glad to meet Glen-L builders.
- Tony Urbizu's article about Cuba, his father, and the L Dorado is a great story; we hope to be able to publish more stories of this type from other builders. Perhaps you want to commemorate your father's project or that Tiny Titan you built in High School?
- The Monte Carlo design project has met with some delays; Glen now hopes to have this barrel-back mahogany runabout ready by January.
- Christmas is coming. We have included a list of gifts that may help you answer that "What do you want for Christmas?" question. I don't know if we will post another WebLetter before Christmas, so I would like to take this opportunity to wish all of our readers a happy holiday season from the Glen-L staff.
Barry, Gayle, Glen, Darla, Allyn, and Alfredo
Checking it twice...

This time of year we get a lot of orders "to arrive in time for Christmas". Frequently we are asked for suggestions from spouses who have no idea what their boatbuilder might need or want. The following is a list of some basic items that builders and dreamers might want, but are not specific to a particular boatbuilding project.
- Transfer paper - I received an email today asking the easiest way to transfer the patterns to the wood... at $7.95 for a 2' by 16' transfer sheet, this is the answer and makes a great stocking stuffer.
- T-shirts and caps - Someone in your family is building a boat? Our Boatbuilder T-shirts and caps make the perfect gift.
- Books - For those who are building a plywood boat, Boatbuilding With Plywood ($27.95) and How to Fiberglass Boats ($18.95) are a must. Prepare yourself for your boatbuilding project and refer to them while building. No other texts deal with the subjects as thoroughly. And if your builder is working on an inboard project, Inboard Motor Installations will provide valuable information that many builders learn only through costly experience. For these and more books for the boatbuilder, see our Boatbuilding Books pages.
- Videos - Let's face it, books are not the answer for everyone. Our "Stitch and Glue Boatbuilding" ($33.95) and "How to Fiberglass Boats" ($32.95) videos are a way for the whole family to share in the project. These videos show the potential builder just how easy these methods are, with loads of practical advice that is not always communicated well in a book. (Unfortunately, we do not have a video on regular plywood construction.)
- Oars - This may seem like a strange choice, but last year these oars were a popular item at Christmas.
- Safety kit - This is something every builder should have, and frequently don't order. Protect the builder in your house with a Glen-L Safety Kit.
- Application kit - This is another item that your builder needs, but has tried to "make do" with stuff around the shop. Don't use your best brush or wasteful paint roller to apply epoxy, order our Application Kit.
- Poxy-Shield® epoxy resin - Chances are that if your builder has started building, he has already purchased Poxy-Shield®, but if not... this makes a practical gift. For gluing applications, we recommend also ordering our #1 Silica filler.
If you are ordering for Christmas, please order early to allow for the extended shipping times caused by the current emergency.
Merry Christmas from the Glen-L staff.
On the Mark: Stainless steel fasteners
by Mark Bronkalla
Every so often, boatbuilding points out that the correct answer to a problem is not always the obvious one.
There have been many questions regarding which type of fastener is best; whether galvanized, bronze or stainless. This is complicated by the lack of readily available bronze vs. the ready availability of stainless.
In a Boatbuilder Connection thread a while back, it was pointed out that stainless will corrode terribly and possibly completely in the absence of oxygen (needed to oxidize and therefore passivate the surface). This did not sit well (not fitting with common sense to me). That coupled with a recent thread on rec.boats.building gave me the drive to find the answer. In addition, over the years I had found a number of bolts and screws that had oddly "necked down". I had blamed this on vibration and mechanical erosion, but with some misgivings since the threads were still present but at a reduced diameter. With further research, a light (finally) went on and I realized what I had seen was the corrosion of the metal.
Stainless steel is "stainless" due to an outer oxide layer forming which resists further corrosion. If the oxide layer is damaged or abraded, then oxygen from the atmosphere will react with the newly exposed metal to form a new oxide layer.
If immersed in liquid containing chlorine or other ions (courtesy of salt water, fresh water impurities, and solutes from the wood itself) in an enclosed space, the metal is attacked. The oxygen becomes depleted from the solution before the other (attacking) ions, and the metal erodes quickly and sometimes completely.
Because of this, bronze is definitely the material of choice below the water line and for through-hull fastenings, whereas stainless may be used above the water line where the joint has a chance to dry out and the oxygen is then replenished. While there are high quality stainless materials available that resist attack, they are not easily found by the amateur whether from a marine supplier or the local hardware store. In addition, they are high cost items.
Galvanized is a lower cost alternative, but you must be careful not to nick or wear through the zinc coating or the steel will corrode anyway. With carriage bolts, the lack of an ability to "trim to fit" is a problem. It is very convenient to be able to buy just a few sizes of bolts and then cut them down to length as needed rather than stocking the many sizes needed, and not having this option is the major downfall of galvanized.
When referring to galvanized, this generally means hot dipped (rough). The galvanized "deck screws" (smooth and shiny) you find at the home center don't count. I recently did some maintenance work on a dock which had been assembled with galvanized deck screws and the majority of them snapped off . Those that did come out were severely rusted and necked down. This is in the upper Midwest with fresh water and cold winters. In a more severe climate (for rusting anyway) I would expect that the dock's deck planks would have lifted right off with little effort.
On my own boat, the through-hull fastenings are bronze to match the castings. This is due as much to matching the materials for minimal electrolytic corrosion as to finding a good deal locally on the bronze bolts. So, in my case, the correct hardware is present on the outside and through the hull. On the inside, I will check the shaft log in the spring as it was fastened down with stainless screws. It is too late now, for this year, as the boat is covered up and we are to get our first significant snowstorm of the year this weekend.
For further information:
http://www.alberg30.org/maintenance/ruddershoe/
This is a very nice description of the problem with photos.
http://marinesurvey.com/yacht/corrosion_1.htm
This is from Dave Pascoe's site. He is a professional marine
surveyor. This site is very helpful for finding out what NOT to do. His
explanations are excellent and does not mince words (condemning poor
construction). I found it to be very useful to read about what an
experienced marine surveyor looks for and then tried to figure out ways
to avoid the cited problems. Reading some of his tirades (otherwise known
as informed discussions of the lack of quality in modern fiberglass boat
construction) will make you feel better about building your own boat
versus buying and possibly restoring a fiberglass boat.
http://www.hghouston.com/n032298.html
A bit more scientific and with a bibliography if you want to read more.
http://www.mcnallyinstitute.com/04-html/4-1.html
This also contains a list of metals and relative corrosion resistance.
Google search on: Anaerobic corrosion of Stainless steel
Next month: Epoxy fillers and color matching.
We are very pleased to have Mark sharing his expertise with his fellow boat builders. If you would like to comment on this article to Mark, he can be reached at "builders at bronkalla.com". Replace the at with @. (Just trying to dodge a few spammers). See Mark's great web site for information on his Riviera project.
A great BRONZE screw and boat nail source
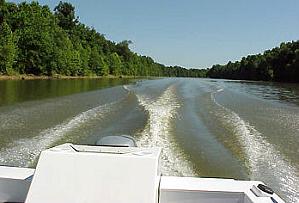
Exploring the Green River
by Ray Macke
And the coal company came with the world's largest shovel
And they tortured the timber and stripped all the land
Well, they dug for their coal till the land was forsaken
Then they wrote it all down as the progress of man.
And daddy, won't you take me back to Muhlenberg County
Down the Green River where Paradise lay
Well, I'm sorry, my son, but you're too late in asking
Mister Peabody's coal train has hauled it away....
In the early 1970's I enjoyed the music of John Denver as did many young adults. The words to one of his songs had a familiar theme and have always stuck in my mind as result. I had been born and raised in Southern Illinois coal country and Peabody Coal Company had a major presence in my area. In fact, my father worked for Peabody for most of his career and I too spent a couple of years working at one of their mines. The Denver song "Paradise", quoted above, made reference to the destruction that was a byproduct of strip mining and named Peabody as the perpetrator - that was kind of cool when your 20 years old. (The song was written by a Kentucky native, John Prine, who was later sued by Peabody Coal because of the reference to their mining operations.)
Designer's Notebook: Fastening sheet plywood to frames?Building boats planked with sheet plywood started around the WW II era. Before that, the adhesives used to make plywood were, in short, worthless for marine application; the plies would delaminate in a heavy fog. After the adhesives were improved, it took a long time before professional boatbuilders would use plywood because of its previous problems. Builders of the time planked boats with solid wood with many seams. When plywood started to be used, builders logically built the same framework and attached the plywood in the same way as they had done with planks. Rarely did that work out. Boats planked with sheet plywood wouldn't conform to the shape of a planked boat. A surface developed from a segment of a cone or cylinder was required to enable the sheet material to bend to natural curves. The method is known as "sheet plywood development". Most builders retained the closely spaced frames with many longitudinals and a zillion fasteners. Then someone reasoned that all that framework wasn't required . Further down the road, many production boats were monocoque; the boats were built over a form with stem, transom, chine and sheer the only framework members. After the hull was removed from the form and righted, they were reinforced with internal framework, primarily longitudinals. This eventually led to current Stitch and Glue boatbuilding. But before that progression, the sheet plywood boat framework resembled that of its predecessor, the planked boat. At about the same time, more powerful motors such as the automotive V-8's were converted and installed in the new plywood boats. This was before the advent of superior epoxy adhesives and epoxy based putties for fastener holes. At higher speeds, the putty over the countersunk fasteners would come out, water would catch the outer plywood lamination and eventually rip out the outer plywood lamination, starting at the screw hole. This condition was primarily observed across the plywood at frames that contacted the bottom, longitudinal fasteners caused minimal problems. The logical solution was to eliminate cross fastenings in the bottom frames, and it worked. Some builders even went so far as to relieve the frame so it had no contact to the bottom planking. This also worked well and today is quite common in faster sheet plywood boats, although in slower boats the frame contacting the planking is still prevalent. However, fasteners are preferably NOT used across the planking in any sheet plywood boat. Fairing a sheet plywood boat framework so the planking will perfectly contact the frames is wonderful in theory, but virtually impossible in practice. The frame will either contact the planking causing a hard spot or the reverse. In many sheet plywood boats, side battens were eliminated or minimized and this accentuated any out of sync frame. Fasteners driven into an out of sync frame causes a visible bump or dish that will mirror through the finished planking. This becomes more visible on dark painted sheet plywood planked sides. Eliminating fasteners and relieving the frames so they did not contact the plywood solved the problem. Many die hard builders and older texts still retain the notion that sheet planking should contact frames. The latest practice allows the sheet plywood to take a natural bend; it isn't being forced against framework to form an unnatural compound curvature. Many have questioned why we do not advocate fastening into frame on sheet plywood boats. The foregoing is our reasoning and is proven in practice. Should the planking be glued to the frame? Why not? Thickened epoxy adhesive on the frame will fill in the void and make positive uniform contact as developed by the planking. Plus it's a preservative for the otherwise exposed frame edge. A boat built using the described procedures will not have bumps or hollow spots or framework mirrored to the outside. It'll be a smooth uniform surface and even black painted hulls are practical. Plus that it's proven to be durable. Why build any other way? |
Seen on the web -
Building the "Mary E", a site devoted to the Glen-L Alpha
2.
http://kerchevalave.com/alpha2/index.html
The Minn-Kota 32 pound thrust electric motor moves the boat along at a good clip (faster than rowing) even with 3 adults aboard. - from Building the Mary E site
We have known about Tom's site for some time, but it has grown, with an Alpha 2 Forum and pictures of Alpha 2's by Tom Strong, Peggy Babcock, and Walt Conrad.
Feedback: Renegade
Subject: Sugar and Spice
Occasionally we like to review your web site to see what's new and who else has built the Renegade. Our Renegade, which was named "Sugar and Spice", was finished in 1984. I am sorry to see it is no longer on your web site since it is the only one with bright wood work top sides. The boat is now seventeen years old and has been enjoyed every year!
"Sugar and Spice" is powered by a 440 cubic inch Chrysler engine that has been marinized with some of your components as well as : Velvet Drive transmission; Stern Power outdrive, model 107; 16 1/2" x 24" cleaver style propeller. The boat is an excellent ski boat, all around day cruiser and runs in the mid-60's, wide open.
Allen and Robin Cohon
Monticello, NY
Note: Mr. Cohon's Renegade is still on the site,
in the Boat Design Catalog Renegade page.
Mr. Cohon sent additional photos.
Feedback: Bandido performance specs
Barry, its funny, the experts at the performance shops said bolting a pair of 200 hp outboards to your hull would be like bolting them to a dock! With only 400 hp, they said the hull wouldn't break 55 MPH.
We proved them all wrong!
Our outboard version of "Bandido" weighed in @ 3960 lb. dry (all accessories but no fuel or water). The pair of 200 hp outboard push the 30 footer to 76.3 MPH. What a rush! Speed was determined by a Raytheon L365 fish-finder on a fresh water lake in Maine.
If we were only interested in top speed, we bet we could hit 80+ with a prop change and a salt water environment. Currently, props are 22 pitch and the outboards peak at 6000 rpm. Cruise speed is 38 mph @ 17 GPH or 2 Miles per gallon. Any of our competitors are only getting 1 MPG.
Thanks again for adding the photos to your WEB site. We've had several people see it on the web site and actually take a road trip to Naples to talk with us.
We are going to put the "Bandido" up for sale. Do you ever get inquiries about boat purchases?
Brian Hockney
brian_hockney@res.raytheon.com

The "Red Dart"
by Tony Urbizu
Palm Bay, Florida
Back in 1957, my father, Antonio G. Urbizu and I built the L-Dorado from your plans in Havana, Cuba. It was love at first site for my father. He ordered the plans and kit from you, and we built it in an old garage. After my father passed away in 1966, I was looking at some old pictures that my mother has saved and I found two pictures that reminded me of this great speed boat...
In 1957, Cuba was going through a period of unrest. My days were spent at school and at night we stayed home. During the night, terrorists placed bombs in Havana. These acts were mainly local. How little did we know that two years later the country would completely change hands and transform from a Republic to a Communist system, that after 40 some years has not changed.
Since there was not much to do, my family joined the Commodore Yacht Club, a local hotel and yacht club on the outskirts of Havana in a section called Miramar. In the Yacht Club was a compound. Here we had many ways of escaping the political unrest that Cuba was going through. I was a 15-year-old young man who wanted to enjoy life. Many Cuban families brought their families to the Yacht Club. Because it was a place away from the city, and it was a worry free environment, this was a place of socializing and enjoying a little of the good things in life.
As I matured, I noticed that there was a marina besides the pool and other amusement activities like "Tea Bailables". These were dances on Saturday nights where the Yacht Club would hire a local band and teenage boys and girls could dance until 10 PM to the rhythms of Cha, cha, cha and other tropical music. For some reason, I started visiting the marina and talking with the operators. As Club members, we were allowed to store any small boat. The marina had two rows of shelters and a curved pier that stretched a couple of hundred feet into the ocean. On the pier, was a crane that could lift the boats and place them on the water. People on Saturday mornings would push their boat to the crane and return in the afternoon after a wholesome day of cruising and having fun at the beach.
Visiting expert
We had a visit from Alan Thomas and a friend
from Saskatoon, Sask, CANADA. Alan told us about his experiences with his
Tiny Titan and mentioned that the boat had been driven by a 250 lb.
driver using a 25 hp motor and that it planed easily. This is contrary to
what we usually tell  builders. We
recommend that the driver not weigh more than about 175 lbs. So... how
did he get the boat to plane? He used a "slider". He bought it
at a local marine store, but he said "it's also available from
J.C. Whitney". We looked it up (never having heard of the term
"slider") and we found the "High-Performance, Extra-Large
Hydrofoil" ($16.95 for a 2-piece set in the catalog we have). This
is something we do know about, but did not know that it would help plane
the Tiny Titan with a 250 lb. driver.
builders. We
recommend that the driver not weigh more than about 175 lbs. So... how
did he get the boat to plane? He used a "slider". He bought it
at a local marine store, but he said "it's also available from
J.C. Whitney". We looked it up (never having heard of the term
"slider") and we found the "High-Performance, Extra-Large
Hydrofoil" ($16.95 for a 2-piece set in the catalog we have). This
is something we do know about, but did not know that it would help plane
the Tiny Titan with a 250 lb. driver.
If anyone else has experience with adding a hydrofoil and how it changed performance or about planing the Tiny Titan with heavy loads, tell us about it. Inquiring boatbuilders what to know.
Recent email:
Subject: Scull boat project registry update
Date: Mon, 19 Nov 2001 07:25:25 -0600
Scott Dover
Hughesville, MO
I have now completed the scull boat and hunted from it on a couple of occasions. It worked very well as a layout boat in a low level marsh and glides like a gator on larger lakes. Easy to hide and very sea worthy. I am working on "learning how to scull" and may build a light version of the boat solely dedicated to marsh hunting.
Follow up 11-19-01:
build time ... geez a long time as I worked on it in my spare time. I
took it from rough decking to finished in about a month, working weekends
and a few nights. Guessing about 5 months of weekends and scattered
nights total. I cut my own lumber and did all shaping by hand which
significantly added to my time. For about 6 months it just sat.
Pics...I have taken some this weekend and should be able to get you some soon.
Scott
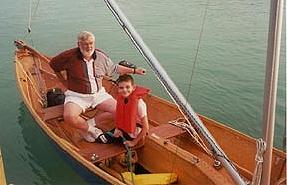
Subject: Sea knight update
Date: Wed, 14 Nov 2001 20:44:55 -0800
I have included several photos of my sea knight. I'm closing in on the finish line and hope to have the boat in the water by the new year. I am amazed by the way it has gone together. It actually looks like a boat! I have been working fairly steadily since February, only taking off a week or so here and there. I would guess I work most evenings for an hour or two and many hours each weekend. I no longer take care of the vegetable garden and the roses did not have a particularly good year. The place has a wild look and the cars no longer fit in the garage and may never again. The boat looks pretty darn cool.
thanks for all the help!
John Earnest
Subject: New Propulsion Methods
Date: Sat, 10 Nov 2001 16:17:53 -0600
From: Rick W Boniface
Dear Sirs;
First, let me say Thank You for the difference your plans have made in many young men's lives, including my own. My friend and I each built a Tiny Titan during the 1967-68 summers. This came at a difficult time in my adolescence during my parents heated divorce, and the boat projects were a way to redirect my attention in a positive manner during these formative years. Many happy hours were spent both in the building and eventually in the usage of my hydro. It went pretty quick with an 18hp Johnson and speed prop! I am now a licensed aircraft pilot and owner, but that boat still hangs in my garage.
I now find myself with 4 young sons and although they will not be saddled with the issues of divorcing parents, I still would like to use a boat-building project as a way to instill some values and help them to appreciate the satisfaction of completing a substantial project - which would also then be a source of pride for years to come. To this end I have come home to Glen-L...
Thanks again for the great plans.
Just Another More-Than-Satisfied Customer
Subject: BUILDING "TUFFY"
Date: Sat, 27 Oct 2001 16:55:25 EDT
10-1-01 Update on "Tuffy's" performance: with a new
10-1/2" Yamaha prop, (which I may have worked over this winter) we
saw 25 m.p.h. with a 200# passenger in the front seat and myself (280#)
in the back! I did find out the 15 hp parts are already on the engine,
but there is surely more speed to be had! Thanks for a great project, I
highly recommend the Tuffy for a first timer, the instructions are super
easy to follow and very detailed. Now I am starting my T-N-T for when I
want to zip around by myself.
P. S. Thanks to Barry for all your help!! Don S.
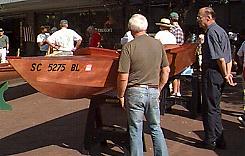
Subject: Georgetown Wooden Boat Show
Date: Tue, 23 Oct 2001 21:44:38 EDT
Dear Sirs:
I thought you might be interested in my Poweryak that was on exhibit at this year's Georgetown, SC Wooden Boat Show. I built it from 4 mm Okoume mahogany
Regards,
Dan
Subject: Squirt
Date: Sun, 21 Oct 2001 16:39:09 +0100
From: Graham Knight
I started work on my Squirt today, picked up a large bundle of Mahogany from the timber yard this morning, took it to work and cut out all the frame members. It all went very smoothly as I had expected. This isn't quite my first boat, I designed and built a small sailing dinghy 15 years ago but sold it when I came to live inland, I also rebuilt a canvas covered canoe a few years back. As a professional modelmaker I have built a few model boats over the years and the Squirt is really no different to any of those, just bigger!
Next month I move into a new house with a mooring on the River Thames, I had to have a boat and couldn't resist the cool retro looks of the Squirt. I'll post some more updates as I make progress, in the meantime I'd love to hear from any other Squirt builders, especially those in the early stages of construction.
Graham Knight
London, England.
Build more boats
GLEN-L boats, of course