On the Mark: Notes on the Riviera Engine Compartment
Continued...
If you have slightly misaligned the cut, do not despair, it should be viewed as an "opportunity" to trim out the hatch or opening edge.
Hatch Hinge
The hatch hinge is temporarily installed while the hatch is still supported by the partially cut battens. The hatch is still in perfect alignment with the rest of the deck, take advantage of it!
The hinge is cut to length. Set up the side trim pieces and look it over for appropriate overlap. I set the ends 1/2" from the outside of the cuts.
|
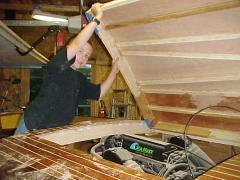
Hatch sawn and hinge temporarily installed. |
First opening of the hatch. The blue tape kept the corner support blocks from being glued to the hatch edge as the blocks were put into place. |
When calculating the length of the hinge, test place it over the opening. Make sure that none of the screw holes are over the gap. It will probably need to be shifted so that the screw holes are equal distances from both ends. This means that you get the pleasure of cutting the hatch hinge twice!
Clamp the closed hinge with a padded vise and between two wooden blocks. The clamp blocks should stop at the cut. Cut the hinge with a fine tooth blade. I used a 24tpi blade in the Sawzall. Use a slow speed and start at the open side. Have an assistant hold the free end so that it does not whip back and forth as it is cut and distort the end. It is very easy to bend the hinge.
After cutting, reclamp over the cut to straighten (if necessary). The hinge is thin and easily bends. The disk sander or grinder makes for quick cleanup of the cut. File to remove burs and give a finely finished end. Opening the hinge will show off any angular error in the cut. Round over the outside ends of the hinge slightly to relieve the sharp edge at the ends of the pivot.
Open the hinge to 90o and align over the cut. Place a couple of outside end screws first. Fold the hinge flat and place a couple of the center screws. The holes are pilot drilled and use a #6 FH SS sheet metal screw for fastening. I like Philips or square drive screws for this. Straight slots leave small sharp edges if not perfectly aligned to catch and scratch the unwary passenger. When installing the screws, work by "splitting the distances in half". Start screws at each end and the center. Then add 2 more halfway between these, and so on. Simply starting at one end and working down may cause the hinge to bend or drift off of the centerline and it will be hard to operate.
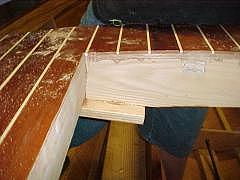
Corner stop - primary support for hatch |
Installation of internal corner support stops
I recommend installing support stops. These will bear the weight of the hatch when closed as well as relieve pressure on the trim and possible bending.
Trim the underside of the hatch and frame flush at the corners. Cover the hatch edge with tape. Glue and screw the support stops in place.
Removal of the hatch
Take the hinge off. Saw through the battens. The hatch is now supported on the corner stops. With the hatch out clean up the hatch edge faces and finish them.
Finishing
Fill the screw holes with epoxy thickened with okoume sanding dust and silica to color match the wetted okoume plywood. If a new "trim strip" is required, or if you simply want to cover the unfinished plywood edges, rabbet the edge and install the filler strip. Use flush trim bit to rout the hatch and opening edges flush with the frame. Round over the edges slightly. Sand and epoxy coat.
Varnish the boat and hatch prior to re-installation. Tape over the screw holes to avoid getting them filled with varnish as well as picking up bits of sawdust (more important) on the brush to redeposit elsewhere on the finished deck.
It is of course possible to varnish before cutting out the hatch, but it would have been very easy to scratch the soft varnish. For the first 45 or so days, the varnish is still soft and easy to scratch.
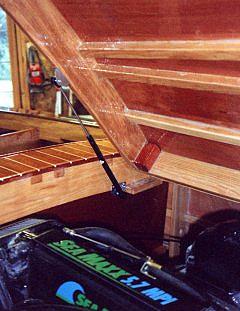
Springs
The hatch weighs approximately 60 lbs. In order to have it stay safely open, gas springs are used to support it. A pair of 60lb pressure springs are used. These are just enough. Stronger springs could have been used
The gas springs I used are 17.5" long extended and 10.5" long compressed. The fixed mount is as close to the hinge side as I could get it. The mounting bracket is a surface mount piece that is screwed into the side of the frame.
Remember that the pivot and the spring body must be below the hatch frame when the hatch is closed. The pivot on the hatch itself is mounted to the bottom of the hatch itself. I recommend test fitting one side first, so you will have fewer holes to fill if the first mounting points are not correct. As you can see there is not much room to get at the mounting points with the hatch closed as the engine is in the way.
These are not high pressure springs and are then also not very long. The limit on how far the hatch will open is set by how close you can get the fixed mount pivot to the hinge side of the hatch. The farther out the pivot on the deck frame is, the less the hatch will open.
 |
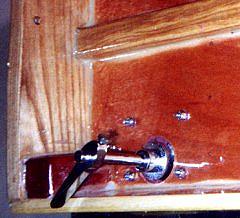
Latches
Now that the hatch is balanced, it won't stay closed over bumps. Originally, I had planned on using flush lift rings and not using latches at all. Fortunately, I had not installed the lift rings yet and could easily switch to flush latches. The latches are made by ABI.
As seen above, the latch is flush and mounted adjacent to the hatch trim strips. 2 latches are used.
Place the latch in position upside-down. Trace the outline with a sharp knife. Use the knife to score through the fiberglass. Route and chisel out the area inside of the outline for the body of the latch. Drill and rout out the lower recess for the swivel portion and drill through for mounting bolts and latch shaft.
Epoxy coat the holes and mortise. Bed the latch in 5200 or polysulfide. Use mahogany or black colored material. White shows up too much.
As seen below, the underside of the hatch and latch is shown. The catch lever is adjustable. A aluminum catch / wear strip was also installed on the inside of the deck hatch frame. This wear strip was also ramped slightly (1/8" in 6") to provide a firm closure. The latches must be turned towards the center of the hatch to latch and lock. The catch plate prevents the wood from being damaged due to the latch rubbing and bouncing. Also seen is one of the corner blocks that support the majority of the hatch weight.

Hatch latch from top |
Hatch latch from bottom |
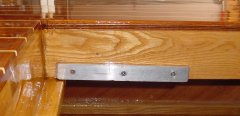
Hatch catch plate |
Trim installation
As a final step, prior to reinstalling the hinge, round over the outside 2 corners to about a 1/4" radius. The hatch trim strips will also get filed and ground to the same radius. While square corners look very neat, the sharp corners on the open hatch are a hazard. I got gouged by one of the corners last summer and did the round-over this year while the hinge and strips were off for varnishing.
After the hinge is back in place, the hatch trim was installed around the perimeter of the hatch. Measure it in place and you will probably have to cut both ends of each piece to center up the screw holes.
Cut the trim while it is clamped between 2 blocks of wood for support. Use the disk sander and file to smooth and square off the ends.
A VIX bit is a big help in getting the screw holes centered. These are the self centering bits with the spring loaded sleeves. I had never purchase one before, as I normally only mount a few hinges at a time. With >120 holes to drill for the hinge and trim, it was time to buy one and it worked out very well. The Vix bit starts the hole. Use a standard bit and countersink to finish the hole. The purpose of the countersink is to taper the hole so that the edge does not mushroom up as the screw enters. The mushrooming makes it hard to seat the screws, and is a starting point for delamination.
After drilling the holes, remove the trim and hinge. Add a dab of bedding compound on each screw hole. Now reinstall the trim and all of the screws. Clean up the squeeze-out with mineral spirits. Remember, the trim will trap moisture and wick more in, it is a good place for moisture to enter the wood and rot to start.
Next month: "What are the starting tools needed to build a boat?, Part 1"
We are very pleased to have Mark sharing his expertise with his fellow boat builders. If you would like to comment on this article to Mark, he can be reached at "builders at bronkalla.com". Replace the at with @. (Just trying to dodge a few spammers). See Mark's great web site for information on his Riviera project.