WebLetter 28
An Occasional Publication for the Home Boat Builder
Glen-L Marine Designs - 9152 Rosecrans Ave. - Bellflower, CA 90706
In this issue
- On the Mark: Notes on the Riviera Engine Compartment - Part 2
- Designer's Notebook: DISPLACEMENT by Simpson's Rule
- Old Boat Registry: XP8
- Old business: Fan Club
- Feedback: Pot Luck
- Steermaster replacement cables from Glen-L
- Recent email
GLEN-L Update
- Web site:
- We are often asked for lists of builders of specific designs in various parts of the country. That's why we added the Project Registry to the Web site; to give builder contacts. In the next WebLetter we plan to feature canoes and kayaks, so I sent email to all those in the Project Registry and 6 came back, "Delivery has failed". These addresses are no longer active. The same thing happens with street addresses. The only way to keep these contacts up-to-date is if the builders themselves take an interest and keep us informed of changes to addresses in the Registry. We do not give out information on builders who have not "opted in". In fact, we don't usually know whether construction is taking place unless we are sent a Project Registry. If you find any links in the Registry (or anywhere else on the site), let us know so we can add a "not valid" note, or make corrections.
- We've had a great response on our new "Honker" duck boat design. If you missed it, see WebLetter 27 for information.
- Work on the "Minimaxed" is proceeding. We featured this Minimax update in WebLetter 27. The instructions and drawings are roughed out and now being proofed. Allyn is currently checking the plans, Darla is proofreading the instructions.
- WebLetter:
- The next WebLetter (29) will feature Glen-L canoes and kayaks. We would appreciate any input: performance, construction, adventures.... that you would care to share with fellow builders.
- I would like to thank Mark Bronkalla for his continuing column. In this issue he finishes the hatch installation on the Riviera. In the next issue he will talk about tools; one of the "most asked" questions is "what tools do I need?" Join us next time for Mark's answer.
- We have had many comments from readers of the WebLetters, saying that they really look forward to each one, but not many suggestions about what they would like to see in future issues. What would you like to read about? What would you like to write about? Remember the questions you had before you started? Well, now you know the answers, how about sharing. Sometimes the perspective of a fellow builder can make the project easier to understand.
- A great quote: "Sometimes at work if I'm having a tough day I remind myself, 'hey, I'm building a boat', and I honestly get satisfaction from that." ...Jerry Shelton (See below: Recent Email)
Barry
Witt
Editor
Stitch and glue Model
We need input. We build scale models of many of our boats to check the lofting. We have discussed the idea of marketing a model stitch and glue boat kit that would allow builders to try out the procedures that would be required to build the full size boat. Does anyone have any thoughts or suggestions?
On the Mark: Notes on the Riviera Engine Compartment - Part 2
by Mark Bronkalla
 Cutting the hatch out
Now is the moment you have all been waiting for: Cutting a large hole in the pretty deck of the boat!
Drill upwards in the gap to mark the location of the frame gap on the top surface. Use three holes in each corner, one at the corner and one about an inch or two along the side, and a couple in the middle of each side. The drill may be deflected by epoxy squeeze out, so do not depend solely on drilling upwards in each corner. Have a helper hold a scrap block of wood tightly over each drilling location to minimize tear-out or lifting of the fiberglass.
Use a long straight edge and permanent marker to mark each cut. Use a circular saw to make the cuts, plunging carefully and backing towards the corners (VERY carefully to avoid runaway). If you are at all uncomfortable with a short climb cut with the circular saw, finish the corners with a hand saw or sabre saw. The saw should be set for slightly more than the thickness of the decking. Do not cut through the battens yet.
When making the center, fore and aft cuts, the saw is set to 90o. When cutting the sides, the saw must be angled to match the framing. If you cut with the saw at 90o, it will mar the face of the hatch edge leaving circular saw marks that are hard to plane out. In addition, as you plane the saw marks out, the hatch gap gets wider and starts to look sloppy.
Remove the spacer blocking and fastening screws. Use a hand saw or sabre saw to finish the corners. If the blocking is held by epoxy squeeze-out from the deck planking, enlarge width of the saw kerf. This is when you will wish that the non-glued surfaces were covered with tape if you forgot to do it during assembly. If necessary, use the circular saw set deeper as well, but this will increase your chances of alignment errors showing. If the shim blocks are really stuck, use a thin metal (~1/8thick"x2 wide") strip and hammer from the top.
Continued
Designer's Notebook:
|
Old Boat Registry
XP-8 / Paul Jacobsen / Maple Grove, MN / 5-29-01: I am in the process of rebuilding an XP-8 that was originally built to the 9' 3" dimension. I located this noble vessel through an ad in a local paper. It was described a "Monoplane" for a very small amount. I had no idea what I was looking at when I bought it. No idea that it was a Glen-L design.
I took the small craft home and licensed it and set it a float with an old Merc 9.8 hp to provide the push. It worked. After half a season of using it with a tiller motor and with cartopping it I had to add a helm and a trailer.
I soon found out that the original builder had taken some short cuts. The bottom was made from the finest marine-grade plywood but the sides and top were made from cast-offs from some construction project. The sides had voids. Only two plies of wood in areas where there should have been three. The missing plies were on the external side of the wood and some were the size of a dinner plate. The voids were hidden with thick layers of Bondo and where sanded and painted to match.
The patchwork held up for quite a while in this Bondo Bandit. I unknowingly even left the Bondo in place when I used the seaworthy craft to navigate through the locks on the Mighty Mississippi. Worked fine.
I later upgraded the vessel to a 20 hp Merc and that's when the Bondo started popping loose. It still did not sink. I then invented a method of inserting a matrix of shavings and glue into the voids and it is holding up just fine, thank you.
It was during a river run that I noticed that I was drawing a great deal of attention from all I passed by. One large vessel had the works "Port of St Louis" proudly displayed on her transom. The passengers and crew crowded her rails to get a good look as I serenely motored past.
That got me thinking..... why is it that only craft of a certain size have names and hailing ports grandly painted on their transoms? Shucks. I got me a grand craft, so grand the original builder couldn't sink it with a gross application of Bondo, it's fast with only a fishing motor for propulsion. At the suggestion of a buddy I have found a name for her - ApoCalypso, Hailing from the Port of Minneapolis.
That only leaves three minor problems. One is that the diminutive transom is too small for all that text and an outboard in the center of the transom cramps your working space. Another is that at rest the transom and all that off-centered lettering is submerged.
Did I also mention that the original builder used about 200 of the cheapest steel screws in the construction. They have all rusted from the inside out, lifting the paint or leaving red rust marks to reveal the locations of each one.
No problem. I just fix and float, fix and float. Am now fixing and will soon be floating and have done up the preliminary plans to make her into a long-distance cruiser, complete with a huge fuel tank, seating that is comfortable for day-long cruises, and a transom-mounted trim tab that will be adjusted to during the voyage to compensate for fuel burn.
One more thing. The ApoCalypso draws a crowd at every boat ramp and at every fuel stop. Every time. The single-most question from the lookers is "Is that a wood boat !!??"
Sherwood Queen 15' 6" Mini Tug Kits for Sale
Posted by Tom Burke on June 14, 19101
Purchased this kit from GLEN-L several years ago for my father. He unfortunately passed away before ever opening it. The Kit includes; Frame Kit in original shipping frame, Bronze Fastenerer Kit original bags, and box. Complete Plans with full size patterns.
Approx. $700.00 value will sell for $425.00 OBO
Kit is located in Orange County, CA, USA
Old business: Fan Club
In the last WebLetter, Mr. Paul Jacobsen suggested starting a Glen-L Fan Club. If you are interested, visit http://groups.yahoo.com/group/Glen-L-Builders to see what's going on.
Feedback: Pot Luck
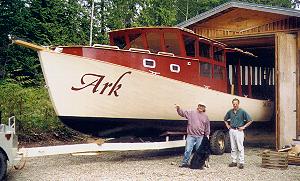
Letter dated 18 June 2001
Desolation Resort, Powell River, BC, Canada
Glen-L
Sir,
Two or three years ago I purchased the Pot Luck plans from you.
This is what I built from these plans, I changed it a little bit.
With twin 90 hp 4 cyl. 4 stroke engines the boat is now capable of almost 30 miles/hr. Some further fine adjustments on the engines and propellers will probably move it about 30 miles/hr. (no cargo).
Running it 9 miles/hr. at 2000 rpm consumes 7 liters (not gallons) per hour on both engines.
By the way - I am the guy with the dog and I really appreciate your plans.
Bernd Scheifele
For more photos see Customer Photos
Did you know that Glen-L has replacement cables for Steermaster steering systems?
Well... we do. Since putting the Inboard Hardware catalog on-line we have learned that there aren't many suppliers for Steermaster, one of the most popular OEM steering systems. See our on-line catalog for measuring directions. We also have the best prices on 303 stainless 1" prop shafts. Check us out if you are in need of Inboard Hardware.
Recent email:
Subject: Steermaster Mark II
Date: Tue, 19 Jun 2001 20:59:38 -0800
From: family blust
To The Glen-L Staff--
I found your company on the internet by searching for Steermaster. I had doubts about finding a replacement cable for our 23 year old system. Using your measuring guide I was able to order a replacement cable on Mon. June 11th. We had the cable in Juneau on Thurs. the 14th. We installed it on Sun. and it was a perfect fit. The steering is better than it's been since we've owned our boat. Thanks for the great service. We will contact for some of our future boating needs.
Thanks very much,
Dean and Chris Blust
Subject: DRIFTER
Date: Sat, 16 Jun 2001
From: Cars2all@aol.com
DRIFTER 14'/ Ron Marani / 6/6/90: 1st Drifter built with Glen L plans, with help from Boatbuilding Manual. I used white oak frames, Douglas-fir Marine plywood for sides, bottom and transom, white cedar for seats. Honduran mahogany for splash board and rub rails, West epoxy for hull coating with fiberglass cloth. All fasteners and cleats are bronze. My boat is now 10 years old and still looks great! I have built 5 of these boats in the past few years. Great plans and a great boat. Thanks Glen-L.
Subject: MONACO/RIVIERA PLANS AND LEVEL OF SKILL NEEDED FOR
CONSTRUCTION
Date: Fri, 08 Jun 2001
I am new to the pursuit of boatbuilding and the plans that most caught my eye are the Monaco and Riviera. I have quite a bit of woodworking experience with previous furniture projects and also an engineering background. I recently ordered the study plans to see if I'm getting myself in over my head but would like your opinion on whether these boats are realistic as a first boat for anyone.
Thanks in advance,
Answer:
This is a big project. The important thing is to realize that this is not a
couple-of-months project. After the hull is complete, the installation of the
motor starts a new project. Generally, if you are confident with tools and
stick to your projects until they're done, this is definitely do-able. I
suggest you contact one of the builders in the Project Registry. You might also
visit Mark Bronkalla's web site (it will be listed in the Project Registry
under Riviera).
--
Barry
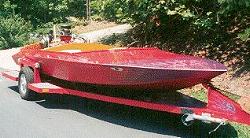
Subject: Rampage built in 1987
Date: Wed, 06 Jun 2001
From: Curt Ripley
These are photos of a Rampage I built while in college. I used epoxy resins and they held up extremely well for the years on the boat with no maintenance ever. I built everything including the trailer. The whole project including paint was done in the basement of my house and I have since built many more custom boats.
This was a fun boat to build and the first really useful boat after building many hydro's.
curt
Below is the result of your feedback form. It was submitted May 30, 2001 at 16:53:20
---------------------------------------------------------------------------
name: Ross Pfund
Comments: Thanks for your help. Ordered manifolds and elbows today for the restoration of our 1958 21' Chris Craft Capri. I'm giving the 1962 Chrysler Golden Commando a "street rod" look, and the aluminum manifolds will really look sharp, and save a bunch of weight as well. Have a Missile waiting in the wings to refinish next. It has a Mopar 383 and is in excellent original shape, although the lime green paint will have to go.
CC of the following email correspondence was forwarded to Glen-L.
Subject: boat
Date: 05/22/01 11:18 PM
From: David Allen
To: Jshelton
Hey I was wondering if you like your minuet boat? I am thinking about building one, but was trying to get an idea on the cost, I am hoping I can do it for around 5k. and about the cabin area, I am looking for something that will hold some gear and be big enough to sleep in and move around a bit, cause I will have a few all nighters, I love boating and taking trips, but can't afford a "Big" boat yet.......okay thax for the info and take care
David Allen
Atlanta, Georgia
Subject: Re: boat
Date: Wed, 23 May 2001 08:44:41 -0500
From: JShelton
To: David M Allen
David: I am really enjoying building the Minuet. I must admit my progress is pretty slow. I have found time to be more difficult to find than the cash. Like you, I have a passion for boats and I have since my earliest memories. I can't remember not loving boats. But I can't afford a large boat either. Neither am I living in a location that makes it easy to own one. I am pretty landlocked in the panhandle of Texas. But with a trailer, I can go anywhere I want. I know how Noah must have felt, I get teased all the time... "where do you plan on sailing that when you get it built?" they say with a little grin. I have taken to responding with, "you don't have any dreams do you?" Well, enough about that. I can talk about boats all day long.
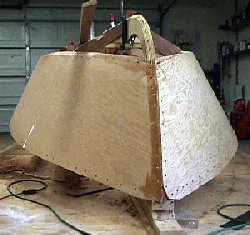
The cost of Minuet is a little difficult to nail down. you can obviously add up all of the "pieces" you expect to order from Glen-L. But then you have other items to consider. Building the form, and I needed to cover the concrete slab in my boat shop with plywood so I would be able to build a form that won't move. I have also had to buy a few tools (great for suggesting birthday presents) My biggest expense was buying a table saw. I think you need to plan on extra epoxy etc. You obviously can control cost some by what type of material you buy and where. You can probably build it in Atlanta cheaper than I can build it in Lubbock. Mahogany in those lengths are not available here and neither is marine grade plywood. So I ordered from a supplier I found in WoodenBoat magazine. I had to pay shipping from New York. I have also had to order things like the stainless steel bolt for my centerboard out of Dallas. So to answer you question... I can't answer your question. But like any project I have ever done, I think it is more expensive than what I originally planned and takes more time than I thought. BUT, the great thing about it is that if I were to go buy a comparable production boat I might spend as much or less if used, but in my situation I would have a bank note to go with it. But building it myself I buy the materials as I have the money to do so. When I am done I will have a brand new boat that I own with no payments. In addition to that, I get to enjoy the process. Sometimes at work if I'm having a tough day I remind myself, "hey, I'm building a boat." and I honestly get satisfaction from that. With regard to cabin size, I think it will be great for single handed overnighters. Day sailing with the family will be great too, but I expect to spend some weekends alone on mine. I have not reached the stage of building the cabin yet (I will attach photo of my construction) but from the size of the hull, I think it's going to be fine. I also think there will be a lot of room for stowage. You will have locker room in the cabin and in the cockpit seats.
I hope Capt'n Bob does not mind me sending along his email address, but he has been a great friend and mentor to me through the process. Just knowing Capt'n Bob is only an email away has been a great comfort. He too is building the Minuet. Maybe we can convince you to build the Minuet too and we can all three meet for a sail. We have talked about doing that for about a year now. Please let me know if you decide to order the plans. I would love to keep up with your progress. (you will probably pass me up in a very short period of time, then I would be asking you how you did stuff). Thanks for writing and I hope to hear from you again!
jerryBarry:
That is absolutely fine with me if you put my email in the next WebLetter.
Nothing could be better than having opportunity to convince someone to build a
boat!
Capt Bob also wrote to David and he copied it to
me. I will paste his letter below in case you are interested in his
response.
jerry (When I finish my Minuet maybe I will feel qualified to sign as
"Capt. Jerry")
From: ROBERT ROSENZWEIG
To: David Allen
Sent: Wednesday, May 23, 2001 6:39 PM
Subject: Minuet
David
How are you? Jerry forwarded your e-mail to me. I live in Atlanta as well.
Well, outside of Atlanta... Acworth to be exact. I am in the middle of building
the Minuet. I have built many boats, but have enjoyed building my Minuet the
most. As Jerry said, it is less expensive to build here than in Texas. I figure
that I will bring in the finished product under $5000.00.
Jerry and I have become great friends, and we learn from each other constantly
just by staying in touch on the internet. So I am rewarded twofold. I will have
a beautiful sailing vessel, and I will have, hopefully a friend for life in
Jerry.
If you are indeed interested in building Wooden Boats, and in particular the
Minuet. Please feel free to e-mail me anytime with questions or concerns or
moral support. As I told Jerry the only way to get started is to jump in with
both feet. You won't be disappointed.
I am leak testing my boat this weekend at Lake Alatoona. Wish me luck.
Subject: Mock Ups of Hulls
Date: Sun, 3 Jun 2001
From: Glen Grotendorst
Barry,
I decided to start with a model of the Aqua Cat before building the full size boat. After reading your notes on how you built your Mock ups I ran across a Gentleman that builds the finest model ships I have ever seen. He uses the copy machine like you recommended to scale the boats. He then uses wallpaper glue to glue the copied frame patterns to wood and then cut them out. Seems to work great. I used a copy machine at Office Depot that could mirror the frames that were only given in 1/2 view. Having started this project I already feel more confident about building the full size boat.
Thank You,
Glen G
Below is the result of your feedback form. It was submitted on Friday,
June 1, 2001 at 20:33:22
---------------------------------------------------------------------------
Comments: I like how useful your site is. It always has tips and suppliers along with price lists and many other helpful things that other sites generally never have. I have your 216-page catalog and have ordered some plans from you in the past and a hardware and rigging kit for the 8-Ball should be on its way here if you have gotten my order by now. Never once have I been disappointed with a purchase from Glen-L. Thanks
Build more boats
GLEN-L boats, of course