On the Mark: Epoxy, fillers and color matching
Continued...
Epoxy needs fillers
For all but coating applications, epoxy needs fillers to be added for maximum strength. This is analogous to using aggregates and reinforcing materials in concrete. Fillers can modify the properties of the epoxy and reduce the cost of using it. The fillers can:
- Increase tensile strength (stretching strength). Think of adding fibers as being similar to adding rebar, wire mesh or polyester fibers to concrete. Both concrete and epoxy have good compressive strength, but in tension both are subject to cracking. Adding fibers / reinforcement along the direction of tension greatly increases the strength.
- Reduce brittleness. Fibers or silica fillers make the epoxy less brittle. This is especially noticeable when planing drips, runs and sags. The pure epoxy drips are very brittle and tend to shatter and chip. The filled material works much more predictably.
- Expand the volume of the epoxy. Since the epoxy resin and hardener are expensive, using fillers to "stretch" the mix makes economic sense (within limits). It also allows the resin to bridge gaps where the joints are uneven.
- Make it thixotropic (stays where you put it without running). Adding colloidal silica helps the epoxy stay put. It also provides a superior surface finish on the cured mixture.
Why the food references?
If you have read about the use of epoxy, you have probably heard of descriptions of the epoxy mix and food references for texture / consistency comparisons. The color and texture can match quite closely the food analogies, but I can't quite do the ketchup color without dye.
In my experience, the thickness comparison refers to the "sag" or droop of the mix when placed on a flat surface. Every time I mix a ketchup or mayo consistency batch (as measured by my calibrated stirring hand), it comes out too runny compared to what I like for gluing. The only one that I have found that closely matches the analogy is that of peanut butter. The epoxy mix and creamy peanut butter are very close in consistency. If it resembles "super chunk" or "natural" peanut butter, start over with a new batch.
Gluing vs. "appearance" fillers
Most of the fillers can be intermixed between brands and components to get the mix that you like. The exceptions are the light weight fairing fillers which should only be used for fairing, filling or "dress up" non-structural fillets. The fairing fillers are made to be light and easy to sand , which means that they are made up largely of air. Think of it, air as a filler does not add strength.
The only other filler that has a definite place is micro-fibers. This should not be used (or very lightly) in a final surface. It is rough and uneven in appearance. While it is great for gluing, it is hard to make a nice clean fillet with it.
Filler types
Colloidal silica
This is a light fluffy powder (be careful to wear a mask and not inhale). It makes the epoxy thixotropic (reduces runs and sags) and also helps provide a nice smooth surface to a fillet. Common trade names include Cabosil, Glen-L #1 silica, West 406. Colloidal silica should be added and mixed into the resin/hardener mix before any of the other fillers are added. Colloidal silica adds a slight milkiness to the color of the epoxy, but is overall neutral in color.
High density silica
This is a high strength additive used for making fillets, and bonding. When used with other colored fillers it is used to lighten the color. Common trade names include Glen-L #2 silica and West 404 high density filler. This stuff is terrible on edge tools. Clean up squeeze out as you go and make a habit of doing shaping with rasp, chisel, or plane after an overnight (6-8hr) cure. After 24-48 hrs, the resin has set hard enough that it seems like you are trimming solid rock.
Microfibers
Microfibers are my favorite bonding material. The resulting mix is strong, wets out well, is easily trimmed. Trade names: West 403, Glen-L Fiber Filler.
Microballoons
The microballoons are made up of microscopic spheres of phenolic resin or glass (old material). The phenolic material is a dark reddish brown when mixed; the glass, a cream color. It makes an excellent hole filler and fairing material. It can also strongly color the mix when used in small quantities. I often used it (5-10%) of glue mix to get a better color match to the stained color of the mahogany. Trade names: System 3 Microballoons, West 407, Glen-L Microspheres.
Wood flour
This is the do-it-yourself filler. Vacuum out the bag of your belt or random orbit sander prior to collection to get rid of coarse sawdust that may have been sucked in. Put a new filter on your shop vac. I like the sanding dust that comes from using an 80-120 grit belt. Clean off the filter into an old ice cream container, run through a strainer to get rid of the errant large specs a few times and voila - filler for free. Collect separately for each wood type you have. I have containers of ash, oak, cherry, walnut, okoume, maple, mahogany. This gives you a lot of color possibilities. If mixed in high proportions, and sanded, it can even take a stain to some degree (still not perfect).
Saw-dust I think this is too coarse to use for color, but can be used for color texture. This adds some randomness that otherwise may make a uniformly colored filler stand out. If using sawdust in the mix, overfill and sand down. Once sanded the texture variation will show up and vaguely resemble wood grain.
Fairing fillers - Not worth bothering with in my opinion. Use micro-balloons instead.
Colorants
I separate the colorants from the fillers as the colorants change the color, but not the structure of the epoxy (unless you are overly generous with them).
UTCs
Universal tinting colors can be added for hard to match or contrasting colors. Very little is needed to produce a lot of color. I use about a pea sized dab for a 3 pump mix of epoxy to get a walnut like color. These can be purchased in tubes in a paint / hardware store.
Dyes
Yes dyes can be used, but most dyes are not highly color fast. We have used them for interior work, but I would hesitate using them on the exterior of the boat. Dyes can be found at www.homesteadfinishing.com.
Pigment
There are some pigments available such as West 501 white pigment. I used this for the stripes on my deck.
Wood changes color
The natural colorants in the wood change upon exposure to ultraviolet light. This varies by species, but in general, the wood will initially darken and then some woods will lighten over time. The coloration change is not only one of darkness / density, but also of color / hue. This makes matching color with dyes and pigments problematic. What may match today will probably not a year from now.
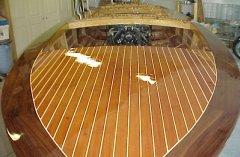
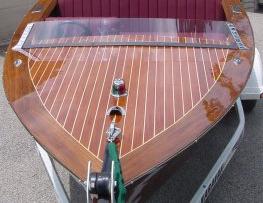
As case in point, look at the photos of my boat. The deck is natural mahogany and walnut. The first photo was taken after the initial fiberglassing and varnishing. The second was taken a year later. Yes the lighting conditions are different, but you can see the strong initial color contrast has been greatly reduced over time. The walnut lightened considerably and the mahogany darkened. The darkening was also quite evident when I pulled off some hardware for re-varnishing. This proves the color change was not due to lighting conditions.
Epoxies generally use an ammonia-like amine hardener which will change the color of most woods; much like the amonia-fuming process used by Stickley on his craftsman-style furniture. The amine reacts with the wood pigments, such as tannins and generally darkens it. The amount of darkening has many variables, such as temperature, coating thickness, etc. If you coat, then sand through the coating and apply a varnish or other clear finish, you may have two different colors.
How to match
You are trying to match the "wet" epoxy coated wood, not the dry. So, first wet the surrounding wood with epoxy to set the background color.
I start out with a fairly simple mix. Add resin and hardener and mix well. Now, add the filers, but start out with ~1/2 the total you think you will need for the final mix so you can adjust the color. Normally I will do a 1-3 pump batch (never more) for filling. It is slow work to fillet and fill holes. Larger batches just kick off too soon.
The additives are : 1/3 colloidal silica (mix in completely before adding the others), 1/3 high density silica, 1/3 wood flour.
Test this mix for color match against the wet background. If necessary adjust the ratio of the wood flour to high density silica. I never had to go as far as total mix of 1/3 colloidal silica to 2/3 wood flour.
Add more fillers in the correct ratio to get the final consistency right. I sometimes use tablespoons or coffee scoops to do the measuring. After a few batches you will get the hang of it. Of course use the initial batches in an inconspicuous area such as: engine compartment, around the gas tank, under seats, etc.
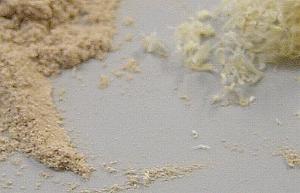
The photo shows the relative size difference between wood flour and normal saw dust from my table saw.
When color matching, proper lighting is extremely important. Normal fluorescent lighting provides a poor indication of the closeness of the match. This is due to the reduced spectrum of the common fluorescent lights. I use Kitchen and Bath type lamps mixed with some daylight lamps and some tungsten lighting as well. A optimum mix is 1x100w incandescent lamp for 2x40w fluorescent tubes. I normally have 1x100w incandescent per 4x40 w fluorescent tubes. Purchase fluorescent tubes with as high a CRI (Color rendering index) as possible. If you use the cheap "shop light" tubes you may have some real surprises when you move your boat into the sunlight - especially in the red / orange materials.