WebLetter 34
An Occasional Publication for the Home Boat Builder
Glen-L Marine Designs - 9152 Rosecrans Ave. - Bellflower, CA 90706
In this issue
- Monte Carlo is here!
- Feedback: Quest houseboat
- Designer's Notebook: Laminating, an alternative to single-piece members
- Exposed Drum Cable Steering
- Contest: Your opinion on Poxy-Shield
- Feedback: TNT with a jet engine
- Rudder cavitation cure
- Feedback: Sea Knight, Zip, and Utility
- Useful Information and Suppliers Glen-L site resources
- Escapade model
- Conundrum
- Feedback: TNT
- Shop talk: Fairing boards
- Recent email
GLEN-L Update
- Web site:
- Photos: I have stopped compressing the photos in response to visitor requests. "I would rather wait a little longer for a better photo." Compressed photos load faster, but there is always some loss of quality. As I have time, I have been re-scanning some in larger format, but I cannot update emailed photos because we no longer have the originals. If any one has sent a photo in the past that looks grainy, I will be glad to replace it if you re-send it.
- Many of the older messages in the Boatbuilder Connection have been moved to an Archive file to make the Connection load faster. Will try to do this more often. I know there are other bulletin boards out there that do this automatically... but that seems too easy... no, not really, I'm just not very good at modifying scripts. Perhaps later this year.
- As you can see in this WebLetter, the Monte Carlo, our new mahogany runabout is ready. There is a link in the article below to the new page in the Boat Design Catalog.
- Have you used the "Search" feature on our site? Each week the engine re-indexes our site; this week the engine searched 4930 pages. There are many photo pages on the site that have "no search Meta tags", so don't really know the total number of pages we have, but the site grows every day. Be sure to check Customer Photos and the Project Registry to see if anyone new is building the same boat you are.
- WebLetter:
- Mark Bronkalla has taken a break this issue, but should return in the next issue.
- There have been a lot of other contributors this issue. It is not always easy to decide what to include. Items are included that provide information, encouragement, proof that people can build their own boat, or because I just like the entry. Our readers appreciate all of your email and submissions to the site and WebLetter.
Barry Witt
Editor
The Monte Carlo is here!
Our latest design is now available. This seems to be one of the most anticipated designs we've had in some time. We have received many email asking when this larger barrel-back "Gentleman's mahogany runabout" is going to be available. Well, now it is. Plans & Patterns only $135.00 |
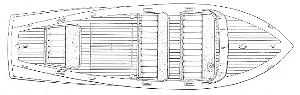
Feedback: Quest houseboat
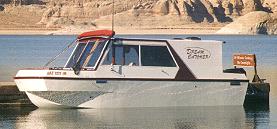
| Builders: | Jim Vander Wiel and Susan Shelly, Page, AZ |
| Length of project: | 20 months working part time. |
| Features: | Hot/cold water, shower, toilet, full galley with sink and stove, fish finder, stereo/CD, VHF radio, dual batteries, generator, natural Honduras mahogany,/birch cabinets and woodwork, 5 foot wide couch and dinette settee that converts to a queen size bed, foam flotation insulation in roof, cabin sides and hull, and lots of storage. |
| Engine: | 2002 225 Hp EFI Mercury outboard with 15 dia. x 17 pitch propeller. |
| Fuel/oil capacity: | 56 gallons of fuel, 4 gallons of oil. |
| Performance: | 28 mph cruising speed at 3800 rpm. Very quick to plane using hydrofoil on cavitation plate. Extremely well balanced and corners well. |
| Expenses: | Shorelander trailer - $4,000 Engine - $9,000 Boat - $14,000 Total - $27,000 |
| Comments: | The plans were very well done, making the construction of the boat very enjoyable. Good job Mr. Witt!!!!!!!!!!!!!!! |
Engine displacement: Converting liters to
cubic inches:
61.023744 X Liters = Cubic Inch Displacement
Note: Thanks to Kristin F. Karalius for correcting us. This was originally printed as: 62.5 X Liters = Cubic Inch Displacement. It's great to provide information; even better to provide correct information.
Exposed Drum Cable Steering
What is it? how do you install it? where can you get it?
Racing-type exposed drum steering is ideal for smaller boats such as the Glen-L TINY TITAN, SUPER SPARTAN, PICKLEFORK, XP-8, CLASS RUNABOUTS, and similar boats where there is no room under the foredeck to run other steering systems.
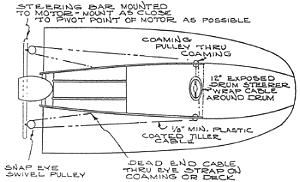
Mounting
Mount the steering drum in the center of the dash. The vinyl covered tiller cable threads in and out of holes on the steering drum. The tiller cable should be of equal length on each side of the drum. Wrap each half of the cable 3 to 4 turns around the drum in opposite directions. Holes are cut into the coaming to accommodate the coaming pulleys, with the chrome flange mounted on the outside. The coaming pulleys should be located so that the cables run parallel to the dash when threaded through the pulleys.
Clamp a piece of scrap wood (1" x 2" x 4' approx.) to the motor, parallel to the transom, as close to the pivot point of the motor as possible. Fasten the tension springs with eye straps to the outside of the cockpit, side deck, or other suitable position, at least 4" forward of the transom. Temporarily tie or tape the steering pulleys equidistant toward either end of the piece of wood. Thread the cable through the coaming pulleys and steering pulleys, and clamp to the tension springs. Turn the steering wheel and check the turning radius. Move the pulleys in or out and try again until desired turning radius is achieved. NOTE: For the fitting process, twine can be used, instead of cable.
Now that the length of the steering bar is determined, purchase a piece of steel or aluminum channel, or flat stock. (NOTE: On the Tiny Titan, we used 1" x 1/4" steel channel.) This will be fastened to the motor as close to the pivot point as possible. Secure steering pulleys to the bar, thread cable, and clamp to tension springs. There should be tension on the cable; pull the final spring, approximately 1" extension, before clamping. Trim cable to length.
Where can you get it?
Glen-L offers a kit that provides for a complete system up to the steering bar, including: tiller cable, coaming pulleys, swivel pulleys, cable clamps, tension springs, and eye straps. Wheel is 12" diameter in gleaming bright metal spokes with black cushioned, easy-grip wheel. Comes with mounting bolts, 4" aluminum drum which is mounted on the dash, with cables exposed.
For more information see our Online Store
For larger designs see Teleflex Safe-T QC Rotary Cable Steering Kits in our Online Store.
Epoxy Contest
...And Gayle said, "why not have a contest".
Glen-L Poxy-Shield is one of the best epoxies on the
market; specifically formulated for boatbuilding. But many of those calling or
emailing don't seem to know that we have it. That's probably our fault.
Certainly, the feedback we get from those using Poxy-Shield are mostly very
positive. So, to increase awareness of this great product, we are asking for
input from those of you have used it. And to encourage feedback... "why
not have a contest?".
- Tell us about your experiences with Poxy-Shield
- Email your entry before April 10, 2002, Subject line: Epoxy Contest.
- Glen-L will have the right to publish your comments with your name... no addresses.
Feedback: Jet drives in the TNT
Terry Mortimore
In the latest WebLetter you asked for information on installing a jet-ski package in the TNT. If you look in WebLetter number 5 you will see our first boat the TNT called MR. Bean which has a power package removed from a very old Sea-Doo (1960's vintage). Other than changing the angle of the transom to match the pump flange it was a very straight forward installation. It has proven to be a very safe and practical power package for the boat. The only down side is that in anything larger than an 8" chop, the pump cavitates quite a bit. I think that if you were to use a more modern pump and duplicate the water intake area that the original jet-ski has, this problem would be eliminated.
What angle was required for the jet?
I can't remember (the transom angle) off hand and the boat is covered with
snow right now, but it was not much of a difference. Five or six degrees at the
most. The engine is a Rotax mated with a Berkeley pump.
Do you have any idea what the HP rating is?
It is a very old 377 cc Rotax engine that I think was rated at 18 horsepower.
It does not snap your head back but it does get up and plane reasonably fast
with two adults in it. I'm sure that any of the more modern jet packages
that would be available would do an excellent job.
How did you do it?
I filled in between the bottom battens with solid mahogany running fore and aft
between the transom and the first frame. I also put in white oak rails running
fore and aft between the transom and the first frame to act as an engine bed, I
think they are about 16 inches apart (8" on either side of center). My
installation required cutting out some of the first frame, it was strengthened
with a steel web. The pump requires that a hole be cut starting on the bottom
of the boat and running up the transom. The pump has a flange running around
it's perimeter, I used a router to cut down into the planking to allow the
pump to sit flush with the bottom of the boat.
I hope the pictures will help, it was just getting dark here (forgive me for not crawling under the boat). The engine has been removed to install a modern CDI ignition system, the original was points.
In any installation I would try and reproduce the water intake area so that it is the same as what was on the donor personal water craft. Hopefully this would help avoid any cavitation problems.
Riviera update: Our Riviera is away in the garage for the winter, soon I will be starting to build the frame work for the upholstery and that will be done by the spring.
Terry Mortimore
Sault Ste Marie, Ontario, Canada
Feedback: Jet drives in the TNT
Thomas Nilsson
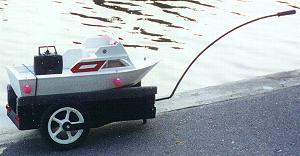
Here are some pictures of my TNT equipped with a Kawasaki 440-engine and water jet from a jet ski.
It's really safe and fun without any visible engine/prop. I made the water intake in fiberglass and I used all the useful parts I could from the jet ski, like gas-tank, exhaust, cooling, electric-start, steering-cables and so on. Because of the jet, it's easy to go all the way in to the shore even for the kids without having to worry about any prop. Next season the water intake is to be modified (optimized) a bit and new paint will be applied.
Thanks for good plans and frame kit.
Thomas Nilsson
Enhörna, Sweden
Follow-up email Thu, 31 Jan 2002
Here are some answers to your questions.
The length of the engine and jet in the jet ski is about 115cm, and that is way too much for this boat, so I had to shorten the driveshaft as much as I could. I made the shaft about 30cm shorter than it was in the beginning. I still needed some 13cm more space and moved the seat 13cm forward, then it was possible to squeeze the engine in.
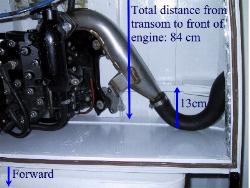
The distance from the transom to the front end of the engine is 84cm, measured on the bottom, the angle of the transom is the same as in the plan, the jet is pointing a little downwards. The hatch over the motor is not raised at all, it's almost 2cm space on top of the motor. The speed is limited to 12 knots with a driver of 75Kg, and that is because the water intake is bad, the impeller cavitates after 1/3 throttle. That is the reason why I am modifying the intake for next season. I made the intake so small and steep simply because of the lack of space after the compact installation (engine close to jet). Now the intake will begin under the engine instead of behind it, this will give a much smoother way for the water to get in to the jet.
You can see the modifications I made on the boat to fit the engine, on the attached picture. I promise to send you an email when the new intake has been tested this spring/summer.
Another thing to mention is NOT to forget where the force is concentrated in a jet installation; it is the front bearings of the driveshaft that has to take all the force. That's why I have a thick stainless frame going from the bearing-housing to the transom. See engine picture in last mail.
Please add me to your project registry!
Regards,
Thomas Nilsson
Note: Ideally a jet is installed in a vee bottom boat. Because of the interest in jet installations and the plethora of used jet motors now available, we are looking into the possibility of designing a TNT-size boat for a jet. Will keep you informed in future WebLetters.
Steering problem - Rudder cavitation
Subject: Bonanza
Date: Thu, 28 Feb 2002
Hello, I have a Glen L Bonanza built in 1963 by my father and my grandpa. There has always been a problem with turning. When making left turns the bow tries to go down. My dad said it has done this since the first time it was driven. He has talked to many people about it and they can't figure it out either.. Any ideas? Thanks, Shane
Answer:
The following is taken from our book Inboard Motor
Installations, Chapter 16, page 191. See the Boatbuilding
Books pages for more information on this book.
The rudder must not be located where it will suck air. Since the rudder depends on a constant flow of solid water for turning ability, the presence of air will cause an immediate loss of steering action, and possibly cause propeller cavitation or "ventilating" as well. In many cases, especially on the shorter high speed runabout or racing-type boat, the rudder will necessarily have to be located beyond the transom of the boat to suit the propeller shaft angle and clearances. Such a condition will almost always result in the above described condition, and if it occurs, an extension or "plate" must be used over the rudder from the bottom of the boat to prevent air from being sucked in on a turn (see Fig. 16-6). The problem is evidenced by a severe stream of water or "rooster tail" flying up from the transom area, together with a loss of turning ability.
Although the above copy does not mention the symptom described by Shane, it is caused by cavitation and is a fairly common problem.
Feedback: Sea Knight, Zip, and Utility
Subject: Past project photos.
Date: Sat, 2 Mar 2002
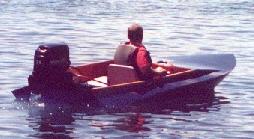
Attached are three new photos I thought you might find interesting. The single B & W picture is your "Utility" running with a believe it or not 35HP engine. The other two are of your "ZZZIP" and are two different boats. They are identical so both pictures represent their finished appearance. The one in the water preceded the cruiser "Sea Knight" I built later and the engine was transferred to that cruiser. A 4 blade bronze 10 x 10 prop was used with this engine on the cruiser and it ran about 17 MPH with this arrangement. This is the cruiser you already have pictures of on your site. I might add that all of these boats (Built in the mid 50's) were reinforced on the bottom of the hulls by adding vertical 3/4" wide members on top of all bottom battens and keel. These members extended to the top of the frame members and were corner blocked to the frames much the same as the racing Hydros of that era. This also included the "Sea Knight" cruiser which also had a bottom double planked with two layers of 1/4" Plywood and sheathed in fiberglass cloth and resin. This cruiser was new in the spring of 1959 and sold in the spring of 1961. I saw it only once after that, in 1978, 17 years later, and it was still in use with a Vee 4 engine. I think it speaks well of the structural integrity of that hull. My upcoming second Sea Knight will be also as good or better.
Regards, Charles Bresette Jr.
Useful Information
To answer many of the email questions we get each day, I often refer the emailer to the "Useful Information and Suppliers" section of our website. If you are not familiar with these resources, I suggest you check them out.
List of lumber
suppliers
Links: Other Web Sites that
may be of interest
Glossary of Boatbuilding
Terms
Diesel Engine Suppliers
Jet Pump Suppliers
Useful Weights and
Measures
Tables &
Formulas
Escapade Model
Dear Sir.
I have had on hand your Escapade Plans since 1975. I never had time to build it as is, but since I'm retired, I've made one 27" x 10" with radio control. It is very nice looking. I enclose photos.
Jacques LaChapelle
Quebec, Canada
Conundrum
Allyn had a call from someone asking questions about the Console Skiff. His final question was "How does someone go to the bathroom in this boat?" Allyn suggested that he and his passengers limit their intake of liquid or wear "Depends". How do you solve this real-life problem?
Feedback: TNT
This boat was built from a TNT frame kit in order to replace my older TNT. I finished the project just prior to the 2000 boating season. The boat has white oak frames with red oak splash rails and dash. I fiber-glassed the hull and deck, making the boat very solid, much more so than my old boat that was not made with these materials. I also repainted my 1988 Mercury 25, which is such a great engine I had to make the boat black to match it! The low center of gravity engine and a fin on the bottom of the boat provide good tracking and turning, so I couldn't be happier with the all-around performance. I learned of this Glen-L kit when my brother Ethan and my father first built a TNT, and we just love the safe, fast design!
Luke Stryker,
Penn Yan, NY
Shop Talk: Fairing boards
by Rhed Brown
I made my own fairing boards for fairing my Rob Roy and they worked out very well. I took some pics of the process and thought that they may be of interest to other builders.
Recent email:
Subject: wood boat builders
Date: Mon, 04 Mar 2002
From: Peter Beck
Organization: Peter Beck Inc.
hello-
I'm a photographer based in Minneapolis but I'll be working in Florida
from April 8-11.
I'm looking for a site where a boat is being built, ideally with a good deal of wood visible in the hull. I shoot for Corbis (14 years) and will be illustrating the theme of craftsmanship among other themes. I'll be happy to pay a fee for access/use of the site in a photo shoot of about two hours.
If you know of a builder who might be interested, I'd be grateful for any leads. If a fee is of little interest, I'd be happy to provide reproduction quality film (35mm chromes) in exchange for use of the "set".
my pictures can easily be seen at www.peterbeck.com
many thanks...
Below is the result of your feedback form. It was submitted on Saturday,
March 2, 2002
--------------------------------------------------------------------
name: Wendell Banks
Comments: This site provides the best bang for the buck on the Internet. From the pictures and diagrams on the site, the catalogs and the help provided after the sale, Glen-L projects just don't fail!
Below is the result of your feedback form. It was submitted on Friday, March
1, 2002
----------------------------------------------------------------------
name: Roger Jiles Comments: My father built a 19' Hot Rod design in the late 50's. We built a Glen-L 10 in the early 70's. I have been a Glen-L fan since I was a boy. Your catalog continues to capture my imagination for hours on end. Having this site on the web just adds to the pleasure. I can log on at a whim at 11:00 PM and before I know it the clock is striking 4:00 AM, and I need sleep! Thank You for a lifetime of enjoyment. Sincerely, Roger Jiles
Subject: RE: Glen-L 12 Registry
Date: Tue, 26 Feb 2002
Barry,
Thank you for your reply. Every thing about the building project has been very satisfying and well supported by Glen L Marine. The launching should occur within a week and photos (on the water) will be forthcoming.
Karl Almquist
Below is the result of your feedback form. It was submitted on Thursday,
February 21, 2002
----------------------------------------------------------------------
name: Mark Whittington
Comments: Hello,
Just ordered the plans and patterns for the Squirt. I am anxious to get started
on this project. This is my first real boat project.
I have wanted to build a boat so bad that the wagon I built for my son has
turned out to be a 5' flat bottom runabout mounted to a 7' 2X4
Trailer.
My wife is convinced I fell off the turnip truck.
Calm waters
mark
Below is the result of your feedback form. It was submitted on Wednesday,
February 20, 2002
---------------------------------------------------------------------
name: Ron Gallfy
Comments: My dad and I built a "Zip" 45 years ago from Glen-l plans and we used that little boat everywhere, lakes, bays and yes even off shore. When my father died it passed to another part of the family but I believe it had a productive lifespan of at least 35 years. Building it was a wonderful experience, in that it gave me the confidence in my abilities, the understanding of the joy of doing a job well, and finally it gave me quality time with my Dad. Small boat building is a wonderful family experience that I often recommend to my friends and I even mention Glen-L.
Subject: new pictures
Date: Fri, 8 Feb 2002
From: William Quigley
Hi Glen-L,
I have a new email address, and finally have some pictures of the sailing Foamee up on the web site.
http://www.quigs.org/Foamee/sailing.html
Bill
Below is the result of your feedback form. It was submitted on Sunday,
February 3, 2002
----------------------------------------------------------------------
name: jerry webb
Comments: Have had many, many boats over the past 35 years. The most fun boat I had was a Glen-L Crackerbox built by Otis Faulkner around 1954. Sold the boat 20 years ago, have been looking for another one ever since.
Subject: Tango builder(s) in Calgary
Date: Mon, 28 Jan 2002
From: Rob Billington
I'm building a Glen-L Tango and enjoying it immensely. I briefly met another Tango builder on Glenmore Reservoir in Calgary last summer. He invited me to give him a call if I wanted to have a closer look at his boat. Since then I've lost his name and don't remember it.
He ordered the plans from Calgary & built the Tango in Calgary about 5-7 years ago. Would you be able to let me know his name/phone number?
Thanks very much.
-Rob Billington
We can't really look up builders by City and if he has not ordered in 5 years, he may not still be in the system. Perhaps he or someone else from Calgary who has built the Tango is reading this WebLetter and will contact Rob.
Below is the result of your feedback form. It was submitted on Friday,
January 25, 2002
-----------------------------------------------------------------
name: Gerald Mulvey
Comments: I built a Glen-L 14 in 1980. Still have it. Lasted the test of time.
Feedback on WebLetter 33
-
I just want to let you know how much I enjoy your WebLetters. I copy them and file them for future reference and re-reading. I am a yet to be first time boat builder but I am very much wanting to start one. Hopefully this year. I have one of your catalogues that the pages are all dog-eared on from many dream filled trips through it. I am thinking about my first boat being a V-Dory. ...Thanks again for your WebLetters. I think you have a great organization.
Steve Barrows -
Please continue...always learn something and I've a lot to learn! Andy
-
Wonderful, wonderful, wonderful! Just the thing for the long, cold north-east Ohio winters. Please keep it coming!
Thank You.
Curt Gregg -
---I love boats preferring cold-moulded wood construction over most others. I enjoy your updates and find the whole news letter well worth the read. I remember when I first found some of your stuff back in 1971 and building a boat was just beginning to interest me. Keep it up it's great Thanks for the mail. visit our site www.paddlersforparts.ca thanks greg
-
Glen-L;
Congratulations,Your update and newsletter sent Jan 24, 2002 was excellent. I was especially happy to see the pictures of the Amp-Eater (arranged to be powered by either steam or electric power). I recently bought the plans for the Amp-Eater, but haven't had the necessary intestinal fortitude to get started on it; in fact, haven't had the time yet, as I am currently finishing up an 11 1/2' flat bottom row boat. What especially interested me is how did he convert the design from transom to fantail? I have for a number of years had an interest in a steam powered boat. In fact, I have a half completed double expansion 3/4 h.p. engine at hand right now. Perhaps being able to convert from transom to fantail style might re-arouse my ambition.
Anyway, congratulations to the builder, as well as to Glen-l.
Regards,
Dale
Build more boats
GLEN-L boats, of course