On the Mark: Introduction to Fairing
Continued...
How do you tell the hull or frame is fair?
There are several tests:
By eye. Once the hull is completed, it will be covered by a glossy paint or varnish finish, or a mixture of these two. Reflections of objects off of this mirror-like surface will show imperfections. We do not want a "fun house mirror" effect. Given that at this stage the hull is basically air, going by eye has limitations.
By feel. Running your hand over the hull will reveal humps, valleys and ripples. While this is very useful on a planked hull, this one still does not have enough substance. Running your hand over individual battens, chines, sheers or the length of the keel can help, but going from one area to another, your hand will "fall through the holes in the hull".
With a stick. Think of this as a portable piece of hull. By laying a flexible stick/ruler/batten over the framework, you can very closely approximate the shape of the finished hull. Think of it as "draping" the batten over the framework. When draped over the hull, the stick should contact every frame member underneath WITHOUT having to be pushed down. With a limber/flexible batten, only light pressure near the ends (~15-20% of the way in from the ends) should be necessary to make it conform to the shape of the frame.
Why fair now?
You may ask, "Why fair the hull now, when I will be adding 2, 3 or 4 layers of planking over the frame?" The answer is that believe it or not, at this phase you are fairing mostly air. By fairing the unplanked hull frame, which is maybe 5% wood and 95% air, you can "quickly and easily" achieve fairness. If you wait until the hull is planked to start fairing, the hull is 100% wood. Much more material will need to be removed. If the initial frame fairing is not good enough, you may even need to cut through one or more layers of the relatively expensive plywood or have to put on large expanses of epoxy fairing compound (to fill valleys).
How good is "fair"?
How close you will fair the hull depends on the desired level of craftsmanship you want to show off on the project, the degree of gloss of the finish, and the size of the hull. For example, a matte camouflage painted duck boat does not require the same degree of fairness as a glossy varnished runabout - for visual appeal. Also, the bottom of a 50' cruising yacht does not get the same tolerance as measured in hundredths or thousandths of an inch as a Class D racer that will hit 100 mph. In all cases, the fairer the hull, the faster the boat will go since water resistance will be reduced.
Another attribute of a fair hull is good performance at speed. A planing hull must have a dead flat bottom going forward from the transom. If that area is curved or has bumps and dips, poor handling, porpoise and other bad behaviors will occur.
For my boat I set a goal of 1/16" (~1.5mm) of error in fairing the frame. There were a few areas that were slightly worse (mostly dips) that were discovered while planking. For the finished hull <1/32" of fairness was achieved over the vast majority of the area.
Tools
Fairing sticks/battens - The battens are straight grained flexible pieces of wood. I used both battens and plywood scraps as battens. Probably my most used batten / fairing stick was a 2"x6'x1/8" aluminum ruler (Empire Tools). When placed on edge it is stiff and suitable for the straight and slightly curved sections. When placed flat, it is flexible enough to conform to most of the curves. When tilted at an angle, the degree of flex can be varied. Sighting under the edge with a light source placed behind the batten, the gaps between the batten and the frame indicate the humps and valleys.
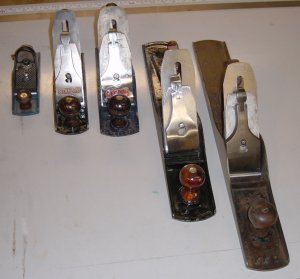
Hand planes - Block plane, #4 or 4 1/2 and a #6 or #7. Other sizes are also helpful. I recommend metal (Stanley Bailey style) over wood for this task. The intermittent cutting action as you cross frames or battens quickly knocks the wedge loose on a wooden plane. The planes shown (left to right) are: block, #4, #4 1/2, #6, #7. This shows the relative size of each. As a side note, only the #4 1/2 was purchased new. All the others were bought used at flea markets, antique stores, rummage sales or on E-bay.
Sanding board(s) - The flex of your sanding board should be just enough to conform to the shape of your hull. I used 1/4" plywood. It is 4.5x33" long. This holds three half-sheets of sandpaper. The sand paper is held on with sanding disk adhesive, Scotch 77 spray adhesive or double stick carpet tape.
Lots of Lights - Both overhead and to be placed behind the battens. For my Riviera I used 8x 4' dual lamp fluorescent lights. The walls and floor were also painted white to reflect light and to be visible behind the batten when sighting along the hull.
Colored Markers - Black for outlining the frame edges, red for high spots / humps, blue for valleys, purple for chip-outs (or pick whatever colors you have on hand).
Colored chalk - This is rubbed thickly on the wooden battens. When the batten is then moved over the frame, the chalk will transfer to the frame high spots. Grab some of your kids (or grand kids) "sidewalk chalk" it is big, soft and brightly colored.
Cyano-acrylate Adhesive and Accelerator (a.k.a. Super Glue) - Get a 2 ounce bottle of the "thick" variety. This can be found in a hobby store (for model airplane and rocket building) or a wood working store. A common brand is "Hot Stuff". Do not get the stupid little metal squeeze tubes of "super glue" that you can find at the grocery store or hardware store. The glue hardens in the ABSENCE of air (anaerobic reaction). This is why, if you have used the tubes, and you go back to use them later they are always hard. When squeezing out the glue you also squeeze out the air, causing it to harden in the tube! You also want to use the "thickened" , high viscosity type of glue, and the stuff in the little tubes is low viscosity (runny). A 2 oz (50 gram) bottle is usually $6-10 Vs $1 for a 2 gram squeeze tube.
Power Plane - This is optional, but it greatly speeds up the shaping of the chines and keel.
Rasps - I had never owned a rasp before. While struggling through the clean-up of excess epoxy, sandpaper did not really "cut-it". I bought a rasp and was amazed. Fun tool! Works very quickly and provides remarkably smooth results. I tried both name brand (Nicholson ~$20) and bargain bin (MIT ~$3). Nicholson is better and sharper, but the cheaper one is certainly a useful and satisfactory tool. In addition to the rasp, a double cut file (12") is useful, and I actually like the cheaper one better! A file card is a necessity for the file as the epoxy will fill the teeth.
Fairing process
The fairing process is also the aerobic side of boat building (at least so far). This is a strenuous activity that is best done in short bursts. In addition, the pauses provide a break, and upon returning, a lack of fairness seems more obvious. Is it that perhaps when you are refreshed you look at the frame with a more critical eye?
Marking the Frame
The edges of the frame are your reference. Each frame will be beveled. The "high" edge should remain untouched. When the battens were inserted, you should have set them such that one edge of each frame is aligned with the batten and the other is high. Starting at the widest / highest part of the boat and working towards either end, the "high" edges should be those closer to the ends of the boat. The reference edges are those towards the wide part of the boat. Take the black marker and heavily color the reference edges of the frames. The edge to color in is the outside, where the planking will be attached.
When the fairing is complete, a thin black line should remain along the reference edges of the frames. This is your only indication left from the plans, that shows the proper shape of the hull. Be sure that you do not go too far when fairing! If you accidentally plane off the remaining line, mark it again but in a different color.
Planing
Prior to each planing session, run your hands along the frames and battens looking for staples, screws, nails or other bits of metal. Remove them PRIOR to starting to plane. Each time I put it off, thinking I would remember later, I added a new nick to the plane blade.
Start each session with a freshly sharpened plane iron. I normally sharpen my plane irons at the end of each session, so I am ready for the next day.
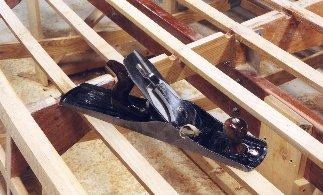 #6 plane shown in the proper orientation for planing along the battens. Note the narrow shaving being taken on the right side of the plane. |
Most of the planing is done with a #6 or #7 jointer plane. This is approximately 18-24 inches long. First plane the frames with the plane at a 30-45 degree angle and the tail resting on the adjacent batten(s). Take care that the plywood gussets are not chipped in this process. Chipping is greatly reduced if the outer edges of the gussets are first planed at a 45 degree bevel approximately 1/8 inch deep, cutting from the face of the ply towards the edge- not from the edge first!.
To fair the battens, chines and sheer, the plane is most commonly used with the tail resting on the batten adjacent to the one that is currently being faired. Where the batten is between 2 or more others, cuts should be alternated with the tail on the batten to the right and left (above and below) the batten being faired. The plane is moved along the length of the batten, NOT along the length of the plane. This is known as a shearing cut. A shearing cut also requires less force to cut and leaves a smoother finish than a straight cut with the plane.
The power plane is a big help for roughing in the chines and sheers. After doing the chines, it looked like there had been a sawdust snowstorm in the shop. Chips and sawdust everywhere. I had trouble using it for final fairing, and switched to the hand planes. The power plane has a tendency to dig in at the start and end of the cut.
The silica filler is hard on the plane irons (not to mention the odd staple and screw). I had to sharpen every 1.5 hrs on average. The chip out would increase, shavings would get splintery, and gussets would chip as the blade dulled. If you don't ding the blade, it only takes a few minutes to sharpen (literally 3 to get to hair shaving sharpness). Rather than struggle with a dull or marginally sharp tool, take a break, crack open a beer and sharpen the blade.
Tear outs and chip outs
When planing, sometimes the trailing side of a piece of wood will tear out or the plywood for the gussets will chip out. To minimize tear out, bevel the trailing sides of the pieces with the block plane or rasp at about a 45 degree angle. On the plywood, cut though ~1.5 layers. When you make the next pass, the plywood should not chip out.
If you have a chip out on the plywood, stop. Any additional passes will further fracture the chip or break it off completely. Now is the time to pull out the super glue. Put the glue on the chip and press it back in place. While holding it, spray on some accelerator. Hold for ~30-60 seconds and it is glued in place. It will take 24 hrs for a full cure. If you are careful, you can bevel the edge immediately and go back to planing.
Alternatively, If chipping occurs, use a marker on the outer edge to note the damage and move on to another piece. At the end of the session glue the chips back down with epoxy and clamp with a clamp which has its faces covered with duct tape to prevent sticking.
Tear outs along the length of a batten are usually not important. This is the surface that will be adhered to the planking and is not visible. The real downside of tear outs on the battens is that it interrupts your plane stroke. This may result in bumps or valleys depending on how bad the interruption is and how you re-start the stroke. If you are getting constant tear out on a batten, reverse your planing direction, as you are probably planing against the grain. Tear out in localized sections is usually due to knots or swirls in the grain pattern. This is part of the reason to save the "best" and most straight grained stock for the battens.
One step at a time
Remember this is an iterative process!!! Fair lightly overall. Fair overall again, repeat .... If you try to do it all in once pass, starting at one end and then proceeding to the other, the surface will be as ripply as a potato chip! The current fairing effort relies on the surrounding area being close. Each individual incremental section is only very little better (and can be much worse if you are too aggressive) than the surrounding territory. Be sure to keep alternating the sides of the boat. Symmetry of the hull is very important! By comparing progress on both sides, you will find it easier to see any errors in hull shape that may start to develop.
Several times during each session, check your progress with the battens. When sighting with the battens, your line of sight is parallel to the hull surface (get down on your knees). Having a lamp or a light colored wall or piece of cardboard behind the batten will help show the gaps under the edge.
Mark the high spots with the red marker and the valleys with the blue marker. Having to hit the high spots while fairing may seem obvious, but it is also equally important to avoid hitting the low spots.
When fairing the battens on the first pass, very narrow shavings will be taken. On the final pass, shavings that are nearly the full width of the battens will be taken.
Sanding board
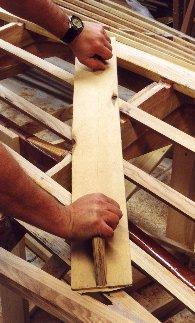
Sanding board top view. The board is held in the stern-keel to bow-chine angle. The stern-keel end is in my left hand (wrist watch). |
The sanding board was made from a piece of 1/4 inch plywood, 4.5 x 33 inches . The surface was sanded quite smooth. The sandpaper was cut into 1/2 sheets lengthwise (4.5 x 11 inches). Three sheets were then placed end to end on the plywood. The paper was attached with 3M feathering disk adhesive. This is commonly available at the hardware store. Spread on the plywood and then firmly press the paper down immediately and then wait 30 to 60 minutes before using. Alternative adhesives are Scotch 77 spray adhesive, contact cement, and double stick carpet tape.
Over time the surface will become fairer and fairer. Using the sanding board with 40 grit paper will leave an even set of scratches. Areas without scratches are either low or next to a high spot. When the scratches are even overall, you are getting close.
As you get close to a fair shape, it will seem that the wood is evenly scratched and it becomes harder to discern the high spots. To help visualize the high spots, sand lightly overall on one diagonal, moving the sanding board predominantly along its length and taking over-lapping strokes. Now flip the board 90 degrees and make another light pass. Inspect the scratch pattern. The high points will show scratches along the flipped diagonal.
The corners of the sandpaper will wear more quickly than the center. Buy top quality sandpaper (I like 3M). You want a resin coated paper. The grains on the cheap no-name or house brand stuff from the home center will very quickly peel off. I saw a better than 4:1 improvement in how long the sandpaper would last using top quality sand paper.
The sanding board is applied on the diagonal, similarly to the angle that the planking will be applied. Start sanding in whatever direction is most comfortable (e.g. stern-keel to bow-chine as shown). Be sure to alternate directions spinning the board roughly 90 degrees (stern-chine to bow-chine) periodically. The boat hull must be fair in ALL directions.
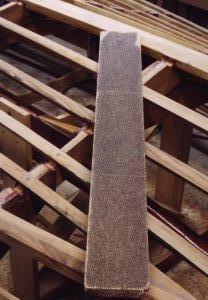
Sanding board bottom view. |
The stroke direction with the sanding board can be random. In some cases, stroking along the length of the board can be done. In other areas, moving it along the length of the boat (pushing it at an angle) will be appropriate.
Remember this is an aerobic exercise! Use your legs (moving your entire upper body) while sanding and planing. The motions are smoother than simply using your arms. It is also much easier on your back and arms.
Keep a face mask on while sanding. I prefer an older respirator (cartridges don't need to be new, just acting as dust filters). You don't need to deeply inhale the sawdust.
When changing the sand paper, heat the sandpaper with a heat gun. This will soften the adhesive and make it much easier to peel off. Scrape off excess old adhesive with a putty knife.
Alternating tools, techniques and directions
Sometimes, when planing and sighting with the batten, it is hard to find the high spots. Using the sanding board and then looking for scratches will highlight the high spots. Switch back to hand planing for further work. When sanding, small bits of abrasive grit will be left embedded in the wood, and this will cause the planes to dull more quickly.
As you move along the bottom towards the bow, the curves are much more extreme. Switching to a shorter plane such as the #4 and possibly to a thinner sanding board (4mm Vs 6mm) will be required. In addition, since the curves vary in the degree of curvature with direction, you may find it easier to use the thicker board on one diagonal (such as stern-keel to bow chine) and switching to the thinner board on the other diagonal (stern-chine to bow-keel).
On the sides, the convex shape (tumble home) becomes very pronounced towards the stern / transom. Here a thinner board is helpful as well as a thicker one can get very tiring to use due to the force required to bend the board and the awkward angle of use, as you are down near the floor.
Corrective actions
Sometimes you may have an area that is just too low. This can be due to uneven fairing or a part that just started out low. Rip thin strips of wood and glue them over the low areas and extending several inches past the ends of the low spots. These strips will then be planed down once the glue hardens.
Completion
It took approximately 30 hours over the course of 2 weeks to fair the frame. In the process of fairing, nearly a full size trash can (~40 gallons) of chips and shavings was removed.
Keep your sanding board. It will find further use as you fair each layer of planking. More fun to come!
The stern of the boat is to the left in this view. I am standing on the port side of the hull
We are very pleased to have Mark sharing his expertise with his fellow boat builders. If you would like to comment on this article to Mark, he can be reached at "builders at bronkalla.com". Replace the at with @. (Just trying to dodge a few spammers). See Mark's great web site for information about his Riviera project.