WebLetter 41
An Occasional Publication for the Home Boat Builder
Glen-L Marine Designs - 9152 Rosecrans Ave. - Bellflower, CA 90706
In this issue
- On the Mark: Introduction to Fairing by Mark Bronkalla
- Gift Certificates
- Designer's Notebook: Skeg Vs Fin
- Boat Doctor by Kenneth R. Cropper M.D.
- Feedback: Two Tunnel Mites by Jason and Joe
- Determining Hull Capacity
- Building the Power Skiff by Billy Lewis
- Feedback: Squirt by Art Spinella
- Feedback: More Squirt by Mike LeCompte
- Recent email
GLEN-L Update
- Web site:
- Computers... just had my hard drive re-formatted, been down for two weeks. Installed Windows XP, now my scanner doesn't work. Have to go home to transfer anything to the web site...
- Dragonfly, a flats boat. The working name for the design was "Flattie", but Gayle and Darla revolted and it was changed to Dragonfly. Allyn and I have yet to proof the instructions and plans, our goal is to have the plans ready by the end of the first week in December... we'll see. See the New pages for additional information on what we feel is going to be a very popular stitch and glue design.
- Lots of new photos since the last WebLetter, including first of the MiniMaxed (Link in Email section).
- Thanks for all the input... wouldn't have been much of a WebLetter this month without it.
- Have you visited the Boatbuilder connection lately? The Connection is a great community that can offer a lot of help and encouragement.
- Christmas... not usually our busiest time, but always a last minute rush. You might consider suggesting a Glen-L Gift Certificate when asked what you want.
- Project Registry - have been checking some of the email addresses. Several are no longer valid. I am undecided whether to delete the complete entry... some of the comments are helpful, plus knowing that others are building the same boat encourages many builders. Keep your email addresses up-to-date. Doesn't help other builders much if they can't contact the builders in the Registry. Let me know if you find any bad addresses.
- I plan to have one more WebLetter before the end of the year... Will be abbreviated, how much we will have will depend on your input. Let others hear your boatbuilding story. There are good examples in this WebLetter.
- If you have not looked at previous WebLetters, I suggest you check them out. There have been many memorable letters and downright good stories sent in by Glen-L builders.
Barry Witt
Editor
On the Mark: Introduction to Fairing
by Mark Bronkalla
In discussing the fairing process, I am referring to the framework of the Riviera (a 20 foot runabout), but the same process applies to any cold molded hull. In this article we will cover the fairing of the frame prior to adding the planking.
What is Fair?
A fair hull is one that has lines/curves that flow smoothly in all directions with no humps, bumps, dips or sags. Having a surface that is fair is NOT the same as one that is smooth. Smoothness is a measure of surface roughness on a tiny, almost microscopic level. Fairness is a measure of overall surface smoothness of the overall surface. A comparison is a newly surfaced highway that has a smooth surface, but with ripples that leave your car hobby horsing down the road. This is a surface that is smooth, but not fair.
Fairing the frame
Starting at a complete frame you may ask: "How can I tell what is fair? It is mostly air!"
Fairing is the process of changing your boat frame from being a series of somewhat matched angular blocks of wood and making it one sinuous, flowing framework.
For the engineers in the crowd, we start with a piece-wise linear approximation of the hull shape and replace it with a series of splined curves via an iterative process.
Piece-wise linear applies since initially, the hull frame can be visualized as a series of (relatively) flat rectangles and triangles. The frames and battens define the edges of these rectangles and triangles.
The reason they are "splined" curves is that we cannot create a curve with one continuous pass of a long and perfectly shaped tool. We will work on individual sections of the framework at a time and blend each section into the other.
The reason it is an iterative process is that it is not possible to go from a rough frame to a fair frame in one pass or even on one section at a time. In the process of fairing, the whole frame is brought closer to a fair surface. The process is then repeated, each repetition of the process brings the entire surface closer and closer to fair.
For the non-engineers, an iterative process is one where you make many passes at approximating the solution to a problem. Each pass gets you one step closer.
Gift Certificates
We would like to remind our builders that we have Gift Certificates available. These are great for last minute shopping. We can email a copy that can be given to your favorite boatbuilder. Gift Certificates take the guesswork out of shopping. You know your builder is going to need something for the project and a Gift Certificate allows your builder to order exactly what he needs. We normally process orders in the morning, so orders received late in the day may not be filled until the following day.
See the Gift Certificate page for additional details.
Boat Doctor?
5/17/02
Dear President, Glen-L Marine,
As is so with those in your position, you may spend a significant portion of time just dealing with problems or unhappy customers. I would like to tell you my story, a good story, a happy story.
I was raised in Fort Worth, Texas. My dad had been raised on a farm in west Texas and fortunately had many hard-work skills which he passed on to me and my other brother. I helped my older brother build a 14' boat from a kit (I don't know the company, but I think it was in Minnesota) when I was in junior high school. When I got to high school age, I decided to build a boat myself.
The reasons, I don't remember too well, but we always needed more room in the small boat. Also, there was a small bit of fear in me - a challenge-type of anxiety, not knowing for absolutely sure that I could "do it"... build a boat on my own. My older brother was away at college and my father was "unavailable".
I remembered seeing your ad in the back of a Popular Mechanics magazine - I'm pretty sure about this. I sent for a book of plans and decided to build the Hell Cat (16'). We had a tiny garage with a dirt floor, one car, a skill saw, a Black and Decker drill motor, and a hand sander. No real power tools.
I started building the boat in October and finished it almost exactly six months later - after school and at night. I was a bit of a loner - I felt the things my classmates did on their time off were silly and unproductive.
Nevertheless, when I launched my boat, I believe I was the proudest lad in Texas! The boat was super and we used it day in and day out throughout Texas and beyond for close to twenty years.
When I graduated from college as a pre-medical school student in 1965, I was really sweating getting accepted into medical school. There was an application to acceptance ratio of about six to one. My college grades were good, but there were many good students at the University of Texas. Also the application process involved several sweaty-palm face to face interviews with medical school professors. One portion of my medical school test, I had done very poorly on. I didn't know at the time that I had a form of dyslexia (spelling and certain word transposition). The professor with a big frown asked me why I had done so poorly on that test. I sweatingly responded that "I must have spent too much time working on my boat!"
He immediately perked up and looked me in the eye,...
"What is this about a boat?"
"Well, I was building a boat after school and at night", I responded sheepishly.
"You built a boat?... What kind of boat?"
"It was a 17' ski boat, a catamaran, I built it in my garage at home."
"You did this by yourself, and the boat worked?" He seemed very curious.
"Well, yes. We've been using it for over three years!"
"That's terrific! I've never heard of a high school student building a whole boat by themselves. Was this a kit or was it from plans?" he asked.
"I just bought the plans, measured all the pieces to figure out how much wood I needed, bought the wood... about three hundred and fifty dollars worth as I remember... and some fiberglass... and I built it. It took me about six months."
I got my acceptance letter from the University of Texas medical branch in Galveston several weeks later. I have No doubt that the interview made the difference for me. The many people that I have told about the boat project seem to me to always react with, well, "wonderment!" It's a good feeling, a very good feeling, the same feeling of accomplishment I had when I launched the boat for the very first time. That boat made a big difference in my life. Not only did it help me get into medical school, but it helped me realize that there was no project that I should be afraid to tackle. It's one of a handful of things I've done over the years I am truly proud of, and one that gave me a very wholesome feeling of accomplishment, completion and, well, success.
I can't believe that those plans still sell for just $69. I've been tempted to buy a set, just to show my two grown, lovely daughters what I had used to build it. I hope the other men (and women) who use your plans get the same satisfaction that I have had.
I'm sure you get letters from all over the world, and you should. The boat performed flawlessly and gave us endless hours of fun. I hope your other customers are as satisfied as I have been.
Sincerely
Kenneth R. Cropper M.D.

Feedback: Two Tunnel Mites
Thanks for the great plans. We decided to build two Tunnel Mites thinking it would be only 1/2 the work to finish the second one. It actually didn't save a lot of time but in the end we have a boat for each of us. It took three months to complete both of the boats working almost every weekend and many long nights after work.
The hull is made of Douglas-fir and the decking is Okoume mahogany. The only major modification made to the plans was raising the dashboard 3" which also adjusted the profile of the coaming. We used push-pull steering assemblies in place of the cable system. A 10" go-kart steering wheel, a tractor seat from Fleet Farm, and two used control boxes later we were on the water.

As for performance, one has '95 15hp Mercury, and the other has a '63 20hp Mercury. We have only had them out once and the temperature was hovering around 32 o, but we managed to stay dry. The 20hp outruns the 15hp by a little, and with a little tweaking over the winter that should increase. Both handle the chop great and ran around 30mph.
Now we wait till next spring.......
thanks again
jason and joe
Minneapolis,MN
Photos in Customer Photos
Determining hull capacity
QUESTION: Sea Knight
I was looking over the USCG Safety Standards for Backyard Boatbuilders to get
the information on max. load/person/gear. On page 6 it begins with filling the
boat with water and counting the buckets full, then figuring out the weight of
water it took to fill it. After searching for the part saying it was a joke, I
realized they were serious.
ANSWER: We concur, the USCG method of filling the boat with water is not a practical method. They do have a method to calculate the interior volume, but it is rather complex. A short method follows that is reasonably accurate for the purpose and on the conservative side. It assumes that the boat was built per the plans.
Plansheet 2 shows the sections of the hull in HALF SECTION.
- Strike a line parallel to the reference line at #0 (transom) sheer level. The square footage of the area below this line and inside the hull outline must be calculated at #0, #2, and #5. The drawings are to 1 inch = 1 foot scale.
- The area can be figured by dividing these areas into geometric shapes (rectangles and triangles). The area must be in SQUARE FEET.
- The simplest way to do this is to use transparent graph paper with a 1/4" square grid. Each square in scale is 3" or 16 squares per square foot.
- Lay the graph paper over the section drawing and count the squares in each of the three sections.
- Figure the area of each of the three stations.
- Add them together and multiply by 2 (2 halves).
- Multiply by 5' - The result is in cu. ft total volume.
- Mutliply the cu. ft. by 64 (weight of water)
- The final answer is the weight required to sink the boat to the sheer level.
We've taken some liberties on the conservative side as to where the sections are taken, but it's probably as accurate as filling the boat with water.
When the US Boating and Safety Act was first passed. We assumed we would be required to calculate these figures for each design. We contacted the USCG to ask how we should go about this and they asked if we built the boats... no, then you cannot make the calculations. Only the builder can certify the figures as the builder may not follow the plans.

Building the Power Skiff 14
(Stink Pot)
by Billy Lewis
I began building the Glen-L Power Skiff around January 2000 and with the exception of paint, the boat was complete in about two months.
Hats off to the folks at Glen-L who designed this kit. The stitch-n-glue method makes building a boat very fast and simple, if not for the time spent idle waiting for glue to dry, this boat could be built in less than a week.
My first effort at painting failed miserably due to not reading the directions carefully. The second coat attacked the first and I had to strip the entire mess and start over. This actually turned out in my favor because I gave the boat a test run before the second attempt at painting and discovered some problems that had to be corrected prior to painting. I had rounded the chines slightly, which caused water to wrap around the chines and up the sides of the boat instead of spraying out away from the boat. The second problem was the boat porpoised when on plane.
After a little eyeballing, it became obvious that the bottom was not flat from the stern forward. It had a slight cup beginning a couple of feet ahead of midship running aft to a point a couple of feet ahead of the transom. I had originally intended to build this boat as a center console but as the basic boat developed, I decided to follow the plans. After seeing the cupped bottom, I changed my mind yet again and decided to move the center seat aft and build a center console centered on the original position of the seat. The new position of the seat would be centered over the cup in the bottom and I thought a seat post cut to the necessary length might help straighten the bottom. After a few extra layers of fiberglass to build up the chines and a few more itchy days of grinding them to a nice sharp edge, work began on the console and new seat position. All said and done, the console came out great and the new seat position along with the slightly longer post greatly improved the performance of the boat. I believe the new position of the driver helped as much as a straight bottom but the two combined made this boat a pleasure to operate. The sharp chines are much better but my boat could still use spray rails. I think this boat looks very handsome as a center console. It does take some imagination to rig a tiny console, but where there's a will, there's a way. Of course no one knows this better than boat builders.
The extra work has added about two years to this project but only because I ran out of free time after finishing the original kit. If I had to do it all over again, I would, I would, I would! I would make sure the bottom was flat EVERY time I walked by the thing! I would also not be scared to venture off the beaten path if the original was not exactly what I wanted to end up with. After all, isn't that why we build our own boats?
As for the name, my father is the son of a son of a sailor (from Jimmy Buffet's' song) and any boat that burns our natural resources, especially if it goes faster than the length of the hull (displacement of course) will allow, disgusts him. Every time we go fishing or sailing and big fast boats pass with that awesome cloud of burnt gas and oil following them, he always snorts.. "STINK POT".
This is obviously a condensed account of this
project but if you have any questions about my experiences along the way, feel
free to contact me at: milehigh@surfsouth.com.
Happy building,
Billy Lewis
Feedback: Squirt
by Art Spinella

This is the sweetest little boat I've ever had, and not just because I built it myself. With the 15 hp Johnson (vintage: 1995), it came up on plane virtually immediately with two adults on board. We put it in 10 Mile Lake here in Southwestern Oregon on Saturday November 2.
It took half an hour to pull away from the dock because of all the questions from other boaters. Everywhere we went on and off the lake, from the gas station to McDonalds, resulted in extremely positive comments.
But nothing can compare to driving the Squirt. It's quick, dry and comfortable. The short windshield was more than enough to direct the wind up and over the driver and passenger. And after hours of being on the lake, there wasn't a drop of water inside the hull. The hull design must be commended. It tossed water away from the boat making for a spray-free ride.
Top speed was about 26 mph thanks to a nifty performance prop on the Johnson. Cruising at 20 was not a strain for the motor, hull or driver. It handled the wake of other boats well and while a fin would likely improve the crispness of turns, it steered where aimed and responded just fine without it.
While strangers who saw it were enthusiastic and complimentary, I was most surprised by the reaction of teenagers. At least a dozen teens at different locations all gushed over the Squirt. One, at the dock where we launched, yelled from the parallel ramp, "That's the coolest boat I have EVER seen!" Questions ranged from "How'd you get the plywood to bend like that" to "How many coats of varnish did you use?" And naturally, "Where did you get the plans?"
Thanks, everyone, for a great time building the Squirt and an even better time showing it off.
Art has been very thorough in documenting the construction of his Squirt. See the Project Registry and Customer Photos.
Feedback: More Squirt
by Mike LeCompte
My Squirt is finally finished. It's been two years and was a very enjoyable project.
I built the frames of mahogany and planked with marine grade 6mm mahogany plywood. I glassed the bottom with deck cloth and epoxy. The deck, I just coated with 4 coats of epoxy and 4 coats of varnish. I've had three different engines on her. The first one was a 10 hp Seahorse, second, an 18 hp Evinrude. I wasn't really happy with the older engines, although they looked good on the boat. Now I found a 1984 Johnson, runs like new (very few hours). With this motor, the boat runs around 27 mph and rides very flat and stable with smart tabs, smallest ones.
The Squirt has no bow rise when accelerating. I used a small fin on the bottom, so it doesn't slip in turns.
Thanks for your help throughout my boat building experience. Look forward to my next one.
See in Customer Photos.
Recent email:
From the Boatbuilder Connection
Glen-L in Classic Boating Magazine
Posted by Rob Witte on November 09, 2002 at 07:36:52:
In the November/December issue of Classic Boating there's a great article and photo of a Glen-L inboard built in the '60's and displayed at the 2001 Concours d' Elegance. I believe it's a Mist Miss, and one of the prettiest examples of plywood inboards I've seen.
In all the years I've subscribed to Classic Boating, this is the first kit boat I recall seeing...quite a tribute to Glen-L!
Sent: Saturday, November 09, 2002 8:34 PM
Subject: union jack
Mr. Gayle Brantuk
I send you photos of the Union Jack Named "Dublin" Built by Arthur Traynor From Buenos Aires, Argentina.
Thanks
Arthur Traynor
Photos of the steel Union Jack trawler are in Customer Photos
Subject: Riviera
Date: 11-11-02
I'd like to sign in your project registry.
Name: Varno Porovarde
Project: Riviera
Location: Estonia
E-mail: surf@corrsfan.com
Project status (08.nov.2002): Frames on motor stringers. Installing chine and
battens.
All the best
Varno Porovarde
Subject: Link
Date: 10-31-02
Good morning,
I am addressing you with a small request.
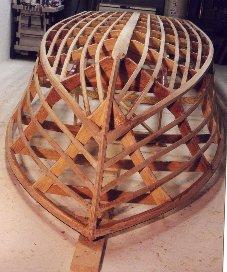
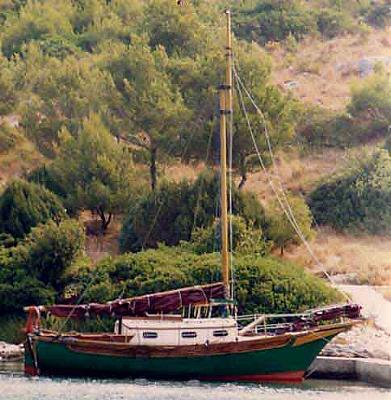
I am preparing our new web site, and since the first boat I have ever built (back in 1984) was an Amigo 22, I wanted to ask you if I could include a link to your site, and use the Amigo drawings from your site.
I am including a picture of the boat, and should you be interested, I could send you more. The boat has been built in cold molded technique, for a famous Croatian circumnavigator, Mr. Joza Horvat. However, the Amigo was intended and built for coastal cruising only.
I look forward to your kind reply, and remain with best regards.
-- Bob, the wooden boat builder. We build your dreams. Since 1984.
Below is the result of your feedback form. It was on Thursday, October 31,
2002 at 19:55:23
---------------------------------------------------------------------
name: Daniel O. Sayers, Jr.
Comments: I found your web site quite by accident while researching another
modeling project and it has kindled a fire to seriously consider building one
of your designs - Monaco.
A few years ago, I began looking for plans to build a replica Chris Craft
inboard motor boat. In the process, I found a boat builder who produced a very
nice replica in a 23 foot boat; however, in order to get the boat I desired, I
would have to spend about $65,000.00 and then ship the boat from California to
Connecticut.
I have only just begun to explore the wealth of information on Glen-l, bought
your catalogue, and am awaiting delivery of some "How to .." books.
Much planning to do.
You certainly have covered ALL the bases from what I have learned and I'm
confident you will have the answers/materials I will need.
Thanks for the opportunity........
Dan Sayers
People often ask "How much can I save?"... From Bill
Yonescu's email in the Customer Photos
section:
"...Here's some photos of the Monaco, finished similar to the Riviera
already displayed on your photo board #1. Being the second one I built, it came
out a little nicer (my opinion) than the first. It also has the MerCruiser 350
MAG MPI (315 HP) engine and almost reaches 50 mph. Each boat took about 10
months full time (I'm slow) and the raw materials cost about
19K$."
Below is the result of your feedback form. It was submitted on Tuesday,
October 22, 2002 at 12:04:18
----------------------------------------------------------------------
name: Forrest Brooks
Comments: I completed a Glen L 19 in 1988. After too long out of the water, I am in the process of making her seaworthy again. Noticed several folks are in the Project Registry building the Glen L 19. Hope they enjoy theirs as I have mine.
Subject: MiniMaxed
Date: 10-22-02
Here are the latest pictures which you requested that we send. My son Anthony and I built this together over this summer. It will do about 23MPH with a 5HP and a 9" pitch prop. You can post these on your site since we cannot find any Minimaxed pictures. Thanks
Philip V. Crusco
Lewes, DE
Photos in Customer Photos
Greg Morrell built the Ski Tow (See WebLetter 40)
Subject: windshield
Date: 10/18/02
Hi Barry. You asked where I got my windshield. Well, after some research, I
found that most places wanted about $400.00 to heat form a windshield and you
still need the moldings for the top & bottom edges. (I have about $160.00
in mine). The plastic I used is 1/8 inch Lexan which is very flexible, but
won't crack or split when bent cold.(I have used a sheet metal brake to put
a peak in a racecar windshield before!) The moldings are a little more tricky.
It involves annealing extruded aluminum stock and then shaping it around a
wooden buck. If you would like more info. I would be glad to take some close up
shots of my windshield and go into more detail of how I shaped the parts to
build mine. Greg.
P.S. thanks for using my photos on your web site.I have a ton more but they are
all 35 mm & I don't have a scanner.
Subject: T-N-T Update
Date: 10/18/02
Hello,
Here are a couple more pics of my T-N-T. I am running a hopped-up 9.9 Yamaha
with a stock aluminum prop and I an getting 26+ m.p.h. on G.P.S. After I get a
few more hours on the motor, I'll work on it some more. I also have a SS
prop coming for it.
D. Slomke
Photos in Customer Photos
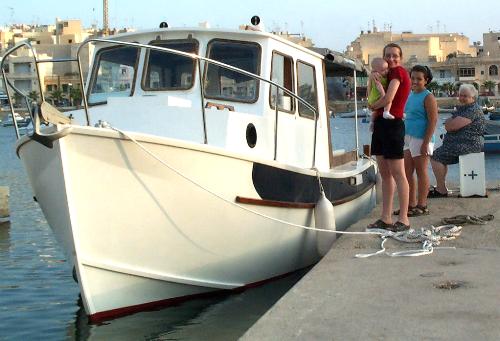
Subject: Re: Play 'N Jane
Date: 10/18/02
Hi Barry
I'm sorry I never came back ( to the Project Registry) but things were a bit hectic here.
Yes it did float, it performs beautifully and it is my joy and pride.
Every where I go I am asked a hundred question as it is different from the other boats usually built in Malta.
I am attaching a photo of TONINJA together with some of the crew.
Regards
Albert Zerafa (Malta)
Below is the result of your feedback form. It was submitted on Friday,
October 18, 2002 at 07:56:59
------------------------------------------------------------------
name: Melvin Kooy
Comments: In 1967 I purchased a Glen-L Thunderbolt from a friend of mine who had built it from plans. His name is Jim Thurmond, he lives in Canoga Park Calif. I put a Chrysler Hemi in it and enjoyed it for a couple summers of water skiing and racing on the Colorado river near Parker Arizona, also at Lake Millerton near Fresno Calif. I sold the boat for $2,500. to a guy I worked with at Litton Industries in Woodland Hills Calif. It was a beautiful boat that brought much pleasure. I relocated to northern Colorado near a couple of small lakes and am now near retirement and looking for a wood working project. I am interested in the Glen-L 17 sailboat. I intend to order the study plan as a starter.
Build more boats
GLEN-L boats, of course