On the Mark: Floorboards, storage and other interior design choices
Page 2...
One of the fundamental problems is deciding what to do about the floor boards. As you make the floor flatter, it will need to be raised to clear frame members and the stringers. The difference in height between a completely flat floor and a "reasonably flat floor" is about 6 inches (15cm). The completely flat floor places the floor at the same height as where the seat bottoms are shown in the plans. This leads to further modifications and design choices.
Test fitting and sitting
With the seating and control layout being a subjective thing, it is important to mock-up the interior using scrap materials to make sure that everything and everybody will fit comfortably. Changing seat height influences dashboard depth, steering wheel location and angle, throttle location, gauge position, etc. Changing the floor height impacts leg room which influences seating height, which influences dashboard depth, steering wheel location, ...
It is nice to test the seating, etc. in a closed shop. Just think of what the neighbors will say when they see the "crazy boat builder" sitting in the unfinished boat, holding onto an unconnected steering wheel. At least don't make any engine sounds as you do it! I hear that it IS common for home airplane builders to take photos of themselves sitting in the "cockpit" of the uncovered completed fuselage framework.
As part of the testing and fitting process, you should also consider storage options. Common storage locations are: bow area, under seats, alongside of the engine, and under the floor.
Under seat storage
If you make the bench seats narrower (across the width of the boat) it may be possible to make them flip forward (like pontoon boat seats). This opens up storage possibilities. If you push the seat edges out to the sides of the hull, you may find that it is impossible to flip them up. Test fit them and tape on some throwable seat cushions to simulate the thickness of the final upholstered seats when testing the operation of any flipping / folding seats. Also do the flip-up testing with several people in the cockpit. What is workable with one person, may not be with 6 or 8 people on board.
In our boat the bench seats are basically fixed, removable for maintenance, but not convenient enough for most storage. We have the spare propeller mounted on the side of one of the stringers under the rear bench seat. The rear anchor is a folding design and it slides under the rear bench as well on the port side. The forward anchor is a mushroom type which fits nicely behind the driver's seat. The water intake and plumbing enters on the starboard side. Having the required access to the sea-cock / water intake valve makes storage on this side impractical.
The area behind the spotters seat (actually under the forward deck) is used for the front cockpit fire extinguisher and our "dry clothes" storage.
Under floor storage
Just face it, on this boat, under floor storage is really pretty impractical. In the forward cockpit, the floor boards are pretty well trapped under the seats. If the floor boards are made smaller so that they can be pulled up between the seats rather than forward, then additional bracing is required. The frames also limit how much length you have available for long items such as skis, paddles, wake or knee boards, etc.
We leave our boat in the water all summer. This coupled with the boat being used for water sports means that the bilge always has some water in it. The bilge pump will get the water down to ~ 3" (maybe having multiple pump locations would help) and we then have to manually bail and sponge out from then on. Of course, if you haul out every time, then draining is easy. Anything left in the bilge water for an extended period of time will get slimy (another storage limitation). Also, any engine oil leaks or spills will coat the bilge and linger despite your best cleaning efforts. The oil does seem to have a preference for items left in the bilge vs. the hull. As a side note - be sure to check the clamp (or lack thereof) on the oil drain hose prior to engine installation!
The rear cockpit floor
In the rear center section between the stringers, there is some space left over that is not occupied by the exhaust and sea strainer. We use this for spare ski ropes and handles. Wherever you put your sea strainer and sea cock, make sure that they are easily accessible. It does not take much idling in duckweed to clog the strainer. In addition, most engine water pumps do not respond to intake resistance very well, so any increased resistance to water flow can lead to low cooling water pressure and possible engine over-heating. Hopefully, you should never need to access the seacock in an emergency, but it is very nice to have it easily visible, to ensure that the water is "on" prior to starting the engine. Ours is tucked under the rear seat and the position of the lever can normally only be felt (up = on, forward = off).
Rear floor with seat removed. The seat overhangs the brace (horizontal board on top of the stringers in bottom of photo) by about four inches.
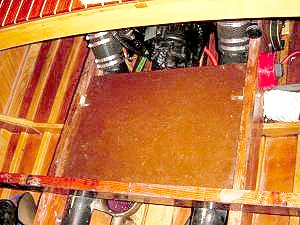
In our boat, the outer portions of the rear floor are simply the inside of the hull. A "finished" raised section could be accommodated without losing much leg room and would also still be easily removed for cleaning.
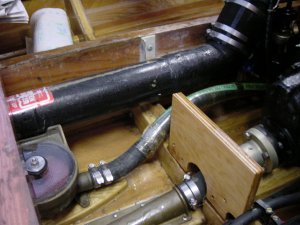
This photo shows the center section with the panel removed. The floor panel rests on the mufflers and a vertical plywood bracket that extends upwards from one of the frame members. Note the notch in the plywood bracket for the drive shaft and packing to pass through.
The front of the floor panel ends at the rear of the transmission housing and this is also approximately where the exhaust angles down as well. Extending the floor up to the rear of the engine keeps body parts and ski ropes away from the drive shaft and coupling. Even if you delay the other floor boards (as we did) in an effort to get the boat in the water, this section is required.
Note also, the tops of the stringer clips are rounded over to make them more "foot friendly".
Front cockpit floor
The outer portions of the front cockpit floor are again simply the inside of the hull. Here the hull curvature, lack of access around the seats and limited leg room made floor-boards seem impractical.
Having a "finished" center section of the front cockpit floor is a necessity. The V-shape of the hull's center section makes for very unstable footing. The steering cable also passes through this area and should not be stepped and and is a trip hazard. The floor can be broken into reasonably sized sections that can easily be lifted or slid out. This is a time where test fitting around the mocked up seating is very important. It is easy to make the floor boards too big to be removed once the seats are in place.
|
|
|
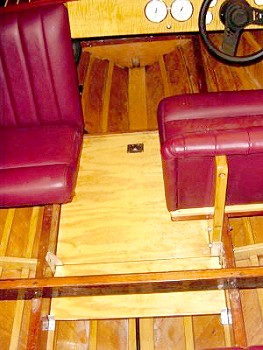
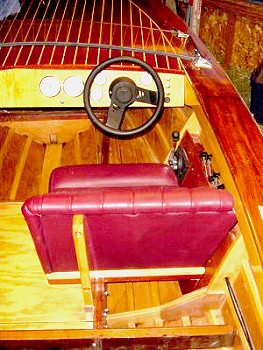
Here are a couple of views of the front floor. Again, the bench seat is removed to allow a better view. To remove the floor without removing the front two seats, the forward edge is lifted with the recessed lifting ring, and then slid forward. At that point it can be lifted out. There is really no way to lift it straight up without either narrowing the seats (very uncomfortable) or splitting it into two sections lengthwise, which would require more bracing. The piece running horizontally on top of the stringers is the forward support for the bench seat. It is screwed to the stringers and is unsupported at the outside (hull) ends.