On the Mark: Floorboards, storage and other interior design choices
Page 3...
|
|
|
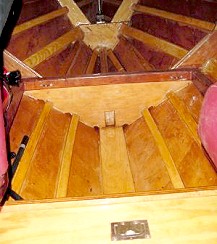
The left photo is a view of the forward edge of the front floor between the seats. The board at the front edge is the top of the frame gusset. Note that in both photos, the floor is well below the top of the stringers. I did not want to simply lay the floor on the stringers as this would have sacrificed too much leg room. The recessed area in front of the floor is a great place to hold a cooler. It is easily accessible and not in the way of the driver or passengers. Forward from there, we normally carry spare life jackets and throwable seat cushions.
The right photo shows the rear section of the front floor after the floorboard has been lifted out. It is held in place by 2 small aluminum clips in the rear that keep it from sliding back or jumping up. Simply tilt it up and it will clear the stringer mounting clips. Note, that if it were any longer, tilting to clear the stringer clips would not be possible as it would be obstructed by the bottom of the bench seat forward brace. The small amount of curvature of the clips is enough to keep the floor board from jumping out when the boat hits a wave.
|
|
|
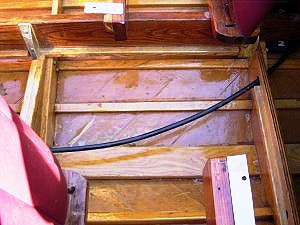

This left photo is looking down from through the edge of the driver's seat with the seat bottom and forward floor section removed. The curved black line is the steering cable. The floor needs to be supported on all sides to avoid excessive bending under my weight.
I fastened batten pieces flush with the bottoms of the stringers to support the sides of the floor. This then set the height of the floor. Additional pieces were added to the top of the frame gusset that is between the seats to bring it level with the sides and to provide an adequate lip for the two floor panels where they meet in the middle. The forward edge is also supported with a piece of batten stock glued to the rear side of the frame gusset.
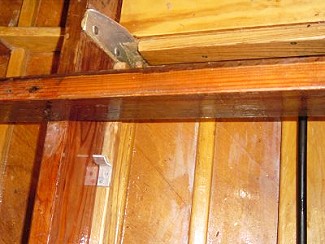
At the right side of the photo, the support for the front of the floor can be seen. In the left photo, a close-up of the floor supports can be seen. This is the front corner under the edge of the driver's seat. The brackets are glued and screwed in place. The joints are also filleted to ensure that no water can get in and make for easy cleaning.
Making the floor supports used up the last of my left-over batten stock from building the hull.
Sizing of floorboards
It is nice to try and make the floorboards fit closely so as not to rattle and also provide a finished appearance. You must remember to allow for epoxy coating of the stringers, brackets and floorboards. This means that on the un-coated pieces you should allow 3/16- 1/4" (4-6 mm) of clearance. Otherwise, once everything is coated, the floor boards won't fit back into place or will scratch nearby surfaces on the way in.
Colors
Try to keep the floor colors light as the floor will get quite hot in the summer sun. As you can see, the front floor boards are lighter than the rear. There is easily a 20 degree difference in surface temperature between them on a hot summer day - very noticeable on bare feet. Replacing the rear floor board is on the "long term improvements list".
Our seats are a burgundy red. We think they are quite attractive, but also get quite hot in the sun as well. You may want to consider a lighter color for that reason. I now understand why most of the commercially made boat seats are white or off-white colored.
Many folks paint the bilge, but I do like the natural wood color, and left it unpainted. Unfortunately, constant submersion and varnish are not very compatible. So, if you intend to keep your boat in the water, the only real choice is to paint. This decision should be made prior to engine installation as once it and other hardware is in place, large areas become quite inaccessible and hard to paint neatly.
Moaning Chair
Overall, fitting out the interior is the part of the project which presents one of the greatest opportunities for creativity and uniqueness for the boat builder. The myriad choices may seem daunting at first, but by testing, making mock-ups of interior components and just plain sitting in the cockpit areas for a while, the choices do get narrowed down. In a number of Wooden Boat articles there is mention of the boat shop "Moaning Chair" used for contemplation of the next phase of the project or while searching for the solution or fix to a new mistake (yes, we all make them). Why not have it be one of the test seats in the cockpit of your newly flipped hull for a while?
![]()
We are very pleased to have Mark sharing his expertise with his fellow boat builders. If you would like to comment on this article to Mark, he can be reached at "builders at bronkalla.com". Replace the at with @. (Just trying to dodge a few spammers). See Mark's great web site for information on his Riviera project.