On the Mark: Spraying clear 2-part polyurethane's
Continued...
Manufacturers and products
Before I dug into researching this, I assumed that going with a water reduced finish would avoid the potential health issues. It turns out that the same basic isocyanate hardeners are used. This means that the worst of the health hazards remain.
Most of the manufacturers do not recommend applying their finish over ANY old finish. Reasons range from chemical incompatibility and blistering of underlying finishes to mechanical incompatibility. When I contacted Epifanes, the tech support guy (very helpful) said that putting a 2-part finish over varnish would be like placing a sheet of glass on a pillow!
In the end the availability of a local stocking dealer and the recommendations of airplane builders led me to Imron. There are a lot of 2-part clear finishes available. Most are marketed to the body shops and are optimized for them. Fast dry rates, recommended high temp (140-170 degree) oven drying and narrow application temperature ranges pushed most of them off my list. My shopping list of characteristics included: wide application temperature range, long recoat window, reasonably long dry time. I looked at information for Awlgrip, Sterling/Detco, Epifanes, System Three and ??? . Some are polyurethane mixes or a mix of polyurethane and acrylics. You want a 100% aliphatic/linear polyurethane. It has the best UV absorption for epoxy protection.
The final choice was Imron 500S (clear) and the associated hardener. Forest green metallic Imron was used for the lettering.
Toxicity
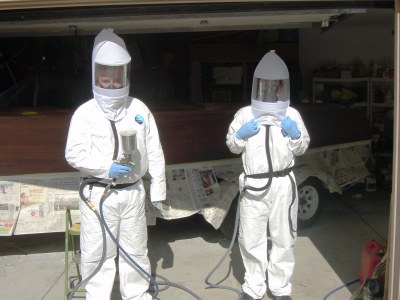
The isocyanates contained in the hardener require the use of a forced air respirator. The isocyanates used in the hardener are highly toxic, can cause permanent asthma and are odorless. Because of the odorless property of the most toxic component, no cartridge respirators are approved for this use. Axis products makes the Hobby Air a very nice, reasonably priced (at least for these devices) product for the amateur. They are primarily sold to aircraft builders. See: https://secure.foxvalley.net/axispro_com/ . I bought the double half mask outfit and hoods. With 2 masks, both my helper (son David), and I were protected.
It took a bit of digging to find out what the risks are and why some folks get away with rather sloppy safety techniques. You have a 5-20% chance of getting permanent chemical induced asthma if your protection is not adequate! After that, the normal solvent toxicity issues come in... think heavy duty lacquer thinner. See the following links for some excellent background info:
| Collision Industry Action Group | www.ciag.ca/iso.html |
| OSHA | www.osha-slc.gov/SLTC/autobody/docs/nioshctm/nioshctm.html |
| EPA on HVLP spray guns | www.epa.gov/dfe/pubs/auto/spraygun_success |
| EAA Sport Aviation Magazine | www.eaa.org/benefits/sportaviation/aircraft_bldg0302.pdf |
| WoodWeb Q&A | www.woodweb.com/knowledge_base/Filtering_out_isocyanates.html |
Finicky Finish
Clear coats must be sprayed for a high even gloss. The cost of the finish is approximately twice that of a good varnish. At approximately $200/gallon, HVLP becomes a must. You need an HVLP gun to minimize the overspray which saves money and minimizes the health hazard and a turbine with a long hose (to cool the air) or a conversion gun and big compressor. You MUST use a filter or dryer on a conversion gun. Water droplets cause pimples in the finish.
Once you have done the research and made the decision to leap to the linear polyurethane finish rather than regular varnish. Buy the proper equipment, find a supplier and it is time to get to work. If you know of an airplane builder in your area, you may be able to borrow or rent some of the gear. Most folks are understandably shy of loaning out spray guns. If the gun is not COMPLETELY cleaned, this finish WILL RUIN the gun. It will set up hard and no solvent will touch it.
The Riviera required a bit under a gallon of mixed finish. The remaining base should be fine for several years, but the hardener will go bad in the can within a year.
Prep for spraying
After the scraping is complete, the surface must be sanded. This is once again a "full scratch" sanding job. If recoating with varnish 220 grit is required. If using a 2-part automotive clear such as Imron, you need to sand up through 400 grit for good wet out. There is a very noticeable difference when spraying over 400 vs 220 grit sanded epoxy.
Now is the time for a final test for compatibility. Wipe the hull down with the appropriate solvent for your finish. Apply a test area of finish and wait overnight to see if it still looks good. Rather than testing on the hull, floor boards make a good test sample. Remember that finish failure requires taking everything off and restarting the prep process.
Get the lighting set up. You want to have several low angle lighting sources so that you can judge how even you spray on the finish.
New water line
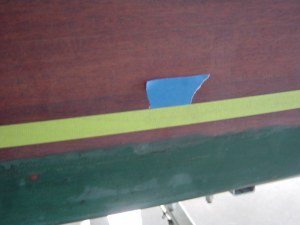
This finish is not for below the waterline applications (neither is regular varnish). Given that the old water line was a bit too accurate (right at the real water line), I decided to raise it. The new water line height was marked lightly in pencil and then blue masking tape was used to highlight these marks. You want to lay the tape down in long passes. This does not allow you to get very close to see the pencil marks. By marking the edge with bits of blue tape, you have a high contrast target to aim for with the edging tape. The new waterline edge was taped in with 3M 233+ fine line tape (light green). This stuff is really great. Relatively high tack, superior chemical resistance, supple texture that conforms to edges and objects. Interesting, the things you find that are "hidden" among the various trades.
Ready to go
Once the normal prep is done, now the spray prep starts. Drape off everything in the work area. The interior of the boat is also draped off as well. Any hardware that cannot be removed is masked off with the green tape. The overspray is very permanent.
Your work paths have to be set up. You will be dragging both the air hose for the gun and the hose for your mask. They seem to want to form macramé or resemble a couple of mating snakes very rapidly. When spraying, if the hose hangs up, the interruption in the sweep of the gun will almost certainly result in a run!
With the top of the boat also needing to be sprayed, stools and ladders are needed. Once you have everything ready, make several practice passes with the gun and mask connected. Make sure that everything reaches and the hoses do not hang up.
You will need to be completely protected with full coverage clothing or spray suit, gloves, etc. Tyvek suits provide good protection for very little money. Just be sure to buy one at least two sizes larger than you think you will need. With reaching and bending, you will often rip out the back and butt of the suit if it is not over-sized. Back when I did x-ray system service, I had to go into hospital surgery units and it seemed that the only size "bunny suit" that they stocked was a "dwarf extra small". More than one nurse was surprised to see me come out after a service call with the suits nearly completely shredded with every seam ripped open. You should tape the arm openings shut over the gloves. This will prevent sweat from dripping out onto the new finish or where you are about to spray.
You should buy the protector sheets for your mask or hood as well. These are clear plastic film sheets which stick on. They can then be peeled off after each session. If you don't use them the lens of your hood will pick up the overspray and quickly become unusable.
Once everything is ready, suit up and mix. We mixed small batches, not knowing how far it would go and not wanting to waste any finish. To minimize overspray problems, we started with the sides and then did the top. Most of the overspray from the top shot past the sides, but when spraying the sides, a fair amount of overspray would land on top.
We sprayed on two full coats the first day in one session. The next day we fixed up some runs/sags by wet sanding them out and then sprayed on another full coat. This gave us the recommended final film thickness. Too thin and you don't get enough UV protection, too thick and it may want to peel off. Resist the temptation to keep building the film.
Next the lettering was applied. Since we sprayed on the finish, I wanted to spray the letters as well, rather than using cut vinyl again. The letters are in an Imron dark green metallic. A local sign shop, Blast Graphics, made a cut vinyl mask for the letters. This is similar to the vinyl used for normal lettering, but is a lower tack adhesive. The mask is put in place and then the letters were sprayed in. After the finish had set up (~2 hrs) the masking was removed. There were still bits of adhesive left over, but these were easily removed with 3M Adhesive Remover (mostly naptha).
Final sanding and buff out
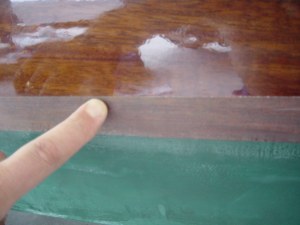
Now the question is: "How fancy do you want to get?" The photo at the right shows the freshly sprayed finish at the new waterline. You can see the high gloss of the Imron compared to the full scratch 400 grit sanding job on the epoxy. If I had a better spray gun technique, I could have probably stopped at that point. Unfortunately, there were still some sags and runs. Initially this was very depressing. I did not want to have to sand and re-spray the boat again, so I decided to sand out the sags and then buff the finish. Of course, this decision was made on a Sunday so finding the right supplies was a bit of a problem (auto body supply stores were closed). I did not want to wait another week as we wanted to get the boat in the water for the next weekend and the swim platform still needed to be attached and all the hardware had to be reinstalled.
Any remaining sags, drips or runs can easily be sanded out. Start at 320 and work your way up to 1200 or 1500 grit. It goes very rapidly, so it is helpful to have several sanding blocks loaded and sitting in buckets of water. Clean off the freshly sanded area with water and a towel between grits. Left over grit will leave scratches.
For the buff out, use a 9" right angle buffer, such as a Milwaukee 5460. You will need to buy a hook and loop backer pad and a couple of foam buffing pads. The foam pads are used with the compounds. Do not use lambs wool or fabric pads or they will leave streaks. The foam pads are found at the auto body supply shop - most hardware stores do not have them. A variable speed buffer allows some control as you get the feel for the tool and allows a slow start up so that you don't spray the buffing compound all over everything. I have some items that got stripes of tan and white that were five feet away! When buffing, you really should wear safety glasses as well, as the compound is not kind to your eyes. The 9" right angle buffer and pads will run close to $300. Ask around to see if you can borrow a friend's. The small vertical buffers at the auto parts store or home center are just toys and you really do want to eventually finish the buff out, don't you? The finishing compounds are available from the automotive paint suppliers or even West Marine (at a premium price).
If you sand to 2000 grit, you can go right to using 3M Finesse-it II with the fine white pad and have an almost immediate high gloss, mirror finish. Since I had some overspray and slight orange peel, I stopped at 1500 grit for the sanded areas. Next a pass was made with Heavy Duty finishing compound (yellow foam pad). This results in what looks like a glossy finish. Clean off all remains of this and switch to the white foam pad and Finesse-it. This now will up the gloss and you will see that the old "high gloss" still looks cloudy. Each full pass of buffing took 3-4 hours. If you want a true "show quality finish" more time can be taken with full wet sanding, compounding and buffing. As my wife said repeatedly, "Its a boat and will get scratched".
Hardware
While the hardware was off, we cleaned and polished it. My wife, Teal, had the pleasure of polishing all of the stainless and chrome. The water spots were cleaned off with vinegar and then chrome polish was used to brighten them up. Some scratches in the stainless were sanded and buffed out as well. Use sewn buffing wheels. You can go from 600 grit sandpaper to emery compound on the buff and then white rouge for a real mirror finish.
The hardware was reinstalled and bedded with polysulfide compound. When reinstalling, the screws are lightly dipped in the compound to make sure the holes are thoroughly sealed.
For the final results, take a look at WebLetter 49, the middle of the page of the Wakeboard Pylon article.
Disclaimer:
I am not a professional refinisher, and this article is based on my research and experience (so far). I would encourage the reader who wants to undertake spray application of these finishes to do additional research and contact professionals in their area before attempting to spray any of the 2-part Polyurethane finishes.
After a full season of use, the finish still looks great. After the first season the varnish usually looked OK as well. The real story on the improvement in durability of the new finish will be known by the middle of next summer. That is the point when the varnish starts to look bad. Hopefully the Imron will still be going strong.
We are very pleased to have Mark sharing his expertise with his
fellow boat builders. If you would like to comment on this article to Mark, he
can be reached at "builders at bronkalla.com". Replace the at with @.
![]() (Just trying to dodge a few
spammers). See Mark's great web site for information about his
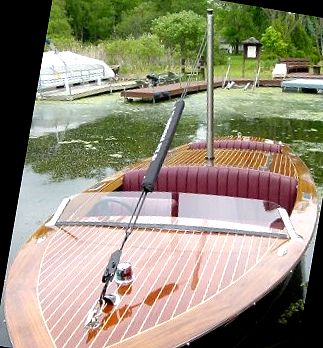
Riviera project. If you live in Wisconsin and are interested in woodworking,
Mark is the current president of the Wisconsin
Woodworker's Guild. New members are
welcome.
(Just trying to dodge a few
spammers). See Mark's great web site for information about his
Riviera project. If you live in Wisconsin and are interested in woodworking,
Mark is the current president of the Wisconsin
Woodworker's Guild. New members are
welcome.