October 2003: Bought Sapele mahogany (African) for the frame members,
chines, battens and sheers. Bought 1/4 inch BS1088 mahogany marine plywood.
Ordered 1 gallon West Systems Epoxy.
November 2003: Cut out and assembled the frames, stem and transom. I
used a jigsaw, spokeshave and hand plane to do most of this. Constructed the
building form and fixed the frames, transom and stem in position. I used bronze
carriage bolts where bolts were required (sent to Ireland from Glen-L), I
counterbored the holes and then filled the holes with epoxy/microfibres.
December 2003: Fitted the chines, sheers and battens in place. I had to
scarf-joint the chines and sheers; I found it very simple to do just using a
hand plane. I temporarily nailed them to a flat table while the epoxy was
curing and removed the nails afterwards. I used bronze screws to fix the
longitudinal members to the frames. I spent the Christmas holidays fairing the
framework with a hand plane (I found a power-plane hard to control). I had to
add extra thickness to the chine near the stem because I originally didn't
have enough twist in the chine.
January 2004: Fitted the side and bottom planking. I used an
epoxy/microfibre mixture and made fillets on the inside of the hull from the
epoxy that squeezed out. I used ordinary steel screws (chipboard screws) to
hold the planking in position while the epoxy cured, then I removed all of the
screws.
February 2004: Flipped the hull right-side-up. Fitted the deck beams
and coaming sides. I extended the cockpit backwards about 6 inches because I am
6'2". Bought sapele and maple strips so I can apply a nice planked
deck.
 March 2004: Completed
deck framing including the radiused fillets which I drew out patterns for on
autocad so I could get them perfectly tangential to the coaming, dash and rear
deck beam. Faired the deck framework and filled and sanded all of the screw
holes in the interior of the hull. In my opinion, sanding the interior is the
most tedious job so far.
March 2004: Completed
deck framing including the radiused fillets which I drew out patterns for on
autocad so I could get them perfectly tangential to the coaming, dash and rear
deck beam. Faired the deck framework and filled and sanded all of the screw
holes in the interior of the hull. In my opinion, sanding the interior is the
most tedious job so far.
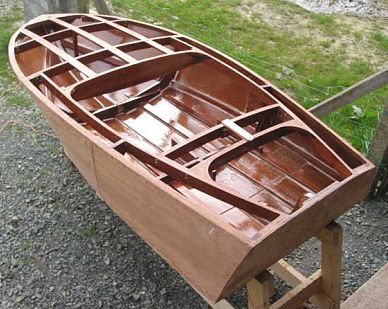
April 2004: Continued sanding the interior. Fitted three supports for
the seat bottom, one on the keel and one on each outer batten. Applied three
coats of epoxy to the interior (wet sanding with a sponge block & water in
between each coat).
May 2004: Bought a 1998 15hp four-stroke yamaha electric start outboard
engine. It looks massive on the boat but it weighs 99lbs which I hope will be
ok on the transom. I painted two coats of gray garage floor paint on the
interior. It contains some sort of anti-slip grit. I also have begun work on a
trailer for the Squirt, based on info in your "How to Build Boat
Trailers" book.