Building the Tunnel King - Part 2
by Matthew Green
Continued

Materials
The Tunnel King is predominantly built of plywood, which greatly eases construction and results in a stronger, lighter, longer-lived hull. Douglas-fir and a variety of "mahoganies" are the main types of marine plywood suitable for this boat. Fir will be cheaper, is widely available, and is very strong. One of the more popular marine plywood's is okoume, which is considerably lighter than Douglas-fir and looks fantastic when clear finished; unfortunately, it is very expensive. For the fastest, lightest boat, okoume is preferable.
Stay away from exterior grade plywood. Although the glues are virtually the same as marine plywood glues, exterior plywood will have more voids in the inner veneers than a marine plywood, which is supposedly "void free". Also, when buying 3/8" Douglas Fir plywood, get five ply instead of three ply. In my experience it bends better and is stronger.
(Editor's note: Five ply is always preferable, but not all manufacturers make it and it may not be available.)
The Tunnel King does not have any large solid wood members, such as stringers or bent frames; instead it has many smaller longitudinals and five transverse, plywood re-inforced frames. Sitka spruce or Philippine mahogany are specified for the solid wood parts of this boat, and both are excellent choices. Sitka spruce is much lighter, but more expensive and can be very hard to get. Philippine mahogany in long, clear lengths is readily available. Both woods work well with hand tools, but are somewhat split-prone: pre-drill and countersink for all screws on this boat; don't forget to stagger your fasteners as well. I used mostly mahogany with Sitka spruce in less stressed areas, such as the seat bases. Buy your lumber well before building, and let it acclimate to your workshop before rough cutting it. I let mine air dry for a year in my garage before beginning construction.
Fasteners
The fastening schedule included with the building instructions calls for a variety of sizes of wood screws and boat nails. Stainless screws are preferable (they tolerate power driving better than bronze), and square drive ("Robertson" to Canadians like myself) are easiest to drive. I followed the fastening schedule closely with one major exception: where # 12 or 14 by 3/4 inch bronze nails were called for, I used # 6 by 1" screws. The screws are somewhat slower to drive, but they are painless to remove if misplaced and seem to pull two bent pieces together better than nails; this is especially helpful when installing the deck pieces.
Glue and Epoxy
The Tunnel King design predates modern wood/epoxy construction; nevertheless, it is a prime candidate for epoxy saturation construction. For the full story on epoxy techniques, see one of the following:
- i) "The Epoxy Book" by System Three Resins
- ii) "The Gougeon Brothers on Boat Construction" by WEST Epoxies
- iii) The Glen-L Website
- iv) Wooden Boat Magazine
Is far as I am concerned, epoxy is the only glue suitable for this kind of boat. When the directions are followed closely it's easy to use, immensely strong, waterproof, and fills gaps well. The two glues suggested in the bill of materials, plastic resin and resorcinol, have significant shortcomings:
- i) Plastic resin glue is not totally waterproof, only "highly water resistant". Joints glued with plastic resin are known to come apart after a few years of exposure. It is however, inexpensive.
- ii) Resorcinol is totally waterproof and very strong, but terrible at filling gaps and requires monumental clamping pressures.
In short, I see only one instance in which NOT using WEST construction on this Tunnel King makes sense: if you are intending this boat as a pseudo-raceboat, i.e. the lightest possible, with no passengers in mind. I can understand not wanting to add the weight of epoxy coatings, reinforcing glass, etc.(*)
Tools
Although it's possible to build the Tunnel King entirely with hand tools, I think most of us would rather be on the water than sweating behind a ripsaw. For this reason, I suggest builders be fairly well equipped with power tools before beginning construction. Below is a list of tools that, in my experience, are almost essential for building this boat:
-
Power Tools
- table saw - for ripping the many longitudinals
- jig/sabre saw - cutting curves in plywood
- circular saw - cutting plywood
- cordless drill - the more the better!
- regular 3/8 drill - two is better
- disc sander - for grinding away epoxy blobs
- orbital sander - sanding epoxy, preparation for paint
- belt sander - shaping bevels on plywood, smoothing curves
- radial arm / miter saw - cutting compound angles on transom blocking
-
Hand Tools
- planes: block, #3 or #4 smoothing, jack
- files and rasps
- lots of drill bits, countersinks, screwdriver bits, et cetera
- small, fine handsaw - for cutting frame notches
- chisels
- sharpening stones
- tri-square
- T-bevel - two is better
- level
- 36" straightedge
- carpenter's scribing dividers - for fitting decking
- hammer and nailset
- LOTS of clamps
- one or two deep-throat (6-8") C clamps - transom assembly
- chalkline and prick wheel - marking from templates
-
Nice to Have
- router - rounding over bottom battens, et cetera
- bandsaw
- drill press
- jointer or jointer plane
Getting Started: Building Frames
About time we started building a boat, eh? Once you have assembled all your tools and materials, and cleared out the garage, it's time to build the frames. The transverse 1x3's are cut to length, with the specified angles on the ends. The plywood gussets, which are the heart of each frame, are shaped according to the full size templates provided by Glen-L. Since each frame needs two identical gussets, they should be tacked together and cut simultaneously. Make sure all curves are fair, the gussets and notches are correctly placed, etc. The building manual suggests using a jig to ensure alignment during assembly; I think this is a great idea. Glue and fasten according to the fastening schedule. Some material may be cut out of the center of each gusset to reduce weight. These "lightener holes" are optional, but they make great passages for routing steering hose/cables, wiring harnesses, et cetera. It is critical the frames be built accurately; otherwise the boat will never perform well and could have dangerous handling problems.
The next task is building the transom frame.
There are two ways to build the transom, depending on if you are
intending to fiberglass the boat or not: in one version, some frame
members are attached outside the 1/4" gusset, and in the 'glass
version, all solid wood members are inside. Neither the Glen-L building
manual nor the plans are particularly clear about the arrangement of
blocking members; so 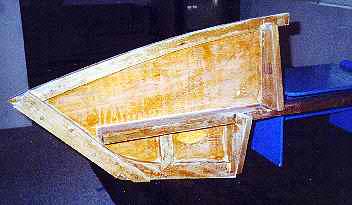 please
view the photos of the assembled transom that accompanies this article.
Again, accuracy and proper assembly procedures are imperative, as you
will be hanging a 300 plus pound motor off of this frame.
please
view the photos of the assembled transom that accompanies this article.
Again, accuracy and proper assembly procedures are imperative, as you
will be hanging a 300 plus pound motor off of this frame.
The Building Jig and Frame Setup
A building jig? I thought Glen-L boats
didn't require a building jig! According to the instruction manual,
"No building form is required for the construction...", but in
practice, a system is needed to hold the frames in the same plane and at
the proper spacing, as well as providing the necessary support for the
builder, who will be crawling all over it. Glen-L suggests just using
sawhorses, but in my opinion, these are totally inadequate. For my
building jig, I used two very dry, straight-grained fir 2x6's, 18
feet long, spaced about two feet apart. The upside-down 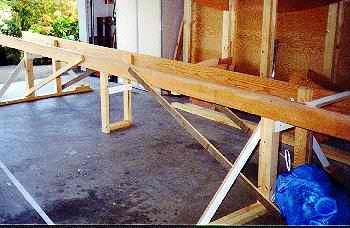 frames rest on the 2x6's and
are held in place by blocking and clamps. The 2x6's are held up by
six posts and eight diagonal braces, stiffening the entire structure,
which is bolted to my garage floor (see photos). In my opinion, an
accurate building jig is vital when building a high speed planing hull.
frames rest on the 2x6's and
are held in place by blocking and clamps. The 2x6's are held up by
six posts and eight diagonal braces, stiffening the entire structure,
which is bolted to my garage floor (see photos). In my opinion, an
accurate building jig is vital when building a high speed planing hull.
Once you have built your five frames plus the
transom frame, you can start to setup the frames on the building jig. The
lower edges of the first four transverse 1x3's, and the face of the
1x3 of the transom frame, all rest in the same plane. Therefore, the
transom frame 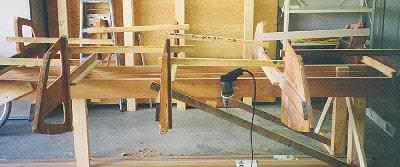 must be blocked up to
make it level. The dimensions for the frame spacing are scaled off the
blueprints. Frame number five (closest to the bow) sits "below"
the other frames when setup on the jig (remember the boat is initially
built upside down), so it will require notches being cut into the
building jig. These notches are not cut until the tunnel side is ready to
be assembled, which will be covered in the next installment.
must be blocked up to
make it level. The dimensions for the frame spacing are scaled off the
blueprints. Frame number five (closest to the bow) sits "below"
the other frames when setup on the jig (remember the boat is initially
built upside down), so it will require notches being cut into the
building jig. These notches are not cut until the tunnel side is ready to
be assembled, which will be covered in the next installment.
More photos
***
In the next article: Full-scale construction.
Continued in WebLetter 16
(*) Editor's note: We agree that epoxy is the best choice for this and most boatbuilding projects. We normally add a slip of paper to the plans, adding epoxy to the list of options. We would, of course, recommend our POXY-SHIELD, which is used in the same manner as the WEST epoxy, and is less expensive.