
A place to share YOUR boat building story
Glen-L Marine Designs - 9152 Rosecrans Ave. - Bellflower, CA 90706
|
Performed by Gove Scrivenor |
 In this issue
-
Good Times in 2008 by Rich
Coey
-
Glen-L Boatbuilder of the
Month
-
100 Skills Every Man Should
Know
-
Designer's Notebook: Yankees
and Epoxy
-
Thanks for the Plans by
ArtDeco
-
Photos sent in since the last
WebLetter...
-
Shop Talk: 7 Tips for Clean Plywood
Cuts
-
Recent email
-
When Pumpkins Drink...
GLEN-L Update
I'm writing this as Gayle and I are flying home from Alabama, having just left all of the wonderful people and fabulous boats present at the 2008 Gathering of Glen-L Boatbuilders at spectacular Lake Guntersville State Park, about an hour's drive out of Huntsville, Alabama.
To those of you with whom we had the pleasure of your company for the past few days, THANK YOU! We loved the time spent with you, the boat rides, the shared boatbuilding (and boating) tips and techniques, the jokes and good-natured teasing, and the absolutely delicious food. To those of you who weren't able to attend this year, I implore you to start making plans for next year's Gathering. Really, do whatever you need to do in order to insure that you don't miss out on what really can be a life-altering, fun and inspiring few days in one of the most beautiful places on earth!
There were close to 100 people and over a score of boats in our gregarious group of gracious gunwale-grabbing groupies. Singles, couples, families, young and old, city-slickers or country-bred, they were all there, and they all had a wonderful time. Some brought finished boats, some partially-done, some brought just their dreams, but all brought a sense of joy and friendship.
In next month's WebLetter we'll feature a number of stories and photos of the 2008 Gathering so that you'll all get a sense of what those who were able to attend experienced, and I am sure that you will be thrilled and inspired by all you read.
As for me, I've already made our reservations for a lake-side cabin for the 2009 Gathering!
Until next month . . .
Editor
Good Times in 2008
by Rich Coey
It's the end of summer here in
California and we just finished the last official cruise of
the season. This has been the first full summer since
'Reminiscent', our Glen-L Monaco was launched. The season started
out on May 4th at the West Coast Rendezvous, where we had a
great time meeting everyone and seeing all the other Glen-L
projects. Next was the Antique and Classic Boat Society Show and
Cruise at Bass Lake, California. This was a combination event
with the Northern and Southern California Chapters. There we
met Esley Cowman and his wife with their Monaco named
'Acajou'. Next was Clearlake which was a show, then a
lunch cruise to a private island with all the boats.
July held the ACBS South Lake Tahoe Show with many amazing
classic boats. The day after the show was a cruise to Emerald
Bay for a picnic. The last event of the year was a Cruise on
the California Delta. It was a three day event with a BBQ, a
cruise to a private club on an island for lunch, and a
catered dinner with impromptu excursions throughout the
weekend.
We meet new people everywhere we go. The boat seems to
attract a lot of attention. You would be surprised how many
people either have or have had Glen-L boats. We met one man
(I don't remember his name) at a marina on the Delta, who
had a Missile that he had redone. His father
had built and launched it at the same marina in the
60's.
Building our boat was a lot of fun and I plan on doing
another, but have to say using it has been the most fun. Even
though Tahoe is beautiful, our favorite place to go is the
California Delta. With 1,000 miles of waterways, from
half-sunken houseboats with people living on them to duck
blinds to mega-yachts, there is something new around every
corner. In between the sponsored events we take day trips for
brunch at Pirate's Lair, or lunch at Giusti's, who
claim to be the first restaurant on the Delta and almost 100
years old. If you could see this place you would believe
it.
Other times we have gone on cruises with our friends Jerry
and Kate who we met at a Lake Tahoe event. Their boat,
Razzmatazz, a 1941 Chris Craft barrellback is a Concourse
d'Elegance winner, but these days, like us, they prefer
to be out on the water instead of tied up at a show. In
August, Jerry organized a 100 mile cruise on the Delta. What
a fun day!
We are looking forward to next year and hopefully another
Glen-L Rendezvous to start it all off.
-- Rich and Sherri Coey
Glen-L Boatbuilder of the Month
Stephen Yokubaitis - Glen-L Riviera
Steve Yokubaitis has a
"Mistress" - the beautiful Glen-L Riviera pictured below! Born in Omaha,
Nebraska on October 19, 1952, he is the youngest of 3
children born to parents Elsie and Vincent.
Steve is a petroleum exploration geologist since 1978. He
lived for 20 years in Denver, and the last 10 years in
Amarillo, Texas. Currently working for Rio Petroleum, Steve
is married to Ruth (20 years).
The following is Steve's boatbuilding experience, in his
own words . . .
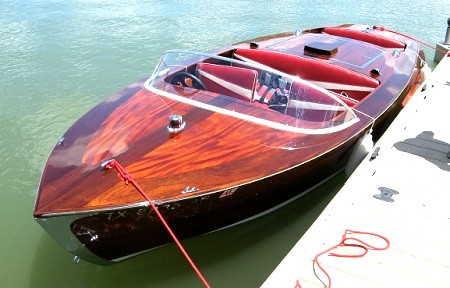 "The Riviera is the first boat that I have built. She is
named 'Mistress'. I enjoyed all of the hours that I
spent working on her and it was also a great learning
experience. Building any wooden boat entails lots of work
with various hand tools and involves lines and surfaces with
continuously changing curves. The Riviera is certainly about
curves. Therefore, building a boat like the Riviera can be as
much an artistic process as it is a mechanical process and I
especially enjoyed that mix. My wife says that being a boat
builder requires you to be six different people; woodworker,
architect, mechanic, artist, inventor and dreamer. She may be
right.
I enjoy working with wood and certain types of wood are
enjoyable for specific reasons; with pine it is the smell,
with walnut, the smooth texture and beautiful grain and
color, and with Honduras Mahogany it is the choice of widely
varied grain to pick and choose from to achieve a certain
look. Cutting all of the veneer myself allowed me to hold
back certain pieces for use in particular places. This was
especially true on the deck. I 'book matched' the
deck down the centerline and used flat grain mahogany stained
a brown tone for the finishing boards with ribbon grain
mahogany for the rest of the deck stained a traditional red
tone. On the foredeck I used mahogany with a curved crotch
grain. It was a lot of fun composing and constructing the
deck veneer.
I'm sure that I will always be building something with
wood and may someday build another boat. I envision that it
might be a 14' flat bottom rowing skiff. I have always
enjoyed rowing ever since I got my rowing merit badge in Boy
Scouts. I would like to dream that my next boat would be the
44' Marauder but there are a lot of reasons
why it won't be; not the least of which being the length
of time that it would take me to build it by myself, and
where I live relative to an ocean to float it. Oh,
well.
I am certainly grateful to my wife for all of her help,
especially those many hours spent spreading epoxy. I too, am
thankful for the lessons that my dad taught me about working
with wood and the joy of being on the water in a boat."
Editor's Note: See the story about Steve and his "Mistress" in
the Amarillo Globe News and more pictures in Customer Photos.
100 Skills Every Man Should Know:
2008's Ultimate DIY List
Brains and charm are fine, but a real guy needs to know how
to do real stuff. If you ask me, the #1 Skill Every Man
Should Know is How to Build a Boat - after
all, the world over suffers from floods, tornados, tsunamis,
etc. - and a boat supplies shelter, transportation, a means
of catching food ('gators, crocs, fish), quality family
time, and most of all, fun!
Popular Mechanics magazine's expert editors, after
months of debate, compiled the following lineup of essential
skills, broken down in 10 categories for the competent man -
plus 20 tools you need to own.
Read, enjoy, then build a boat!

Automotive
1. Handle a blowout
2. Drive in snow
3. Check trouble codes
4. Replace fan belt
5. Wax a car
6. Conquer an off-road obstacle
7. Use a stick welder
8. Hitch up a trailer
9. Jump start a car
Handling Emergencies
10. Perform the Heimlich
11. Reverse hypothermia
12. Perform hands-only CPR
13. Escape a sinking car
Home
14. Carve a turkey
15. Use a sewing machine
16. Put out a fire
17. Home brew beer
Designer's Notebook: The Previously Ubiquitous "Yankee" Screwdriver
The "Yankee"
screwdriver revolutionized driving screws long
before the electric drill/screwdriver became
commonplace. The source of the name
"Yankee" screwdriver is not known; it
could be the trade name of the original, but we like
to think of it as an offspring of "Yankee"
ingenuity. Clamping Epoxy Glued JunctionsMost who work in wood have been taught, or soon learn, that glued joints must be firmly clamped together. Crank the clamping handle as tight as you can and let the glue ooze out.Unlike most adhesives, however, epoxies require only moderated clamping pressure. The adhesive should not be squeezed from the joint. The strength of the junction is based on a thin coating of epoxy remaining between the mating surfaces being bonded. If the junction is clamped excessively tight and most of the epoxy is forced out, the joint will probably fail. A starved epoxy glued junction that has failed will have a sugary or grainy appearance. A properly glued junction will pull the wood apart before failure and have a film of epoxy between the mating surfaces. It's probably worthwhile to make a couple of test samples of epoxy glued joints before you start building your boat. Use different clamping pressures and get the feel of how much is best for the epoxy you are using. Incidentally, Jim Betts, in the short-lived IABB booklet described a new "miracle" adhesive. Most older adhesives were made of horses' hooves. This new horse-based adhesive guarantees that you cannot get the parts apart after you use it - it comes with a real live horse that kicks you in the ass if you try to separate the parts! |
Thanks for the PlansWhen you need some helpOn the boat-building scene There is one place to go That place is Glen-L Marine The people are friendly They really know their stuff They don't hand out BS Or leave you in the rough For a half century and more Of designs big and small From folks far and wide I say thanks for us all Thanks for the service The advice and the plans In the boat-building world Glen-L, you are The Man -ArtDeco |
Photos sent in since the last WebLetter... |
Product Review
by Andy of Andy's EZWoodshop
Irwin®
Quick-Grip® 6'' Bar Clamp
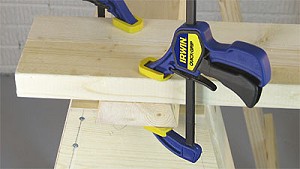
I had bought the Handi-Clamps first, tried them on a couple of projects, then hung them up never to be used again. In desperate need for some type of clamp for the shop (at least something better than the old rusty C-clamps I bought at a garage sale), I ignored my hesitation about buying another "quick-grip" style and plopped down $15 or so for a pair of the Irwin Quick-Grip bar clamps. And oh my gosh, what a difference these clamps make. The gripping power is exponentially greater than the Handi-Clamps. Not sure why, exactly. Maybe it's just the design of the clamp, with the sliding bar and all that. Whatever it is, the Quick-Grip bar clamps have quickly become a must-have tool in my shop.
Funny phenomenon going on with clamps these days. Have you seen all the mini clamp sets being sold at places like Home Depot? I like clamps as much as anyone, but geez, who really needs a set of 36 super-tiny quick-grips? Maybe it's a hobby thing, I don't know. It's strange, though, how I'm curiously drawn to those packages sitting out in the main isle by the checkouts. I really can't think of any use I would have for them...but damn...I want some of those!
Back to the Irwin bar clamp...which I have recently decided is the most awesome tool I have in my shop. It's really unbelievable to me how well these things work. I guess the best part is the one-handed operation. After using these bar clamps on a few projects, I'm totally confused why woodworkers didn't have stuff like this 100 years ago. I mean, really, why in the world did it take so long for someone to invent a clamp that can be used with one hand? I'm befuddled.
The Irwin clamps I bought are shorties...with a little 6" bar. I suppose the traditional use for a bar clamp is to clamp large wood projects together or glue up wide panels, in which case the bar would need to be quite a bit longer than 6." I've done plenty of drooling over those larger Irwin clamps I see at Home Depot. They're are on my wishlist, but they can be a little pricey. For now, the short bar clamps are working fantastically well for the smaller projects I'm building in my shop.
For larger projects, boat-building, etc. consider the following:
Irwin 12" Quick-Grip Bar
Clamp/Spreader
Irwin 18" Quick-Grip Bar
Clamp/Spreader
Irwin 24" Quick-Grip Bar
Clamp/Spreader
Irwin 36" Quick-Grip Bar
Clamp/Spreader
Irwin 50" Quick-Grip Bar
Clamp/Spreader
Note: Many thanks to Andy for allowing us to reprint this
excellent article.
See more of his articles at Andy's
EZWoodshop.
 (or a boat?) you must make, not a place you must find." -- Anonymous |
Shop Talk: 7 Tips for Clean Plywood Cuts
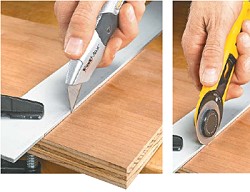
1. Scoring. The key to preventing splinters from appearing along the edge when you crosscut plywood is to pay special attention to the thin veneer layer. One of the easiest ways to do this is to score or cut through the wood fibers of the veneer before making the cut. A sharp knife or a rotary fabric cutter, like you see in the photo at right works great for this. You’ll find this method is fast and effective. But you’ll need to take some time to align the saw blade accurately with the score line. That way, you’ll cut through the fibers you already scored.
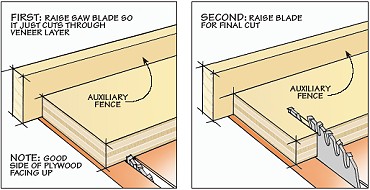
2. Saw Blade Scoring. Another method to prevent splintering is to use your saw blade to score the veneer of the plywood. With this method, you’ll need to make two passes, as shown at left. On the first pass, set the blade at a height that will just cut through the lower veneer layer. Next, you can raise the blade and complete the cut with a second pass. You can use an auxiliary fence on your miter gauge to help keep the workpiece aligned with the blade. And if multiple pieces are being cut, adding a stop block helps to ensure the pieces are the same.
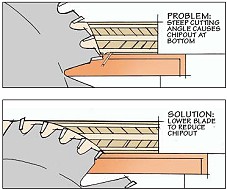
3. Adjust Blade Height. The height of the blade as it cuts through the plywood can be a cause of splintering. If the blade is set too high, the teeth cut almost perpendicular to the veneer. This makes a clean cut on top but it causes chipout at the bottom. You can correct this problem by simply adjusting the blade height so that it’s only 1/8" above the plywood. The change in cutting angle reduces chipout.
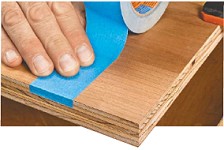
4. Tape. Another way to prevent splintering is to support the veneer layer as the blade makes the cut. One of the easiest ways to do this is to apply a strip of masking tape directly over the layout line (see photo at left). This gives the face veneer enough support to keep it from being torn away by the saw blade. After making the cut, slowly remove the tape by pulling it toward the edge of the cut.
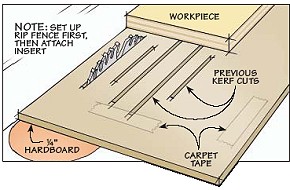
5. Zero-Clearance Inserts. A good way to get a clean cut is to have no opening between the blade and the table saw insert. Then as the blade cuts through the workpiece, the insert is there to back up the bottom veneer of the plywood. This ensures you’ll make a clean cut each and every time. A quick, zero-clearance insert can be made by using carpet tape to attach a piece of hardboard to your table saw. Then raise the blade through the top.
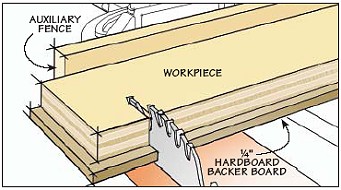
6. Backer Board. A quick method of supporting the veneer layer is to place a piece of hardboard directly below the workpiece as you make your cut. The hardboard supports the bottom veneer layer so it can be cut cleanly without splintering. Again, it's helpful to add an auxilary fence to the miter gauge, like you see in the illustration below. This helps keep the workpiece aligned with the blade and holds the backer board firmly in position as the cut is made.
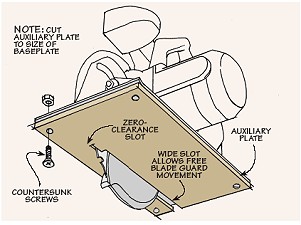
7. Circular Saw. Cutting plywood with your circular
saw presents a different problem. Here, the splintering
occurs on the top side. If you need a clean cut on both
sides, start by placing the good side down. Then, make an
auxiliary hardboard plate, like you see in the illustration
at right, and attach it to the baseplate of the saw. The
plate acts as a zero-clearance slot for the blade as it cuts
the plywood.

Recent email:
Subject: Glen-L WebLetter
Date: 8 October 2008
Have you heard the version by Jimmy Buffet and Alan Jackson
Regards,
-- Todd Broadlick
Subject: WebLetter
Date: 7 October 2008
After checking out your WebLetter, I want to build a boat! I did build Drag Boat engines and ran a Hondo flatbottom back in 1973. It turned 111 mph in the quarter-mile - very fast (I was pretty crazy then)!

Now I love the wood boats and I would love to build one.
My thanks to you and Gayle. God & Country.
-- Sgt. Richard Cabral
Crestline, California
Subject: Barrelback 20'
Date: 7 October 2008
I just wanted to let you know that, though I haven't "laid the keel" yet, I have built my building form, and aside from research, research and more research I have laid up my frames and started making the frame parts. I think this constitutes a "start" in construction. I am building the Barrelback 19' extended to 20'1" to support the small block Chevy 350 we plan on stickin' in her.
The boat is being built in Shooting Creek, North Carolina, deep in the heart of the Appalachian Mountain Range on Lake Chatuge. Lake Chatuge is ½ in Georgia and ½ in North Carolina. The state line runs east to west straight through the middle of it. Nothing like a little geographic trivia, huh?
Anyway,wish me luck! I need to hit ALL 6 numbers sometime soon so I can go all out with this thing. I'm really looking forward to this and have enjoyed everything I've learned, all the books I've read and all the people I've met and that includes YOU!
Thanks a bunch,
-- Mark Moyer
Shooting Creek, North Carolina
Subject: Squirt
Date: 7 October 2008
I put a lot of work into it over three summers (garage too cold in the winter months in Canada).
I really did enjoy the project and never thought I could actually complete such a "work of art." This boat handles the water beautifully and turns many heads when we take it out for a ride.
-- Paul McMillan Ontario, Canada
Editor's Note:
See pictures of Paul's Squirt in our Customer Photos area.
Subject: "End of Summer" WebLetter
Date: 13 October 2008
I want to let you know I enjoyed the End of Summer" Webletter. I especially enjoyed Alex Neymark's Cracker Box build. Back in the 1950's, a neighbor had a similar boat. I was fascinated by the design and the look of that boat which I felt was purpose-built for high speed performance. It was much speedier than the 25-35 hp outboards of the day, which were my only other fast boat experiences.
The segment on knots also brought back memories. When my wife and I got into sailboats and sailing, the first thing I did was learn some "knotsmanship." The idea was I didn't want to appear too lubberly around the docks with all those yacht people watching. Unfortunately, I should have spent my time learning to sail instead of tying knots. As we were bringing our "used/new to us" sailboat back to its slip under sail for the first time, I came in with way too much momentum. I had no idea of how to slow it down, so while making frantic but totally useless motions, I rammed the dock. The boat was ok; the only real damage was to my ego.
There were a dozen or so boat neighbors watching us at the time. Worse, a couple of dozen more people on the restaurant deck above us were gaping at the Keystone Cops routine going on below them. Not one of my better days afloat.
Jerry Foster
San Jose, California
Subject: Project Snorkfröken
Date: 7 October 2008
I just wanted to send you some photos of the last phase of my building project. I built a Malahini this spring/summer in Amsterdam, Holland. It all went very smooth and fast and the drawings were very good and clear.
It took me 7 weeks from raw mahogany timber to a finished wooden motorboat! I finished it in a very basic manner, no upholstery, mahogany decking and such. This is partly because the boat is berthed in one of Amsterdam's canals, so there's always a risk of small crime, partly to keep the cost low. The '81 Mercury 50 hp runs fine and has plenty of power.
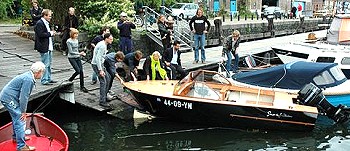
Thanks for good plans and to see the other Malahini projects on your website was very helpful!
All the best,
-- Gerbrand Burger
Amsterdam, The Netherlands
Subject: Glen-L WebLetter
Date: 8 October 2008
I have not built a new boat for years. I am a shipwright/marine mechanic so I spend 2/3 of my time on boats, marinas and the water, and (with my spare time) a continued restoration of an old unknown boat called the "Out O' Gloucester." She's a (1958) Phillip Bolger design, 30-foot, full double-planked boat built in Yokohama, Japan of all places. In 2005-2006 I completely restored (alone) another rare Ed Monk 50-foot boat built in 1943.
I had to respond about our "shakey ... times." Yes, the economic times are tough. Yet, I am constantly called to work on boats of all types and sizes here in Portland, Oregon.
Why? I find that the majority of owners did the math. Flying out for vacations is expensive. Maintaining a boat in a covered marina here is a great way to vacation. Even if fuel costs are up - just staying aboard and having friends onboard is enough fun.
With all the silly things you can do with your time, such as sitting and watching worthless TV or internet...most everyone has a garage sitting empty that can be put to use. Imagination can be put back to use there in building and working with your hands and mind.
Get the kid out of the bedroom, turn off (or better yet) disconnect the computer and get him or her busy building a boat (and more important) a relationship!
-- R. Michael Pitman
Portland, Oregon
When Pumpkins Drink
This is what happens when Pumpkins drink.....so very
sad.... |
GLEN-L boats, of course
