WebLetter 23
An Occasional Publication for the Home Boat Builder
Glen-L Marine Designs - 9152 Rosecrans Ave. - Bellflower, CA 90706

Happy
|
In this issue
- New product for transferring patterns to wood
- Messing about in Southern California
- Rigging Small Sailboats - Chapter 10
- Latex Paint for Boats - by Dave Carnell
- Feedback: Kingpin
- Sweet Caroline stitch and glue
- Feedback: Noyo trawler
- Recent email
GLEN-L Update
Web site:
Another year is coming to an end. The website has grown considerably this year; new formats for the online catalog, new how-to pages, and many, many new Project Registries and Customer Photos. One of the popular internet buzz words is "community"... it's something we're supposed to strive to create. I have recently reviewed many of the pages that I have not seen since they were first put up. I am amazed at how much information is there, and with the input from our builders to the Registry, Customer Photos, the WebLetters, and the Boatbuilder Connection, I can see that we are creating a community. I would like to thank all of those who have helped to make this site what it is.
My goal was to have a shopping cart by the end of the year... a goal missed. We will have one long before the end of 2001, I just have to figure out how to do it. We also plan to re-format the "Rigging Small Sailboats" book that has been running in these WebLetters to PDF format. Need to get a program and figure out how it works. Hope to have it up by June.
I think we have a good WebLetter this month. I don't get much feedback telling me to change the format or include additional features. So, either you all like it the way it is, or no one is reading it.
Neil Gaughan recommend Dave Carnell's site for info on latex paint for boats. Asked Dave for permission to reprint... visit his site for other boating shtick.
Again, I thank all who have contibuted to this WebLetter and hope more of you will decide to participate. Until next year....
Barry Witt
Editor
New Product
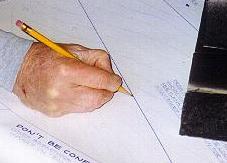
Darla's husband, Jack, does craft projects and has been using a transfer paper to transfer patterns to wood. "Wouldn't this be a good product for us to sell?" she asked.
Well, yes... can't believe we haven't thought of this before. We use large sheets of carbon paper to transfer patterns for our test models. We've had them forever and I don't have any idea where we'd get more. The transfer paper works great and it is very reasonably priced. It sure beats poking holes through the pattern with an awl. The transfer paper is 2' x 16' and can be used for more than one project.
The transfer paper has been added to the Supplies section. At $7.95 (post paid in the US) it's a great buy.
Messing about in Southern California

For those of you living in Southern California, check out the Scuzbums... a chance to share your boatbuilding interest with others of like mind.
Southern California Small Boat Messabout Society
"The purpose of SCSBMS is to encourage the design, building, restoration, and use of small boats, by promoting gatherings of its members at small boat messabouts. A messabout provides a congenial social setting for nurturing and sharing our enthusiasm for small boats."
http://www.geocities.com/southbeach/lagoon/6151/
Glen-L boatbuilders in the news
Robert Ensign wrote an article about building his Glen-L Huck Finn "Shantyboat" that appeared in the 15 Nov 2000 issue of "Messing About in Boats". Messing About is a small magazine that has a loyal following around the country. If you are interested in learning more, see their website, http://www.mims.com/maib/index.htm.
Latex Paint for Boats
by Dave Carnell
WARNING: This article contains material that may be offensive if you think painting is more fun than boating.When I bought my first yacht (27' auxiliary sloop) for $300 in 1951 I quickly learned that if it's for a boat, the same material costs several times as much as if it is for your house. Oakum was $1/lb. at the marine supply store; five pounds for a dollar at the plumbing supply store. Marine paint cost several times as much as house paint of similar composition. I worked for a major chemical company that also made paint and knew that their paint that made the most money and on which they spent the most on research was house paint. Houses are out in the weather all year-no winter cover or inside storage. Their owners expect to repaint them infrequently, such as every ten years or so. They also expect a good paint job will require little preparation before repainting. Back then the only house paints were oil paints, so my yacht was painted with top quality oil-based house paint.
All paints consist of binders or resins, pigments, solvents, and additives. The binder forms the film that sticks to the boat and holds the pigment there. The pigments color the paint, make it opaque and have a good deal to do with UV resistance. Solvents keep the binder dispersed or dissolved and the pigments dispersed in an easy to apply state. They allow the paint to be applied in the correct thickness and then evaporate from the paint film as it dries. Mineral spirits, a petroleum distillate fraction, is the most common solvent in oil-based paints. In latex paints, water is the major fluid. It does not dissolve the latex particles, but disperses them in suspension. Small amounts of special solvents are present to control the coalescence of the latex particles into a tough, tenacious film and to slow down the drying of the latex paint.
Through the years latex paints have developed to the point where 100% acrylic latex paints are better than oil paints on all counts. They are more durable and tougher. They resist chalking and fading, retaining their color especially well when exposed to bright sun. They are easier to apply, going on more smoothly and with less brush drag. They have less tendency to grow mildew. They have almost no odor and no fire hazard. Cleanup is with water. They can be re-coated in as little as one hour.
The 100% acrylic latex is the key to the outstanding latex primers and paints now available. The weather resistance of these polymers parallels that of the acrylic molding powders that make red automobile taillight and stoplight lenses that last forever without fading. I checked out all the top quality exterior primers, paints, and porch and deck paints at both Lowe's and Home Depot-they are all 100% acrylic latex products (the Glidden latex exterior primer at Home Depot used an organic nomenclature I hadn't worked with for 50 years, but my Handbook of Chemistry and Physics translated it to 100% acrylic copolymer latex). All of the products are available as custom colors mixed to your desire.
Our new boat went together pretty fast-instant boat or tack and tape construction. What kind of a paint schedule can you use to get it in the water next weekend? Let's say the inside will be all one color and the outside all one color, not necessarily the same as the inside. You can do the outside in one day, the inside the next, and give it a couple of days before you launch it.
Feedback: Kingpin
Date: Thu, 16 Nov 2000 12:15:29 -0600
From: Chris Willemssen
The Kingpin has now had about 10 hours in the water, and even 2 hours of skiing time. The boat runs well and moves around very nicely. Time to plane is extremely short, likely helped a great deal due to large cav plates. The wake is extremely ski friendly, but not quite as minimal as a buddy's Malibu (but my boat is 4' longer than his!). The boat turns fairly well, with one small quirk I have yet to work out: At medium speeds and above, as you gradually increase the turn sharpness (rudder angle), there comes a point where the nose of the boat drops, and the boat kind of "falls out" of the turn. I'm pretty sure this is due to the rudder angle becoming too sharp and then not allowing the prop driven water to flow past the rudder correctly. I think this will be solved by adjusting the rudder tiller arm stops to an "earlier" position. I plan to do this and test it as soon as the ice goes away here in Minnesota.
Due to motor newness, I have not run an all-out top speed test. I have run the boat to about 55 mph, with the tach reading 3700 rpm. There is definitely some more engine to use once it gets broken in a bit more.
Due to my occupation as a control systems engineer, I decided to make and install an on-board monitoring computer, complete with a touch-screen operator interface. This allows all the things normally controlled by switches to be controlled via the touchscreen. In addition, by using photocells and thermocouples, things such as prop shaft RPM, rudder angle, cav plate position, and current/min/max temps of v-drive, manifolds, and engine compartment. It has been enjoyable and informational to think of various things to monitor with the computer.
Plans for winter progress are cockpit carpet, v-berth pads, and a towing cover.
see ya-
Chris
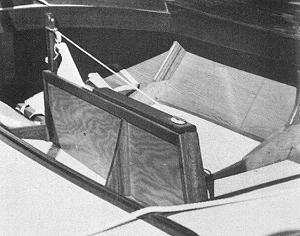
Sweet Caroline in stitch and glue
The following is in response to my question, "How did you go about converting it to stitch and glue?"
I began with a set of your plans for the frames. Built them out of 2x4 stock to get the points to draw fair lines for the bottom planking. I temporarily attached those, a stem pattern and the actual transom to the bottom. Used that as a jig to produce cardboard patterns for the side planking. The rest was just stitch and glue work. I left the temporary frames in until the hull was glued and at least two thwarts were in to keep the shape.
I have at least one photo of the stage with cardboard patterns being made. We were so busy I don't think I have as many good construction photos as I wish we did. Waiting for some good action shots to be developed. The stitch and glue style keeps the inside very clean and leaves the floor almost flat. I put in a shallow anchor well in the bow and made the forward seat as a water tight bulkhead/seat combo. I put partial bulkheads of 1/2" ply under the two after thwarts. Boat seemed stiff as all get out even with seven aboard.
It would not be too much trouble for you to redraw this one as a stitch and glue design. I think it may save 50 pounds also on the hull weight. I used more tape on the chines and stem and transom joints than Devlin recommends for a boat this size, but I like things overbuilt. Used 4" and 6" biaxial at all the main points. I also used three rub strip/shoes on the bottom instead of the skeg because we are working very shallow water.
You will enjoy noting that your plans (sold years ago to "dreamers" who bought plans for many boats and then realized they could not all be built) are occasionally available. The set I bought had been folded up so long, opening them was almost as hard as some of the building. The Internet has also proven to be a world of help to us newcomers. Thanks for your web site. It is wonderful.
Thanks again,
Richard Barnes
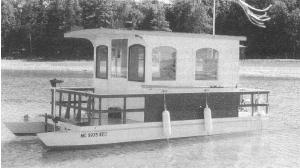
Feedback: Noyo trawler
Letter11/01/00
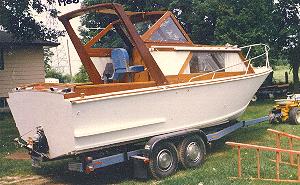
I ordered the plans and patterns for your Noyo Trawler way back in 1995. I have been working on her ever since. Two reasons it took so long; the first was money, the second was time. I built the boat in northern Wisconsin and was limited to four or maybe five months construction time, before it got too cold for gluing, as I built her outside.
As you can see in the photos, she is a boat that floats. We launched in early May and had a great summer in her... logged around 350 miles or so. You should see the heads turn when we put in. Everyone just loves it, and they can hardly believe that I built it. Some think that I am restoring an old boat, as I am not quite finished with her yet (probably never will be), but we say no... she is brand spankin' new, from the keel up.... just not finished making her more beautiful. Children seem to have a liking for her also. She has been referred to as Popeye's boat, the sailorman's boat, Theodore the Tugboat, and also the S.S. Minnow. Most adults just say it's cute.
I would like to thank you for a great design. She is a good sea boat. We were in a 5' following-sea and corkscrewing pretty good. We took more than a 30o roll, and she snapped back... not too quick, but real nice. I would like also to thank you for all your support. It was nice to know that you were only a phone call away if I ran into any problems.
Are you going to put any of our pictures on the net? ... Hope so.
Happy Sailing....
Mr. and Mrs. Jeffery A. Hanson
Cabin Skiff: Just want to let you know that
I have added a few more pages to my web site -
http://egyptian.net/~raymacke/ .
Recent email:
Subject: Glen-L Rebel.
Date: Fri, 01 Dec 2000
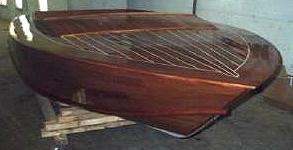
I have just acquired a boat built by Jonny Jekthammer here in Norway. The boat was built during the winter 1993/1994. The attached picture is taken in the spring 1994. All of the boat's interior and exterior is covered in mahogany. As you can see it was a very pretty boat when it was new.
When I aquired the boat, it was partially prepared for refinishing, but had been left out in the rain for several months. The result was a boat with a finish quite different from the one in the picture.
I plan to refinish the boat in the spring of 2001. A new interior is going in together with new varnish finish and a set of custom made "Rebel" logos in chromed brass.
The result should be at least as pretty as the 1994 version of the boat.
The engine is going to be a mid-sixties mercury straight six, rebuilt to look as new.
This is for information only. I plan to send you more information and some more pictures to post on your web-pages as soon as the boat is re-launced.
Regards,
Trond Solem.

Subject: Glen-l
Date: Thu, 30 Nov 2000
Hello!
I am a 15 year old boy from Norway, my name is Anders. I saw
your site! My grandfather and I builded one of your
boats.(picture) The boat does 31 knots with my new 9,9Hp
engine. With Two, 24knots. I am the only one who has this
kind of boat on the Oslofjorden, I think It`s very cool!!!!!
Subject: Boats
Date: Thu, 16 Nov 2000
Hello,
I was surprised to see your website, I built two of your
models, PeeWee & Utility, back in the early 70's. The
Utility was my first, I guess I did too nice a job, because
after I had it in the water for a month, it got stolen... we
never found it again.
The PeeWee model was a high school wood shop project, my
friend had purchased the plans and I copied them, another kid
in class liked it so much he decided to build one for
himself. The teacher had to grade all three of them at the
end of the semester.
Jim Bartz
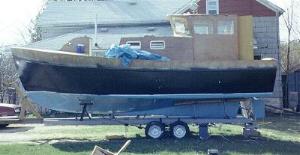
Subject: Guest Book entry
Date: Thu, 16 Nov 2000
Name: Ken Williams
Comments: I am in the process of buying an older Glen L from a gentleman that built it back in the late seventies. After seeing the boat if the deal falls through I am so impressed with the design that I will try to build my own. It's a 23 ft cruiser with a 185 Merc i/o in it. I live in southern Ontario Canada.
(The boat shown in the photos is the Mai Tai) More photos
Subject: i AM SO EXCITED TO SEE YOUR AD !!!
Date: Mon, 6 Nov 2000
From: CLIFF & SANDY
hello ! I'm Cliff Steele....60 yrs old now.. but before my wife and I were married, I bought one of your wonderful frame kits. Sandy and I built it in a garage that we rented. The little boat was "Tuffy", it was 12 or 13 feet long. I was able to buy a closeout outbd motor for her for $200.00 NEW!! and still in the crate. West Bend pots and pans decided the marine division wasn't a good idea.
All my young life I had wanted a boat... I built models and wished I could get in one and float across the lakes. After we built Tuffy, I covered her in fiberglass... a new product back then. We found an old trailer in a chicken coop... for $35, it took a week to scrape the chicken dung off!! It was then off to the lake... and what excitement!! Up and down the lake we zoomed... it was breathtaking! I'd guessed it went almost 100mph... but actually about 40. After Sandy and I got married we continued to boat. About 3 yrs later we found a 16 footer with a 105 Chrysler outbd. We were saddened to leave our little Tuffy, but it was to find another owner soon. After the 16 footer, we bought a new 21 foot Winner brand (out of business now). Our 2 children now were getting older, so we bought Bayliner's new aft cabin 8 beam. It was a wonderfully roomy boat which we still have... 22 yrs.
Sandy and I ply the waters of the Great Lakes... Tuffy was also on Lake Michigan. We also boat in the beautiful North Channel as we write stories for "Heartland Boating Mag". As we look back on our boat building experience with Tuffy from your Glen L Co, we have nothing but wonderful memories. Your little boat may have had the shortest length, but it gave Sandy and I the chance to get into boating. I have a few photos of little Tuffy about and will scan them and send to you. It's neat to have a company such as yours that also sells people such wonderful memories !!
Most sincerely,
Cliff and Sandy Steele, Rockford, ILL
Subject: FOR BARRY...
Date: Wed, 8 Nov 2000
HI Barry... Sorry if I'm on the wrong screen, but just had to tell you what a wonderful layout you did with my (our) story and photos of little "Tuffy". Some things never leave our hearts and memories. We change, but those little things way back when, still tug at our heart strings. As I viewed the pictures from all the boatbuilders (true craftsmen) and their proud accomplishments I could think back to my early years and feel the experience all over... It will take years for most of those builders to realize how much your products will play upon their lives.
Thank you so much for welcoming one of your old customers.... CLIFF
See Customer Photos for photos of Cliff and Sandy's Tuffy.
Build more boats
GLEN-L boats, of course