WebLetter 37
An Occasional Publication for the Home Boat Builder
Glen-L Marine Designs - 9152 Rosecrans Ave. - Bellflower, CA 90706
In this issue
- Feedback: Celerity
- On the Mark: Making Improvements by Mark Bronkalla
- A problem: Cabin/Console Skiff motorwell
- Inboard Hardware: Struts
- Feedback: Yukon
- Update on Cabin Skiff
- Shop Talk: Stitch and glue notes
- ABX?
- Safety Standards for Backyard Boat Builders
- Recent email
GLEN-L Update
-
Web site:
- What can we do to make the web site better? Keep in mind that things like more pictures and contacts depends on you, the builders. The shopping cart is not dead, we are working on it, but want to do it our way. And.. well, we don't know what we're doing. We know you like the site, but what more would you like.
- We are working on a possible solution to the "how much?" question, but don't know whether our builders will find it helpful. It involves our totaling the board footage of the lumber from the bill of materials and listing the total number of sheets of plywood. This is actually a time consuming project, so I don't want to go ahead if it doesn't help. I have made up a sample section that can only be accessed from this WebLetter. It includes feedback from customers, but this is limited. We may have a few more entries, but this would only grow with your input. Please check out "Lumber/plywood totals for Glen-L designs" accessed from: Estimating lumber and plywood costs and email your comments.
- Web site stats: We recently had the links on our site checked: 11,369 links, 17 bad links (now corrected). Number of pages: we don't know for sure, our site search engine stops at 5000 pages; somewhere between 5000 and 6000 pages, plus photos.
- Thanks to Scott Pett for links to Boatbuilding Supplies in the UK. I would like to remind our readers that you are the main source for additions and corrections to our Lumber Suppliers List.
- For those interested in getting more information on Hamilton Jets, our list of Jet Suppliers has also been updated.
- Search. I sometimes get Project updates and the sender neglects to tell me the boat name. I use the Search feature on our site, using their name to find the previous entry... it works great! Before adding this note, I did a search for Greg Auman (first name that came to mind) and got 9 entries. You will remember that I promised Internet fame to those who contribute to the site...
- Interested in Joseph Banks (a naturalist who sailed with James Cook)? I ran across this while looking for something entirely different. http://www.slnsw.gov.au/Banks/
- Search engine. I'm just throwing this in, I have been using a non-IE/Netscape browser that is much faster than either: Opera. I have no motives for sharing this bit of information except that I think too much power is migrating to IE. You can download this browser for free at http://www.opera.com/. Drawback, it has a banner add in the upper right corner. You can download this browser and still use other browsers. I use Netscape for picking up mail and Opera for browsing. My small revolution.
- Dyno Jet/Dyno Mite update: Darla and Gayle proofread the instructions. It is now up to Allyn and I to check plans, patterns and instructions. We still hope to have it ready by the end of this month, with heavy emphasis on "hope".
Barry Witt������
Editor������
Feedback: Celerity
This was a fun Project that resulted into a very usable boat for me. Initially I was going to make this boat a center console but after contemplating our weather in the northwest and how it can change rapidly on the water I decided to put the Jackknife cabin on to block out the wind and water splash and also provide lockable gear storage. The hull is fully encapsulated in epoxy and the options installed make her rival any 14 ft production boat on the market. The topsides are done in nonskid paint for durability and hard use while the hull is two part epoxy. The boat is balanced on the center of buoyancy with a half of tank of fuel.

Some of the features are dual batteries, depth sounder/ fish finder, vhf, am-fm stereo with amp, down riggers, sea scuppers, fish hold, below deck 18 gal fuel tank, crab and shrimp pots, and necessary coast guard items to name a few.
Cost: I invested about $7500 into this project not counting the motor which I had. The motor was totally rebuilt and actually I built this boat to match the motor. The boat could definitely be built for much less without the gadgets, and built a lot quicker too.
The building process was strait forward and having a wood shop it can be done fairly quickly. The finish work was time consuming but if you don't do it, the boat won't get done, and depending on how nice the final product is, that's how much time was spent. I ended spending lots of time block sanding the hull. I did not vary off the plans too much, only the frames which are an inch thicker, not for any particular reason other than I wanted them like that, and the transom area was modified just in case I ever put a heavier 4-stroke motor on the back, plus the motor well is offset to accept a kicker motor.
The boat has not been in the water yet, but I am excited to sea trial her upon trailer completion. Conclusion so far: I am very impressed with the design of this hull it really does seem to be everything you say it is and more. I'll send more pictures and a performance report.
Thank-you for the plans Glen-L.
John C. Smith
Edmonds, WA
Buy our Fiberglass Video
After hanging up from supplying technical information to someone fiberglassing his boat, Allyn looked at me and said, "I feel tempted to just tell them to get the fiberglass video...."
It's only $32.95, cheap if it prevents you from wasting material. Also makes the job easier when you know the right procedure. Much of what is shown is difficult to say in words. Fiberglassing is easy, if you do it right. Can be very difficult and expensive if you use the wrong materials or techniques.
On the Mark: Making Improvements
by Mark Bronkalla
One of the fun things about building your own boat is making "improvements". This spring I fine tuned my Riviera by adding cup holders for the forward cockpit and 2 more skid fins.
Cup Holders
With the Riviera, we noticed the lack of a simple amenity - cup holders. The cooler fits well under the front deck, but where to put the open cans when you want to ski, land the big one, or simply move to a new fishing spot? Since I was going to varnish the interior, now was the time to add them, so that they should be bonded in place with epoxy
Design requirements:
- Simple - to fit with the design of the boat
- Spill proof
- Sheltered to keep water out when the spray hits
- 2-4 can capacity for the seating area
To meet these goals, we tested several shapes and mocked up the design through a few iterations with foam core material. Foam core is used for mounting photos and trade show posters. It is easily worked and relatively inexpensive or free. Contact your company marketing department or a trade show exhibit company. There are always old posters that are no longer needed.

The material cuts with bandsaw, holesaw or fly cutter and is easily filed and sanded to fine tune the fit. This photo shows the first attempt at fitting the top of the cup holder. It straddles the frame in the cockpit. The top panel of the holder will fit under one of the battens. This provides plenty of glue area and an easily concealed joint.
A problem
Subject: steering linkage
Date: Thu, 30 May 2002 14:32:25 -0700
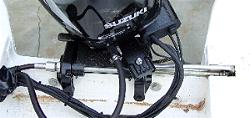
Hi guys,
I have nearly finished my Cabin Skiff but I ran into a problem when
installing the engine. The steering linkage is too long and will not
allow me to turn right. (see pictures) I
had to cut a notch into the seat. Has anyone else had this problem? What
do you think went wrong? I followed all dimensions on blueprints for the
transom area.
Edward
Some of the newer motors evidently come with a steering mechanism that requires a wider motorwell. Although there may well have been other builders with a similar problem, this is the first time we have seen it. We would suggest that builders check the specifications of the motor before making the motorwell and make it wider if necessary.
As an after-the-fact solution to the above situation, a cutout could be made, surrounded by blocking, with a plywood bottom glued and fastened in place.
Inboard Hardware: StrutsThe following is not attempt to explain all the different types of struts that are available, but rather, to provide enough information to make an informed selection from those we offer in our Inboard Hardware section. The strut is an underwater component connected to the outside of the boat, which locates and supports the aft end of the propeller shaft. In addition to these functions, the strut contains a bearing to minimize friction and wear on the spinning propeller shaft. We usually use 3/8" flat-head machine screws to fasten our struts in place. Our struts are all cast from manganese bronze. In planing boats, the single leg fixed drop strut is most commonly used. An adjustable type strut in this configuration is sometimes used. Although considerably easier to install because the strut can be adjusted to suit the shaft angle, they are more cumbersome thereby adding to drag. Because the adjustable type is not as strong as the fixed leg strut, they are not recommended for large propellers or high RPM'S. We do not stock adjustable struts. Some types of boats, may require the use of an intermediate support to prevent shaft whipping when it is necessary to use longer shafts that turn at high speeds. These are commonly referred to as "whip struts". These whip struts are generally located directly adjacent to the hull where the shaft passes through. Since the strut operates under water, the bearing housed in the strut and the shaft within the bearing are water lubricated. Bearings are of two types: patented "cutless" rubber and less expensive Aqua Lube (Micarta) bearings. These bearings have internal grooves or fluting running longitudinally along the bearing so that when underway, the momentum of the boat forces water through the bearing. A further advantage of the rubber-type bearing is that some vibration is eliminated and sand does not become imbedded as it can in Aqua Lube bearings. Bearings are held within the strut housing by either a press fit or a press fit together with at least two set screws for struts of larger sizes. Our struts are all machined for a tight press fit not requiring set screws. The outside of the bearing must match the bore of the strut, the inside must match the diameter of the shaft. It is not necessary for the bearings to run the full length of the strut barrel. A single bearing is cut in half and pressed in from either end. You can press the bearings into your strut by using a piece of threaded rod with nuts and washers that are gradually tightened until they are pressed flush with the ends of the strut barrel. Then ordering a strut from Glen-L, we strongly recommend ordering the bearing at the same time. We will install the bearing at no additional cost. When selecting a strut, you need to consider the angle of the shaft, the "beefiness" required, and the drop. Because shaft angles do not always fall at the angles of the available struts, it is often necessary to shim one end to obtain the proper angle. The drop is measured at the aft end of the strut, from the centerline of the shaft to the bottom of the boat. The propeller will be located one shaft diameter aft of the strut and should have a minimum clearance of 1" from the bottom of the boat, with 2" being preferable. Choose a strut with a drop sufficient to allow for these clearances. The term "Competition" denotes struts for heavier duty use. Here are a few examples of which of our struts would be appropriate for various designs. |
Feedback: Yukon
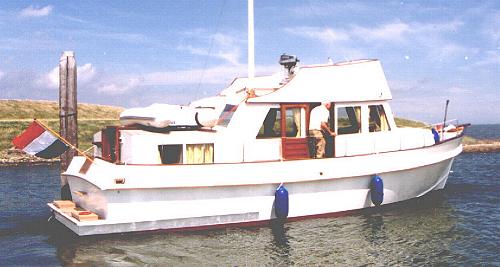
My boat is ready!
I built the Yukon in 8 Years, 2 days a week most of the time alone, and I have never worked with wood and epoxy before. I also built the Yukon outside in the open air. In Holland the weather is not very dry, so it is not possible to build it a lot faster. The design is simple, but I have no experience with other designs. When I started building I was 18 Years old and it was my first Project. I built the Yukon and made her a bit longer (plans says max. 10%) so I made her 39'.
We cruise some times in protected water but most of the time on open seas. Waves are no problem for the Yukon (for my wife is an different story), as long as they come from front or from behind, waves from the sides are not very comfortable. Our waves on the North Sea are very short. When we cruise slow the boat jumps with the waves, but when we go faster the boat is steady although there comes a lot of water over the boat.
Maneuvering with the Yukon is easy when there is no wind but when there is a strong wind maneuvering is more difficult because he catch a lot of wind. I have built in a bowthruster to fix this problem. It is easy to build in the pipe for the bowthruster when You make hull, later this would be much more difficult.
We cruise now 3 Years with the Yukon we called "Millennium" and it is a very fine ship. Speed is about 9.5 knot, normally we cruise at 7 knots @ 1600 rpm. full speed is 2600 rpm. I installed an new Engine Vetus Deutsch 128 HP turbo diesel but now I think 100hp we be more than enough. At cruising speed the engine use 5 liters p. hour.
I am sending You a photo from my boat. As You can see it is not exactly built as the building plans, because we wanted more space in the aftroom.
If You start building let me know I can help You with my experience.
Sorry for my English writing.
Erik Jansen
See the Project Registry for contact information.
|
Poxy-Shield epoxy resin Plus #1 Silica
09-509 Poxy-Shield resin and hardener (1.2 gal.)
|
Update on the Cabin Skiff
Dear Sirs/Madame,
I had the pleasure of building a Cabin Skiff some seven years ago, and
launched it in 1996. I have had many years of fishing pleasure on this
craft. Unfortunately I recently have had to remove the entire hard top
minus the windshield due to wood-rot. I cut the roof beams out of spruce
and did not fiberglass the surfaces. I would suggest to any novice
building this design, to fiberglass EVERY exposed surface. Interestingly
enough, I used pressure treated pitch pine, for most of the cleats, and
that lumber is in pristine condition. The hull, after all these years is
also in pristine condition. I have attached a picture taken in the summer of 2000 to add
to the ones you already have. I am about to begin the restoration of the
hard top. Any suggestions you have would be most welcome.
Best Regards, Al Seymour Jr.
Shop Talk: Stitch and glue notes
Stitching
We have had several inquiries about what to use for stitching, plus statements that there is only one right way to do it. The right way is whatever works. What we think works best is copper wire. When adjusting the junction along the chine, to keep it fair, we frequently loosen, adjust, then re-tighten. Plastic ties don't allow you to do that. Why not use cheaper steel wire? Because it's really hard on your fingers and should any be left in the boat, it rusts. I built the Fife, which has multiple strakes (planking strips) along the side. If these strips are loosely held together or are not adjusted so that the junctions are fair... they don't look pretty. It has no affect on performance, but aesthetics are definitely important to most home builders.
Resin
"Isn't the resin what's important in stitch and glue construction? Can't I use cheap plywood if I intend to coat it with epoxy?" Not everyone agrees with us, and it does depend on what you mean by "cheap", but no, we don't think so. Coating with epoxy helps insure that the inherent strength of the plywood is not compromised by dry rot or weathering, but it contributes very little to structural strength. If you use structurally unsound plywood and use even the strongest joining procedure, your hull will be of questionable integrity. Epoxy and glass is extremely important when used to connect panels, and what type of resin you use is important. Although some builders advocate polyester resin for fillets, it is good to remember that polyester is not a good adhesive and that stitch and glue construction has only come into its own since the widespread use of epoxy.
"Epoxy resin will completely encapsulate your plywood and protect it from the water; the water will never get to the plywood." Yea, right! There is no such thing as never. Drill a hole or drop a sharp object, you have entrance for water.
ABX?
Question
From: Barry R Witt
Sent: Friday, June 07, 2002 2:04 PM
To: Help
Subject: ACX?
I read the following on the Internet. It is not
the way I understand it and is not what we tell boatbuilders. To me, X
means exterior.
Barry Witt
Answer"People commonly think that the "ACX" grade of plywood is exterior because of that "X" at the end. That isn't true. The voluntary grading system of the APA - Engineered Wood Association uses the first and second letters to tell you about the faces of the plywood. An "A" face has no voids or putty filling knot holes. A "B" face may have football-shaped wood glued in where knot holes were. A "C" face will have knot holes, sometimes filled with putty, and sometimes not. A "D" face looks like the surface of the moon, with unfilled knot holes in the face.
"So a "AC" grade of plywood has a good face, and a poor face. But what about the "X" at the end? Does it stand for exterior? No, the way I understand it, it specifies that the inner core is of undetermined species."
Help wrote:
In accordance with the US Voluntary Product Standard for Construction and Industrial Plywood , PS 1-95, the panel grade is A-C. Again in accordance with the PS 1-95 there is no such thing as "ACX" You will not find "ACX" on a plywood grade stamp. "ACX" is a slang term for A-C Exterior. Note: "CDX" is a slang term for C-D Exposure 1. C-D Exposure 1 is an Interior grade panel with Exterior glue.
Or to re-phrase: The name "ACX" is commonly used to refer to AC Exterior plywood, but it is not an official APA term. The "X" has no official APA meaning when used to refer to plywood. When we use it, we mean exterior. brw
Safety Standards for Backyard Boat Builders
Tom Joiner suggested we provide a link to "Safety Standards for Backyard Boat Builders" discussed in our last WebLetter. So here it is... http://www.uscg.mil/d8/mso/louisville/WebStuff/comdtpubp16761_3b.pdf (This is a 54 page pamphlet, in pdf format.)
Recent email:
Subject: Tubby Tug Completion
Date: Tue, 18 Jun 2002
18 June 2002. This version of your Tubby Tug is named the Puddle Jumper and begins operations on the lakes and rivers of central Florida this weekend. All controls are inside the cabin and enclosed watertight storage is under the centered helm station. This boat was a pleasure to build and outfit. My 3-year-old son, Captain Ryan is as excited as a little boy can be. Being a U.S. Merchant Marine Engineering Officer, of course I had to impose modifications such as all cypress cabin and trim, a mast, watertight compartments, horn, running lights, bell, whistle, carpet, etc. . . . .
Eric Stiles
Ocala, Florida
Subject: Hey Berry,
Date: Sun, 9 Jun 2002
This is Uncle Don from Alaska. I have a seven year old computer that
could be classified as a Dog. Your WebLetters load just fine and are one
of the best I've ever seen. Now if I could just find out how to get
them to load in the Out House (where I do most of my reading) they would
be perfect.
Keep up the Great Work, I'll give you Two "ATTA BOYS" Be
Well Uncle Don beside the Kenai River of Alaska.
From the Boatbuilder Connection
Posted by Steve on June 03, 2002:
Okay guys, you have all helped me beyond belief. Mark's suggestions for scrapers has been invaluable (even though I wish I had known it about three months ago)...now I stumbled onto something that might be obvious to everyone but me... For the first time the other night I decided to WET sand...I was using up 320 grit paper by the bundle and killing myself in the process...then I poured a glass of water on the top of the visor of my boat and began to sand....man alive...the sand paper lasts about 20 times longer and the elbow grease is almost effortless...another lesson learned in the school of hard knocks.
My point: don't be afraid to state the obvious...cuz to some of us it just plain isn't!
Then again...I could probably buy more books and do more research before I dive into this stuff...but wait till you guys see it !! (July 18th!!!!)
I had the same experience when sanding the Whitehall. I have a really good high-speed reciprocating sander and was going through sandpaper like crazy... and I wasn't getting anywhere. I switched to wet sanding by hand and it was a breeze. brw
Subject: River Rat nearing completion
Date: Wed, 05 Jun 2002
From: Spike Hampson
Hello Glen-L,
Three and a half years ago I started construction on a River Rat, and now I am about one month away from the anticipated launch. I built the boat according to directions, but opted to increase its length (as specified in the plans) to over 21'. I also designed and constructed a cabin for the boat that has a clamshell top capable of being raised about 10" to allow for ventilation. I chose to install a Kodiak jet unit for propulsion and decided on a Rotary Power Marine Corporation rotary engine (supercharged; 240 horsepower) to drive it.
This undertaking has been a wonderful obsession and is only the first part of a larger project. Eventually, I intend to use this boat to travel from Wyoming to Buenos Aires by way of rivers and protected waterways (except in the Caribbean, where I plan to island hop on good weather days). My planned route is as follows: down the Powder River into the Yellowstone and then the Missouri; up the Mississippi and Wisconsin to Portage where the boat would be transferred a few miles to the Fox; down the Fox River into Green bay and then along the north shores of Lakes Michigan and Huron before taking the Trent-Severn Waterway across Ontario; down the St. Lawrence and along the Quebec and New Brunswick coasts to just south of Prince Edward Island where the boat would be hauled the 20 miles necessary to get it to Chignecto Bay and the Bay of Fundy; south along the entire eastern coast using the Intracoastal Waterway; through the Caribbean by island hopping (there would be three 90-mile stretches of open water but in all other cases the distances between islands would be less than 45 miles); up the Orinoco to the Casiquiare distributary and from there down the Rio Negro and Amazon to Manaus; up the Madeira to near Santa Cruz in Bolivia where a portage to the Paraguay-Parana watershed; and finally down that system to the Rio Plata where Buenos Aires is located. I apologize for overwhelming you with all these details, but as you can see I am rather preoccupied with this entire scheme.
I chose to install a jet system in order to cope with shallow water conditions and the occasional rapids associated with this route. Obviously, the extended journey made the notion of a cabin seem attractive.
I will attach a few photos of the boat that were taken about six weeks ago when the engine was being installed. I have a good friend who is a mechanic who did the engine installation for me; otherwise, all work on the boat was done without any assistance.
By the way, just so you know, about three years ago I built a Rob Roy canoe that my son and I have enjoyed enormously. This year I made a couple modifications to that craft--a small oak keel to make it track a little better and a removable backrest that permits easier paddling when sitting on the floor of the canoe. I haven't yet tried out these modifications and neither have I taken any photos of them. I'll keep you posted.
I would be happy to communicate with other builders and dreamers. My e-mail address is hampson@geog.utah.edu.
Thanks for providing me with remarkably intelligible plans and very helpful advice whenever I called.
Best Wishes,
Spike Hampson
Subject: Duckboat
Date: Tue, 4 Jun 2002
Dear Sirs:
First off, I want to say thank you for doing such a great job on your duck boat plans!
My father, having always been interested in building a small boat, saw your duck boat plans in 1985. He bought the plans, and put them in a safe spot so he could build it later.
Two things happened over the course of the years. One, the plans were lost in a move (we searched and searched to no avail). Two, my Father was diagnosed with cancer in 1997. We had two good years before he died. Six months later my Mother decided it was time to tear down an old shed. In one of the boxes was the set of duck boat plans! I felt it was only fitting to build it in Dad's honor.
Enclosed you will find pictures of the boat. It is almost complete, still having the oarlocks, seats, and an anchor system to do. My stepson, who is in one of the pictures, wants the boat bad. However, he'll have to wait.
The boat is named "DAD'S DREAM".
Sincerely,
Wesley D. Brent
Harrisburg, OR
Subject: Tiny Might Information
Date: Sun, 2 Jun 2002
From: Chris Kulseth
We just completed our Glen-L Tiny Might and are very pleased. My 12 year old son and I built a modified Tiny Might during the 2001 Winter. We used Tiny Might plans and a frame kit. We then modified the plans to create an outboard version. All went very well and the end result is stunning.
The entire boat is West System epoxy and cloth covered. The motor is a Mercury 25 hp short shaft electric. Trim plates are Nauticus Smart Tabs which control bow rise and stability. Top speed is 32 mph and the boat is very stable and comfortable. I suspect the comfort comes from the aft seating position which also provides an aesthetically pleasing long fore deck.
The boat was a project for my son but I can't help taking it for rides myself!
Thanks.
Chris Kulseth
Note: Mr. Kulseth modified this to be an outboard. It is not detailed for an outboard in the plans.
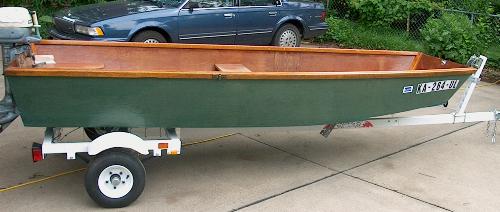
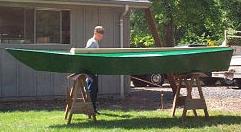
Subject: Mister John Boat
Date: Tue, 28 May 2002
From: Dean Stone
I built a Mr. John when we lived in Southern California back in 1970 and have moved it around with me ever since. Decided to refurbish it and register it here in Kansas. With new paint and a trailer I bought it looks pretty good. Should have a re-launching this coming Saturday.
Subject: Project Registry
Date: Wed, 22 May 2002 11:30:30 +1000
YUKON / Glen Zwicker / Nova Scotia, Canada / 05-22-02: Started building in summer of '00. Turned the hull in 09-01. I have the forward cabin area just about finished, and am just now doing the side decks aft to the transom. The cockpit framing is in, and I have all the roof beams laminated, and the mast and spar is glued up. I live just a few miles from Wayne Milner, who has completed his Yukon, and whose magazine-published story is on this web site (look in MISC in the sidebar on the home page). Wayne has been a great help to me, both with advice and physical help, and I would have been reluctant to start building without his encouragement.
Subject: Tongue Weight...
Date: Sun, 19 May 2002
I own a Jeep Wrangler. You state a 270lb tongue weight on the 16' versions of your trailer. Now I think I can build one and have it come in around the 2000lb range with what I want in it. That 270lb for a tongue weight seems really high to me... Are you just being safe, or is that what I will end up with?
Answer:
An accepted figure for tongue weight for good tracking is a minimum of
10% of the gross weight. If you reduce the gross weight, the tongue
weight is also reduced. In the past, a percentage of 7% to 8% was used,
but the 10% figure proved preferable. (See our book: "How to Build
Boat Trailers", pp. 94-95)
Subject: Campers & Trailers
Date: Mon, 13 May 2002 21:30:47 +1000
From: Ron Humphrey
. . .
P.S. I built the "Missile" in 1963, ( 17 yrs old) the best thing I had ever done! Am right now ready to start on the GlenL 12 sail boat, nearly 40 years in between boats. Great designs & fun to build. ... RH.
Date: Sat, 18 May 2002 22:02:08 Sure you can quote me in your letter. I actually built a scale model of the boat first, which I still have. There are some photos somewhere I must send sometime. I visit your site regularly. Can still remember the day We launched the 'Missile' at Tin Can Bay, ( A Fisherman's Paradise) Queensland, Australia. I got licensed, the boat got registered & a 'seaworthy' all at the same time.Build more boats
GLEN-L boats, of course