
An Occasional Publication for the Home Boat Builder
Glen-L Marine Designs - 9152 Rosecrans Ave. - Bellflower, CA 90706
 In this issue
- New Products
- Fiberglassing the Bottom Trailing Edge of a Power Boat
- Feedback: Cabin Skiff
- Designer's Notebook: Cutting Transom Angles
- Inboard Hardware: Shaft Logs & Stuffing Boxes
- Feedback: Squirt
- Home Boatbuilding Course
- Recent email
GLEN-L Update
- The last WebLetter. Last month, Gayle's notification about WebLetter 39 did not include a link to the letter. We received several email asking "where is the WebLetter?". Those who have been receiving WebLetter notification for some time, know we don't actually send the WebLetter, just a summary and a link. They also probably know that there is a link for all of our News Letters on the web site. We apologize to new subscribers for leaving out the link. Link to WebLetter Index
- WebLetter format. No one's really asked why I have been changing it, but in case you wonder... I just get bored sometimes.
- Email: There have been delays in answering email; updated our email program and everything did not go as it should. Should finally be fixed.
- The On-the-Drawing-Board project has a name: Dragonfly. The project continues, but no due date.
- We have added a lot of Project Registries and Customer Photos, including the first photos of the Honker. See Recent Email below.
Barry Witt
Editor
![]()


Reprise from WebLetter 1...
Fiberglassing the Bottom Trailing Edge of a Power Boat
I am including this again because the subject comes up so often. This is the first answer to the question, "why does my boat porpoise?"
The well radiused corner required for proper
application of fiberglass cloth is not desirable on some areas. For
example, the bottom edge along the transom of high performance boats
or along the inside edge along sponsons of hydroplanes should have a
crisp corner for ultimate speed and performance. The illustration shows a
good method for "re-crisping" the edge. The edge is built up
with pieces of scrap cloth to provide sufficient bulk of fiberglass
material and resin to be ground down to form a crisp edge. The built up
area should be faired so as to not form an abrupt "hump" at the
edge, which could detract from the performance of the boat.
of high performance boats
or along the inside edge along sponsons of hydroplanes should have a
crisp corner for ultimate speed and performance. The illustration shows a
good method for "re-crisping" the edge. The edge is built up
with pieces of scrap cloth to provide sufficient bulk of fiberglass
material and resin to be ground down to form a crisp edge. The built up
area should be faired so as to not form an abrupt "hump" at the
edge, which could detract from the performance of the boat.
![]()
Feedback: Cabin Skiff
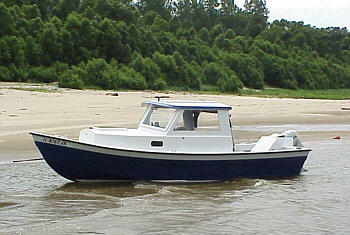
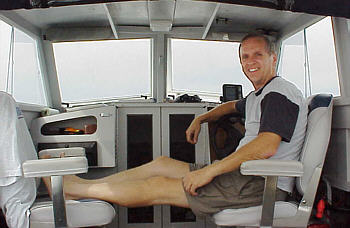
I just wanted to drop a quick email to all of you at Glen-L concerning my Cabin Skiff. This past week I surpassed a milestone in Therapy as I logged my 10,000th mile since the maiden voyage on 7/22/00. It was accomplished while making a round trip on the Tenn-Tom Waterway from Pickwick Dam in Tennessee to just past the Alabama / Florida state line on the Intercoastal Waterway. The intended destination was actually Destin, FL. but the approaching hurricane Lilly convinced me that cutting the trip short would be the prudent decision. Still, Therapy and I covered 1034 miles and completed 24 lockages in five days. It was a great trip and I hope to get time to put together a story for my web site in the near future.
For now, I just want to again compliment Glen-L for a great design. I now have over 720 hours of mostly hard running time on her and she still is as solid as the first time she slid off the trailer. Plus, the amount of attention she attracts at every marina I pass through still amazes me. I kind of expect this in the midwest where fiberglass runabouts rule and there is seldom anything even approaching this style of a boat. But I was taken by surprise when I pulled into Dog River Marina on Mobile Bay (Mobile, AL) on the Gulf Coast and three people were waiting dockside to take a line so they could get a closer look.
And it is not just at marinas. When trailering her to Pickwick I had a stranger pull up beside me on a four lane highway and motion for me to pull over just so he could take a closer look. I did and while we stood on the road edge with traffic zipping by he tried to convince me to build one for him! This might sound unusual but actually it is the fourth time it has happened while trailering. This says a lot about the appeal of the design.
Anyway, I just wanted to thank you again. The photo attached of me in the pilot house was taken when I stopped right after completing the 10,000 mile. I think you can tell by the smile on my face the pride I have in my Cabin Skiff and the pleasure it has brought me.
Sincerely,
Ray Macke
Information about Cabin Skiff.
Designer's Notebook: Formula for figuring finished transom size
The transom pattern perimeter is generally given to the outside back surface, see sketch above. However many boats have transoms angled (A) aft, in the case of outboards about 12° to 15°. Thus the angle required on the bottom, and usually the sides, requires more material (X) than the pattern outline. Cutting the angle away from or greater than the given pattern contour solves the problem. Or, the extra material required for the angle at any given point can be obtained. The sketch shows the total thickness (T) of the transom plus the motor board or frame. The sketch above can be duplicated using the angle given on the plans and the total thickness of the transom. Distance "X", the amount of additional material required larger than the pattern, can be measured. Optionally X can be obtained by simple arithmetic.
AS A FORMULA: X = Angle factor (A, as listed in chart) multiplied by T
(thickness)
As an example solve X for a 1 1/2" thick transom and motorboard
or frame with a 12° angle.
To find the answer in sixteenths of an inch divide by .0625.
|
||||||||||||||||
Inboard Hardware: Shaft Logs & Stuffing Boxes
The following is not an attempt to explain all the different types of shaft logs and stuffing boxes that are available, but rather, to provide enough information to make an informed selection from those we offer in our Inboard Hardware section. The following is taken from our book Inboard Motor Installations, from Chapter 8 - Straight Shaft Installations.
The propeller shaft passes through the boat via a hole that is somewhat larger than the shaft itself. Some means or device must be provided to keep water from entering the boat through this hole, and yet still allow the propeller shaft to rotate. The shaft log and stuffing box perform this function (see Plate 26). In most modern boats, the shaft log is not really a "log", but a metal casting or machined part that fits over the propeller shaft hole on the inside of the boat. The stuffing box, which is similar to a water pump packing gland, fits around the shaft and clamps to the shaft log. While water is allowed to enter into the hole for the propeller shaft (which is called the shaft bore or shaft tube and will be discussed later), it is this stuffing box which has the all important job of sealing the shaft to keep water out of the boat. One type of stuffing box is shown by Fig. 8-9.
There are numerous types of shaft logs available to suit different hull types. However, the popular variety is the so-called "self-aligning" type (see Fig. 8-10). This log uses a rubber hose connection between the shaft log and the stuffing box thereby allowing minor discrepancies in alignment between the propeller shaft and the shaft log. Logs are available for vertical mounting, or for a wide variety of angles. If a shaft log of a specific angle is not available, usually the shaft log can be wedged or shimmed to the required angle. A shaft log within a degree or two will usually suffice without any correction, since the self-aligning feature will take up this discrepancy. This self-aligning feature not only simplifies installation and alignment, but also reduces shaft vibration and noise because of the rubber hose.
For more on the shaft logs we offer see the Inboard Hardware section
![]()
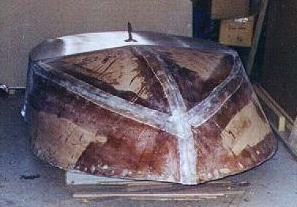
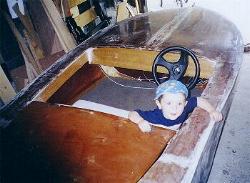
Feedback: Squirt
September 22, 2002 Dear Glen-L I'm finished. I finished my squirt over a month ago and thought I would write to you to let you know how things went. The following page you could add to my project registry as my last posting. I have also included some pictures for you to use if you want. It's not as nice as some I have seen on your website but I like it.
The project was fun to do. My neighbors couldn't believe I was building a boat in my garage and were always coming over to check on the progress. I think they were surprised when I got it finished in August. |
||
![]()
Home Boatbuilding Course...
If you visit the Boatbuilder Connection and other forums around the Internet, "Boatbuilding with Plywood" is frequently mentioned by other builders as a good source for how-to answers. I have these books all around me, but usually don't have occasion to look through them. I recently had a question from a builder and looked through the book for an answer. I found the answer, but also noticed a drawing that answered another question I had been asked on the phone and could only partially answer. I scaned through the pages and was reminded just how much is there. The drawings alone answer most of the commonly answered questions.
So, for the person who asked about making a
curved transom, this may help.
his should answer the question for whoever asked about the dimensions on
a typical dinette seat.
For your own copy of "Boatbuilding with Plywood", a boatbuilding-class-in-a-book, see the Boatbuilding Books section of our web site.
![]()
Recent email:
From Main Forums: Duck Boat/Hunting Forum:
My first boat project update
I just thought that I would update you on my Glen-L "Honker"
project. I finally took all of the frames that I have been making and
started putting them together. Man, I can't tell you how much I was
dreading the initial stages of construction, just because this is my
first boat and I just knew that I would screw something up. I got my
father in-law (Ted Prather-thanks) to bevel my transom. After the transom
was beveled, I had no more excuses to prevent me from getting started. I
was worried that I wouldn't be able to get the keel to match the
curve of the stem but, to my amazement, it actually worked pretty well.
The frames were spaced, squared, and attached to the building form and
everything slowly but surely fell into place. Now that you can actually
tell that I am building a boat, I am starting to enjoy it more. These
pics don't show it, but last night I beveled the harpins with the
router my Dad gave me (Stan Flanery-thanks) and installed them to the
stem and the first two frames. I am going to try to send updated pics
every Tuesday or so. Since I am thanking people I should thank my wife
(Stephanie Flanery) for letting me spend the necessary funds to this
point and for cutting the epoxy out of my hair Saturday night. If you see
any glaring errors, please call them to my attention immediately.
Suggestions are also appreciated.
Matt
(This post was edited by Matt Flanery on 10-16-02 2:31 PM)
Photos in Customer Photos
Subject: Finished Ski Tow
Date: 10-15-02
Well it's finished!. It looks good and runs great. Some specs. 860 LBS. Ready to run, less people. 1961 Mercury 700 full gear shift (70 h.p.).Planes at 18 knots with 3 adults, 1 kid & 2 small dogs. Tops out at 35 with same load. Cruises like a caddy at 25. Would probably run 40 with less people but there were always people wanting a ride or to go fishing. Took 1 1/2 years to build. Some late nites, long week ends & some tense moments, but when I took the cover off and put it in the water (and it floated) it was worth all the work. Thanks for the great plans, help & nice hardware. Greg Morrell.
Below is the result of your feedback form. It was submitted on Tuesday,
October 15, 2002
------------------------------------------------------------------------
name: Larry Shepherd
Comments: Hello,
My father built the Glen-L Sea Knight when I was just five years old. The boat served our family very well with the utmost in safety and convience.
More than once we came out of Long Beach harbor on our way back to Norm's Landing in San Pedro, with small craft warnings advised. The Sea Knight performed exactly the way it was designed to do and always got us home.
Now I am looking forward to building my own Glen-L Design someday. Thank you.
The following was received in response to a "can I quote you" email.
Dear Mr. Witt,
To be honest I actually find the following true life Glen-L stories to be more interesting:
What most people don't know is my father had only been three years out of prison (1959) when he started building our Sea Knight. Dad had done eleven years in prison for murder back in Massachusetts and had come to California right after he got out. The parole officer said that the odds were overwhelmingly against dad and he probably would be back in prison within a couple of years.
My father always loved the ocean. He told me later in life that after being confined in prison for so long, being out on the ocean made him feel truly free. One of his passed on pearls-of-wisdom to me was "If you find you are getting into trouble, dammit, get a hobby!" Dad passed on last year, from natural causes, at the age of 83, and never did he return to prison. While at the height of our boating enthusiasm he become commodore of the Hughes Boat Club, with our Sea Knight serving proudly. Dad always attributed his building of the Sea Knight as a vital link to his recoverery.
During the time dad was planning and building the Sea Knight our landlord's husband was reaching the bottom of his alcoholism. A long time mechanic with United Parcel, Bill had always been good with his hands. When Bill finally decided to get sober and join AA, he would often come over after meetings to meet with dad and watch him work on the Sea Knight. When we finally 'rolled' the Knight's hull over, with the help of many friends including Bill, dad said there seemed to be a sparkle in his eyes.
The very next week Bill bought Glen-L plans for a 24 footer! Bill took over 22 years to build that boat (dad often said he purposely made changes and improvements so that he could make the building last longer!) but all the while he stayed sober. Bill got the chance to proudly launch his Glen-L in Long Beach and enjoyed the boat for years. He named the Glen-L after his wife Alice! He also got the chance to return to his native Wales after retirement, where he passed away.
Larry Shepherd
Subject: Update
Date: 10/13/02
I finally got around to the fiberglass/epoxy stage of my Tango. This is my first experience with fiberglass. It was easier than I thought. It was also more tedious than I thought it would be. I practiced on the rudder before I started and I'm glad I did. There is nothing difficult about fiberglass, it just takes time to learn your own technique. I have glassed the bottom and hope to finish the sides next weekend. I recommend following the instructions in the video on how to fiberglass boats from Glen-L. When I started with the rudder I left my arms exposed while sanding. I will never do that again! Itch is the primary word here. Anyway, I learned a lesson and am moving forward. I'll just keep sanding, and sanding, and... Photos are attached of my Tango with bottom glassed. I am still having fun. I wish I had done this years ago.
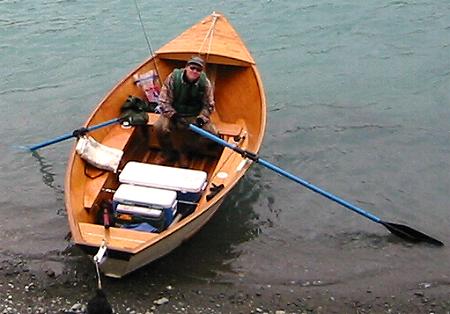
Subject: 16' Drifter picture
Date: 10/14/02
Here's my 16 ft. drifter. Finished, floating, fishing off the Kenai river this fall 9/2002). Sorry took so long to get a picture into you. The rower seat is actually a large cooler and pad (economical spacesaver especially for long trips) that's adjustable (2' worth) up and down the boat via holes drilled for 9/16" all-thread that serve to lock it into place. Like the rower's seat, the rower's foot rest is adjustable as are the oar positions - all in 6" increments. This accomodates any rower's arm/leg length. Would not change anything. The front bench has sliding, overlapping oak panel doors accessible from front or back for items like tackle, life jackets, etc. Modified the transom a little so have extra seat there which has a hinged top for more storage. Ran conduit containing anchor rope from a foot brake to the transom and works great. Have fished in it all summer and it is a pleasure.
Guest Book Entry
10/9/02
Comments: We, my family and I, have been building boats from your plans for more than forty years. Our dad started us on your 13 ft sailboat when we lived in VA. I have built 4 different boats of yours over the years..........my 2 brothers have probably out done me! I would like to build something that is steam powered.......I am retired now and steam would fit my pace. I would like any suggestions from you regarding a(small) steamboat... thanks, Bill Taylor
Depending on the size you want, I would choose either the Whitehall (17') or Harbor Master. (23')
Subject: Okoume plywood
Date: 10/8/02
Bruce K. Roberts wrote:
I am not famlier with okoume plywood. I have built boats with douglas
fir. My questions are is okume as good or better and the weight lighter
or heavier and drawbacks if any. Would you have weights on both kinds.
4x8x1/4 & 4/8/3/8 thank you
Answer:
Douglas-fir is more rot resistant and stronger, but the veneers are not
as clear as okoume.
Because okoume is lighter, it is often used for canoes, hydros or other
small boats. It is a good material for all types of boats.
Okoume comes in mm thicknesses, so thicknesses are not exactly the same as Douglas-fir.
| Nominal Size | Okoume | Douglas-fir | ||
|---|---|---|---|---|
| 1/4" | 6 mm | 20 lbs | 6.4 mm | 25.6 lbs |
| 3/8" | 9 mm | 30 lbs | 9.5 mm | 36.16 lbs |
| 1/2" | 12 mm | 40 lbs | 12.7 mm | 49 lbs |
| 5/8" | 15 mm | 50 lbs | 15.9 mm | 58.6 lbs |
| 3/4" | 18 mm | 60 lbs | 19.1 mm | 71.36 lbs |
For more information about okoume, see: http://glen-l.com/wood-plywood/okoume.html
--
Barry
![]()
Build more boats
GLEN-L boats, of course