WebLetter 45
An Occasional Publication for the Home Boat Builder
Glen-L Marine Designs - 9152 Rosecrans Ave. - Bellflower, CA 90706
In this issue
- The Tenn-Tom-From Pickwick to Florida by Ray Macke
- Designer's Notebook: Sheet plywood development
- School Project: Glen-L 12
- Making the outboard motor fit the boat by Dave Lewis
- Choose The Right Topside Paint by Bob Pone
- Shop Talk: Shop pockets
- Feedback: Alpha 2
- Recent email
GLEN-L Update
- We've had great response to our new Dragonfly design, but no one has sent in a Project Registry... guys? The Dragonfly "flats" boat is a great fishing boat especially designed for use in shallow water. Check it out if you didn't see the announcement in WebLetter 43.
- My favorite boating story teller, Ray Macke, has posted a story on his web site... "Pickwick to Florida". The story begins below and continues on his site. His stories are always eagerly anticipated by our readers.
- I have started emailing the builders listed in the Project Registry to check if email addresses are still valid. I have gotten through the letter "C" so far. I will continue verifying addresses over the next couple of months. If any of you are listed in the Registry and have changed your email address, let me know so we can keep the lines of communication open.
- I would like to remind everyone that we have an on-line Epoxy Manual to answer questions about Poxy-Shield epoxy resin. Poxy-Shield is an exceptional epoxy designed specifically for boatbuilding. This is the epoxy included in our Stitch and Glue and Fiberglass Covering Kits.
- Have a question? Got answers? Visit the Boatbuilder Connection, it is a resource for you to use.
- We have added and added to the Notes pages in our on-line Boat Design Catalog. These pages are frequently added in response to specific questions about a design. Many designs do not yet have pages, but be sure to give them a look if you are interested in a particular design. If there is a Notes page, there will be a link on the design page, under the Photographs link.
- In addition to the many new photo entries in Customer Photos, many builders continue to add to those already posted. I try to remember to change the date listed after the link so you will know when new photos have been added... but don't always. For anyone interested in the Airboat, we have posted additional photos from Ildeu Oliveira's project, on the Archive pages that show the motor and cage.
- We recently had a problem on the Boatbuilder Connection with pop-ups. This is NOT something we put in, but was activated through a post on the board. If you notice anything like this anywhere on our site, let me know. We do not have pop-ups anywhere on the Glen-L site.
- Thanks to Ray Macke, Dave Lewis, Bob Pone, Uncle Don, and the others who contributed to this WebLetter.
Barry Witt
Editor

The Tenn-Tom
From Pickwick to Florida
by Ray Macke
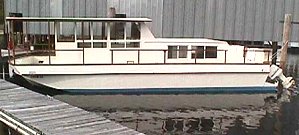
As the fall of 2002 approached I decided I wanted to make one more long trip before the frigid months of Southern Illinois set in. By chance a friend from my area whom had retired a year ago and moved to Destin, FL was coming up for a visit. I decided rather than him driving back to Florida with his wife (boring!) we would load up Therapy and I would take him home by water...
Designer's Notebook: Sheet plywood developmentAny boat built with sheet material for planking, plywood, metal or plastic, must be "developable". To be developable it must be either flat or curved to the surface of a cylinder or cone; most often that of a cone. The terms conendric development and developed for a specific sheet material such as plywood are used to describe a hull that can practically be built from sheet material. Such a surface will either be straight or convex in section. It cannot be compound to form a flare or concave surface although a developed sheet plywood boat may appear to have somewhat concave sections as viewed from different angles. It is also possible to compound the panel endings, in some cases, to introduce a minimal convexity. But a generous flare cannot be made on sheet plywood. Metal can be heated, bumped or formed to introduce compounds but is not a surface that will accommodate sheet plywood. Make a simple practical test to illustrate a developable surface. Take a sheet of paper and form it into a cylinder and then a cone. Any strip through either is developed and could be covered with a sheet material without buckling. To illustrate what happens when a compound is introduced, lay the sheet of paper on a table with one edge weighted to the table with a ruler. Bend up one corner and the paper will form a nice smooth developed surface. Now attempt to put a concavity on the underside of the raised corner. The paper kinks, would not take sheet material, and is not developable. The design of a boat to accommodate sheet material can be rather complex without the use of computers. Initially, the development method used required a point or points with radians emanating and forming segments of a cone or cylinder. The method worked, but attempting to get a desirable boat shape was difficult. Worn out erasers were commonplace. Other methods were introduced and the development was simplified, but it's still a tedious process. And, from practical experience, we've found that a little tug or shift when building the boat can cause variations, usually minor, from the developed surface. The developed surface makes one that can be formed with sheet material. It does not prove that the material being used CAN be bent to that surface. A nice developed surface may be impossible to bend into shape if the material is too thick; then multiple layers may be required. A stitch and glue boat is an excellent example of one with developed surfaces. The sides and bottom are joined along the chine, stem/centerline, and stern and the sheet material bends naturally in shape. Of course the side and bottom shapes need to be developed by calculations, model or mockup. However, the building method doesn't try to force the plywood into a compound shape. The method does lead to some interesting possibilities on models or prototypes on what can be done on the panel endings and how much compounding is practical; not much in most cases. GLEN-L does have boats built from plywood that have compound surfaces. There is a distinction as these boats may be built from plywood but NOT sheet plywood. Construction is cold mold using layers of relatively narrow strips of plywood running diagonally across the boat. These do form a compound surface and some areas (typically aft on planking boats) may be large panels covering a developable surface or with minor compounds. The term "developed for" (steel, plywood, or aluminum) describes a surface that sheet material can be bent around smoothly without buckling and does not have compound curves. Don't attempt to alter the exterior contour of frames or other sectional members of a sheet plywood boat. If a compound surface is introduced, sheet planking will be impossible or at best impractical to force in place. |
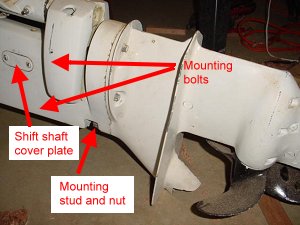
Making the outboard motor fit the boat
Dave Lewis
Instead of raising the Zip transom for a 20" shaft motor, I converted the outboard to a 15" shaft length with used parts. The 1977 Johnsons are easily converted. Here are some of the details for shortening the outboard motor shaft.
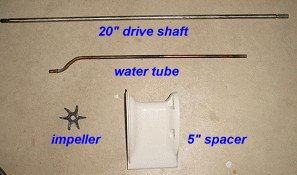
The boat dealer serviceman who sold me the used 1977 25 hp Johnson outboard told me how to do the conversion and also found the necessary parts at a local marine parts store. The replacement used parts were $100 in total (somewhat high but worth the money to me), and consisted of the 15" drive shaft, new water pump impeller and a copper water tube. Disassembly is easy on the '77 Johnsons.
 Side view of lower unit after removing the 5"
spacer.
Side view of lower unit after removing the 5"
spacer. |
First a small 1"x2" cover over the shift shaft coupling on the side of the upper housing (power head) is removed. Then the shift shaft coupling is loosened. The lower unit (gear case) actually has three vertical components inside: a shift shaft, the copper water tube, and the drive shaft.
Next, the nuts that hold the power head to the middle spacer and the gear case are removed. With the shift shaft loosened, the gear case will then pull off with some gentle prying. Once removed, the gear case has the water tube, drive shaft and shift shaft still attached to it. The prying is needed in order to pop the water tube out of its rubber seat in the power head.
To replace the drive shaft, the water pump cover is removed; the old drive shaft, and impeller will then slide out. There is a small pin that drives the impeller which needs to be saved and inserted in the new drive shaft. Then the new shaft end is greased and slipped into the gear case. The new impeller is then slipped over the drive shaft and is inserted into the pump housing. Be sure to get the fins on the impeller positioned the same as the old one. Then the pump housing cover is screwed back down.
Since the outdrive is being shortened by 5", the shift shaft and the long mounting stud extending from the gear case must also be shortened. This is not difficult but accurate measurements are necessary. Also, do not attempt to unthread the stud from the gear case since damage to the aluminum housing usually results.
It's best to cut down the mounting stud and the shift shaft while they are still in the gear case. On my outboard, I had to remove exactly 5" from both. I then re-tapped the threads onto the stud end, and ground a slot into the end of the cut down shift shaft so it would mate with the coupling in the power head. Again, this sounds difficult, but it is not.
The water tube simply pulls out of the rubber seat on the water pump cover. The shorter tube is then hand inserted. I greased the upper end of the tube with soap so it would easily slip into the power head rubber seat.
 Old parts removed when making conversion from 20"
outboard to 15"
Old parts removed when making conversion from 20"
outboard to 15" |
Lastly, with the middle 5" spacer removed, the gear case is slid back into the power unit, being careful to align the water tube, greased drive shaft end, and shift shaft with their seats in the power head. I had to hand turn the prop a little to get the splines on the drive shaft to align with those in the power head. The shift shaft coupling is tightened after all the mounting nuts are re-installed and tightened.
Now my transom has a 2" recess in it, instead of a 3" camel's hump. Keep in mind that most late model outboards cannot be shortened or lengthened in this manner. They just don't make 'em like they used to.
School Project: Glen-L 12
I'm a teacher at a school in Vancouver BC, West Coast Christian School, where I plan to build a Glen-L 12 over the next 3 or so years. I finally have a couple of photos! To this point we've transferred all the patterns to the 3/4 inch plywood and have drawn full scale frame contours onto 1/8 inch whiteboard. We'll tack the pieces of the frame onto the board before gluing so we're assured everything has the proper alignment. The gussets will be traced next and I'll locate some mahogany after that. We've yet to pay even a Canadian cent for anything, thanks to a great contact! Otherwise, the project is funded and owned by students who purchase shares. At the moment, several diligent students work on the project after regular class work is complete, or have a good track record in the area of homework. Next year the grade 9 & 10 students will work on it during a 12 week woodworking course. As the school's math & science teacher, I'm able to justify using additional class time because of the many directly related topics. For instance, the chemical reaction that occurs in epoxy adhesives, the force needed to bend panels and all the spatial aspects of putting everything together in a logical order - to name a few.
Choose The Right Topside Paint
by Bob Pone

There are several categories of topside paint, each of which has its own advantages and disadvantages. This is how they stack up.
Two-Part Polyurethane: The hardest, highest gloss, most durable paint. Many can be brushed, rolled or sprayed, while others must be sprayed only. Best results are usually obtained if it is sprayed. However, it is generally more toxic than one-part paints, especially when sprayed. Some two part polyurethane's lift oil-based paints; check label or manufacturer's guides for more information on compatibility.
One-Part Polyurethane: Similar to two-part polyurethane, but not quite as hard or durable. Ideal for do-it-yourself painting of fiberglass topsides, sheer strakes and boot tops. Although formulated for the amateur, many professional painters prefer them to all other enamels.
Alkyd Enamels: Traditional oil-based paints. Easiest to apply for the amateur using brush or spray. More compatible with under lying surfaces than polyurethane's. Most economical, flexible and least fussy in how it's applied.
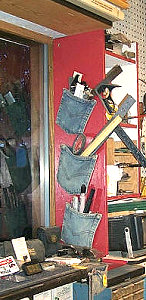
Shop Talk: Shop pockets
OK Barry & Crew, here's one of my
Favorites. Save those Pockets from your Levi's and tack em on the wall.
Handy for holding Rulers/Pens and such. Helps keep the desk clean and I
don't have to sweep around them. Suggestion while hanging the pockets is to
gather about 1" of the pocket that is getting tacked up and tack it down
or the pocket will lay flat and you can't get anything into it.
Later Friends
Uncle Don, beside the Kenai River..
Learn about
Te Pito o te
Henua
Feedback: Alpha 2
It took 6 months to complete and now my Alpha 2 has had 2 seasons in the water and I love it! It is a beautiful boat with classic lines and I always receive great comments when I take it out. One of my favorites was, "That's a beautiful old boat--how old is it?" To which I replied, "Oh about 4 months!" I also enjoy rowing it-- remove mast, rigging and ballast and it becomes a very comfortable and quick boat to row.
I made my sails from a kit from Sailrite, using a cream-coloured sailcloth. They look great with the varnished wood of the boat and were another enjoyable part of the project.
I also have a good report on my bottom paint-- I
used 100% latex exterior house paint. 3 coats of primer and 2 coats of a nice
dark green paint. I bought a top-quality paint and it has held up great. It
still looks freshly painted and the surface scratches in the hull at the end of
the season are easily repainted. Why would you use anything else? This was my
first boatbuilding project--as you can see I'm very satisfied with my Alpha
2 and your plans made it a joy to build. If anyone has questions they can
contact me about any aspect of the project. Project pictures of my boat have
been kindly posted by Tom Strong at http://kerchevalave.com/alpha2/babcock1.html.
Peggy Babcock
Final words...
I guess this could be called inspirational. If you read Ray Macke's story about his latest trip in the Cabin Skiff, you have already read this... I just had to include it for those who didn't.All up, the entire trip had covered 1034 miles and logged 51 hours tach time. On the long drive home, I had a chance to reflect on the highlights. Among them were my first experience with the Intracoastal Waterway, watching shrimp boats work, out-running a hurricane AND being threatened with a machine gun. I also had somewhat of a personal milestone, when near the 186 marker I logged mile 10,000 on Therapy. Kind of a special moment for an 18' watercraft.
But once again this little wooden boat had proved it can pass muster as a long haul voyager. It is not fancy or flush on creature comforts but a solid river runner that once again delivered me back home physically safe and spiritually satisfied. It also serves to prove the point that to make a long cruise on rivers or the Intracoastal Waterway, you don't have to have a 30 or 40 ft boat and a big wad of money. Anyone with a dependable watercraft and the desire (an understanding wife helps too!) can duplicate any of my trips.
For me, it has been well worth the effort and if you have taken the time to read this whole story, I am betting you would enjoy it too.
Why wait? The rivers may be timeless but we are not. Pack the cooler, fill the tanks, cast off the lines and make memories that will last a lifetime. See you out there......
Ray Macke
Recent email:
From the Boatbuilder Connection
Glen-L history
Posted by Rob Witte on March 20, 19103 at 18:37:20:
Here's one for you Glen-L buffs. I was going through some of my old boat magazines the other night and in one particular issue ("TRUE - The Man's Magazine" Boating Yearbook - 1957) I came across a section concerning boat plans and kits. Glen-L was prominently featured along with a photo of the L Dorado.The next magazine I picked up ("Boats" April, 1958) had an ad in the back picturing the same L Dorado, as well as a photo of the Sea Knight test boat. The Sea Knight photo has the same skipper as the picture on this web site, but is taken from a different angle. The funny thing is, this is an ad for CULVER CRAFT of Downey, CA. This ad is well laid out, so I don't think this was a composing error... also, two pages later there's an ad for Glen-L with a different L Dorado. Does anyone know the connection? Did Glen buy out Culver? Barry?
ANSWER:
Culver Craft was a mail order company that was created by an AP photographer
named Ed Widdis. Ed was a real salesman who always had a ready story about the
people he photographed. He took a series of photos of a 28' cruiser that
appeared in Popular Mechanics in the 1950's. The boat was designed by the
builder and somehow Ed wound up as the marketer of the plans. Initially
business was very good because of the Popular Mechanics exposure. Eventually,
business slowed and Ed looked for more designs to sell. He approached Glen-L
about selling our designs. Arrangements were made that allowed him to reproduce
the Glen-L catalog with addresses and headings changed where appropriate to
reflect his "Culver Craft" name.
Ed Widdis continued to market our plans over several years. Ed died quite a few
years ago and Culver Craft disappeared.
Selling Glen-L designs through magazines and other companies was common in our
early years, with a few dealers still selling Glen-L designs.
Barry
Subject: Glen-L 14??
Date: 3-18-03
I have the following questions concerning the Glen L-14:
1. In viewing the excellent set of plans I have recently purchased from you, it looks like the Glen L-14 would be a good candidate for the stitch & glue construction method. Would this be possible? The plans sheet shows how the panels are to be positioned on the plywood sheets for cutting for the conventional construction method prescribed but there are no dimensions to aid in laying them out on the plywood sheets. Would it be possible to acquire these dimensions as it would make the building process much easier no matter which building method one chooses to use?
2. Would it also be possible to add a small cabin to the Glen L-14?
ANSWER:
"Excellent set of plans... I just want to change everything..."
Well that's why people build their own.
Although anything is possible, it is not practical to convert the Glen-L 14
to stitch and glue. We do not have dimensions for the planking. We do have them
for stitch and glue boats, but there is no practical way to figure or use
dimensions on a framed boat. S & G boats always have minor variations;
frames do not allow you to adjust.
A cabin can be added but should be kept as light as possible. For camping, I
would run a line to the outhaul end of the boom from the top of the mast and
use the boom for a ridge pole of a tent.
Barry
Two for the webMASTER:
Below is the result of your feedback form. It was submitted on Tuesday,
March 11, 2003 at 19:09:39
----------------------------------------------------------------------
name: Steve McManigal
Comments: I can't think of anything critical.
This is the best commercial Internet site I've ever surfed.
It's intuitively easy, and very informative, and a hell of a lot of
fun.
I'm not a Glenn L customer (yet).
This site is going to make me a customer soon.
I want to build a Zip or a Malahini.
Below is the result of your feedback form. It was submitted on Sunday, March
09, 2003 at 12:08:15
--------------------------------------------------------------------
name: Cara Heuss
Comments: I found your ad in Wooden Boat magazine when I was contemplating building a wooden boat, and found my way to your website. I am absolutely astounded by not only your website, but the community that seems to have grown around it.
I am a graphic designer and have worked in advertising for some time now. Many of the projects I work on are web-related. It amazes me how so many of the websites I visit are poorly designed, with broken links, and rely more on flashy graphics (which take too much time to load) than information. Your site is by far the most comprehensive boat building site I have seen so far, the information that it contains is so interesting and helpful, and the site is very well organized and very easy to navigate.
In all honesty, I decided to build a boat on somewhat of a whim. Walking through a hardware/lumber store one day, I picked up Wooden Boat magazine, mostly because I've grown up around wooden boats my whole life and appreciate their beauty. (My family has six of them!) I decided to build a boat of my own, with very limited woodworking experience. When I went to your site, I decided to build the Zip immediately upon seeing it. Then, I thought it would probably be best to research other websites to see if I was making the correct choice, not only of design, but of the company I decided to order from. Your website, with customer photos, project registry and archived newsletters was the key determining factor in my decision. I feel a bit intimidated that I don't have the woodworking knowledge to build a boat, but I feel very comfortable that I'll be able to find answers to my questions on your website.
I ordered plans for the Zip last Friday and expect them soon. The woman I talked to on the telephone who took my order was extremely nice and told me that I could call with questions whenever they may arise.
Normally, I don't write into companies to tell them how much I appreciate the thoroughness of their website... mostly because I seldom visit a website such as yours, but I felt compelled to write in and thank you for alleviating my boat building anxiety!
Thanks, Glen-L! Can't wait to get started on my project!
Sincerely,
Cara Heuss
Subject: Epoxy question
Date: 3-11-03
I have a question about your epoxy. I ordered your videos some time back,
but here is where I am confused.
Epoxy adhesive
Epoxy with hardeners
Apparently, there is some difference here. Does the epoxy with hardeners not
function as an adhesive? I will need to laminate some plywood. What would you
suggest? And what about those fillers (microballoons, etc): do we add these to
the epoxy adhesive, or to the epoxy with hardeners.
ANSWER:
Epoxy adhesives are also epoxy resins with hardeners. Our "epoxy
adhesive", Poxy-Grip, is only used as an adhesive. Poxy-Shield is used as
an adhesive, but because it is less viscous, fillers are usually added.
Poxy-Shield is also used for applying fiberglass cloth and for filleting and
coating.
We use Poxy-Shield in the shop, with our preferred filler: #1 Silica. This
combination is more "workable" than Poxy-Grip and also more
thixotropic (sags less) with the proper amount of filler.
Epoxies are a combination of resin and hardener and are not complete without
both components, in the proper ratio. Fillers are added to the resin/hardener
mix.
Subject: New pictures of my Tornado project
Date: 3-11-03
Barry,
I am sending updated pictures of my Tornado for addition to the photos archive.
It now has the small block 406 Chevy installed, complete with Powerglide. The driveline is complete as is almost all of the plumbing. The wiring is next. This will be somewhat simplified by the fact that I am using a Vertex magneto instead of the usual HEI ignition. It is fitted with a 750 Holley double pumper and topped with a Hilborn-style scoop. All of the mounts were hand fabricated. The Casale v-drive and its mounts will receive a powder coat treatment in matching red.
Thanks for great service for so many years. Keep it going!
Drop by the Glen-L Builders discussion group on Yahoo! Groups
sometime:
http://groups.yahoo.com/group/Glen-L-Builders/
Thanks, again.
Paul Miller
Memphis, TN
Subject: Barry (thanks for sharing)
Date: 3-6-03
Barry,
Here is a comment in regards to your request "Thanks for
Sharing".
I've noticed a wealth of information from builders helping other builders
to get through their projects, what a great thing!
For me, the most important aspect to taking on a project big or small is to see
your project finished in your mind's eye. This is the first thing I do to
birth a project, it will keep you super focused with pinpoint accuracy and any
obstacles you may face are no match for a focused builder.
John C. Smith
Subject: Delta King in the water
Date:3-4-03
Please take a look and let me know what you think. Daboat.com.
Regards, john
Build more boats
GLEN-L boats, of course