WebLetter 47
An Occasional Publication for the Home Boat Builder
Glen-L Marine Designs - 9152 Rosecrans Ave. - Bellflower, CA 90706
In this issue
- Email problem
- What do I need to start?
- Building the Tubby Tug by Allen H. Storms
- Building a console
- On the Mark: How to test and troubleshoot epoxy glue joints by Mark Bronkalla
- Designer's Notebook: Setting up - The foundation for building a boat
- BS 6566 Vs BS 1088
- Feedback: Squirt with jet by John Gage
- Feedback: Tornado
- Frame Kits
- Feedback: Fife
- Turning the hull
- Recent email
GLEN-L Update
- Gentry update: This is the 17' Gentleman's runabout currently on the drawing board. The plans and patterns are mostly done. Glen is currently working on the instructions, bill of materials and fastening schedule. When these are done, it will be time for proofreading. Would hope to have them ready by the end of July... but no guarantees. See the New pages for more information.
- WebLetter: What do you want to hear about? This WebLetter is written as time permits and the character of each issue is based on what we get from builders. Do you remember the questions that you had when you started, during the construction.... why not write an article and share the answers you have learned?
- Is anybody out there funny? Just a thought. I personally am about as funny as a rock, but maybe some of you have dreams of being a cartoonist. I'd be glad to offer a spot in the WebLetter if anyone is interested.
- We had to replace our scanner... The new one scans slides, which the old one didn't. I have done a few test scans of old slides and have have included copies because I know you all like to look at pictures of boats.
- Thanks to Mark Bronkalla, Allen H. Storms, John Gage and all the others who have sent in articles or email used in this WebLetter. Your contributions are why our readers look forward to the WebLetter.
Editor
Email problem
"Comments: I have sent 2 e-mails requesting info on the Mark Twain 42 Bill of materials. Plse reply ASAP"
I have commented previously about the amount of SPAM we get (total of 1640 messages on Tuesday after Memorial Day). SPAM is becoming a problem for many people and this has spawned a variety of "solutions". One solution is Realtime Blackhole Lists (RBLs). This is a blacklist of known spammers or "sites with open relays". In theory this may sound like a good idea, but there are problems. There is not universal agreement about what SPAM is. Also it is the habit of the RBLs to blacklist everyone on an ISP that has an "open relay". I am not going to try to define what this means; if you are interested, see this site: http://theory.whirlycott.com/~phil/antispam/rbl-bad/rbl-bad.html
The point of these comments is that our site is hosted on an ISP that runs on Verio. Verio has an open relay for which they feel they have a legitimate use. Certain RBLs have decided that there is no such thing as a legitimate need for an open relay so they blacklisted a block of Internet sites of which we are one. What this means to you is that if you are using SPAM blocking technology that uses RBL lists, you cannot receive email from us. Hence, the comment at the beginning of this article. We are presently trying to get de-listed, but do not know how long it will take, or even if it can be done. This problem will become larger if some other way of blocking SPAM is not found. It could well be that your service would block messages from friends or relatives and you would not know it nor why. Before you use a SPAM blocking service, you should understand the possible ramifications of RBL lists.
So far, we have had 7 email returned because we were on an RBL "open relay" list.
What do I need to start?
Question:
I am going to build the Squirt, but don't want to buy everything at once. What do I need to start?
The basics: Plans & Patterns, Fastening Kit and Glue. Many builders choose to start with a Frame Kit, which will definitely save time and is a great motivator. The Fastening Kits include silicon bronze screws and silicon bronze boat nails.
Glue: Epoxy is by far the most popular glue. We have two types, Poxy-Grip and Poxy-Shield. Poxy-Grip is a one to one mix and used strictly as an adhesive. It does not require any fillers. Poxy-Shield is a five to one mix and usually requires a filler when used as an adhesive. We would always use a filler. Poxy-Shield is also used for coating, filleting and fiberglassing. This is the glue that Allyn uses for test models in the shop.
Poxy-Shield and the WEST System® probably have the highest percentage of resin solids on the market. At $75.21 for a gallon kit, Poxy-Shield is cheaper. A gallon kit consists of a gallon of resin and a fifth of a gallon of hardener. We recommend adding #1 Silica (Cab-o-sil) when using as a glue. All of our fillers will "bulk up" the resin for gluing, but #1 Silica is the nicest to work with and is what we use.
If you have purchased or built the frames, the next step will be to make the building form, then set up the frames. For a pictorial of the process from this point, see the "Boatbuilding Methods", Sheet Plywood pictorial.
When the hull is complete, you will probably want a Fiberglass Covering Kit, which includes cloth, Poxy-Shield and a selection of application supplies.
Summary:
- Squirt Plans & Patterns OR Frame Kit
- Bronze Fastening Kit
- 11-263 1/4" x 3" Galvanized Carriage Bolts with nuts & washers - 4 each
- 09-508 Poxy-Shield Slow - Quart Kit
-
08-522 #1
Silica - 1 LB.
- When hull is complete: Epoxy Fiberglass Covering Kit
Building the Tubby Tug
by Allen H. Storms
This Tubby Tug took me about 5 months in an unheated garage in New Hampshire. I am betting about a month in warmer climes. I used 1/4" ACX and substituted 3/4" ACX for the stern transom, white oak for the sheer and Cambara decking for the deck house. My wife named her the "Shrunkit". To keep the total cost under $1,000.00, I substituted 3 sewn together mop heads for the nose pudding. Next winter I will modify the stern bulwarks to allow the motor a less confined turning radius. Boating season is soon upon us in New England, all 90 days of the season!
I filled all of the "C" side of the plywood knotholes with polyester filler.
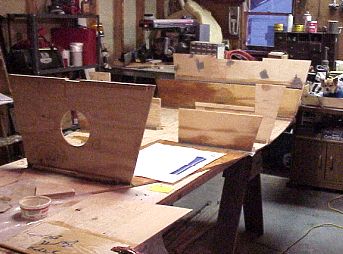
Console plans and patterns
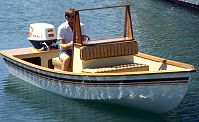
We have been getting inquiries from builders about plans for building a console. The Plans and Patterns for the Console Skiff Console are available separately for $18.00 for those who may want to adapt it to other designs. Additional photos and sample drawing.
Order: 64-501 - CONSOLE SKIFF Console Patterns - $18.00
On the Mark: How to test and troubleshoot epoxy glue joints
by Mark Bronkalla
This started out as an answer to Ken's question (May 21, 2003) in the Boatbuilder Connection but the answer became too long...
Posted by ken on May 21, 19103 at 19:27:23:
What is a qualified way to test the integrity of your glue joints, and your shop process?
I have glued scraps of my frames stock together (parallel grains) and then separated them with a wedge driven in, the glue line separated. However, if I applied a turning torque to the pieces then the woodgrain let go excitingly. So, I wonder if a tension load is an appropriate test?
The answer
Properly mixed and applied, the epoxy joint will be stronger than the wood fibers themselves. This assumes that a "normal" side grain to side grain joint is being made.
My joint testing
My first test was simply gluing some sets of ~1x2" and 1x4" ash sticks together with a 4" long by 1" wide joint and clamping. I tried to break them apart and could not without breaking the wood. At this point I was satisfied that the stuff was at least as strong as the PVA (carpenters white or yellow ) glues that I have used for years.
Not knowing where to start on the frames, I started at the back gluing up pieces of the transom. This turned out to be the most complex and difficult piece to do since everything is curved and angled. I measured multiple times, aligned it, put on witness marks, took everything apart again and started the glue up. The next day I discovered that I had a witness mark lined up with a measurement mark (multiple bad words muttered and a vow to erase all extra marks in the future).
I now had a new opportunity to test the bond strength in trying to salvage the misaligned frame parts for the transom. This was discovered 24 hrs after gluing. I clamped the piece in a large vise on my bench, applied a bending load (piece in vise, with long ~2 foot long arm hanging horizontally) and progressively applied force:
- Yanking on it
- Hitting with 1 LB. hammer (on a wood block)
- Hitting (whelping) it with a 3 LB hammer and wood block
- Jumping on the end (yes, all 240 LBs of me)
- It would not let go. I next took a 1" mortising chisel and attempted to drive it in with a hammer, and then a larger chisel (builders slick) and a 3 LB hammer - no luck.
- Finally I sawed it apart.
Designer's Notebook: Setting up - The foundation for building a boatA boat, unlike a house or garage, does not have flat areas such as a level foundation with vertical uprights (studs), etc.. A boat is curved from most any direction you view it. An artificial foundation must be created. We've developed a method of using a "building form" to substitute for the "foundation" in the analogy with housing construction. This type of building form is used on conventional boatbuilding, wood, metal, or fiberglass but is not required for stitch-n-glue boatbuilding. The conventionally built plywood boat is built around a series of sectional members called frames or bulkheads. We furnish patterns to make your own or you can buy the ready made assembled GLEN-L Frame Kit that includes all the members listed for the particular boat; each machined to shape and fully assembled. Our system utilizes an athwartship horizontal reference line across each frame. On most small boats this is the inside surface of the bottom frame member. However, it may be a horizontal cross member at most any selected height on the frame. The frame centerline is perpendicular to this horizontal reference line that we call the "set up level". The set up level is also parallel to the waterline thus forming a horizontal plane level both lengthwise and athwartship through the boat. If the frames or forms are aligned vertically at 90 degrees to the set up level, horizontally level about this plane, and centered along a longitudinal centerline the variances in the curved boat shape are automatically developed. These frames and other hull framework members are supported by the building form. This is simply a method of supporting the frames and other members such as stem and transom accurately at the set up level. Several types of forms can be used but generally we prefer one developed over the years that has proven simple and accurate. The frames and other members are supported by two longitudinal members (set up members) that are level both lengthwise and athwartship, at a convenient working height, and spaced a width compatible with that of the frames. These longitudinal members are supported to the ground or working areas by upright legs. The longitudinal set up members may remain as part of the boat. Often they are used as longitudinal supports for floors, cabinetry, etc. If the boat is inboard powered, the set up members double as motor stringers to support the weight and spread it through the structure. Set up members on smaller boats and those outboard powered are used only to build the boat and are not a part of the finished boat. It is not necessary that the ground or floor is level; only that the set up members be level in both directions. Obviously you don't want to work on the side of a hill but a level surface is not necessary. In days gone by, the typical beginning of construction started with building a level floor to build the boat on. Great idea but expensive and not required with the method we have developed. The upright legs supporting the set up members may be posts buried in the ground if working on a dirt area. Some will have the advantage of building on a paved area, however, it's doubtful if you want to bust it up and put in posts. To overcome this we use a horizontal base member anchored to the ground with expansion bolts. This base member is used with cross members to support the legs. Most of our plans detail, dimension, and give instructions for a building form specifically for the boat being built and even list the sizes and materials required. But, the building wood sizes or type is not critical and any scrap lumber can usually be substituted. The frames and other parts that form the hull structure must be rigid. Longitudinals will be bent around this framework that will require shoving, pulling, etc.; the structure must not move or the hull shape may be distorted. Fasten the frames securely to the set up members. Upright blocks from the set up members fastened to the frames with screws, bolts, double-headed nails, or clamps will do the job. Or use an athwartship cleat atop the set up members and fastened to the frame or cleat on the frame set up level, fastened by any method listed above. Remember, however, the fasteners will be removed to lift the boat from the building form. Don't position fasteners in such a manner that they are inaccessible and cannot be removed easily. Brace the framework with cross braces between frames or block the frames to the floor. Perhaps a ceiling or wall is available for anchoring the bracing to the framework. Usually some of the braces can be removed just before planking the hull. Better to have more bracing than not enough. A well built building form, with accurate frame members properly centered, leveled, and securely held in place, will provide the sound foundation for the construction of the balance. Spend a little time to make it correctly and time spent fixing goofs will be virtually eliminated. |
BS 6566 Vs BS 1088
There have been inquiries on the Boatbuilder Connection regarding the difference between BS 1088 and BS 6566. I knew there was a difference in the outer veneer thickness, but not whether there were other differences. The following are my notes. I hope to add a more complete description to the Wood & Plywood Information section of the web site when I feel I have all the information. I am including these notes for those "who want to know...". I welcome any additions.
My only "in person" contact so far has been Dick Garwood of Shelman USA. As far as I know, Shelman is the largest manufacturer of okoume marine plywood. They are very concerned about the confusion over plywood standards and will be one of the manufacturers that Woodenboat magazine will talk to for an upcoming series on marine plywood.
Summary of a phone conversation with Dick Garwood of Shelman USA, 3-13-03. The question being, "what is the difference between BS 1088 and BS 6566".
BS 1088 (This is the only plywood Shelman refers to by number.)
-
Face and back: 1.3mm (regardless of total plywood thickness). There may
be some very minor differences, because the 1.3mm is before final
sanding.
WBP glue (glue is rated on a scale of 1-10. Shelman uses between 5 and 10) - No voids or patches
- Outer veneer in one piece.
- Rotary cut, all the same species
- The panel is completely balanced
Okoume is rated as a non-durable wood. Shelman adds a fungicide to the glue line which changes the okoume Lloyd's rating to "equivelant of a minimum of moderately durable". At the present time, Shelman is the only one to do this. This material is sold under the trade name "Shelmarine® plywood". They also make a non-fungicide okoume that is sold as marine okoume. Shelmarine® is also available in an African mahogany, "sepele", which is used when appearance is important, more strength is desired and weight is less a concern.
Regarding Lloyd's certificate: There are lots of Lloyd's certificates, the question is "what is it certified for?" A Lloyd's certification by itself means only that it is certified for what the certificate says it is certified for. Lloyds is very touchy about these certificates. They are not posted on the panels. The best insurance of getting a real BS 1088 panel is to purchase only panels that have the manufacturer's name on it. In effect, manufacturers are the ones certified; without the manufacturer's name on the panel, there is no way to determine what the panel is certified for.

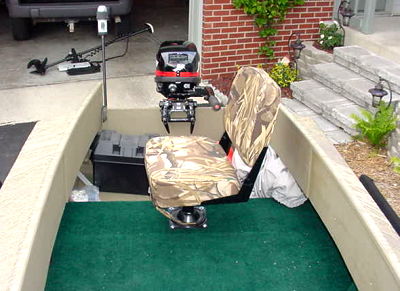
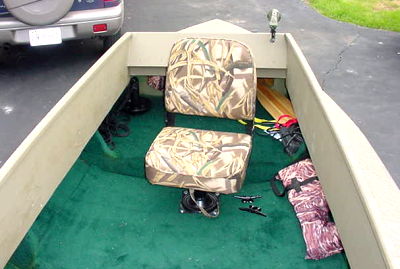
Feedback: Squirt with Jet
by John Gage
My Squirt project was completed about a year ago in May of last spring. It has worked out great with the retrofit jet ski engine and drive installation. The jet ski engine has so many advantages. They are marine ready, they all have electric start, the oil is injected automatically and I have a charging system for on board perks like a radio and some day lights. The greatest advantage I think is that there is no prop under the thing so my small children can stand by it on the shore in very little water. I would recommend the jet conversion to any one who can find a good deal on a jet ski engine, and is willing to think through the necessary steps needed to make the system fit and work properly in the boat. Thank you for asking. The pictures in customer photos have sparked a lot of interest in this type of retrofit fit for the Squirt plan. I have tried to help those who ask with a description of the steps I used to plan for the job. I am sending pictures of the open engine compartment since a lot of people have asked for that.
"Always wear safety equipment when working with epoxy" ...John Little
Feedback: Tornado
Having obtained the plans for the Tornado in November of 2002 it has been "full speed ahead" in the construction of the boat. The boat is being built in Townsville, North Queensland, Australia and since it is in the tropics boating all year round is possible, including the building.
The boat at the moment is in the stage of just having the top decking fitted. Next step is to add some trim and mouldings for decorative purposes.
In Australia we have a problem of obtaining such timbers as Douglas-fir (here it is called Oregon), the timber we have available is called Meranti. It is used a lot for making external doors and mouldings and being a lightweight yet strong timber, it is common to find it used in boat building projects. Marine ply made from plantation pine is available as well in the AA grade and does seem to be readily available.
The boat project can be addictive and I have found that all my spare time is devoted to it. When first looking at the plans and patterns it looked like a complicated project but when the actual construction started, it all came into place with relative ease. I took two weeks holidays to fair-in the frame work for the bottom and side decking and I found this to be the process that took the longest. I had started a week before and as this is a high speed boat it had to have the time taken to make sure it was correct. 3 weeks at 9 hours a day with 6 days per week calculates to 162 hours of fairing. I am now an expert at a plane and blade sharpening.
I find that now that the main construction is through, it is a little sad, as it has been an enjoyable experience doing this project. I still have the mouldings and epoxy sheathing with the sanding and painting to go along with it. The boat is being built in the middle of a workshop with engineering and carpentry going along around it. Everyone who comes into the workshop notices the boat and not the furniture being made or the metalwork going on as the boat looks impressive even in the raw stage.
Regards and happy boat building,
Tony.
Frame Kits
Note: In 2007 we stopped making Frame Kits when our shop foreman retired. Although Frame Kits were a definite advantage, most builders did not use them. That combined with the need to train someone to make Frame Kits and rising shipping costs for large crates led to our decision to discontinued them. This article has been left to give an idea of how frames are made.
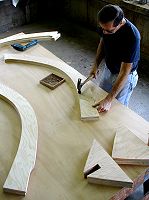
A recent phone call from a builder of the Wanderlust included the comment, "If I had it to do again, I would get a Frame Kit". The builder mentioned that there was a lot of waste that resulted from cutting irregular pieces from the relatively narrow boards that he could get locally. When I mentioned that I usually say that a Frame Kit saves about a month in construction time on a boat the size of the Wanderlust, he said, "at least!"
Currently under construction: Minuet Frame Kit
Feedback: Fife
Andy Anderson has built several of our boats and given them to friends, family and a local camp.
You'll be interested in the report on the Fife from my niece in NC
who is now the proud owner...
Andy
Sea trials are complete, she passed expectations and then some. Chris sat on the rear thwart, and I rowed from just forward of amidships, and she rowed just like a little Whitehall-perfectly!!! I moved the rowing station forward about 18 inches, love those oarlocks and the way it's so easy to move them. At first I rotated the station 180 degrees, which, of course didn't work as the angle of the oar was decreased, but once I figured out that you had canted the station it worked like a dream. We were out in 5-10mph winds and enough motorboat wakes to give her a thorough trial and came back dry and without any new vocabulary. Seriously, she behaved like a lady and rowed like a dream. Now I'm going to find the smallest (weight wise) battery and the proper sized trolling motor for her, and then we'll see about some speck fishing!! Thought you'd like to know that our combined weight was close to 360 LBs, and we had plenty of topsides showing. As soon as we can, we'll get some pics to you. Chris and I want to thank you so much for our pretty little boat, we're already enjoying her.
Andy's boat is in Customer Photos.
Turning the hull
Do you have any information or tips for the rollover process for the double eagle?
The following links are scattered throughout our site and show in one way or another how various builders have turned their boat. I would welcome feedback from other builders.
- From "Boatbuilding with Plywood"
- Hunky Dory
- Riviera
- Monsoon
- Renegade
- Sea Knight
- Tango
- Virgin Boatbuilder, Part 3
- Yukon
Recent email:
Subject: Hull design
Date: 6-3-03
Barry,
Got the book (How to Design a Boat) and am reading it. Have become interested in mult-hulls (pontoons) - think I now understand why I don't understand!! Thought you'd get a giggle - check out this link.
http://www.maths.adelaide.edu.au/Applied/llazausk/hydro/taxon/taxwaves.htm
Ken Franks
Calgary, ALBerta
CANADA
Subject: Tango afloat...
Date: 6-2-03
Our TANGO is a now proper boat - she splashed for the first time on June 1, 2003. I took her to the Glenmore Reservoir in Calgary last evening to float her off the trailer for the first time. No mast yet & no motors allowed on the reservoir so we sat at the dock for a while just because... She's strong, stable and very comfortable to move around on. The centreboard trunk is well sealed and (we sat through three squalls) the homemade round portholes are also sealed well. My sails are waiting at Canada Customs so I'd better hurry up on that mast. More details & pictures soon.
Subject: Re: Honker
Date: 5-26-03

Sorry I didn't get these to you sooner but my computer crashed and I
had to wait until I got a new one.
Ron & Joe Bastin
Subject: Boat Project Registry
Date: 5-23-03
My posting for the Boat Project Registry
Cabin Skiff / Ed Skulski / Buffalo, NY / Rventure@adelphia.net / Received plans, patterns, and video in Jan of 01. It's been off and on again when I have time to work on it, but it's truly a labor of love. Fortunately or unfortunately I spend about as much time planning and dreaming as I do working on the boat. As of 5/03 I have the hull formed with transom and floors installed. The hull is turned over ready to start glassing the bottom. Most plywood parts are cut out from the patterns and I have made the windshield with hinged windows over the winter. Also have made louvered doors for the aft bulkhead opening as well as port lights for the cabin. One thing I enjoy is finding old bronze fittings for the boat. I have pretty much collected all the hardware now which will be all bronze. Whenever I get frustrated I spend a few minutes looking at Ray Macke's site and it gives me motivation to keep going. Ray & the rest of the guys that have posted photos really are an inspiration.
Subject: RE: Zip
Date: 5-20-03
Hi Barry,
Thanks for the interest in my project. The registry is a great thing. I have had numerous e-mails from people asking about my project.
Unfortunately my project has been going very slowly. I don't know where the time goes, it just seems to disappear. I also recently purchased a 31 foot Uniflite power boat. That is getting most of my attention at the moment, but I will be getting back to the Zip this fall. I currently live in Vancouver, BC which is on the ocean. The Zip was to be my lake boat for vacations. I have really enjoyed the time that I have spent working on it and planning as well. I am also learning new woodworking skills as well as finding out that some of the ones that I currently have are not quite as good as I thought they were.
Thanks for the great plans and your great web site. I have a suggestion for your WebLetter or perhaps a section on your web site. There has been a lot of discussion of standard modifications for the Zip, I am sure this is the same for other designs as well. It would be nice to have some "official" recommendation in this regard. One item I can think of is using 20" shaft motors instead of 15". I have read lots of information both for and against this. It would be nice to know what you think. An item more specifically for the Zip would be something to make it not slide quite as much in the corners. Although a fin on the bottom works it makes it hard for beaching. A tapered piece of wood on each side of the keel, under a batten, might be a better idea. Again the "official" word would be nice.
Cheers, Bryce.
See the following links.
Short to Long-shaft: Boat Design Catalog, Outboard
section, bottom of the page
Skeg/Fin:
WebLetter 41
Small boats such as the TNT, Tiny Titan, Super Spartan, XP8 and Pee Wee
should not use long-shaft motors. The cavitation plate on the motor
should be approximately even with the bottom of the boat. On a
long-shaft, this shifts the weight of the motor higher and can make it
unstable on a turn.
Below is the result of your feedback form. It was submitted on Wednesday,
May 14, 2003 at 21:45:05
-------------------------------------------------------------------
name: ALLEN BLACKWELL
Comments: Built one of you boats "Squirt" in 86. Have enjoyed it, both building and using. It's always been a hit at the boat shows.
Below is the result of your feedback form. It was submitted on Saturday,
May 17, 2003 at 14:41:30
-----------------------------------------------------------------
name: John Maki
Comments: The Glen-L website is excellent. Very informative. The customer photos are very helpful. The best thing I've found about using your website is the people I've contacted who have built your boats, is their willingness to share information.
Subject: Re: Tornado
Date: 5-8-03
Barry,
My e-mail is still active, obviously from this reply.
I have completed my project and am waiting to get time to take off from
work for a week to get it into the water. I anticipate some minor
"adjustments" to the drive systems that I will have to attend
to. I'll send pictures of its launching. I still moderate the
discussion group for Glen-L builders at
http://groups.yahoo.com/group/Glen-L-Builders/
and for v-drive boats at
http://groups.yahoo.com/group/v-drive_boats/
Paul Miller
Memphis, TN
Subject: Re: XP8
Date: 5-8-03
I finished my XP8 a couple years ago. Up until last summer I've been
using a Merc110, getting speeds just over 25MPH. This winter I finished
rebuilding a 1950's Mercury Mark 25, and should get the boat going
around 35MPH. Sometime this summer I will finish my 1950's racing
engine, a Mark 15H. That should push me over 40MPH, and I could use the
MK25 powerhead on the H tower... That would be reeeaaaalllly fast.
Can't wait to try it out.
Yep, I have many photos. My brother has a telephoto lens on this 35mm,
so we have some nice shots from the rowboat. As a matter of fact, he has
a Pee Wee (I'll send one of those pictures too). The Pee Wee has a
1997 Johnson 9.9HP on it and goes slightly faster than my XP-8 with a
70's Mercury 9.8HP. I'll send a couple now, if you want more,
just let me know. Have I mentioned I'm only 19 (I was 17 when I
completed construction)? I did all the work myself. Only help I got was
my brother helped me flip it during construction.
Subject: Re. V-Dory
Date: 5-7-03
V-dory has been "wet" for two years now. In that time I've
modified it twice -- once to remove the cabin originally installed (I
found I was hot more than I was wet, so opted for more "air"
under a bimini cover), and once to cut down the motor well sides to get a
different outboard lower in the water (Mercury motors are tall and thin,
Yamaha's are short and fat and it hit the sides of the box). I also
fully decked the insides to make shrimp handling easier and added a helm
console. One good thing about a wooden boat -- you can cut, drill, bore,
refill, caulk and do it all over again all you want. This boat is a rock
in the water. Only wish is that I'd built in a gas tank under the
floor, but that can be the next project. I want to build another V-dory
and install a small diesel inboard. Anyway - I'm still here! Keep up
the good work!
Jack Lavallet
Below is the result of your feedback form. It was submitted on Friday,
May 02, 2003 at 13:40:05
---------------------------------------------------------------
name: Doug Pelton
Comments: I just pulled my recently completed Glen-L 16 ft "Drifter" out of the shop. I set up the interior for fly fishing on the Bow River that flows through Calgary, ALBerta. The boat looks great and I am eager to get it into the water. Thanks for providing a terrific set of plans.
Build more boats
GLEN-L boats, of course