WebLetter 49
An Occasional Publication for the Home Boat Builder
Glen-L Marine Designs - 9152 Rosecrans Ave. - Bellflower, CA 90706
In this issue
- The Gentry is here!
- A Frame Kit for Television
- On the Mark: Improvements - Wakeboard Pylon by Mark Bronkalla
- Dear Steve: Feedback on the Rebel by Dale Mogk
- Designer's Notebook: Fitting the chine
- Building The Hobbiton by Greg Vander Feer
- A great web site: Console Skiff
- Old guys building boats: E.L. Anderson
- Darla's Corner
- Shop Talk: Odds & Ends
- Feedback: Squirt by Steve & Phil Slesinski
- Console Skiff: Cradle/Dolly by Dan Hehn
- Recent email
GLEN-L Update
-
Web site:
- Did you email asking a question, and not get an answer? Perhaps this was you: This mailbox has exceeded their disk quota.
- Gayle took a perusal through the Project Registry and noticed that there are several designs for which there are no listings; some of which are very popular designs. The Project Registry is on the site to be a resource for builders. When you are having a problem, there is someone else you can turn to, even on a Sunday morning when there is no one at Glen-L. I hope that more builders will list in the Registry and become a resource for the community.
- Gentry: Our latest Classic Mahogany Runabout is now available. For details see the new Gentry design page.
- So, what's next? Glen has been playing with model boats. Will we have plans? Will we have a kit? Don't know yet. But as soon as there is anything to report, it will be on the MISC page.
- Customer Photos and Project Registry. We have had a surge of entries over the last month. Some of our visitors think that when they send these in, they are somehow automatically entered on the site. Ain't so. One of my first jobs in the morning is to check for email containing photos or registries. The photos are saved, resized or cropped, then a page is made for them. There must be a link made from the Customer Photos pages, then they are moved to the site. Much the same happens with the Project Registries. What happens if I forget the link? If I forget to move them to the site? Well, they don't appear. If you send an entry and it doesn't appear after a couple of days, let me know.
- For a little over a week this past month we were in a panic trying to determine whether we could build a custom frame kit for the Amigo... in a week. The problem was compounded by the fact that it was wanted without bulkheads. Did we make it? See the A Frame Kit for Television article in this WebLetter.
- There are a couple of builders who have indicated that they would be interested in writing an article or column for the WebLetter. I hope to be able to post their contributions in upcoming WebLetters.
- I would like to thank all those who contributed to this WebLetter. Particularly to Mark Bronkalla, Dan Hehn, Greg Vander Feer, and Dale Mogk for forwarding a copy of his answer to Steve about the Rebel. We all appreciate those in the Registry who take the time to share what they have learned. There has obviously been several others whose email have added to this WebLetter; thanks to all.
Editor
The Gentry is here! The Gentry is here!
Ok, I'm sure that all the readers of the WebLetter have been breathlessly waiting to see our newest rear-cockpit mahogany runabout. Well, you need wait no longer, the Gentry is here. I could write all about it, but since I already have the information on the Gentry design page, why repeat myself?
A Frame Kit for Television...
On the 25th of July we received a call from Paramount Studios asking if we could make a Frame Kit for the Amigo. The Frame Kit would be used in the upcoming CBS TV series, "Navy-NCIS". We do not normally make custom Frame Kits and the Amigo is particularly problematic because several pieces are to be laminated in place from thin veneers. This is not a practical method for production in our shop. This was further complicated by the fact that they needed it "next Friday". After a discussion with George Tuers, Prop Master, we agreed to make a kit using sawn pieces and a few other changes that would give them the look they needed and allow us to have the kit ready in a week.
The Amigo Frame Kit would not be the first TV star produced by Glen-L. When the series Roseanne started, Dan was building a boat. The frames he was working on were for the Kona Kai ("we want the biggest Frame Kit you have"). They did not use all the frames and gradually the boat project faded out of the series. We don't know whether the Amigo will meet a similar fate, but keep an eye out for Mark Harmon as NCIS Special Agent Leroy Jethro Gibbs, outside the normal chain of command, who also builds boats in his free time.
Because we are close to Hollywood, we are frequently contacted by film and commercial makers looking for props. Glen-L Frame Kits have appeared in TV commercials and movies, but we frequently only hear about them after the fact. The Thunderbolt was supposedly used both as a completed boat and as a model in one of the early James Bond movies... they blew up the model. Two separate production companies bought Frame Kits for a Christmas credit card commercial. The commercial showed a father and son working on the boat. In the end you could have missed the frames if you blinked.
There was series with Robert Urich called "Crossroads", which featured a father and son traveling across the country on a motorcycle. One of the first episodes was about an old man they met who was building a boat in his barn. The boat was the Lord Nelson, built by Ned Smith of Flowery Branch, Georgia. Then there was the Kentucky Fried Chicken commercial with the Delta Q... I'm sure there were many more, but I am writing this from memory and that's all I can remember.
So, what does this all mean? Probably nothing... just a bit of obscure history.
On the Mark: Improvements - Wakeboard Pylon
by Mark Bronkalla
Our family has really gotten into wakeboarding. It is a fun family activity and is compatible with the weekend speed limits (25mph) on the local lakes. Unlike skiing where you may have wanted to limit the number of passengers on some boats to improve hole shot or reduce the wake, with wakeboarding, "the more the merrier" is the rule. More people provide more weight and a bigger wake. With the Riviera, there is no shortage of power, so we try to load it up whenever possible.
Last year we had a chance to ride with some friends that had an extended pylon on a Mastercraft Prostar. The pylon made for MUCH easier starts and for higher and longer jumps. While I had made some provisions for a pylon when building the deck framing, I had held off adding it until after using one, as I was not sure if it was of benefit or just sales hype.
The pylon we settled on is a two piece all stainless stell unit from Barefoot International. I like the look and stiffness of the stainless tubing. Having a 2 piece unit makes it easier to stow away when not in use. For a normal installation, the pylon slips over the center ski tow pylon of a competition inboard ski boat. A cable and strap system then wraps around the bow and attaches to the bow winch eye. Well, neither of these are available on our boat. This would NOT be a normal installation.
Dear Steve: Feedback on the Rebel
Note: Dale Mogk is listed in the Project Registry as a builder of the Rebel. The following is a copy of an email in which Dale answers questions about the Rebel.
Subject: Glen-L Rebel
Date: 8-7-03
>
> Hi,
>
> I'm considering building a Rebel and was looking for some
feedback on
> the boat. I'd appreciate anything you could tell me about it. I
got
> your name off the builder registry and I see that you built the
boat
> about 20 years ago.
>
Hello Steve,
Yes, my best friend, my brother, and I built a Glen-L Rebel starting in October of 1985. We had a good time building it and it really did take a lot of work. It was, and still is, very satisfying. By the way, you are the very first person to contact me about building this boat - I've been listed on the Glen-L site for a couple of years now.
Building The Hobbiton
By Greg Vander Feer
The Hobbiton is built using Carioca plans and patterns. The article first appeared in the Valley Christian school paper, "The Crusader". Valley Christian is in Cerritos, CA.
The year was 2002. The place, Valley Christian High School. Masterminds Joshua House and Dan Kersey came up with the idea of building a boat in their wood shop class. Being the wood shop teacher at Valley Christian and loving and having built several boats and one kayak, I told them I thought it was a great idea, but they had a few obstacles to clear such as:
- Where are you going to build it?
- Can we get permission to build a project of this magnitude?
- Do your parents know what you're building?
- Are they supportive?
- And oh yes, one small hurdle, how will you pay for this project?
Obstacle number two was cleared with the blessing, or make that, approval of Mr. Kaemingk. I later found out that Dan and Josh didn't tell him the exact size (17 feet) of this boat, but at this early stage of the project, why make waves.
Dan and Josh made a trip to the local boat plan store. Glen-L Marine sells boat plans for boats from about eight feet long to over 50 feet. After talking to Barry at Glen-L, they settled on plans for a 17-foot long cabin cruiser. Plans were purchased and brought to school. Plans of procedure were read, patterns were studied, and then came the "BILL OF MATERIALS".
Reality check. Remember obstacle number 5? Well, "never give up" seems to be the motto of these two students. Both have part-time jobs, and donations were given by teachers, staff and parents all eager to see the project begin.
Marine plywood, spruce, mahogany, fastening kits and epoxy resin were purchased. The "Plan Of Procedure" gives step by step instructions to follow so you're never lost. Patterns were traced onto wood. Ribs, frames, gussets "braces", were cut, sanded, shaped, glued, nailed, and screwed or bolted. At this stage we had boat parts, but it didn't look much like a boat. A building form was made. It needed to be straight and level in order to have both sides of the hull be the same. Ribs, transom (the back end of the boat), frames, stem (the front) and the keel (back-bone of the boat) were set up straight, level, and square onto the building frame. We now had what looked like the skeleton of a boat and also got an idea of the size of it.
The sides and bottom of the Hobbiton are made up of 3/8" plywood glued together with backing blocks and epoxy glue. After gluing these panels together in the shop, they were taken outside and glued onto the boat, nailed with the correct nails and then trimmed to size. The whole hull was sanded by Dan and Josh and friends willing to help. Fiberglassing was the next step. Epoxy and fiberglass cloth covered the entire boat. Friends were not as abundant sanding the fiberglass. Must have had something to do with the itching. With persistence, the fiberglassing was completed. Priming the hull came next. Wet sanding the primer seemed to bring all the friends back. Want to get students together? Just add water. The second coat of primer was applied last weekend and we could be ready for painting as soon as this weekend.
Many pictures have been taken as construction has progressed. Some of these pictures can be seen in the MISC section of this web site. Click on High School Boat Project. Better yet, come out and see it in person. This has been a very enjoyable project to be part of and I've already invited myself on a fishing trip even though it's not finished yet. Well, summer's coming and maybe by the beginning of the next school year, the completed Hobbiton will greet all new and returning students to Valley Christian High School.
P.S. The name Hobbiton came from the book "Lord of the Rings".
A great web site: Console Skiff
I have seen Kurt Ayres' web site in the past and it is listed in the Useful Information & Suppliers section of the Glen-L site. But following a recent link in the Boatbuilder Connection, I was brought back to Kurt's site. I am adding a link here because I think the site would be helpful to other Console Skiff and Cabin Skiff builders. I particularly like the "Construction Log (with photos)". Perhaps he and Ray Macke can get together, since they are plying the same waters.
Kurt Ayres' Console Skiff
Ray Macke's
Cabin Skiff
Old guys building boats
E.L. "Andy" Anderson

Current age 83 1/2 years. Started first Glen-L project about 5-6 years ago. Following is a list and status:
- Rowme
- Bull's-Eye
- Dory
- Glen-L 15...not finished
- Sea Kayak
- 2 Dinkys
- Fife
- Kayak 13
- Tubby Tug
- Sissy Do
The best picture I have of myself includes my "boys"... not because they helped me, but they are just with me all of the time. I have also included pictures of the boats listed above.
One of my salty nieces really likes the Fife. She's a widow in Alabama and says the Fife rows like a dream... no effort... and it also draws a lot of attention from other old salts in her area.
Built the Dinky for my kid sister (81 yrs) who is in an assisted living community in NC. She formed a yacht club last year for members who race sailboats on their lake and needed a boat to retrieve sailboats caught in the weeds.
I am now building the Kayak 13 for another niece in NC. All other finished boats have been donated to the local "Children's camp" for underprivileged kids.
Hey...don't knock it....some idiots play golf!
The only other comment I would have is, what next? ...After I finish the Kayak 13, that is. (Finished 9-03, second Dinky completed 4-04.)
Andy

Darla's corner
by Darla Schooler
I welcome your contributions
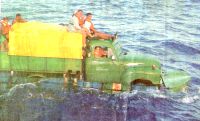
The photo at the right appeared in the Arizona Republic. The caption: "Yes, your eyes aren't deceiving you. That's a 1951 Chevy flatbed truck, decked out with pontoons, plowing over the waves of the Florida straits. The Cubans almost made it."
The article continues: "According to the Coast Guard, the green 1951 flatbed Chevrolet had been converted to seagoing use by attaching a buoyant pontoon of 55-gallon drums. A propeller had been stuck on the drive shaft." All the parts had been carried to the beach in the truck and assembled in six hours.
The truck contained 12 asylum seekers who were spotted 40 miles south of Key West, having traveled 50 miles on the high seas. The truck still had its wheels as the would-be immigrants had planned to drive up onto the beach once they landed in Florida.
Back in Havana, after being taken off by the Coast Guard and returned to Cuba, the Associated Press reported the Cubans said, "We thought that they would let us in because it was so outrageous".
And what happened to the "boat"? After the Cubans were removed, the vessel was scuttled as a potential hazard.... I mean, a 1951 Chevy, what were they thinking?
![]()
Never be afraid to try something new.
Remember, amateurs built the ark,
Professionals built the Titanic.
![]()
Shop Talk: Odds and Ends
The instructions say to use a carriage bolt to attach the knee to the transom. Does that mean I have to penetrate the transom from the outside with the carriage bolt? How is the bolt set in the transom?
Answer
Counterbore so that the head is below the outside surface and fill with a hardsetting filler and sand smooth.
Transferring patterns
Here is the method I am using to transfer your full size plans to the two 1/4" marine plywood sheets. I first transfer each part shape (using carbon paper) to cardboard. I then cut out the cardboard (using a pointed razor blade) to make a sharp pattern. I then arranged all the cardboard cutouts on the plywood sheets as shown by your design and then I drew around them. I am drawing on the B grade side of the marine plywood. This allowed me to locate all the parts on the plywood first to ensure that I had them in the correct location before I drew anything on the plywood.
Here is one other procedure that I used. Because the marine plywood has A
and B grade sides, I wanted to get the A side on the outside. For the
sides, this required turning the cardboard pattern over for the second
side so that the A grade side would be on the outside. Thanks again for
your detailed plans and instructions.
Charles F. Rader
This email is from France.
Subject: Information
Date: 7-31-03
Hello
> I have more questions, sorry. But what is Douglas-fir, is it
plywood?
> and what means 125 bd.ft. and "random-random", in the
lumber file
>of the Phantom 27.
> Thank you
Answer
Douglas-fir is a type of wood. In the US, Marine plywood is made from Douglas-fir. It is also used as a lumber for building boats. It is often available in longer lengths than other wood.
In Europe, sapele or okoume BS1088 plywood is most often used. Lumber would probably be mahogany or white oak.Random-random means random widths and lengths. "bd. ft" is "board feet" = 1" x 12" x 12".
A board 2" x 12" x 12" = 2 bd. ft. As does a board 1" x 12" x 24".Another term used in our plans when referring to wood, is "lin. ft." This refers to linear feet. It is used to refer to a group of pieces of wood that have the same width and thickness.
60 lin. ft. of 1" x 4" mahogany, would refer to a number of pieces of mahogany whose length adds up to 60'.Note: When we say 1" when referring to lumber, this dimension is before the boards have been surfaced. The final thickness is usually 3/4", but can be slightly more. In some cases, we will specify 1" NET. This means that the board must be a full 1" thick. Most designs do not have many or any NET lumber. Lumber widths are almost always "actual". There are two exceptions to this in the Phantom bill of materials. In the US, 2" x 4" and 2" x 6" are common sizes in construction. The actual size is 1 1/2" x 3 1/2" and 1 1/2" x 5 1/2". You can use standard lumberyard sizes or full dimension.
Plywood thickness are actual thickness.The US uses a primitive system of measurement, based on history. It is not easy to use, but until we adopt the metric standard, it is what we have to work with.
You might contact: Dominik Papas (Rebel builder) in Germany or one of the other builders in the Project Registry who are in Europe, to see if they have suggestions about materials.
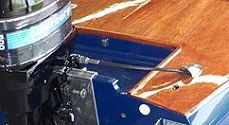
We recently received photos of Jerry Waller's modified Flying Saucer. Note the way that the steering cable exits the deck. This is a possible solution for others building small boat who wish to use a TeleFlex or other single cable steering system. The vent used is a standard piece of hardware. See our Boatbuilding Supplies pages for more about this vent.
The following was posted on the Boatbuilder Connection:
I have put together some blinking lights for my little row-boat. I have one side green and one side red. My question is - what color goes on my right and which should be on the left?
Answer from "Chapman Piloting, 63rd Edition"
Defining Navigation Lights...
Sidelights:
Colored lights, green on the starboard side and red on the port side, showing an unbroken light over a 112.5-degree arc, from right ahead to 22.5-degrees abaft the beam on their respective sides. (The sum of the arcs of visibility of green and red sidelights is the same as that of the white masthead light.)
On a vessel less than 20 meters (65.6 ft.) long, the sidelights may be combined in one fixture carried on the boat's fore-and-aft centerline. On a vessel less than 12 meters (39.4 ft.) long, this combination should be carried "as nearly as practical" to the fore-and-aft centerline.
Since the question was asked, Kurt Ayres offered the following memory aide and information: "'red port wine'-- the red light goes on the port (left) side. The lights cannot blink; blinking lights would confuse others and create a hazard to navigation."
This information applies to the US. This information and additional information about lighting requirements see "Navigation Rules" on the US Coast Guard site. Outside the US, contact your local authorities.
Privacy alert |
Feedback: Squirt
My son and I finished the Squirt last week! We ordered the blueprints from Glen-L on August 4, 2002. We built everything from scratch. We figured it took about 200 hours to complete. In Michigan, we took the winter and the spring off due to temperatures below 70, which was too cold to fiberglass.
We bought the fiberglass kit from Glen-L. It was the first time we ever applied fiberglass. We used some old plastic paneling molding painted black for the edging. It was highly flexible and easy to install.
We purchased the steering system from an old marina in Mobile, Alabama for $25. It has a long cable, but it fits easily under the bow area and steers great. The tiller arm was removed and we made a bracket with a pivot hole for attaching the steering arm. The controls were bought used from Ebay and made to fit the outboard with standard hardware. We installed a kill switch just in case there was a problem.
The hull was painted with an industrial enamel and the top was spray painted with a gloss enamel and then striped with 1/8" white vinyl. We made the seat from thick dense foam and vinyl covering. We modified the seat back to add a slight angle for comfort and to add more space to the cockpit.
We bought a 4 person aluminum lift so it can be left in the lake and used at a moments notice. The Squirt fits perfectly. We plan to add a battery and radio next.
See attached pictures for the finished look.
- Steve & Phil Slesinski
Console Skiff: Cradle/Dolly
by Dan Hehn
I am building the Console Skiff. To make my work easier, I chose to build a cradle/dolly to support the boat during construction. For me, the cradle had to have the following characteristics:
- Support the boat hull properly during construction.
- Hold the bottom hull panels at the designed angles
- Allow me to easily move the boat around in or out of my garage
- Easy to build and inexpensive
Recent email:
Subject: RE: Audeen w/jet drive
Date: Tue, 19 Aug 2003 19:16:14 -0700
Barry:
Thought you might like to know, in 1970 I built an Audeen with a Berkley Jet Drive. The boat is still in use. If anyone asks about this configuration I would be glad to communicate. The boat is powered by a converted 1958 Plymouth 318. The boat has been from Canada to Coulee Dam (about 160 miles), on Lake Roosevelt in Washington State.
This project left the engine in the original position, the jet drive connected with a drive shaft. Berkley made a package in the early seventies just for this configuration called a "Package L". Few jet drive folks seem to even know about it's existance. The boat handles great, is on plane very quickly, the center of gravity of the hull is right where the plans had it located.
L Rux
Subject: Wee Hunk
Date: 15 Aug 2003
Dear folks......
After 2 1/2 summers of leisurely effort, I took my Wee Hunk on the water today. Neet !!!!!!!
Powered by 30 HP, It literally jumps up on plane, and far exceeds my expectations. Thanks for a great design, and a very complete, concise plan set.
Also..... Without the e-mail help of Matt O'neill it would have never come to be. Unfortunately, I have not got Matt's current e-mail address to thank him personally. If anyone out there has it I would love to send him some photo's.
If not....... If he gets a chance to read this. "Thanks Matt, and bless your heart for being a kind and sharing person. Hope you are well, and fishing yourself senseless."
I will send photo's at the first opportunity. So far everyone is too busy riding to take pictures !!!!!
Regards
Don Rasmussen
Oakville, Ontario, Canada
Subject: Project Registry
Date: 13 August 2003
Please change my Project Registry entry to the following:
WANDERLUST / Anthony Ciarochi / Browns Point, WA / email address /
(date):
Coming along. Check my progress at http://12.206.85.156/~ciarochi/boat/Wanderlust.html
(continually updated)
Thank you!
Anthony Ciarochi
This site contains good photos of construction and particularly of scarfing plywood. On the first page of the site, Anthony recommends that you read his disclaimer before proceeding...
Disclaimer
This site is for archival and entertainment purposes only. Many of the materials and techniques we use are dangerous and probably self-destructive. Using them may cause injury to you, your unborn children, family pets, and birds that happen to fly too close.
We are neither trained nor very skilled boat builders. Everything we know was gleaned from books, or the Internet, with a smattering of experience thrown in. There is almost definitely a better way to do ________ (fill in the blank) than the method we used, and you should seek these methods out and use them instead.
In short, we are just a couple of goofballs with little regard for our safety or the safety of those around us, and if you choose to use any of the methods or materials shown or described on his web site, then you must accept the fact the you probably are also.
Subject: Project Registry
Date: 8-13-03
Mist Miss
Clif Poynter
Columbus Ohio USA
I purchased the plans in the winter of last year (January of 2002) and am currently finishing the planking (covering) of the hull. Finding the correct wood in this area of the country without having to ship it in has been extremely difficult. Finishing the hull is my goal for this summer, as I soon will have to move it to a new garage and want the added stiffness. I have found an engine and transmission and rebuilt them and they are ready to install. Finding a used engine has saved me thousands of dollars (I just hope it runs well!). The plans have been excellent to this point and combined with the Boatbuilding with Plywood book, have kept any surprises from happening. I would recommend this book to anyone who is thinking about building. If you read it, almost all of the items I see as questions on the website are answered within. I would like to talk to some other builders in the area to see what they do for lumber supplies and some of the other supply questions that I have. Please feel free to email me. Also I would like to thank those of you who have created your own websites detailing your building projects. Your information has been invaluable.
Below is the result of your feedback form. It was submitted on Monday,
August 11, 2003
----------------------------------------------------------------------
name: George Maher
Comments: Starting to build my first Glen-L boat, the Sissy-do. With that under my belt, I will build the Glen-L 15, a beautiful 15 foot sailboat. That will be fun. The best part is that my wife can't wait until both of these are built and we can go sailing on Strawberry Lake of Becker County, Minnesota. Of course, I can't wait either. I have the plans for both boats already, and they are very good plans, tons of information if only one looks hard enough, it's there.
Subject: Customer Photos
Date: 8-10-03

Hello All,
Well, I am finally finished with my Glen-L Sissy Do. I started in
January 2003, moved the project outside in the spring, and finally
finished in July. I truly enjoyed every bit of the aggravation between
bevel cuts, boards not limber enough to bend, not owning a table saw or
electric planer, redesigning the bow because I bought 13 ft lumber
instead of 14 ft for the sheer, not to mention the RAIN! I think it
turned out great! As you can see, I added a few extra touches not
included on the plans. The storage compartments add extra large,
comfortable seating and a place to lock up stuff. We had the launch at
Hasse Lake, Alberta on July 18. And it went on its first fishing trip a
week later with my boys. It took on a little bit of water, but everyone
tells me if I let it get wet the wood will expand and the seeping will
stop.
Here is the link to my web page if you would like to add it to your Customer Photos page www.members.shaw.ca/brandonjohnson/boat/boat.htm.
Thanks for the fun!
Jan
Below is the result of your feedback form. It was submitted on Thursday,
August 7, 2003 at 15:01:30
----------------------------------------------------------------------
name: Shawn Wells
Comments: Great informative website. I've started a project but on a
much smaller scale...a 1940s barrel back... 1/5th scale. Now after
looking over your site I can't wait to get done with the model and
start on the for real boat. =)
Subject: Missile landing
Date: 7-28-03
Barry and crew,
Thanks for your quick assistance and expertise to get me a new water
pump for our Glen-L Missle. I finished it the night before a big boat
show last weekend about 180 miles away. No time to water test, but we had
the engine running. Dropped her in and even in her 1970's colors, she
was a hit at the show, sitting dock to dock with the Gar Wood,
Chris-Craft and Hackers. The general public just loved it, and everyone
wanted to know just how fast it would go.
After spending a couple of weeks getting it water ready, I know a little
more about it. It has a Glenwood v-drive (1-14), with in and out. The
motor is a 1960 RB 383, which according to Year One, they only made in
1959 and 1960, and are quite rare. This is a P383 (325 stock hp), which
would make it a 1960. It has Edelbrock M11 headers, an aluminum bell
housing, a vintage Edelbrock intake, M/T valve covers, and I replaced the
old Holly double pumper with a new Edelbrock 750. We were in the water
all day on Saturday (the first time the boat has been wet since 1986),
and the attached photos were taken at our lake cabin yesterday. To say
the boat "hauls the mail" is an understatement! I'm running
a 13 x 13 three blade, and the acceleration is awesome! I believe the
boat is a 1962. It was originally metallic maroon, with a metallic cream
interior. Someone did a Mopar remake in the 70's, but I think bright
yellow with a white tuck-n-roll would be perfect.
Again, thanks for your help!
Ross Pfund
Ada. MN
Subject: Scull Boat update
7-23-03
Finished the boat in June. Have had it out learning to scull all of July. The boat handles great. A good sturdy, sea worthy, float. Been fiddling with ballast in the bow. So I'm not getting bow slap on the water. Getting closer to having it right. Now just practice... practice. It's pretty cool how the single oar out the transom gets the boat moving.
Subject: Customer Photos - Squirt - Hendren
Date: 20 Jul 2003
Hi again,
Our squirt is finally finished! We water-tested her last Thursday, and
she is fabulous!
I'm attaching a few pictures of "L'il Nessy" complete.
This was a great project, and we're looking forward to building
another one - quite similar to this Squirt, in the near future.
John and Cindy Hendren
Build more boats
GLEN-L boats, of course