WebLetter 51
An Occasional Publication for the Home Boat Builder
Glen-L Marine Designs - 9152 Rosecrans Ave. - Bellflower, CA 90706
In this issue
- On the Mark: Other repairs, dents and dings by Mark Bronkalla
- Designer's Notebook: Fairing Tools
- Feedback: Squirt by Bret Bordner
- Darla's Corner
- Construction of Glen-L 12 by Carl F. Sevey
- Feedback: Sissy Do by George Maher
- Feedback: Bo-Jest by Bob Ellis
- Feedback: Bo-Jest by Bob Trygg
- Feedback: Honker by Matt Flanery
- Feedback: Sliding Seat by Bob Bissett
- Recent email
GLEN-L Update
- Web site:
- Boatbuilder Connection: We have had a problem with SPAM. I need more
feedback. I am able to "control" SPAM by visiting the forum often and
deleting it as I find it. On the weekends, I check from my home computer.
Other options: Several people have suggested a password be required. For those comfortable with the Internet and inclined to participate, this may be a good option, but many people will not casually visit a forum if a password is required. Many people don't trust the "forces behind the Internet", and think something sinister may come if they give any sort of information on the net. People like us may well be naive or just peculiar, but, there you are... I feel the board should be easy to use and have no impediments to casual browsers. These people often become active participants.
Replace our current board with another? It would be possible to disallow certain types of entries, but only a password system will prevent SPAMing at present. Likely, this too shall pass.
Other concerns. Early in the life of our board, I edited out non-helpful entries and started the first archives. This is a ridiculously laborious process and I have not done it since. Instead, I have archived in 2 month increments, without editing. Lately, I have been deleting the older archives, based on the feeling that it is unlikely that very many people look at them and they take up a lot of room. Since I archive in two month increments, I have been letting the board build up to about four months before removing entries for archive. This means the board gets slow by the time I remove entries. Question: Is this a good way to handle the board or....? I would add that I do not personally visit on-line forums, other than ours. When I have visited to do research, I found many of the other board formats to be confusing. But I need input from more enlightened users.
Please send your comments and input. Note: Usually very few people respond to this sort of appeal, so if you do, your opinion could well be decisive. - I would like input on this WebLetter. Something other than, "I really enjoy your WebLetter". I would prefer a "but" after that statement. What don't you like, what more do you want? There are now over 10,000 people being notified of the posting of WebLetters, someone must think they are less than perfect. If you want more humor, I must admit that I am not a funny guy. There is an opening for a humorist.
- As always, I would like to thank those of you who make this WebLetter possible, the contributors. I could never manage to fill this without your help.
- Boatbuilder Connection: We have had a problem with SPAM. I need more
feedback. I am able to "control" SPAM by visiting the forum often and
deleting it as I find it. On the weekends, I check from my home computer.
Editor
![]()

Christmas is coming,
the goose is
getting fat...

On the Mark: Other repairs, dents and dings
by Mark Bronkalla
In the course of using the boat, it is virtually certain that over time, damage will occur. A big part of building a wooden runabout is having a floating show piece. Keeping it in near showroom condition takes continual effort and upkeep. Frequent use of our boat and pulling up to other boats or docks in bumpy conditions has led to some damage. The anchor was also swung into the hull resulting in a dent as well.
The epoxy / fiberglass covering of the hull provides a large degree of ding, dent and scrape resistance. The varnish outer layer provides a final "wear" layer that can be renewed after sanding out scratches and lesser scrapes. The varnish also provides the UV protection for the epoxy and the wood. Damage and repairs fall into several categories:
- Cosmetic scratches and scrapes. These only affect the varnish or the outermost portion of the epoxy (no glass damage).
- Dents and dings with the fiberglass firmly adhered to the wood.
- Dents and dings with the fiberglass partially delaminated from the wood. The fiberglass is basically intact, but may have minor cracks. The delaminated area will appear cloudy.
- Scrapes / dents where the fiberglass has been breached and the wood is now exposed to water.
Designer's Notebook: Fairing Tools
Fairing, as referred to in boating and as it applies to this discussion, means angling, beveling, and shaping the framework of a boat so the planking or decking will lie flat to all members and not just rest on edges. Fairing is required on most wooden boats except possibly stitch-n-glue craft where the process is virtually, but usually not completely, eliminated. The amount of fairing required varies. A flat bottom rowboat won't require the shaping a vee bottom hull with compound curvatures will. After the boat is completely framed and ready for fairing, fear strikes many neophytes. Not that fairing is difficult, it isn't, but it is confusing for the first time builder. Taken a small step at a time and thinking the process through simplifies the project. Some builders, however, start whacking away without the faintest conception of what must take place. Installing longitudinal battens AFTER fairing is overlooked by many. It's easier to notch the battens into frames or bulkheads from a faired surface to the exact depth required. A hand held circular saw, or enlarged base router set to the required depth cuts the notches accurately and quickly. Battens installed after fairing should require minimal shaping while those installed from unfaired surfaces could require unneeded and undesirable removal of stock. The purpose of fairing is to shape the framework so the mating member, deck or planking rests firmly in place. Take a couple of battens or strips of plywood of width to extend half the beam of the hull, to simulate how the planking must mate to the framework. When working on the bottom, bend the batten athwartship from keel to chine. It will be apparent that some high points will need to be faired if the strip simulating the planking is to lie flat. Do this along the bottom and from chine to sheer on the sides. Bend the strip longitudinally over several forward frames and the stem. Typically, a lot of beveling will be required along the stem, and note that most angles are ever changing. If the angles were constant, they could be precut. In conjunction with, or after rough fairing, simulate the planking on the boat with sheets of plywood or portions of the planking used. Visually seeing what fairing is required and understanding it will make fairing much easier. A common fairing method simulates the bottom planking, as described above, that will lie on a chine for example. A file is used to make a notch in the chine to the angle that would be required so the planking would lie flat. This procedure can be repeatedly done along the chine and will serve as a guideline as to the amount of material that must be removed. The stem and other areas can be done in this same manner. Just remember, the plywood, solid stock, cold mold, strip, or carvel planking must mate solidly to each supporting framework member. After doing some fairing, each individual develops a favorite tool (or tools) that does the task efficiently. Some use only hand tools, others primarily portable power tools. In almost all cases, a good fairing job will require the last phase to be done by hand. Let's consider the area that requires the most fairing, usually the stem that in many of our designs is plywood laminations. Trimming a bevel on a long plywood edge with a hand wood plane is slow work. A good husky wood rasp will take off a lot of material in a hurry. One professional boatbuilder, who had formerly been a shingler, used his razor sharp hatchet, to rough trim the angles required. This is much like the wooden shipbuilder who uses an adz for rough trimming, some with amazing accuracy. Rough finishing is still required, usually with a hand plane or possibly a file. A power plane can remove a lot of material in a hurry, but it is easy to remove too much. The favorite power tool for rough fairing used in our shops is the disc sander with coarse sandpaper. It can take off a heap of material in a hurry, but again, removing too much material is easy. Other sanders are usually reserved for finish work. Some will use a belt sander and although it can remove material quickly, it's difficult not to get a rounded surface or undercuts from the belt edge. A router or belt sander mounted on a jig has its advocates but, in most cases, the fairing can be done by other means quicker than a fixture and tool can be set up. But again, if you have a special tool and are proficient in its use, it may be preferable for you. Getting the fairing done correctly is the important task, not how it's done. In our shops we finish the fairing with a hand plane followed with a thorough sanding with coarse paper. The sanding is done with a sanding belt cut to make a long single piece fastened to a flat board. Pushed back and forth diagonally across the boat helps smooth any projections. However, if the athwartship sections are convex, concave or reverse curves, the sanding board must be used in varying fore and aft directions. Care must be taken so the beveled edges are fair. The curved surfaces must be true curves without humps or dips. What if you goof? If you butchered a deep dip in the member, fill it with a wooden shim epoxy glued in place. Remove any humps, but take care, often a hump is concealing a dip on either side. Stand back, sight along the lines, hold your face sideways, upside down, and every which way. From any angle the surfaces must be fair. Still getting a positive surface for the planking or joining member can be difficult. Modern technology has come to the rescue. Epoxy resin (POXY SHIELD) with thickeners, silica or microspheres, will fill reasonable gaps and still have structural integrity. Care is required if, for example, a dip is being filled with thickened epoxy. If screws are driven fully home, the planking or mating member will undoubtedly follow the dip. To prevent this, use a wax or plastic covered wood strip fastened at the ends to bridge the gap and omit fasteners in the filled area until after the adhesive cures. How long does fairing take? How far is up? A good boatbuilder with the correct power and hand tools will probably fair a typical 16' plywood boat in two hours or less. Could you do the fairing in this time? Very doubtful, perhaps a half day or even a full day would be more like it. |
Feedback: Squirt
by Bret Bordner
10-6-2003I had always wanted to build a boat. I figured with the help, company and enthusiasm of my 2 sons (Ryan 8 & Jack 5) I, or should I say we, could do it. We looked for months for just the right boat and fell in love with the Squirt at our first glimpse. So we ordered the plans and started our planning. We spent many hours just talking about the Squirt. It was great.
After receiving phone calls at work for days from the boys telling me that the UPS truck did not stop at our home, our materials finally arrived. We started the Squirt in September and had hopes of being on the water for the first Saturday of May which is the Opening Day of Yachting Season on Lake Washington. But between school, sports and the hours spent just looking at and talking about the Squirt and how it would perform, we had to settle for Memorial Day.
Following are pictures of our Squirt in action. With a 9.9HP Johnson on her and both boys along for the ride she tops out at 25MPH and is able to pull kids on a tube. Next summer we'll try skiing behind her. What a great boat. We had a fantastic time building, talking about, dreaming of and using our Squirt this summer. Just as we will for many more to come I'm sure. My younger son is already asking when we will be starting his Squirt. I guess that's next winter's project.... I can't wait.
Thanks Glen-L for the memories my boys will have forever.
Bret Bordner (and of course, Ryan and ,Jack) Bellevue WA

Darla's corner
by Darla Schooler
I welcome your contributions
![]()
Read this quickly, and be amazed...
Aoccdrnig to a rscheearch at Cmabrigde Uinervtisy, it deosn't mttaer in waht oredr the ltteers in a wrod are, the olny iprmoetnt tihng is taht the frist and lsat ltteer be at the rghit pclae. The rset can be a total mses and you can sitll raed it wouthit porbelm. Tihs is bcuseae the huamn mnid deos not raed ervey lteter by istlef, but the wrod as a wlohe. Amzanig huh?
![]()
"Will order the fiberglass kit later on assuming I get that far. I don't even buy green bananas these days." ...Andy (old boatbuilder)
Q. What's "The 15/20 Rule" of sailing?
A. No sailing above 15 knots of wind or below 20 degrees F.
Feel Healthy? Health is meerely the slowest possible rate at which one can die.
![]()
The Construction of Glen-L12, "Need-a-Breeze"
(Every time I go out on the lake, the wind calms down, hence the name.)by Carl F. Sevey
I purchased the Glen-L 12 sailboat frame kit in March, 2002. I started the building form, but the work came to a complete stop after our vacation, when a ladder collapsed and I broke four bones in my right foot.
Ten weeks later, (now December/Winter) the work began again in our rec-room basement. In the Spring of 2003, (a cold one), work continued in my garage little by little. I needed warm days for the glue to set. I used brown wrapping paper for the plywood layouts.
Feedback: Sissy Do
by George Maher
Work on the Sissy-Do has been occasional, so far. But progress is being made... continue
Feedback: Bo-Jest
by Bob Ellis
This is my final Bo-Jest input to your "Customer Photos" section.... continue
Feedback: Honker
by Matt Flanery
Well, I finally finished the "Honker" and I must say that the boat was a lot of fun to build... continue
Corners of the web site you may have missed...
Design Characteristics
Frame Kits
Wood/Plywood FAQ
Boat speak
Feedback: Bo-Jest
by Bob Trygg
I am writing again to give you a little update about our boat "Rascal" (a modified Bo-Jest design).
After our launching last year we did not get to use her that much, only a few trips on Lake Superior covering about 50 miles total. We made some minor refinements during the last winter and started this year with more ambitous plans. We entered "Rascal" in the "Woodies On The Water" boat show in July and won first prize in the category of "Best Power Boat under 24 ft." Many people had a chance to see her and we had many questions about her. We had signs on the boat showing Glen-L's name as the designer and source of plans.
In August we trailered her up the north shore of Lake Superior to the Canadian border where we launched her at a place called Grand Portage. We then took her to Isle Royale National Park some 24 miles out into Lake Superior. Isle Royale is an island park some 40 miles in length. We were there for about 2 weeks and covered about 150 total miles in that time going around the island. It is a very rugged place and conditions are not always pleasant, but "Rascal" never let us down. We had some real rough weather rounding the northern point and had seas of about 4 to 5 ft. with some of the waves throwing spray completely over the wheel house at times. It was sure nice to be inside for a change for over the years we have made this trip in sailboats and had to be sitting outside in the cockpit. We stayed aboard the entire time and found the accommodations to be quite nice for 2 people.
We are enclosing 2 pictures, the first one is a picture of "Rascal" at the "Woodies" boat show and the second is showing her on the trailer with a cover we sewed for road travel. We find that it is faster to get somewhere covered up, or we are constantly stopped by people asking us about the boat.
Thanks again for the design and plans. We love the boat and plan many more trips in it.
Feedback: Sliding Seat
The Sliding Seat is finally done and in the water. The seat fit our 17' Coleman perfectly, after taking out the center brace. I added cleats under the outriggers and used 2" C-clamps on the gunnels. It's a good set up for us. I get a great workout and she sits in the back steering with the paddle and enjoying the beautiful scenery.
Great fun and a great set of plans and hardware.
Bob Bissett

Recent email:
Subject: Project Registry
Date: Wed, 29 Oct 2003
Please add us to the project registry.
Glenn and Austin Northcott
Bethlehem, PA
After receiving the plans, we were both very excited to get started on our IMP. So, along with my son Austin (age 7) we began to build the forms last night and are ready to get started ASAP on more. I can already tell it is going to be a great experience.
Cost of plans $36. Cost of Materials... $200. Seven year old saying
"Thanks for doing this with me Dad" every five minutes.....
PRICELESS!!!!!!!!!!!!!!!!!!
Subject: Epoxy
Date: Fri, 24 Oct 2003 00:58:56 EDT
Barry,
I still have some left over epoxy from my last boat. I'm thinking about
mixing it with wood flour and forming it into fake doggie poop to fool my wife
and friends. Do you think I should use some of those rubber gloves in the
rolling process or can I use my bare hands and then just use a bunch of acetone
for cleanup? That stuff about sensitizing to epoxy is just a myth and a ploy to
sell gloves and barrier creams... right?
Thanks, Al
Subject: Subject: Part Built Monte Carlo For Sale - Ft Lauderdale
Florida.
Date: Tue, 28 Oct 2003
Dear Barry,
Due to a severe respiratory and skin allergy to epoxy, I am forced to stop working on my Monte Carlo and offer it for sale.
The boat is in Ft Lauderdale Florida. The frame is complete, and the first diagonal laminate applied to the sides and bottom. The hull is now ready for the second laminate.
I appreciate your interest and help.
Meldrum Kydd
The Monte Carlo was sold as of 29 December 2003.Subject: Sea Kayak
Date: Wed, 22 Oct 2003
Good Morning from Nova Scotia Canada,
Just survived a hurricane and cleaning up. What a mess.
I completed the 17' sea kayak, red in colour, and have had a wonderful
summer and fall with it. I did 14 trips in fresh water and finally got to the
salt water for a 2 1/2 hour paddle. Was with other commercially made kayaks and
I MUST say that your design held its own amongst these others. Thanks for a
 wonderful design. I would point
out that my 8 and 9 year old boys handle it without difficulty. Also, you were
right, I don't need a rudder or foot braces. ...Thanks for all the
assistance you gave along the way during my construction by email. Finally, I
am a Yankee fan. Great game last night in Miami.
wonderful design. I would point
out that my 8 and 9 year old boys handle it without difficulty. Also, you were
right, I don't need a rudder or foot braces. ...Thanks for all the
assistance you gave along the way during my construction by email. Finally, I
am a Yankee fan. Great game last night in Miami.
Cheers,
Mike Cooke CD, Q.C.
Below is the result of your feedback form. It was submitted on Wednesday,
October 22, 2003 at 14:19:12
---------------------------------------------------------------------

name: Jerry Berger
Comments: I have a Missile that was built in 1966. I'm the second owner. The boat has not been in the water in over 20 years and I'm thinking of fixing the ole girl up again. She has a Ford 312 engine with a Casale V Drive, She was a real head turner in her day!
Subject: Project Registry//Double Eagle
Date: Sun, 12 Oct 2003
Hi: Please update my project registry with the following: 10/12/03: Frames
set complete; White Oak frames with laminated Mahogany transom.
---------------------------------------------------
Barry:
The process of laminating the Mahogany transom was quite interesting. I
modified the process from the type where the guys staple thin strips over a
base structure. I ripped my own Mahogany strips from a 2x8 on a bandsaw, then
tacked (lightly stapled) them in place. A bare minimun of staples was used
merely to keep the wood from crawling around while wet. I then built a bag
around the whole transom piece and pulled a vacuum on the whole thing. After
cure, a power hand plane was used to plane level thickness all over, then
sanded conventionally (of course pulling those few staples). I already had the
transom cut to shape here, but if you did this process on a blank ply sheet ,
then you could laminate like this and have NO FASTENER holes in the finished
item.
If you think this interesting, I can provide more info and pics.
Thanks, Ken.
From: David Huff
Date: Sat, 27 Sep 2003
Hello,
I received the plans today. I have examined the plans, and read through the
manual, and find them good.
Well worth the money. If this had been on eBay, I would have entered positive
feedback:
Fast ship. Item exactly as described. Top notch seller! A+++++++++++++++++
Thank you very much,
David M. Huff
Subject: Low Power Jet Drive
Date: Mon, 22 Sep 2003
Dear Sir;
A few weeks ago I sent to you a message (re. jet pump experiment). I just
wanted to let you know that I've followed up with some static and on-water
tests using a standard  engine
driven agricultural centrifugal pump (Pacer Pumps, 200 gph, 5.5 hp, about $300
retail). I've not optimized any of the parameters yet (e.g. inlet
configuration, nozzle geometry, etc.) but the results are encouraging.
engine
driven agricultural centrifugal pump (Pacer Pumps, 200 gph, 5.5 hp, about $300
retail). I've not optimized any of the parameters yet (e.g. inlet
configuration, nozzle geometry, etc.) but the results are encouraging.
If you are interested in the details to date, please check out www.belljar.net/jetboatdevel1.htm
Best regards,
Steve Hansen
Amherst, NH
On Wed, 24 Sep 2003 15:59:54 -0400, Dan Hehn wrote:
Barry,
One more question...
How wide should the motor well be for the "Teleflex" type steering? I
have heard conflicting messages from others.
Thanks,
Dan Hehn
Ans: I think the reason that you are getting conflicting messages is that it depends on the motor; how the steering connects to the motor. The motor we used worked fine with the standard transom cutout, but some of the newer motors have a built-in receptacle for the steering, which results in more room required for the steering movement. This seems not to be the case with all motors.
The following is from WebLetter37 and 38:
WebLetter 37
WebLetter 38If you know the motor you are going to use, the manual should tell you the motorwell width. I believe that the 33" wide should fit all motor widths: Motorwell dimensions.
Subject: Pee Wee
Date: Fri, 26 Sep 2003
Hi Gang - -
Great Company - - Great Service - - Great News Letter!!
I am attaching a couple of pictures of the Pee Wee that I completed this past
spring. The little grandson proclaimed grandpa's new boat as for "kids
only" - - and the name stuck.
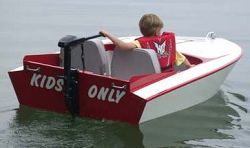
At present it is powered by an old OMC three speed trolling motor - - modified considerably to fit the boat. Low speed is a slow walk, medium is a fast walk and fast is a nice jog. Just right for the little ones in the cove off the main lake.
It was a fun project - - grand kids (4) love it - - and all the neighbors love to watch it. Down the road I will outfit it with a small outboard.
Best regards - - and thanks for you great service.
Bob Atwater
Seneca, SC
Below is the result of your feedback form. It was submitted on Thursday,
September 25, 2003 at 14:56:51
-------------------------------------------------------------------
name: Colin Ming
Comments: What a wonderful surprise, finding your Website!
Popular Mechanics, Chevy, Ed Sullivan and Glen-L; trusted names synonymous with the fifties and sixties. I doubt if any company has shown people how to fulfill their dreams, learn new skills and have fun, all at an affordable price, as Glen-L.
I almost built one of your boats after I got out of high school, but ended up in the Canadian Army and in later years the business world. Now I'm retiring and about to move into a new house with a fine workshop. As soon as my wife and I are settled in, my Granddaughter and I will be building one of your fine boats.
Kind regards.
Colin
Vancouver BC
Build more boats
GLEN-L boats, of course