WebLetter 38
An Occasional Publication for the Home Boat Builder
Glen-L Marine Designs - 9152 Rosecrans Ave. - Bellflower, CA 90706
In this issue
- On the Mark: Bottom repair by Mark Bronkalla
- Inboard Hardware: Rudders
- Web sites worth looking at...
- Designer's Notebook: Can I lengthen the ....?
- A problem... an answer
- Feedback: Bo-Jest
- Recent email
GLEN-L Update
- Web site:
- We've had a lot of additions to Customer Photos and the Project Registry this month. In Photos, 3 different builders sent in TNT photos. Be sure to send in your photos and Project Registries. Many builders regularly communicate through the Registry; it is a great resource and enriches the experience for all involved.
- Our new designs, Dyno Jet and Dyno Mite (see below) have been added to the Boat Design Catalog.
- We have added additional notes to the Notes pages in the Boat Design Catalog.
- Although these are not new, I have referenced the following pages several times this last month in answer to email questions. They answer a lot of commonly asked questions. Wood/Plywood FAQ's, A Brief Description of Inboard Hardware Parts, How Fast?, Glossary of Boatbuilding Terms.
- If you find any of the information sent in by fellow builders contained in this WebLetter to be helpful, please consider sharing information on your project. Particularly: How much?, How fast?, How long?
- The next WebLetter may be a little late since I will be gone for two weeks.
Barry Witt
Editor
|
The Dyno Jet is here! Dyno Mite Plans and Patterns: $69.00 |
On the Mark: Bottom Repair
by Mark Bronkalla
Prelude
It had to happen sometime. While scrubbing the bottom of the boat, I noticed a deep scratch along the forward part of the keel, under the front cockpit.. We keep the boat in the water all summer and I was scrubbing the bottom while snorkeling under the boat. It was not there the day before, but we had been in some shallow areas attempting to catch some more fish. We had no luck on Sunday, too hot and few bites, but the Friday before was a lot of fun and provided a nice dinner.
The scratch went through 2 layers of fiberglass and about 1/4" into the plywood. The boat would have to come out of the water right away for repairs. I did not want the plywood to get saturated and risk rot. I had also worried about peeling fiberglass off the bottom when running around at high speeds. Unfortunately, this was Sunday June 30th. I needed to have the boat back in the water by July 3rd for the long 4th of July holiday weekend.
The local lakes are very busy on the weekends and holidays. In order to launch, you need to be in by 10 or 10:30 AM and pull after 7 PM to avoid a long wait (1-3 hrs) in line. We decided to wait until later in the day to pull and at about 8 PM we were at the dock and ready to pull out.
The kids were with me to help, my oldest daughter and her boyfriend were there to help with the truck as we pulled the boat out. Some day I will get around to modifying the trailer to make it easier to get the boat properly centered. For now, I have to hold it centered over the bunks while a helper pulls the trailer forward , otherwise the boat always sits with the water pickup supporting the boat on top of one of the bunks.
With a classic styled runabout like the Riviera, there is almost always a crowd at the launch and a lot of questions. Usually it starts with "How long did it take to restore?". After a couple of minutes the kids are rolling their eyes (Oh no, not again...), but I have lots of fun. Most people can hardly believe that people actually build boats like this any more. Even more they are amazed when we talk about the family involvement in building. The kids are proud of the work they did, but still add that I did not pay them enough to pull out the staples. So, with ego restored, we were ready to tackle the repair.
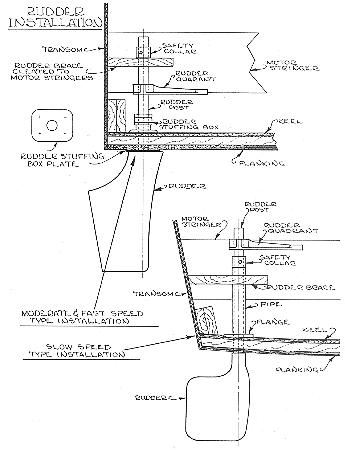
Inboard Hardware: Rudders
The following is not an attempt to explain all the different types of rudders that are available, but rather, to provide enough information to make an informed selection from those we offer in our Inboard Hardware section. The following is taken from our book Inboard Motor Installations, part of Chapter 16 - Rudders & Steering.
When building a boat, the size, shape, type, and location of the rudder, is usually specified by the designer of the boat. Not all inboard boats however, use rudders, such as stern-drive and jet-drive boats. Depending on the design, the rudder required may be a ready-made item, or details may be provided so that the builder can make his own rudder. On an existing boat that will be re-powered, the present rudder will probably be adequate for the job if it is currently satisfactory and the proposed installation is similar to the existing one. However, if the powering change will be from a single engine to a twin engine, or vice versa, then changes to the rudder and steering system will probably be necessary. If changes in rudders are necessary, competent professional advice regarding the size and type of the rudder should be sought, preferably from a qualified naval architect familiar with the type of boat, or from the manufacturer of the boat. Due to the many possible boat types and rudder configurations there is no set formula for determining rudder size without knowledge of the design.
There are basically two types of rudder systems; those mounted under the boat called "inboard" rudders, and those mounted outside and behind the boat called "outboard" rudders (see Plate 56 and Plate 57). Many shapes and types are available in either configuration, as illustrated, and will vary considerably depending on the speed and type of boat. Generally, the faster the boat's speed, the smaller the rudder can be. Sailboats and low speed powerboats will have considerably different and larger rudders than high speed planing powerboats. However, the rudder principle is the same in all cases. The rudder is a blade in the water connected to a stock or shaft to which force is exerted to turn it one way or the other. This in turn deflects the water moving over the rudder and moves the stern of the boat to make it turn. Note that it is the back of the boat that does the turning, since it pivots about the bow in order to change direction, which is just the opposite of an automobile.
Web sites worth looking at...
Dominik's web site shows applying wood veneer over plywood for a "planked" appearance.
REBEL / Dominik Papa / Germany / 10-01-01: Bought the plans, lumber, epoxy and different woodmachines, cleaned up a cowshed to build the boat there. 10-07-01: framing complete. 4-22-02: It's time to update the status of my project. Plywood planking finished in Jan. 02. Mahogany planking started in April. Thanks for your great plans, it is always a pleasure to build this boat! Web site: www.dominik-boot.de/
Zip
Subject: Zip construction
Date: Wed, 26 Jun 2002Dear Glen-L:
Here is a link chronicling the construction and eventual launch of my "Zip" design from your site. The boat was begun Aug 1, 2001 and launched May 16, 2002.It's a great boat, and thanks for great plans.
Roger Stouff
Chitimacha, Louisiana
Cabin skiff
Edward Andrews has done a great job and made a great web site for those interested in the Cabin Skiff.
http://www.seaputter.com/
Designer's Notebook: Can I lengthen the ....?The answer can be yes, no, and maybe. Lengthening or shortening a sailboat is not recommended. There are simply too many variables: center of lateral resistance, sail center of effort, lead and other factors are altered when the length is changed. Designers go to considerable effort to get the relationship of these various factors correct. If they are changed, the results can be questionable. Most human or motor powered boats can be lengthened or shortened as much as 10%. However, there are exceptions that will be discussed later. Why 10%, can't I go 18%? Possibly, the lines can be lengthened or shortened BUT, we know from experience that up to the 10% factor, the integrity of the design remains basically unchanged. All length factors are altered 10%. This means the location of a centrally located motor, CG (center of gravity, and location of major weights are also shifted by the 10% factor. Beyond the 10% factor the characteristics can be altered; put in another way we get into a gray area. It may be OK but it might not. Then too, the construction may not be adequate when a craft is excessively lengthened. Why take a chance? Altering length when done properly works well and is simple to accomplish; do it incorrectly and one big mess will probably result. You can't simply add a frame at midpoint or at the stern. A boat has curving lines and each section is (usually) different. Lengthening by this method will cause unfair lines that will be almost impossible to correct and may well alter the hull characteristics. The correct way is to re-space each of the stations or frames from the aft end of the stem to the transom a proportionate amount up to 10%. If frame spacing is equal or varies, multiply by the percentage factor being used. As an example if frames are uniformly spaced 18" apart and the 10% factor is used, each spacing will be increased 1.8" (.10 x 18") or rounded off 1 3/4" (1.75"). Some designs are impractical to lengthen. Stitch and glue boats with full size patterns are a prime example. Simply extending the side and bottom templates for the most part simply won't work and the results can be questionable. Check the web site, many that have tried it had real problems. Boats that have a sawn harpin are another type that doesn't lend itself to easily lengthening. A harpin is a portion of the boat sheer line as seen in plan view that is sawn to shape rather than bent. If the boat is lengthened in the harpin area the contour of that member changes; the harpin pattern given won't fit properly into the frames. Yes, the harpin shape could be re-drawn, stretching (or shortening) the spacing a proportionate amount. But unless you have some lofting or drafting knowledge, re-drawing the contour may not be easy. Can the beam be changed? Not practically, this changes all the frame patterns and the curvature (on most) of the side frames. Never attempt to alter the chine beam; this will alter the characteristics to such an extent the result will be unknown. Can the depth be increased? Possibly a small amount by extending the side frame members equally. This will also increase the beam and could exceed the practical or legal towing width. Boats with excessive flare or tumblehome are best not changed as increasing the side frame member curvature could be a problem. Every design is different so a universal statement as to whether a design length can be altered is impractical. If in doubt ask the designer. |
A problem... an answer
Subject: how to respond??
Date: Tue, 25 Jun 2002 18:24:18 -0500
From: "Jack Lavallet" <jacklott@bellsouth.net>
In the current newsletter (WebLetter 37), someone asks for help re being "unable to turn right" because the tiller cable hits the seat. How can I respond? The problem can be solved by moving the motor end of the loose link (between the motor and the tiller cable end) back toward the motor. There are several holes in the motor tongue. If the hole used is farther out, more travel is required for the tiller cable to effect the same motor angle. Note that as you move the link toward the motor, more effort will be required to get the same turn angle. (Lever arm is shorter.) E-mail if I've confused you.
Feedback: Bo-Jest
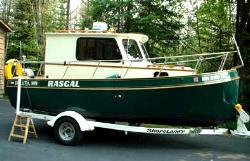
Subject: Bo-Jest
project
Date: Thu, 27 Jun 2002
Glen-L Marine Designs
I have just completed "RASCAL" which is based on the BO-JEST
design with my take on how the boat would best suit our needs. The hull to the
deck level was built exactly to the plans with almost everything above the deck
built with my ideas. Among the major changes are the following:
1. Moving of the pilothouse bulkhead aft to the station 1. location.
2. Reducing the pilothouse/cabin width approx. 8" total to give more width
in the walkaround decks.
3. Redesign of the pilothouse to give a completely different look and to me a
Trawler like look.
4. Use of custom built aluminum framed windows to go with the Trawler
look.
5. Elimination of the rounded cabin front in favor of a flat front.
6. Complete boxing in of the bulwarks to give a cleaner look and easier
maintained deck area.
7. A complete revamp of the interior (as shown in the pictures) to give us the
space and accommodations we wanted.
We also installed a teak deck overlay, added stainless railings around the boat, eliminated the bridge deck aft to give some additional space in the cockpit and added seats on both sides of the cockpit. We have 2- 18gal. fuel tanks (one under seats-starboard & port) 1- 20 gal. water tank under the front berth, a marine head in an enclosed space in the aft pilothouse, and a small galley with sink and 1 burner stove on the opposite side. We are very pleased with how things have come out and are amazed at the space in the boat.
Thanks for the plans and hope you like our take on BO-JEST.
Bob Trygg
Duluth, MN
Recent email:
Below is the result of your feedback form. It was submitted on Tuesday, July
30, 2002 at 19:01:10
----------------------------------------------------------------------
name: Allan Burke
Comments:
I bought your book "Boatbuilding With Plywood" in a boat book store
in Sydney, Australia, then searched the internet for plans where I found you.
Excellent book, well written with quality illustrations - high class reference
material!
Subject: Re: Glass or varnish?
Date: Mon, 22 Jul 2002
Kevin Gough wrote:
I am currently building the Tango and have just completed the decks. At this point I had planned to fiberglass the decks however a friend at the marina has informed me that this is not aways a good idea as glassing the deck can stop the air circulating within the boat and be cause for eventual decay of the timber. He has suggested that I varnish the decks instead as the timber would breath better. Can you tell me if this is so as I would have rathered fiberglass to varnish. Thanks for any advise you can give.
Kevin Gough.
Answer:
First, wood is dead. It can gain or lose moisture, but it is not a living
thing. If it were me, I would fiberglass with a 4oz deck cloth, then several
coats of varnish. The glass will prevent checking and make it more abrasion
resistant. If the boat were kept out of the sun when not in use, the glass may
not be as important.
We would never recommend fiberglassing the inside of the Tango hull. Should you
have water sitting in the bottom of the hull for a period of time and a gouge
or other break in the glass allowed water in, dry rot would be a potential
problem. On the cabin, the most vulnerable areas would be cabin-to-hull
junctions and window openings where edge plywood is exposed. You do not want to
leave a crack or depression where water can collect and sit.
For a second, informed, opinion on glassing the cabin, contact some of the
builders in the Project Registry and ask them what they would do if they had it
to do again.
--
Barry
Subject: Re: History of helm position
Date: Mon, 15 Jul 2002
"G. C." wrote:
The subject came up in our marina group as what was the reason for the positioning of the wheel and controls on the starboard side of most boats. Have searched the internet but can not find a straight answer on the history. Some jet boats have controls on the port side. Thank you Gary C.
Answer:
The right side of the boat is the helmsman's area of responsibility, although this is less of an issue on a small boat that does not have restricted visability. There is a practical reason you might want to vary the rule. On a small outboard boat, the boat will tend to rise on the side toward which the motor rotates, especially if there is a high-pitched prop. Most outboards rotate toward the right, but some do rotate to the left. The driver's weight can help make the boat ride level. However, the main reason is the helmsman's area of responsibility.
I don't know why jet boats would be an exception, probably some
manufacturer's contraryness.
--
Barry
Subject: Re: use of Black Locust lumber for my GlenL-19
Date: Mon, 15 Jul 2002 10:35:00 -0700
Darrell Stotts wrote:
Good morning folks;
I am having great difficultly finding White Oak here in Columbia, SC. I have found a source of Black Locust however. I am told by the supplier that it is used for boat building. The supplier tells me that it is very hard wood (like white oak) and more rot resistant and holds glue well. I don't want to take his word for it so I am asking the expert, you'al. Is Black Locust a good alternative wood to use for the keel, bottom battens, and chine in my GlenL-19? The price is not to bad, I was told that it runs $2.50 a board foot. What do ya think?
Darrell Stotts
Answer:
I knew next to nothing about black locust until I checked the Internet; Google:
black locust uses.
It seems to be a very prolific tree that is invasive outside its Apalachian
range. It sounds like it should be good for boatbuilding based on following
info. But wonder with its characteristics, why it's not considered a
"commercial species".
Subject: T-N-T Complete
Date: Thu, 11 Jul 2002
Well, she's done... After two years of construction my T-N-T, which is
my first home built boat, is complete. Attached are 4 pictures of our final
product which has amazing stability, and performs great!
With a 40 hp motor on her she really scoots along, and attracts attention like
you wouldn't believe! I am very pleased with the final product and
she's a boat I'm very proud to call my own. All and all I would highly
recomend to anyone to build their own Glen-L boat, and would love to build
another in the future!
Thanks alot, Chris Power
Subject: Sea Kayak complete
Date: Mon, 8 Jul 2002 22:37:16 -0500
After over a year of on and off construction, I recently completed work on
my Sea Kayak. I've named her the "Sturgeon" in honor of the
sacred postion of that fish in Ojibway culture, plus like me it's native to
Wisconsin. The boat was built pretty much to plan, but I did use KayakSport
hatches in place of the recommended Becksons. I also decided to use sheer
clamps at the deck to hull junction. This allowed the deck to be cut slightly
oversize and trimmed after installation. I believe this was easier than trying
to stitch that seam together and have a fair sheer. Overall the construction
was very trouble free, even for a first time builder like myself. I found your
plans very clear and easy to use, and the transfer paper was extremely handy!
I've taken her on a few short paddles and she seems to handle quite
sweetly. I really look forward to many enjoyable hours and days exploring with
her. I'm afraid the boat-building bug has bitten me pretty hard, as I'm
already plotting out my next one, probably a tandem kayak.
Thanks,
Joe Stromski
Subject: Finally Done!
Date: Mon, 8 Jul 2002
I'll bet Barry will be glad to hear my TNT is finally done. No more E-mail questions!
Seriously, I want thank Barry and everyone else at Glen-L for being so helpful over the past months. Now that it's on the water, all of the efforts have proven worthwhile. The TNT handles great and it accelerates like a rocket. I am running a stock 30 HP Johnson. As I get used to it, I may play with the engine height, tilt and prop selection -- just for grins.
You probably hear about fathers and sons building their first boat together all the time, however, the difference here is that I'm in my forties, and my father is in his seventies! I made a mistake in the stem height, which caused the nose to sweep upward (I actually like the way it looks), but as Barry Witt pointed out, this didn't affect the performance at all.
Future plans are to paint the hull and put more varnish on the deck, but for the rest of the summer, I'm going to enjoy it.
Great kit, great support... thanks, again. Looking forward to my next one.
Pat Keegan,
Brandon, Florida
Subject: Outrigger
I don't have a copy of the email, but it asked for information about putting outriggers on canoes... Photos at http://elib.cs.berkeley.edu/
Subject: Cabin Skiff
Date: Tue, 25 Jun 2002
From: John Kingeter
Dear Glen - L,
10 years ago I built this Cabin Skiff from your plans. It plied the waters of Kodiak, Alaska for 1 year and the waters of SE Alaska for the last 9 years. It's a fish killing machine and is still as solid as a rock. 2 - 3 years ago, I visited Glen-L in California and you were kind enough to give me a tour. I promised to send you some pictures. She's 10 years old and needs new cosmetics (paint, varnish, etc.) but here are the pictures.
Enjoy,
JCK
Photos in Customer Photos/Photo Board 1
Build more boats
GLEN-L boats, of course