WebLetter 35
An Occasional Publication for the Home Boat Builder
Glen-L Marine Designs - 9152 Rosecrans Ave. - Bellflower, CA 90706
In this issue
- "Dream Building" a new eBook from a fellow builder
- A Note for Glen-L 13, 14, 15 builders
- On the Mark: Frame construction by Mark Bronkalla
- Power Skiff 14 - Stink Pot?
- Tools
- What is the "Old Boat Club"
- Feedback: Argosy
- Shop Talk: Painting options
- Recent email
GLEN-L Update
- Winner of the "Poxy-Shield contest" is Jonathan Bornman in Senegal, West Africa. Jonathan wins a $50.00 Glen-L Gift Certificate to use for purchasing anything on the Glen-L site. Congragulations to Jonathan and thanks to all who sent in an entry.
- TNT-size boat for a jet... I had mentioned this in the last WebLetter; it is still a way off, but preliminary work has started. The new design will be an answer to those who have asked for a small deep vee that could possibly be used with a salvaged jet. Allyn had laid out the planking and made a mock-up. The design will be 10', for stitch and glue construction. We have no due date, but hopefully by early June, if all goes well and we have the shop time to devote to it.
- WebLetter size: This is one of the largest WebLetters we've had; I need feedback. I can break WebLetters into smaller parts with links to the next section, if load time is a problem. Also the more pictures we include, the slower to load. We have had complaints when we split technical articles, because they were more difficult to print out. I suspect that the WebLetters will continue to get larger and at some point we will have to change the format. Is load time a problem for you? We can make changes.
-
Speaking of load time... I have included a link to an MPG file in the
Recent Email section. This file is 4.2 Mb. I can remember the first PC
we got at Glen-L. The hard drive was 40 Mb... "You'll never
need more than 40 Mb". Yea, right! Six months later we added a
second drive, and now a single file is 4.2 Mb.
I've never attached an MPG file before, so let me know how/if it works. - The WebLetter is growing because of builder input. Share your experiences with other builders. The notes, photos, and comments you send are eagerly awaited by other builders and potential builders.
Editor
New Book: "Dream Building"
One family's adventure building and cruising their own boat
Lee and Sandi Freeman built the Glen-L Gypsy in 1986. See WebLetter 1 for a copy of one of our favorite letters, sent by Lee Freeman in 1994. "Dream Building" is the story of building the Gypsy and the adventures of the Freeman family aboard their creation. I have read "Dream Building" and thoroughly enjoyed it. It is a great story of a boatbuilding project and a family working and playing together. The following is from an email from the Freemans and copy from their web site. - brwWork on the Sandi Lee (Mark Twain) is coming along really nice. We are doing the cabin inside now.
We have just published an eBook about the building and cruising of our first Glen-L design, the Fair Havens (Gypsy). We hope the proceeds from this book will help buy engines and completion material for the Sandi Lee!!!
Your Glen-L boatbuilding friends,
Sandi and Lee Freeman
In 1986 our family bought a small runabout to use on local Florida lakes. It wasn't long before we found that a boat capable of larger waters and one in which we could get out of the sun was what we really needed. We were a middle class family, not poor, not wealthy, with children. We wanted a boat that we could use to take vacations as a well as trips to local lakes. But, the type of boat that we wanted was out of our budget range by far. So we decided that if we were to have our dream boat, we would have to build it. The family all made promises that if I would buy the plans, the whole family would build it. What I did not know then, was the impact that this project would have on our family for years to come.
Dream Building is the story of all this. The book includes a host of pictures showing how we built our boat in our back yard. We tell you where we found plans, to where we bought local supplies. We cover building, fiberglassing, painting on a budget, and how we prevented wood rot. You will read about the first testing to the adventures of the maiden voyage.
Excerpt From Chapter 11
Dream Building is available at our web site: http://www.mkt-info.com/fairhavens
A Note for Glen-L 13, 14, 15 builders
If you are building the Glen-L 13, 14 or 15 sailboats, see the Glen-L 14 "Notes" page for another option for the centerboard. Since the cast weight is no longer available, the only option listed in the plans is to pour lead into a cavity in the board. This page details an alternative method for constructing the centerboard.
Boatbuilder Connection
I'm sure most of you know what the Boatbuilder Connection is, but in case you don't... The Boatbuilder Connection is a forum where you can post questions for your fellow boatbuilders to answer. If you take a quick scroll through the board you will notice that many of the same people regularly contribute their expertise to help other builders. We hope more of you will share what you have learned. This is a sample of a recent string...
Boatbuilder Connection
On the Mark: Frame construction
by Mark Bronkalla
The construction and number of frames varies with the type of boat. In a cold mold boat, such as the Riviera, there is a relatively large number, 10 frames in 20 feet. The frames are your first step in defining the final shape of the hull. The care taken at this stage will be reflected in later stages particularly:
- Hull fairness and ability to run true
- Amount of fairing effort
- Difficulty in sanding and achieving a fine interior finish
When starting the process, a key question must be answered:
Will the frames show in the final layout?
|
|
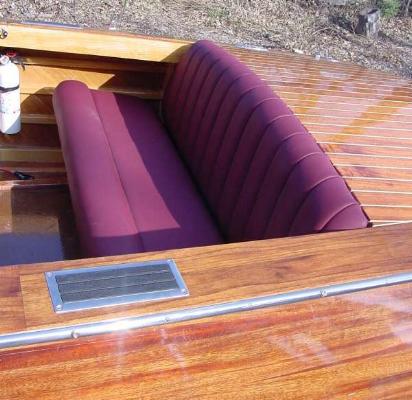
Construction rear cockpit of Riviera
Open interior Click to enlarge |
In the Riviera, you can look at 2 very different construction styles for interior finish. Open, such as I used, and closed as was done by Bill Yonescu and Martin Tomunak (Use back button to return to this WebLetter). In my case, the interior of the hull and frames are visible. In the other case, a complete interior is used and the frames and hull interior are hidden from view. Choose one and it will guide your construction and the amount of time you will want to spend on making the inside of the hull look good. Changing you mind later will result in many wasted hours (est. >100 extra). You will either have spent a lot of time sanding and finishing areas that will never be visible to any one but the builder OR you will be faced with sanding and finishing areas with lots of inconvenient inside corners.
When starting a project of this scope the initial stages set the "tone" of work for the balance of the project. For the beginner, having some small successes, early on such as good looking and well shaped frames helps build confidence. The frames define the shape of the hull and fairness of them will reward you later in reduced fairing time, and conversely, errors that accumulate at this stage will haunt you through the rest of the project and get progressively harder to correct. For example a 1/8" error on a frame which could be corrected with some planing, sanding or gluing in a filler strip over a 1"x2' area will grow to needing to fair a much larger areas with lots of planing and sanding if uncorrected. Worst case, you would need to fair a 3'x4' area of the hull by the same amount which is clearly a MUCH harder task.
Power Skiff 14 - Stink Potby Billy LewisNote: Billy's letter reminds us of the importance of keeping the fore and aft lines of a planing boat flat in the aft sections, as well as the importance of building up the radius of the bottom/transom junction. 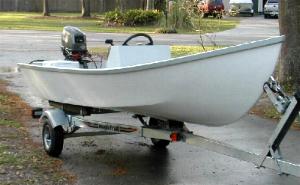
I began building the Glen-L Power Skiff around January 2000 and with the exception of paint, the boat was complete in about two months. Hats off to the folks at Glen-L who designed this kit. The stitch-n-glue method makes building a boat very fast and simple, if not for the time spent idle waiting for glue to dry, this boat could be built in less than a week. My first effort at painting failed miserably due to not reading the directions carefully. The second coat attacked the first and I had to strip the entire mess and start over. This actually turned out in my favor because I gave the boat a test run before the second attempt at painting and discovered some problems that had to be corrected prior to painting. I had rounded the chines slightly, which caused water to wrap around the chines and up the sides of the boat instead of spraying out away from the boat. The second problem was the boat porpoised when on plane. After a little eyeballing, it became obvious that the bottom was not flat from the stern forward. It had a slight cup beginning a couple of feet ahead of midship running aft to a point a couple of feet ahead of the transom. I had originally intended to build this boat as a center console but as the basic boat developed, I decided to follow the plans. After seeing the cupped bottom, I changed my mind yet again and decided to move the center seat aft and build a center console centered on the original position of the seat. The new position of the seat would be centered over the cup in the bottom and I thought a seat post cut to the necessary length might help straighten the bottom. After a few extra layers of fiberglass to build up the chines and a few more itchy days of grinding them to a nice sharp edge, work began on the console and new seat position. All said and done, the console came out great and the new seat position along with the slightly longer post greatly improved the performance of the boat. I believe the new position of the driver helped as much as a straight bottom but the two combined made this boat a pleasure to operate. The sharp chines are much better but my boat could still use spray rails. I think this boat looks very handsome as a center console. It does take some imagination to rig a tiny console, but where there's a will, there's a way. Of course no one knows this better than boat builders. The extra work has added about two years to this project but only because I ran out of free time after finishing the original kit. If I had to do it all over again, I wood, I wood, I wood! I would make sure the bottom was flat EVERY time I walked by the thing! I would also not be scared to venture off the beaten path if the original was not exactly what I wanted to end up with. After all, isn't that why we build our own boats? As for the name, my father is the son of a son of a sailor (from Jimmy Buffet's song) and any boat that burns our natural resources, especially if it goes faster than the length of the hull (displacement of course) will allow, disgusts him. Every time we go fishing or sailing and big fast boats pass with that awesome cloud of burnt gas and oil following them, he always snorts... "STINK POT". This is obviously a condensed account of this project but if you have any questions about my experiences along the way, feel free to contact me at: milehigh@surfsouth.com.
Happy building,
|
Tools
What tools do I need to build my boat?
Although this question has been answered in previous WebLetters in detail, it keeps being asked. So a new approach. What tools would we use in the shop to build a ....?
Stiletto or other sheet plywood/sawn frame boat
The building form requires lumber to be cut to length. We would use a cut-off saw, but a portable circular saw could be used. The form would be assembled using a hammer and nails, or a drill, screw driver and screws.
The lumber for the frames would be mahogany, from piles of 6" to 14" wide boards. We would lay the frame pieces out on the boards using Transfer paper. The pieces would be cut out using a band saw. A saber saw could be used, but it would be time consuming to cut 4/4 mahogany. Frame gussets, stem, and transom would also be cut on a band saw. For assembling the frames and later for installing the longitudinals and planking, a drill and power screw driver would be used.
The longitudinals would be cut on a table saw, from wider boards. A radial arm saw could be used, or a portable circular saw with a guide. Before the longitudinals are installed, some beveling (fairing) of the forward frames will be required. We could use all of the following; Shur-form file, wood rasp, very sharp jack plane, possibly a belt sander or disc sander. After the longitudinals are installed, they would be faired. a very sharp plane would be used for most of the operation, but any of the tools used in the fairing above could also be used. At various stages of construction we would use clamps. We would use about 20 C-clamps, 5" is a good all-around size, but may not be wide enough for all requirements. We generally use bar clamps for some applications or, in some cases, larger C-clamps.
The planking plywood will be leaned against and clamped to the longitudinals, marked around the perimeter, and roughly cut using a saber saw. For sanding we would use a reciprocating sander, one of the high speed, more expensive sanders makes the job much easier. This essentially covers all the tools we would use.
Stitch and Glue
Stitch and glue is probably the least "tool-intensive" method of boat building. We would use Transfer Paper to transfer the patterns to the wood. A reciprocating saw would be used to cut out planking, bulkheads, seat tops, and other plywood parts. If the boat is a power boat, the transom normally requires a bevel on the bottom and possibly the sides. The transom is most often made with two layers of 3/4" plywood. We would cut the bevel on a table saw using the table saw jig shown in the Wood & Plywood Information section of our web site. Sheers and cleats would be cut on the table saw. Stitching and screw holes would be drilled with a power drill. We would also use a power sander, power screw driver and a few hand tools for cutting and twisting wire. We would most likely use a number of C-clamps at various stages of construction. Although other tools might be added, these would usually be enough to do the job.
It would be possible to use less or to use more; but this is what we would use. There are really no "exotic" tools required.
For other lists, see the WebLetter Article Index under "Tools".
What is the "Old Boat Club"
Kinda like the Project Registry, but specifically for boats being rebuilt or repaired. Below is a recent entry. Be sure to send in your entry if you are repairing or rebuilding, and use these boatbuilders as a reference for your rebuilding questions.
RENEGADE / Walter "Spike" Arlt / Ellensburg, Washington / email address / 3-21-02: I am remodeling the Renegade that my sons and I built about 1978. The one that is pictured in your, "Book of Boat Designs", on page 113. The Renegade followed the previous Rebel which I built in 1961 and was powered by a 75 horse Johnson. The growing family used this great design as a water ski boat for 22 years. What a boat, that performed as exactly what is was designed for, fun!
The Renegade was a big replacement for the Rebel with 460 Ford power and a Berkley jet. It has been a great boat over the years, so great that it is getting a major renovation to the interior design. It has all the performance and styling that any one would ever want. It is now moving to a huge open walk through bow with the dash and two seats moving to the back, in front of the engine. The current needs were to move on the party boat concept with lots of open space and lounge seating on the sides in the front. Seems like the boat was full of people every time it was in the water. Now with a grown family and grand children we hope to get a lot more fun out of it.
The structural forward section work is mostly completed and the dash and seats are currently being designed and built. No work has been done to the outside hull and the plywood and fiberglass has not been touched since it was built. A new paint job is about all that is in order to the outside.
Hope to have it back in the water again soon.
My son Richard built the Outrage about 1985 and powered it with a Johnson 125 outboard. This boat was a cross between the flat bottom Rebel and the 12 degree V hull comfort, performance and handling of the Renegade. It is a performance boat and a mover, the boat is still in the family, however it has not been it the water for a few years, I think it is awaiting new power!
Since I am now retired, I would love to hear from others interested in the Glen-L boat building projects.
Old Boat Club
Feedback: Argosy
Subject: Glen-L Argosy "Tamara B"
Date: Mon, 1 Apr 2002
A couple of weeks ago we ordered (and promptly received) plans for the 42' Glen-L Argosy Trawler. Thank you! They will be of great assistance to us as we upgrade the 1979 Glen-L Argosy that we've just purchased.
You can follow our progress with her and see a lot of new photos on the website we've created at http://www.tamara-b.org We've also put a link to Glen-L marine designs on the site. Your information and resources have been very helpful to us.
She is a very special vessel, and we hope to enjoy her for many years to come.
Thanks again,
Kathleen Kelly
This project was also added to the "Old Boat Club" section of our site. The Link to the site is also included on the Links page in Useful Information & Suppliers
Shop Talk: Painting options
A caveat: We are not paint experts. We have, however, painted a lot of boats, and are frequently asked "what would you do?". We invite any comments from other builders and would be glad to include them in future WebLetters.
Allyn Perry is our shop foreman, Frame Kit maker, and boat test model builder and... he has painted all of the test models for the last 30 years. Allyn is always quick to add that he is not an expert, but I think he's pretty good. He most often sprays the paint, but on some of the more recent small boats he has used our epoxy foam rollers with good results. I asked him what he would do, if he was painting his boat.
If you built the Stiletto, the inside is bare wood, what would you do?
Allyn: "I may not be a good example. I would make sure my boat was always protected, under cover. I wouldn't leave it out in the driveway uncovered. I would probably use an oil based primer and then spray Zolatone*. If I expected it to get more exposure, I might use a light coat of Poxy-Shield... I don't know if you want me to say this, I know we don't recommend it, but I would thin the activated Poxy-Shield with about 10% denatured alcohol and put on a thin coat. I would then use an oil-based primer and probably Zolatone. If I expected it to get a lot of abuse, I would probably slop a lot of Poxy-Shield on the inside, then undercoat and Zolatone. Poxy-Shield makes a really hard surface, and that's gotta be good. Most of the other epoxies that are available are thinner than Poxy-Shield, I'm sure they would add additional protection, but I really haven't tried them."
And the outside... assuming it is fiberglassed?
Allyn: "I used to use Z-Spar Monopoxy undercoat. You could apply it in very heavy coats. I'd apply two coats, then do all my final sanding. Monopoxy is no longer VOC compliant, so it is not available in Southern California... I don't know if it is available elsewhere. Now I use a non-marine primer that can also be applied in heavy coats. At the paint store, if you tell them it is going to be used on a boat, they say it is not recommended. I haven't had any problems on trailerable boats that are not left in the water for more than a day or two at a time. After sanding, I spray on InterLux Brightside. It must be sprayed in very light coats, allowed to dry for a day before additional coats are applied. I usually apply two coats on the test models. If it were my boat, I would probably apply more. I have not used Pettit, Woolsey or any of the other available marine paints, because I have no reason to experiment, but I'm sure they all make good products that would work."
*Zolatone is a paint product that must be sprayed; it has different types of pigments that don't mix so that the finish is "speckled". It is also non-gloss and not as slippery as other paints. This material may be known under other names in other parts of the country. Its main use is for truck beds and is available through automotive paint stores.
Other types of paint.
None of the following are "recommended" for below the waterline, but all have been successfully used on trailerable boats. If your boat will remain in the water, you must use a marine bottom paint.
Latex: See WebLetter 23
Industrial enamel: I made a trip to my local paint store to ask
for input on industrial enamels. Many builders have reported using
industrial enamel, but we haven't and I wasn't sure if Alex at
the paint store would know what I was talking about if I asked for it. He
did and took me right to the industrial enamel section. His first
question was "Oil base or water base?"
"Oil, I guess... what exactly is industrial enamel anyway?"
According to Alex, industrial enamel is just a tougher paint, formulated to stand up to gasoline and other chemicals, for a whole lot less than marine paint. "We can't recommend it for boats" he quickly added. I told him we used topside paint all the time and it's not recommended for below the waterline. "I know", he said, "I wouldn't be afraid to use it, but we still can't recommend it".
Marine Top side paints: Allyn uses Brightside, but other manufacturers make similar paints. Brightside is a "topside paint" and states right on the can not to use it for below the waterline. We have used topside paints for years on trailerable boats that are not left in the water and have never had a problem.
Two-part linear polyurethane - Allyn has used it on his
motorcycle; his comments:
"Two part linear polyurethanes are a little more forgiving when
sprayed, since the paint is 'activated' and thick coats will
harden without crinkling. However, pot life is limited and unused paint
cannot be saved. Sanding and polishing properties are very good.
Durability is also very good, but this material tends to be a bit
pricey."
A note: If the outside of your boat is fiberglassed, the purpose of the paint is to 1) Be pretty, 2) Protect the resin from ultraviolet light. Considering this, almost anything can be used if you're not particular what it looks like. If it peels off, re-paint, water will not harm the fiberglassed surface. Latex is a particularly good paint for duck boats that you want to camouflage: non-gloss; using two colors, you can easily mix a variety of color variations. For something more "official", Pettit makes marine camouflage paints.
Recent email:
Subject: To tell or not to tell.
Date: Tue, 9 Apr 2002
I have a rather embarassing tail. I completed my first boat. An eight ball SG rowboat, and she turned out great. I named her "Find A Life" and she's white with a broad blue stripe on the outside and an interesting 2 inch stripe crisscrossing the seats on the inside. But, as for my secret, you'll just have to watch the attached video. And please let your other customers know. Don't let this happen to you!! But, it's ok. Repairs are well underway.
James Mclain
Mission Hills, CA
This takes a long time to load and requires an mpg viewer: 4.2 Mb MPG file
Load time on dial up: approx 14 min, on DSL: approx
30 sec.
A personal note... breaking a champagne bottle can be dangerous. The "professional" launchers use a specially prepared bottle with a net around it and tape or some other protection on the neck where you grasp the bottle. A better option is to pour a glass for all present, plus one for the boat (poured over the bow). brw
Subject: Must be a Glen-L
Date: Mon, 8 Apr 2002
Barry;
The tug featured in this series MUST have been either originally designed by Glen-L, or was built from a modified Glen-L design......no other explanaiton will suffice. If all the pics don't open, right-click your mouse and then click 'open picture' in the pop-up. It's worth the wait, and only a boat enthusiast can truly appreciate the series... http://koti.mbnet.fi/~soldier/towboat.htm
By the way, my Missile Restoration has been in suspended animation for the past year, and I hope to resume work in the next month or so. At some point, I will provide a series of pictures covering the whole project.
Regards,
Jim Dean, Phoenix

Subject: tango kit
Date: Fri, 5 Apr 2002
att. Gayle, My kit arrived yesterday in Jaco, Costa Rica. Taxes, duty, etc. all came to about $500.00. It took just under a month from ordering date, cost a little more than I planned. But its here, I'm happy and can't wait to get started. Thank You, Dennis
Subject: Propeller Sizes for TnT
Date: Sun, 31 Mar 2002
From: "Wibeche Hansen"
Hello TnT builders !!
Is there anyone who has tried out different propeller sizes for the TnT
with a 15 HP outboard?
My thought would be a propeller with small diameter and high pitch, e.g.
8 x 12? The engine I have is a 9.9 HP Suzuki, with a 9 x 8 1/4. I intend
to change the carburetor so it delivers 15 HP (actually 13.8), but I have
no idea what propeller would work best for maximum speed on the TnT. One
of you TnT builders had a Johnson 25 HP with a 10 x 17 propeller. So if
anyone has tried out propellers for 15 HP with the TnT, please send me an
Email.
Erling Svegre, Vangsvik, Norway.
My TnT project is just started, hopefully I will have it ready in June
or July.
Note: If anyone has any feedback on hp/propellers with speeds clocked, we would also like to hear about it; for the TNT or any other design.
Subject: Propeller shaft
Date: Mon, 18 Mar 2002
Attn: tech support dept.
We would like to have following information about the boat propeller > shaft material. Our boat propeller shaft material is s.s 17-4ph, and the local material available is s.s 316L, please advise the suitability of the offered material for the job. any other alternatives. We will be thankful for yr reply.
tks n brgds
ANSWER:
From our book "Inboard Motor Installations".
"The stainless steels often used for propeller shafts include Types
303, 304, 316, and 630. All stainless steel shafting is strong,
especially 630 type (which is also known as '17-4PH'). Stainless
steel shafting in salt water is more-or-less subject to pitting which
leads to crevice corrosion. Types 303 and 304 are probably worse in this
respect, with type 316 being less susceptible, therefore better suited to
saltwater use."
--
Barry
Subject: Thank you
Date: Mon, 18 Mar 2002
Dear Glen-L,
This is the first boat that I am building, the Sissy do, and I wanted to let you know I was very pleased with your service. The plans are very easy to understand and the directions are very detailed. I was also pleased with the shipping service. I received the plans promptly. I mailed out the order from Pennsylvania, and about a week and a half later they were at my door. Thank you very much. You now have a new customer who recommends Glen-L to anyone considering boatbuilding.
Thank you,
Paul Lisowski
Subject: Advice
Date: Mon, 11 Mar 2002
I purchased your Wee Hunk plans and completed the boat this past weekend.
I have about 60 hrs into the project. It was my first boat
building project, although I have built a couple of houses, custom
cabinets and furniture. I enjoyed every minute of the project. I hope to
send some photos to you soon. I put a 30hp 4 cycle motor on the boat and
I hope to try it in the water next weekend.
3-15-02: Tried the boat yesterday. Breaking in the 30hp I didn't
exceed 3200 rpms about 1/2 throttle. I estimate the speed at about 20 mph
with 2 passengers (about 200 lbs. each). - Paul G. Sadeck
----- Original Message -----
From: "Barry R Witt"
To: "Larry"
Larry wrote:
TRANSOM MOTORWELL, DIMENSIONS & DETAILS" from your Web Page is attached.
This detail does not show a drain plug. Do you have a detail that shows the drain plug?
Do you sell drain plugs?
Larry
ANSWER:
There should be drain holes in the motorwell, but there is no need for a
plug. We have used the tubes for the drain plugs to line the hole. Item
#05-514 Drain tube brass - $3.50 plus shipping.
--
Barry
Customer Service
Larry" wrote:
Hello Barry:
My question regarded a drain plug for draining the hull. Some boats are
too heavy to turn over by hand.
Do you have a detail that shows how to build in a drain plug? Do you
sell drain plugs?
Larry
ANSWER:
You don't really "build" a drain plug.
Drill a hole to suit the plug size, seal the inside with epoxy, put plug
sleeve in with silicone, that's it. We generally put one on either
side of the keel, as close to the bottom as practical.
When you get home from boating, prop the front of the trailer up, spray out with hose. Most of the water will drain out the holes, but you'll have to sop up some with a sponge. The one we usually use: Drain plug #05-512, brass tube, plus plug - $7.75 plus shipping.
Barry
Subject: Natural Finish
Date: Tue, 12 Mar 2002
Todd" wrote:
I am building a Squirt. The boat on the Squirt info page of your online
boat design catalog as a beautiful natural wood finish deck. Is that deck
painted? Is there somewhere I can look to see how that is done?
What is the white lines in-between? Is that a filler or is it just
painted?
ANSWER:
I do not know the answer on this particular boat.
Natural decks have been made with mahogany plywood, with "V"
groves made with a router.
Straight cuts, filled with colored epoxy or caulking.
Lines painted on.
Lines made with automotive detailing tape.
Also, veneer strips have been applied over exterior plywood, with and
without caulking lines.
--
Barry
Subject: Re: Glen-L Update
Date: Fri, 08 Mar 2002
Hi folks!
(actually the formula should be Liters X 61.023744 = Cubic Inches) from "Measure for Measure" by Richard A Young & Thomas J Glover.
Happy boatbuilding,
Kristin F Karalius
Thanks for the correction, it was changed in WebLetter 34 on 3-12-02. Keep those cards and letters coming folks. We eventually read every one.
Below is the result of your feedback form. It was submitted on Sunday,
March 3, 2002
------------------------------------------------------------------
name: Leon Daniels
Comments: I bought a set of plans for the Cracker Box in 1956. I was 16 years old at the time. I finished in about 1960 it was a little rough construction as I had no power tools. We used the boat in Idaho until about 1966. The boat was stored in an old warehouse until 2000 then it was brought down to Lake Havasu City Az. Where I live now. I have completely rebuilt everything except the frame. I am about 75% done. Will send pics when I am finished. Leon
Subject: Drifter, 16'
Date: Sun, 05 Jan 2003 12:21:09 -0900
It's now March/02 and my Drifter's been done almost a year. Love it! Made some changes including making the rower's seat adjustable to accommodate any length arm as well as adjustable rower's foot rest. Built the front seat with sliding doors underneath to store tackle, etc. Put hinged door on transom seat to store misc. necessities. Added an anchor bracket as well as a foot brake for the rower to drop anchor w/o having to drop oars. Also installed UHMW sheeting on bottom and 2" up sides for better rock protection. Added weight but think fiberglass wouldn't take abuse. Floats and handles great. Built the forward deck so can sit and flycast from it in calm water. Overall a great project and very satisfying.
TANGO / Bob Whitehead / 3-8-02: Finished and sailing: pictures of parts of the construction process are at http://members.aol.com/fount306. I have received emails from all corners of the world--people building this beautiful design. Not one person has believed me when I told them I built the boat--they unanimously look at me like I'm trying to pull their leg. Wish I had more time to sail her!
Build more boats
GLEN-L boats, of course