
An Occasional Publication for the Home Boat Builder
Glen-L Marine Designs - 9152 Rosecrans Ave. - Bellflower, CA 90706
In this issue
- Featured Design: V-Dory
- Feedback: V-Dory
- Designer's Notebook: How to make a Cutwater
- Feedback: Sneakbox
- Fiberglassing the Bottom Trailing Edge of a Power Boat (Repeat)
- Darla's Corner
- One man's fir is another man's pseudotsuga
- Shop Talk: Metric?
- Feedback: Flying Saucer
- Feedback: Tiny Titan
- Recent email
GLEN-L Update
- Web site:
- Update: The Rigging Small Sailboats book was published in several of
our WebLetters. It has now been consolidated and reformatted. There is a link
on the Boatbuilding Books catalog page.
Build it Yourself the Glen-L Way, a pictorial on sheet plywood boat construction has also be re-formatted and the photos re-scanned. There is a link in Boatbuilding Methods. - I received a phone call from a customer who was looking for a lumber
supplier. I asked whether he had looked at the Lumber Suppliers
List. He replied, that he had, but that one of the three suppliers was no
longer in business. I asked which one, so that I could remove it...
"I'm not sure which one it was...".
Please let us know if you have any supplier to add or find some that are no longer in business or whose phone numbers have changed. This is where the list comes from, your input. - This issue of the WebLetter features the V-Dory. The next WebLetter will feature the Glen-L 13... the first sailboat designed by Glen-L. If you have photos or feedback on this great little boat, I hope you will share it with our readers. A reminder: This section is in response to reader requests. I will try to present as wide an array of designs as possible, attempting to add additional information from what is currently on the site.
- Thanks to Jack Lavallet, Bob Ellis, Fred Dobler, Alex Carlson, Alfred Marshall and all the others who contributed to this month's WebLetter.
- Update: The Rigging Small Sailboats book was published in several of
our WebLetters. It has now been consolidated and reformatted. There is a link
on the Boatbuilding Books catalog page.
Editor
Newest design... An RC Model
Glen and Allyn have been working on this for a
couple of months. I forgot to put information about RC Model X-1 in the  original posting of this WebLetter, so I am
adding a link in this "Breaking news post-publication announcement".
I will be adding additional information over the next week.
original posting of this WebLetter, so I am
adding a link in this "Breaking news post-publication announcement".
I will be adding additional information over the next week.
More about
RC Model X-1
Featured Design: V-Dory
When the Hunky Dory was first designed, it quickly
became one of our most popular designs. For several years, it was  the most popular boat of any size.
In response to requests for larger and smaller designs, we added the Big Hunk,
Little Hunk and Wee Hunk. The V-Dory was the last in this series to be added.
The V-Dory is a further evolution of this rugged work boat. It maintains the
flat bottom in the aft sections for minimum draft and stability, but with a vee
added at the bow for a softer ride. The vee does add additional work in
building and is not quite as stable in the bow section as the original Hunky
Dory. But for many builders, the V-Dory's softer ride overrides any
disadvantages.
the most popular boat of any size.
In response to requests for larger and smaller designs, we added the Big Hunk,
Little Hunk and Wee Hunk. The V-Dory was the last in this series to be added.
The V-Dory is a further evolution of this rugged work boat. It maintains the
flat bottom in the aft sections for minimum draft and stability, but with a vee
added at the bow for a softer ride. The vee does add additional work in
building and is not quite as stable in the bow section as the original Hunky
Dory. But for many builders, the V-Dory's softer ride overrides any
disadvantages.
Today, the sales of the V-Dory and Hunky Dory are
about equal. I asked Glen if he were to redesign the Hunky Dory, would he
design it with a vee.
"No, the Hunky Dory represents a type of boat, and it is always a lot
easier to build a flat bottom."
State laws governing the maximum trailerable width have gradually been shifting from 8' to 8 1/2'. The V-Dory takes advantage of this to add the extra work space at a beam of 8' 5". The V-Dory is an ideal workboat, great for fishing and diving or just carrying a lot of "stuff". The Dory Cabin Plans include several cabin options for the V-Dory to add to its versatility, whether shrimping off the Louisiana coast, fishing for salmon in the Pacific northwest or spending the night anchored in a sheltered bay of an off-shore island, the V-Dory may be just the design you have been looking for.
V-Dory Links:
Design
page
WebLetter
14
WebLetter
15
Customer Photos
Feedback: V-Dory
Date: Fri, 16 Jan 2004
I've really worked this boat - it's had a ton of shrimp and flounder dumped in it during summers, and has offered my grandkids a deep stable platform while they learned and honed their boat-driving skills. I don't think you can turn this thing over. On our second engine now - a 90 hp. Suggestion for builders... watch the width of the motor well. Anticipating using an old Mercury - a fast, narrow, propped motor - led me to make the well too narrow. A newer, slower-geared, bigger propped motor like a Yamaha can hit the sides when tilted if I didn't put stops on the steering bar. Only a potentially big problem the first time - after that, you get really careful. Great boat!!!!! I mistreat it like crazy but its never let me down.
Jack Lavallet, Daphne, Alabama
Other comments from Jack:
WebLetter
29
WebLetter
47
18 Jan 2004
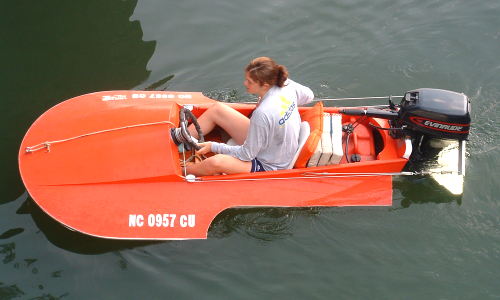
Here are some pictures of the Completed V-dory. I launched her in October of 2003 and I love the boat. It's put away for the winter now but I will use it for commercial fishing for Striped Bass, Fluke and Tuna as well as tending my Aquaculture grant here in Massachusetts.
I added an extra frame to the boat so she's 25' long overall. I also installed deck beams under the cockpit sole and put scuppers in the transom to make the boat self bailing. The hull is covered with 2 layers of 6 oz. cloth and epoxy resin on the outside. I covered the foredeck, rails and inside of the cockpit with fiberglass mat and polyester resin and then gelcoated it for durability and ease of maintenance. The boat is powered with a 90 H.P. Honda outboard and tops out at 25 kts. The wheelhouse is my own design but it is a common type found on many center console type workboats around here.
The boat is solid, stable and seaworthy and it turned quite a few heads the day I launched her.
Thanks for the great plans and I hope to someday build another one.
Alex Carlson
Designer's Notebook: How to make a Cutwater
In the hey day of the mahogany runabout as put out by Chris Craft, Garwood, and others, a protecting metal cap was used at the stem of the boat called a "cutwater" (See photo below). Cutwaters were used on work boats to protect the
bow and this carried through to stylish runabouts... chrome plated, of course.
Some of the fancier cutwaters swooped back from about midpoint to the top to
form Many building today wish to emulate the cutwater, but little information exists as to how they were made. The following describes how some builders made their cutwater from sheet stock such as copper or brass: a malleable alloy that could be formed and easily brazed, seldom less that 3/32" in thickness. Cutwaters should be made prior to the finishing of the boat as some shaping of the wood beneath may be required to allow for the welds. Cutwaters are made in two halves joined by welding on the stem centerline. A template of cardboard is made for each side of the boat meeting over the stem centerline with aft end contoured to suit. Mark the points that will require screws to hold the cutwater in place and countersink the metal halves before assembly for the half oval or flat head screws to be used. With the two cutwater halves taped on the boat, start at the sheer and measure down in increments of 8" more or less. At each of these points, draw on the cardboard template a line aft that is approximately tangent to the stem arc; also mark such a line on the side of the boat. A frame or form in the shape of a vee must be made for each of these points. One method is to use two pieces of wood, 1/4" x 2" x 12" plywood works well, pivoting from one end on a nail or screw driven through both to form an adjustable vee. This fixture is used at each point marked on the cardboard to determine the shape of the frame or form that is required at each section. A frame to that vee is made from 3/4" plywood or 1" solid lumber. The two metal halves for the cutwater are cut to shape, a saber saw with proper blade works, but slowly. Be sure to mark the cross sections drawn on the template to the metal. Use the frames made at each section to form the varying vee shape of the cutwater. Fasten the metal to the form with at least two screws per frame side. These can also be used to fasten the finished cutwater to the boat or brazed over. The results should be two halves of metal joined along the centerline with varying angularity that match the vee at the bow of the boat. The centerline seam is brazed together, preferably tack brazing at frequent intervals. The cutwater can then be checked to the bow of the boat. It should fit very closely, but a hammer may be required to form the cutwater more closely to the bow shape. Use as large a block of wood as practical atop the metal to spread the pounding over a large area and prevent denting the metal. It may be necessary to use some screws to force the cutwater to the stem contour. When all is fitted, braze the cutwater seam and grind the seam smooth. The cutwater is then taken to a plating company, polished and then chromed. Put it on the bow of gleaming natural finished boat and the result is a one of a kind custom fitted cutwater that will draw lots of attention. Yes, it's a lot of work, but the result is worth it. |
Feedback: Sneakbox
Fred Dobler
I thought I would send you a few photos of my Sneakbox. I started building it in September of 2003 and it was almost completed by the start of early duck season in October. It was a good project, but there are a few things I will do differently next time. The plans didn't tell me how to fix a painter to the bow, and after it was done it was clear that I wanted it. I found a way to carefully drill through the bow just a bit aft of the leading edge and epoxied what amounts to a ferrule big enough to slip a 3/8 rope through. This works fine but there may be a nicer way to do it.
Fiberglassing the Bottom Trailing Edge of a Power Boat
This article appeared in our first WebLetter. It is being repeated because it is something that often is the answer to a common question... "Why is my boat porpoising?"The well radiused corner required for proper
application of fiberglass cloth is not desirable on some areas. For example,
the bottom edge along the transom of high performance boats or along the
inside edge along sponsons of hydroplanes should have a crisp corner for
ultimate speed and performance. The illustration shows a good method for
"re-crisping" the edge. The edge is built up with pieces of scrap
cloth to provide sufficient bulk of fiberglass material and resin to be ground
down to form a crisp edge. The built up area should be faired so as to not form
an abrupt "hump" at the edge, which could detract from the
performance of the boat.
of high performance boats or along the
inside edge along sponsons of hydroplanes should have a crisp corner for
ultimate speed and performance. The illustration shows a good method for
"re-crisping" the edge. The edge is built up with pieces of scrap
cloth to provide sufficient bulk of fiberglass material and resin to be ground
down to form a crisp edge. The built up area should be faired so as to not form
an abrupt "hump" at the edge, which could detract from the
performance of the boat.

Darla's corner
by Darla Schooler
I welcome your contributions
![]()

![]()
One man's fir is another man's pseudotsuga
I have tried to be very diligent, re-spelling Douglas fir to Douglas-fir wherever I have found it. Douglas-fir is properly hyphenated because it is not, in fact, a fir. It is a pseudotsuga, or false hemlock (tsuga). Botanists take names very seriously, which allows botanists all over the world to speak the same language. The common names for plants are names that the rest of us remember and can easily pronounce. But these names vary for the same plant, from place to place and language to language.
There are other woods commonly used in boatbuilding that are properly hyphenated or spelled differently to distinguish them from "what they seem to be". These would include the following, but are certainly not limited to this list.
| Common spelling | Correct spelling | Scientific name | Genus of "name" |
|---|---|---|---|
| Philippine mahogany* | Philippine-mahogany | shorea (various) | mahogany = Swietenia |
| western red cedar | western redcedar | Thuja plicata | cedar = Cedrus |
| Port Orford cedar | Port-Orford-cedar | Chamaecyparis lawsoniana |
cedar = Cedrus |
| Alaska cedar | Alaska-cedar | Chamaecyparis nootkatensis |
cedar = Cedrus |
| Douglas fir | Douglas-fir | Pseudotsuga menziesii |
fir = Abies |
As I wander through the more than 6000 pages on the Glen-L site, I will be updating the spelling of these woods in addition to Douglas-fir. I would add that in the wood world, the specificity of the hyphenated names is only just being adapted and the "non-botanic" names are still most commonly used.
Shop Talk: Metric
Because the US is still in the Dark Ages when in comes to measurements, we frequently get inquiries from builders in other countries asking if our plans are in metric measurements, or "what is a gross?", or about the mysteries of lumber sizes. This information is all on our site, but is somewhat scattered, so we have pulled it all into one page for our non-US builders.
Bending chines and sheers
Bending chines and sheers can be difficult, particularly if the wood is over-dried or has diagonal grain across the thickness. Some designs detail these members with multiple laminations to make bending easier. This is more work but is always an option on any design. Steaming is another option, although we have never had to do this on any of our designs. In the shop we have used boiling water and tension to facilitate bending. A description of the procedure is given below.
When selecting lumber for chines and sheers, look closely at the lumber, choose the best material for the members that will have the most stress and put the best end forward. Be sure that the frame notches are faired so that the longitudinals will lie on a flat surface and not on a corner. Clamp the chine or sheer to the frames, bend toward the stem until you reach your discomfort level and tie in position. Put a C-clamp on the end and tie to that. Next, wrap the bend with a towel, pour boiling water over the towels and allow to sit overnight. The following day, continue bending to final position. If necessary, this procedure can be repeated, but is usually not necessary.
See links below for further information about chines and sheers.
WebLetter
49
WebLetter
34
Feedback: Flying Saucer
Here is my Flying Saucer that I launched today in the Salton Sea. Weather was beautiful and no wind.
It's been a "Snowbird" project for me during my winters in California.
It was a solo launch so no action photos, but take it from me, the boat and engine ran beautifully! It registered 32mph, I might of liked a bit more, and I might re-prop, but at 12' you know you're moving! I have no, nada, adjustments to make to this boat!!!
A comment about the Flying Saucer. After reading comments in Project Registry and looking at the early design, porpoising was a concern of mine. As a result, I did make some minor changes during construction. First I extended the stem to the next frame aft, and then added vertical members to the floor battens in the aft area to assure straightness. It paid off. Today I sat in the back; I put the gas tank in the back and not a hint of porpoising.
I guess I forgot; the engine is a 1992 30hp Evinrude with probably less than 50 hours. It was on my Glen-L Sweet Caroline dory. It needed a home , and I think it found the perfect one with the Saucer!
Regards, Bob Ellis
For additional information about Bob's Flying Saucer, see Recent Email, belowFeedback: Tiny Titan
My son and I put together a Tiny Titan when he was 12 as I wished my Dad had done with me. My daughter, however, has enjoyed our Tiny Titan the most these last 7 years.
The stock Evinrude 15HP pushes her along at 32mph. My son made the whale's tail (hydrofoil) out of 1/8 inch scrap aluminum. I highly recommend the tail as it helps the Tiny Titan to plane off flat AND settle off a plane flat. When running, the tail flies 3/4 inches above the surface.
I also recommend using a control box and Glen-L's steering kit to control the boat running a 15HP motor. The adjustable seat not only contributes to control, it adds considerably to comfort. Great design and little boat!
Alfred Marshall


Recent email:
Subject: Flying Saucer boat
To: Bob Ellis
Bob,
I found your email on the Glen-l product registry. I'm considering building
a Flying Saucer and as it would be my first boat, am nervous and excited at the
thought of it. I have some questions that I'm hoping you could
answer:
1. About how much do you think the final project will cost?
2. Beyond standard shop tools (chop saw, table saw, jigsaw, sanders, drills)
what tools would I need to invest in?
3. Any idea how many hours to build from start to finish?
4. Can this design support a forward/starboard helm? (I like this more than the
design's aft/port helm) (I realize you had some concerns on porpoising)
Thanks much for your time!
Pete
Seattle, WA
Date: Tue, 10 Feb 2004
From: Bob Ellis
Subject: Re: Flying Saucer Boat
To: PW
Cc: Glen-L
Hi Pete,
I notice you're a Seattlelite! That too is my home. I live on Whidbey Island, but spend my winters in California.
I'll try to answer your questions. My costs are a little tough to determine. A lot of the materials; resin, some fiberglass and fasteners, I already had as leftovers from my last project; the Glen-L Bojest. Without fiberglass, I would think $500 bucks would be a reasonable estimate. My only source for lumber and plywood down here is Home Depot or Lowe's. Not exactly marine grade, but adequate. But by going this way almost necessitates a fiberglass covering!
You definitely have sufficient power tools for this project. Not power, but you will need a good hand plane to fair the framework before installing the plywood.
I built this one over a six-month period. Manhours? Maybe 200?
You can put the steering fwd, or aft. I wanted it at the stern for three reasons. First I wanted the weight aft for higher speeds; second, I needed access to start the engine,( my engine's a manual start); and third, so that I could shift gears without a cable system. If you look at pictures of Glen-L's Zip, it's just a stretched Saucer, and most of those have front steering.
You mentioned Project Registry; have you checked out Customer Photos? My Saucer is included on the Picture Board. The Bojest, where my spare parts came from, is also there.
I really enjoyed building the Flying Saucer and on the first time out it performed great! A fun boat! This is the 7th Glen-L boat I've built. That should tell you something.
Go for it!!!
Cheers, Bob
Other designs built
by Bob from the Glen-L archives
Subject: Re: Store hours
Date: Sat, 7 Feb 2004
I just wanted to drop you a note of thanks. I visited your store Friday morning and bought some epoxy and hardware. Everyone was very kind and helpful. The service was excellent. Although your website does not explicitly say it, I think visiting your store is the best way to do business with Glen L. Later as my project progresses I will be needing some glass fabric. Count on another visit from me!
Sincerely,
Michael Brannon
Below is the result of your feedback form. It was submitted on Friday,
February 6, 2004
---------------------------------------------------------------------
Name: Thaxter Tewksbury
Comments: My father, Hamilton Tewksbury, and I built the IMP many years ago.
Construction stretched out over many weekends with interruptions from other
activities, but when completed she was a beauty. She is still going strong
today.
We still joke about how "an average handyman can build it in a
weekend". We knew we were not "average" but this proved the
point clearly. We, of course, choose to think that we are better than average!
Thanks for the great plans.
Subject: Project Update for Registry
Date: Sun, 1 Feb 2004
IMP Rowboat, Mitch Rohrbach, 1 Feb 04. Project complete!! Had great fun. Four months building time. Bright yellow hull, red stripe down the sides. Light blue non skid deck. Natural Sheers and seats. Used all 100% Acrylic latex. LOOKS GREAT! $620 total cost. Will send pictures eventually. Thanks for the great plan and your assistance.
Below is the result of your feedback form. It was submitted on Tuesday,
January 27, 2004
-------------------------------------------------------------------
name: Berle Maxey
Comments: Bought plans for PeeWee in 1972, just now building it.
Date: Tue, 20 Jan 2004 23:07:31 EST
Subject: Solar boat
> Dear Glen L
> My son is participating in a solar boat race. I wondered if you have
> plans for a 15 foot solar electric boat, or if you might have
supplies
> that would help us to build this boat. Since it is a smaller version
of
> an electric boat, we have looked for a drive train and other types
of
> motors locally. Perhaps you can tell me if you have books or
perhaps
> advice on how to get started. Thank you. Helen
>
ANSWER: I am not sure what restrictions you may have...
The competition will have a list of rules and sources for materials. Review
these before proceeding.
Usually, these competitions are heavily weighed to the endurance portion. With
this in mind, the best boat would be a displacement boat, something like a
canoe or kayak.
If the competition will allow a trolling motor, this will be the most
economical and lightest weight. See: ETM.
Displacement boats are limited in speed (sq. root of waterline length X 1.34 =
speed in knots) and although you can exceed this somewhat, it is done at a cost
of higher power consumption.
When you test the boat, it should be tested at various points on the throttle.
Maximum speed may well be less than full throttle; if so, do not give it more
throttle as this will only consume more power.
For endurance, it is best to avoid "fast boats" as the speed portion of the competition is usually only a small percentage of the points and planing boats consume much more power.
Solar Splash has different levels of competition. At the college level, speed seems to be given more importance. So a careful review of previous years is probably a good idea to see where the emphasis lies.
We get inquiries from the high school level competition that uses a single boat design for all entries. The endurance portion measures who gets the farthest in 90 min, but with no measure of the power remaining; as a test of efficiency, it is flawed.
For more information see: http://www.solarsplash.com
Rob Roy
Boatbuilder Links: Electric Suppliers
Amp Eater
Notes
Inboard
Hardware
Other links:
http://www.csupomona.edu/~av/solarboat.html
http://www.umich.edu/~urecord/9596/Jul23_96/artcl09.htm
http://www.uno.edu/university/news/nownotes_plus_0702.html#boat
http://www.engin.umich.edu/solarboat/bdtheory.html
http://www.tcnj.edu/~asper/solar_boat.html
--
Barry
Subject: Poxy-Shield
Date: Sat, 17 Jan 2004
All,
Last fall I ordered a gallon of Poxy-Shield to re-encapsulate the bottom of an 11-foot B&H hydroplane I plan to race in the coming year. I also used it to repair some delaminated plywood (the boat had been out in the weather for several seasons) and to install a fiberglass cowling in place of a dilapidated Masonite cowl.
Just wanted to let you know I was thoroughly and positively impressed with the ease with which Poxy-Shield can be applied. The directions were super! The results excellent.
Thanks.
Dan Crummett
Ponca City, OK
Overall, this is a tremendous product, and one that I will use in the future.
Subject: Riviera
Date: Sat, 10 Jan 2004
> I am building the Riviera all mahogany cold molded runabout. My
question
> for you has to do with the hull lamination mechanical fastener
> requirements. The plan says that I should countersink, screw and bung
the
> lams (5 on the bottom, 4 on the side) to the frames, chine, stem,
etc.
> after the last lam goes on. I am questioning why that is needed. First
of
> all I suspect the epoxy is strong enough that you should not need
any
> mechanical fasteners. But if you say I do, why can't I screw and bung
the
> next to last lam so that I don't have to see the bungs on the last
lam?
> Thanks for your help on this.
>
> Mike
ANSWER If you have a good bond with all layers, you don't need
the screws. The designer does not like to assume that all bonds are good, so
prefers screwing through all layers.
You could screw the next-to-last laminate (no bung), then apply the final layer
without screws.
Note: If you want it to look like the classic mahogany runabouts, there would
be bungs showing. The bung would have been used to hide the screw head in
traditionally planked boats. Its purpose was decorative, not structural.
--
Barry
GLEN-L boats, of course